Table of Contents
This chapter describes how to register resources that are the monitoring targets of SysMaster.
After SysMaster has been installed, the target resource is registered to notify the Master and Agent to start monitoring the resource.
Resource registration is done through the Web Admin. Normal operation of the Master and Agent and binary update of the target resource must be verified before starting the registration.
The following is a summary of the resource registration process.
-
Performing Pre-Registration Tasks for each Resource.
-
Updating compressed file for each resource (reboot the Master server for initial registration)
-
Adding compressed Web Admin file(Console) for each resource
-
-
Installing WAS Provider DC(Data Collector)
-
Installing Oracle Provider DC(Data Collector)
-
Installing Tmax/Proframe DC(Data Collector)
-
Installing Tibero DC(Data Collector)
-
Installing AnyLink DC(Data Collector)
The following tasks must be verified before registering each resource.
Note
If each provider is installed during Master installation, pre-registration tasks for each resource are performed automatically.
The file is not required for initial installation. The compressed file for each resource must be copied to the following directory when applying a patch for the resource.
$MASTER_HOME/update/provider
Unzip and copy the compressed file (*.zip) in each folder (provider).
The following shows the result of copying the zip files for the WAS Provider to the provider folder.
[apmqam@tmaxi7:/data1/apmqam/master_5x/update/provider]$ls
sysmaster-provider-was_aix5L_32.zip
sysmaster-provider-was_aix5L_64.zip
sysmaster-provider-was_aix6L_32.zip
sysmaster-provider-was_aix6L_64.zip
sysmaster-provider-was_hpux11_32.zip
sysmaster-provider-was_hpux11_32_ia64.zip
sysmaster-provider-was_hpux11_64.zip
sysmaster-provider-was_hpux11_64_ia64.zip
sysmaster-provider-was_linux2.x.zip
sysmaster-provider-was_linux2.x_ia64.zip
sysmaster-provider-was_solaris10_32.zip
sysmaster-provider-was_solaris10_64.zip
sysmaster-provider-was_solaris7_32.zip
sysmaster-provider-was_solaris7_64.zip
sysmaster-provider-was_solaris8_32.zip
sysmaster-provider-was_solaris8_64.zip
sysmaster-provider-was_solaris9_32.zip
sysmaster-provider-was_solaris9_64.zip
sysmaster-provider-was_solaris_32_x86.zip
sysmaster-provider-was_win32.zip
sysmaster-provider-was.zip
Web UI file must be installed in order to use resource-specific monitoring in SysMaster. The file is not required during initial installation. Copy each compressed Web UI file (zip) under the 'update/console' directory when applying a patch.
$MASTER_HOME/update/console
The following shows the result of copying the Admin, Sysmon and WAS Web Admin files to the console directory.
[apmqam@tmaxi7:/data1/apmqam/master_5x/update/console]$ls -al
total 7584
drwxr-xr-x    2 apmqam   rnd             256 Nov 21 15:26 .
drwxr-xr-x    6 apmqam   rnd             256 Nov  7 20:47 ..
-rw-r-----    1 apmqam   rnd          102303 Nov 21 15:26 sysmaster-ui-admin.zip
-rw-r-----    1 apmqam   rnd          276637 Nov 21 15:26 sysmaster-ui-was.zip
-rw-r-----    1 apmqam   rnd         3127893 Nov 21 15:26 sysmaster-ui.zip
This section describes how to register WAS resources. Basic registration information is given based on JEUS, and the configurations for other WAS products are also described for reference.
WAS resource registration process mostly involves installing the DC. No separate updates are required for the Agent, but Agent-related settings are available.
The following is a summary of the DC installation process.
-
Registering Agent in Web UI
Agent registration will be omitted here since it was already covered in "3.4.2. Agent Registration".
-
Registering WAS Resources
Register resources in the following order.
-
Register WAS Resource
-
Add Node
-
Add Container
-
-
Configuring Environment File (sm.properties)
-
Creating sminst_rt.jar File
-
Copying libdcagent Library File
-
Modifying JEUSMain.xml File
Modify the environment file, JEUSMain.xml, that will be registered when WAS starts up
-
Restarting WAS and Agent
Verify normal monitoring status in Web UI after restarting WAS
Note
This guide describes resource registration method for JEUS, a WAS product from Tmax.
The following are the files required for registering the WAS DC. They are provided as a separate library.
-
sminst14.jar(JDK 1.4), sminst15.jar(JDK 1.5)
-
smrtcvt(executable file)
-
libdcagent library file(separate library files for JDK 1.4 and 1.5)
-
sm.properties
The files are in the following path.
MASTER_HOME/provider/was/dc
The DC binary file can be found in the provided 'dc_binary/was_dc' directory.
If the Agent is currently running, stop the Agent before registering WAS.
-
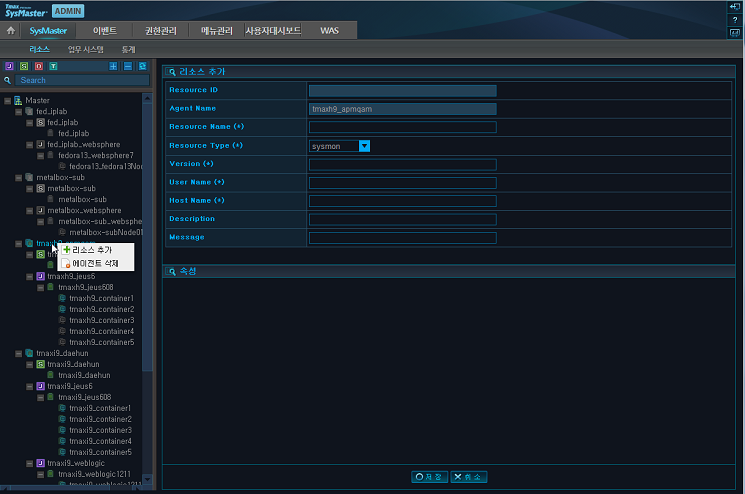
Right-click on the registered Agent from [ADMIN] > [SysMaster] > [Resource] and [Add Resource] menu will appear. Select [Add Resource] to go to the following input screen.
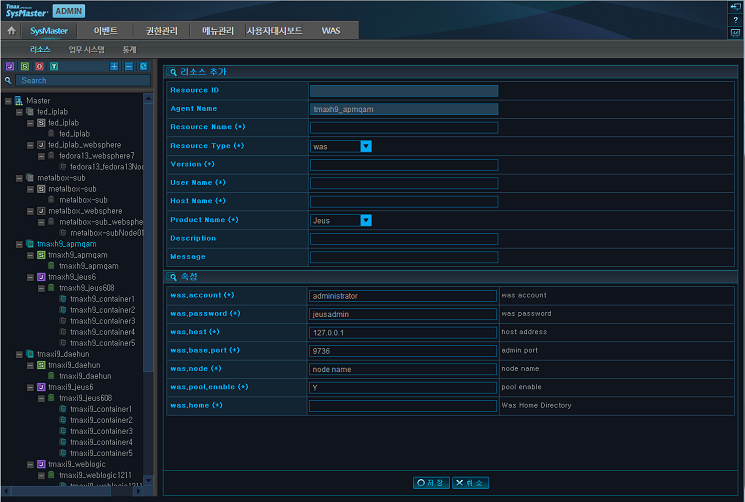
Enter the 'Resource Name(*)' and select 'WAS' as the 'Resource Type'. The following properties will appear below. Enter all the required fields and click [Save]. The result of resource registration can be seen from the Working Set menu on the left.
The following is description of the fields. Required fields are marked with (*).
Field Required Default Value Description Resource ID O NONE Automatically assigned by the system. (Cannot be modified) Agent Name O NONE Registered Agent name. (Cannot be modified) Resource name(*) O NONE Identification name for the Working Set. Resource Type(*) O sysmon WAS or sysmon. Select WAS. Version(*) O NONE Version of the target WAS to monitor. Version syntax: JEUS 4.x / 5.x / 6 or later use the actual number instead of 'x'.
(e.g., 6.0 ~ 6.6 ~... WebLogic 8.x / 9.x / 10.x Oracle AS 9.x / 10.x)
User Name(*) O NONE User name of the target WAS account. Host Name(*) O NONE Hostname of the target system. Product Name(*) O Jeus Select the target WAS vendor.
-
Jeus
-
Oracle AS
-
WebLogic
-
WebSphere
-
Jboss
Description X NONE Description of the resource. was.account(*) O administrator Admin account. (e.g., admin) was.password(*) O ********* Admin account password. was.host(*) O 127.0.0.1 IP address of the server where WAS is installed. (e.g., 192.1.1.1) was.base.port(*) O 9736 WAS admin port. was.node(*) O node name Node name of the server where WAS is installed. was.pool.enable(*) O Y Option to enable DB pool monitoring.
If the WAS collects pool information like WebLogic or Oracle AS, enter the MBean connection information. Otherwise, the analysis/infra/Java pool information will not be displayed.
When WAS DC collects pool information (set dc.pool.stat.enable to 'true' in sm.properties). Set to 'N' to disable the Agent server from collecting pool information.
was.home(*) O NONE WAS Home Directory -
-
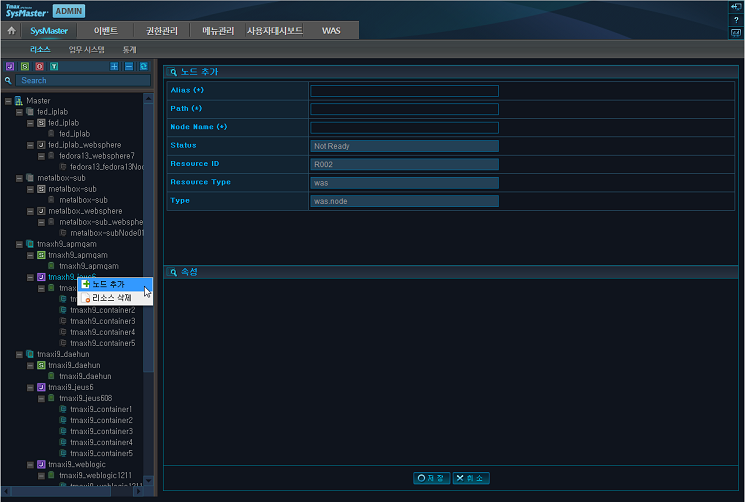
Right-click on the registered resource and click [Add Node] to display the following input screen.
The following is description of the fields. Required fields are marked with (*).
Field Required Default Value Description Alias(*) O NONE Node identification name displayed on the screen. Path(*) O NONE Path used to register the container. Node Name(*) O NONE Name of the Node to add. Status O Not Ready Node status. (Ready or Not Ready) (Cannot be modified) Resource ID O NONE Resource ID. (Cannot be modified) Resource Type O oracle Set to Oracle. (Cannot be modified) Type O instance Set to instance. (Cannot be modified) -
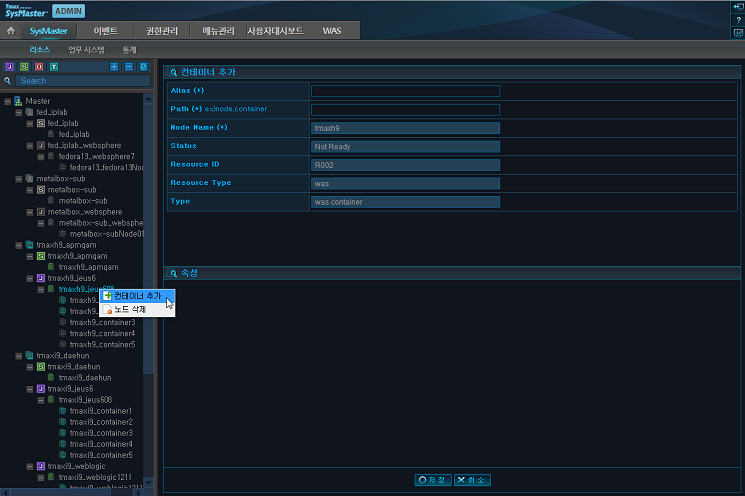
Right-click on the registered resource and click [Add Container] to display the following input screen.
Enter all the required fields and click [Save] to register each one. In the previous versions, the user was able to choose any Container name. Starting from SysMaster 3.2 SP2, the following Container name syntax must be used to support the added functionality of JEUS Admin. Up to 30 Containers can be added.
Full name of the Container (Node Name_Container Name) must be used for registration.
Container Name = Node_Container
Field Description Alias(*) Container Name that will be used for identification from the monitoring screen. Path(*) When registering a Node, ".{ContainerName}" must be appended to the Path for it to be recognized. (tmaxi7.container1). Node Name(*) Node Name used to register the Node. (Cannot be modified) Status Node status. (Ready or Not Ready) (Cannot be modified) Resource ID Resource ID. (Cannot be modified) Resource Type WAS. (Cannot be modified) Type was.container. (Cannot be modified)
This section describes the environment file that is configured during WAS resource registration process.
The following environment configuration files must be configured.
-
Modify config/sysmaster.properties of the Master to monitor ProFrame WAS
-
Modify sm.properties
-
Create sminst_rt.jar by using sminst14.jar or sminst15.jar file according to the JDK version
-
Copy libdcagent library file
MASTER_HOME/config/sysmaster.properties
To monitor ProFrame WAS, add the following setting to config/sysmaster.properties of the Master. After adding the setting, [ProFrame] tab will appear in the [Analysis] > [Service] screen when starting the Master.
was.master.pfwas.enable=true
Note
Only use this setting to monitor ProFrame WAS.
sm.properties
The following are the steps for configuring the sm.properties file.
-
Copy the was_dc folder to a desired path (generally in 'AGENT_HOME/was_dc')
-
If sm.home directory is used, create as many sm.properties files as the number of containers in the 'sm.home/sm_properties' directory. Each sm.properties file name should be unique. (e.g., sm.properties1, sm.properties2, etc.)
-
Configure each sm.properties file according to its container environment.
The following is an example that shows the properties that must be modified for each sm.properties file.
################################################################################
# Sysmaster home
#       - Data Collector's Home directory
################################################################################
# sm.home=/data1/apmqam/agent_5x/sm1007/dc_was/sm_properties/extendbci.propertie
sm.home=/data1/apmqam/agent_5x/sm1007/dc_was


################################################################################
# Network config
#
#       - Data Collector's network properties
#       - net.master.host    : Master's ip
#       - net.master.port    : Master's socket port
#       - net.collector.host : Collector's ip
#       - net.history.port   : Collector's history socket port
#       - net.stat.port      : Collector's statistic socket port
#
################################################################################

# Master Network Config
net.master.host=192.168.1.87
net.master.port=22002

# Collector Network Config
net.collector.host=192.168.1.87
net.history.port=22007
net.stat.port=22006

################################################################################
# Container props
#
#       - Set Resource id
#       - Set cfg path "sm3.properties" 240 lines, 8837 characters
#       - Set Resource id
#       - Set cfg path
#       - Set OutOfMemory Error detect enable : defaule true
#       - Set Socket Trace enable       : defaule true
#       - Set File Trace enable         : defaule true
#       - Set sun's thread cpu time bug enable (linux & sun jdk1.4.x)
#       - Set ClassLoader Trace enable  : defaule true
#
################################################################################
resource.id=R012
container.path=tmaxi7_was.container3

#oomerror.detect.enable=false
#socket.trace.enable=false
#file.trace.enable=false
#sun.threadtime.bug.enable=false
#bci.classloader.enable=false
.... continued
The following is description of the properties.
Property Description sm.home Path to the home directory for data collection.
When monitoring a user specified Java class, the class that is not included in the J2EE specifications must be manually specified.
net.master.host IP address of Master server. Default communication port of DC. net.master.port Master Server BasePort+2. net.collector.host IP Address of Master server. net.history.port Master server BasePort+7. Transfer port for history data. net.stat.port Master server BasePort+6. Transfer port for statistical data. resource.id Resource ID registered through Web ADMIN. container.path Resource Container Path value registered through Web ADMIN. dc.tx.threshold Response time threshold for DC to collect tx information. Collects the service stacktrace information when the threshold is exceeded. dc.tx.rate Rate at which the service that exceeds the threshold value is executed. exception.collect.enable Option to collect trace information about the server when an exception occurs. logging.enable Option to enable logging. logging.level Logging level. bci.using.genid If set to false, the user will be checked based on the URL instead of '_smVisitorID' set in the cookie when accessing the target WAS from a web browser. (The visitor ID might be different from actual value.) bci.jsp.appid
(Priority 1)
App ID extracted from a query parameter in the HTTP Request URL.
If there are multiple values, separate them as in 'serviceId:menuId'.
(e.g., bci.jsp.appid=dsname)
bci.jsp.appid.header
(Priority 2)
HTTP header name used to collect appname.
If there are multiple values, separate them as in 'serviceid1:serviceid2'.
(e.g., bci.jsp.appid.header=serviceid)
bci.jsp.appid.uri.suffix
(Priority 3)
URI extension name used to collect appname.
If there are multiple values, separate them as in 'extension1:extemsion2'.
(e.g., bci.jsp.appid.uri.suffix=biz)
bci.cookie.userid Value to extract from a cookie.
If there are multiple values, separate them as in 'bci.cookie.userid=a:b'.
(e.g., bci.cookie.userid=JSESSIONID:__smGlobalId:__smVisitorID)
container.pfwas.enable
pfwas.user.stat.enable
Option to monitor ProFrame WAS. dc.pool.stat.enable Option to collect pool information from WAS DC. To prevent duplicate collection of pool information, set was.pool.enable to 'N' in the WAS resource properties using Web Admin.
For JEUS, pool information collection is enabled regardless of the jeusadmin encryption option.
WAS that uses jdk 1.4 or previous version does not collect pool information.
(e.g., Jeus4, WebLogic8, etc.)
dc.jdbc.sqllen.max Maximum full SQL length to collect.
If there is a SQL that has been truncated, it must be deleted from the SMB_META_STRING_ID and SMB_META_STRING_ID_EXT tables.
full.url.enable Option to display the full URL information of the service in the service trace.
Creating sminst_rt.jar File
By using the smrtcvt executable file in the sm.home directory, create the sminst_rt.jar file from the rt.jar or core.jar file of the JDK. The * rt.jar or core.jar file can be found in the 'JAVA_HOME/jre/lib' directory that is configured in SysMaster.
The following are the purposes for creating the sminst_rt.jar file.
-
Support of JDK 1.4
While JVM supports the application of BCI using Premain-Class in JDK 1.5 or later, the classloader must be modify to add BCI configuration in JDK 1.4 or earlier.
-
Applying BCI for the Classes in rt.jar File
BCI can be applied to classes inside an application or WAS, but not to classes in the rt.jar file. This is because the rt.jar files are loaded before other classes.
To apply BCI to the classes in rt.jar file, modify the classes and specify the classes in the Xbootclasspath. The applicable classes are collection, file I/O, and socket classes.
Note
Among the distributed files, sminst14.jar is for JDK 1.4 and sminst15.jar is for JDK 1.5 or later.
The smrtvt command internally uses sminst15.jar. If the JDK1.4 is used, open smrtcvt and replace sminst15.jar with sminst14.jar.
The following is the command syntax for executing the smrtcvt executable file.
By using the which java command, verify the location of the Java file before executing the command. (If a different account from WAS is used for installation, check the location of the Java file used by WAS)
USAGE: smrtcvt(.bat) <rt.jar(or core.jar)> <Expected Name> <Vendor> <jdk version> <current sminst path>
Examples of command usages can be displayed by executing the following smrtcvt command.
[daehun2:/home/daehun2/sysmaster/agent5/was_dc]$ ./smrtcvt
USAGE : smrtcvt(.bat) <rt.jar(or core.jar)> <Expected Name> <Vendor> <jdk version> <current sminst path>
 ex) smrtcvt(.bat) /usr/jdk14/jre/lib/rt.jar sminst_rt.jar SUN 1.3 /home/apmtest/dc/sminst.jar
 ex) smrtcvt(.bat) /usr/jdk14/jre/lib/rt.jar sminst_rt.jar IBM 1.4 /home/apmtest/dc/sminst.jar
 ex) smrtcvt(.bat) /usr/jdk14/jre/lib/rt.jar sminst15_rt.jar JROCKIT 1.5 /home/apmtest/dc/sminst15.jar
 ex) smrtcvt(.bat) /usr/jdk14/jre/lib/rt.jar sminst16_rt.jar SUN 1.6 /home/apmtest/dc/sminst15.jar
Note
For AIX(IBM) J9 1.4, use core.jar instead of rt.jar.
The following is an example of creating the sminst_rt.jar file. Use the sminst15.jar file for Java 1.5 or later, and use the sminst14.jar file for Java 1.4.
The following log can be displayed.
        ***************************************************
                        SysMaster Provider(WAS DC) 5.0
        ***************************************************


SYSMASTER Patch Classes...
        java/io/FileInputStream.class : patch...
        java/io/FileOutputStream.class : patch...
        java/util/HashMap.class : patch...
        java/util/ArrayList.class : patch...
        java/util/HashSet.class : patch...
        java/util/IdentityHashMap.class : patch...
        java/util/LinkedList.class : patch...
        java/util/TreeSet.class : patch...
        java/net/Socket.class : patch...

SYSMASTER /usr/java5_64/jre/lib/vm.jar processed
SYSMASTER Patch Classes...
        java/util/Hashtable.class : patch...
        java/util/Vector.class : patch...

SYSMASTER /data1/apmqam/agent/sm1007/dc_was/sminst15_rt.jar created
The CheckEnv.class can be used to verify the library files that are registered in the WAS environment configuration file with the created sminst_rt.jar file. (e.g., IBM J9)
Note
In an HP-UX ia64 environment, if 'java [option] CheckEnv' is executed, it will be recognized as 32 bit, and if java '-d64 [option] CheckEnv' is executed it will be recognized as 64 bit. Use the '-d64' option according to the environment.
The following are the steps for verification.
-
Check that the library file that retrieves the Java Resource information executes successfully.
apmqam@dc_home]$ java -agentlib:/data1/apmqam/agent/sm1007/dc_was/dcagent/jvmti/aix6L_64/dcagent64 CheckEnv
success jvmti_interface=110206288
sun.boot.library.path:/usr/java5_64/jre/bin
* Enter the path of the folder that contains the libdcagent file. For 64 bit machines, use the 'dsagent64' notation for testing.
-
Check that the DC environment information has been properly applied to the built sminst JAR file.
apmqam@dc_home]$ java -javaagent:/data1/apmqam/agent/sm1007/dc_was/sminst15_rt.jar CheckEnv [SMDC] All stdout,stderr will be redirect to: /data1/apmqam/resourceid_node.container1/logs/smlog_resourceid_node.container1 ************************************************************** SysMaster Provider(WAS DC) 5.0 ************************************************************** - Property path : /data1/apmqam/agent/smagent/dc_was/sm_properties/sm2.properties - Extend BCI path : - Resource ID : R012 - Container PATH : tmaxi7_was.container2 - Master IP : 192.168.1.87 - Collector IP : 192.168.1.87 - Req Port : 22002 - Tx Port : 22007 - Mon Port : 22006 - OOM Detect : true - SQL PARAM TRACE : true - Thread Command : true - Socket Trace : true - TX His threshold : 3000 ms - TX View threshold : 100 ms - TX His send rate : 0.05 - TX view send rate : 0.2 - TX header send rate : 0.2 - User profile enable : true - User profile filter : included packages and classes sun.boot.library.path:/usr/java5_64/jre/bin -
Check that the built library file has been successfully loaded.
apmqam@dc_home]$java -Xbootclasspath/p:/data1/apmqam/agent/sm1007/dc_was/sminst15_rt.jar: /data1/apmqam/agent/sm1007/dc_was/sminst_15.jar CheckEnv sun.boot.library.path:/usr/java5_64/jre/bin -
Check that the configured properties file has been successfully loaded.
apmqam@dc_home]$java -Dsm.property=/data1/apmqam/agent/sm1007/dc_was/properties/sm1.properties CheckEnv
sun.boot.library.path:/usr/java5_64/jre/bin
Copying libdcagent library File
The libdcagent library is required for monitoring the JVM CPU and memory status. For JDK 1.4, copy the library file to the corresponding WAS library path.
-
JDK 1.5 or later
System specific libdcagent library is under the following location, and it does not need to be copied manually.
sm.home/dcagent/jvmti
-
JDK 1.4
Copy the system-specific libdcagent library file from the following location to the 'JEUS_HOME/lib/system' directory (for JEUS).
sm.home/dcagent/jvmpi
Note
For 64 bit machines, change the file name from 'libdcagent64' to 'libdcagent' when copying the file.
Specify the absolute path for the bootclasspath, which is referenced when executing the sminst.jar and sminst_rt.jar files, in the command-option property of each container section in JEUSMain.xml. The path of the sm.properties file, which will be referenced by each container, must also be specified.
Caution
When configuring the libdcagent.so file, for JDK1.4, the file must be saved under the 'JEUSHOME/lib/system/' directory or the library path. For JDK1.5, the file is saved under the DC Home(in general) directory and the path must be specified. For JDK 1.5, avoid saving the file under the 'JEUSHOME/lib/system/' directory or other library paths.
The following is an example of configuring JEUSMain.xml for each JDK version.
-
JDK 1.4
<engine-container>
<name>container1</name>
<command-option>
-Xbootclasspath/p:/data1/apmqam/sysmaster/agent5/was_dc/sminst15_rt.jar
-Dsm.property=/data1/apmqam/sysmaster/agent5/was_dc/sm_properties/sm.properties
</command-option>
-
JDK 1.5 or later
<engine-container>
<name>container1</name>
<command-option>
-agentpath:/data1/apmqam/sysmaster/agent5/was_dc/dcagent/jvmti/hpux11_64_ia64/libdcagent64.so
-javaagent:/data1/apmqam/sysmaster/agent5/was_dc/sminst15_rt.jar
-Xbootclasspath/p:/data1/apmqam/sysmaster/agent5/was_dc/sminst15_rt.jar
-Dsm.property=/data1/apmqam/sysmaster/agent5/was_dc/sm_properties/sm.properties
</command-option>
-
JDK 1.5 IBM J9
The following is an example of installing for JDK 1.5 IBM J9.
-agentlib:/data/daehun/sysmaster/agent5/was_dc/dcagent/jvmti/aix5L_64/dcagent64
-javaagent:/data/daehun/sysmaster/agent5/was_dc/sminst15_rt.jar
-Xbootclasspath/p:/data/daehun/sysmaster/agent5/was_dc/sminst15_rt.jar
-Dsm.property=/data/daehun/sysmaster/agent5/was_dc/sm_properties/sm.properties2
-Dsysmaster.master.trace.sql=3
Note
Since JEUSMain.xml settings can vary depending on the JDK type and version, consult with the administrator to determine the proper options for the installation environment. Note that the settings specified in JEUSMain.xml vary depending on the JDK version.
Specify the absolute path for the bootclasspath, which is referenced when executing the sminst.jar and sminst_rt.jar files, in the jvm-option property of each server section in the domain.xml file. The path of the sm.properties file, which will be referenced by each Managed server, must also specified.
The following is an example of configuring JEUSMain.xml for each JDK version.
-
JDK 1.5 or later
<listener>
  <name>http-server1</name>
  <jvm-config>
    <jvm-option>-Xmx512m -XX:MaxPermSize=128m</jvm-option>
    <jvm-option>-agentlib:/data/daehun/sysmaster/agent_20140305/was_dc/dcagent/jvmti/aix5L_64/dcagent64</jvm-option>
    <jvm-option>-javaagent:/data/daehun/sysmaster/agent_20140305/was_dc/rt_15.jar</jvm-option>
    <jvm-option>-Xbootclasspath/p:/data/daehun/sysmaster/agent_20140305/was_dc/rt_15.jar</jvm-option>
    <jvm-option>-Dsm.property=/data/daehun/sysmaster/agent_20140305/was_dc/sm_properties/sm.properties</jvm-option>
</jvm-config>
-
JDK 1.5 IBM J9
The following is an example of installing for JDK 1.5 IBM J9.
-agentlib:/data/daehun/sysmaster/agent_20140305/was_dc/dcagent/jvmti/aix5L_64/dcagent64
-javaagent:/data/daehun/sysmaster/agent_20140305/was_dc/rt_15.jar
-Xbootclasspath/p:/data/daehun/sysmaster/agent_20140305/was_dc/rt_15.jar
-Dsm.property=/data/daehun/sysmaster/agent_20140305/was_dc/sm_properties/sm.properties
-Dsysmaster.master.trace.sql=3
Note
Note that the settings specified in JEUSMain.xml vary depending on the JDK version.
The following lists the files that contain the DC settings for other WASs.
| WAS | Configuration File |
|---|---|
| WebLogic | startWebLogic.sh |
| Oracle AS | Opmn.xml |
| WebSphere | $WEBSPHERE_HOME/profiles/AppSrv02/config/ cells/tmaxi7Node02Cell/nodes/tmaxi7Node02/servers/server1/server.xml |
| Tomcat | $TOMCAT_HOME/bin/startup.sh Resin : {resin home}/conf/resin.xml |
| JBoss | $JBOSS_HOME/bin/run.conf(6.x) Standalone mode: $JBOSS_HOME/bin/standalone.conf(7.x) Domain mode: sysmaster and jeus modules must be added (7.x) |
| Jetty | Jetty.sh |
Modifying the WebLogic(startXXXX.sh) File
The startXXXX.sh file is generally created as startWebLogic.sh, but the name of executed shell varies depending on the site. The startXXXX.sh file is located in the following directory or can be in another location depending on the production site.
-Xbootclasspath/p:PATH /sminst.jar:PATH /sminst_rt.jar
-Dsm.property=PATH/sm. properties1
When there are two or more containers, add a command-option for each container and also create sm*.properties for each container in '$AGENT_HOME/dc/properties'.
-
WebLogic 8.x (JDK 1.4)
Configure the following in JAVA_OPTIONS of the WebLogic startup shell script.
-Xbootclasspath/p:PATH /sminst.jar:PATH /sminst_rt.jar
-Dsm.property=PATH/sm. properties1
-
WebLogic 9.x & WebLogic 10.x (JDK 1.5)
Configure the followings in JAVA_OPTIONS of the WebLogic startup shell script.
-javaagent:PATH/sminst.jar
-Xbootclasspath/p:PATH/sminst.jar:PATH/sminst_rt.jar
-Dsm.property=PATH/properties/sm.properties2
-
libdcagent.so File Configuration
-
JDK 1.4
Copy the file to the 'WEBLOGIC_HOME/bin' directory.
-
JDK 1.5
-agentpath:PATH/libdcagent.so
The following is an example of the libdcagent.so configuration file.
# START WEBLOGIC . . if [ "${SERVER_NAME}" = "server1" ] ; then JAVA_OPTIONS="${JAVA_OPTIONS} -javaagent:/home/weblogic/sysmaster/agent/dc/sminst.jar -Xbootclasspath/p:/home/weblogic/sysmaster/agent/dc/sminst.jar: /home/weblogic/sysmaster/agent/dc/sminst_rt.jar -Dsm.property=/home/weblogic/sysmaster/agent/dc/properties/sm1.properties" else if [ "${SERVER_NAME}" = "server2" ] ; then JAVA_OPTIONS="${JAVA_OPTIONS} -javaagent:/home/weblogic/sysmaster/agent/dc/sminst.jar -Xbootclasspath/p:/home/weblogic/sysmaster/agent/dc/sminst.jar: /home/weblogic/sysmaster/agent/dc/sminst_rt.jar -Dsm.property=/home/weblogic/sysmaster/agent/dc/properties/sm2.properties" else if [ "${SERVER_NAME}" = "server3" ] ; then JAVA_OPTIONS="${JAVA_OPTIONS} -javaagent:/home/weblogic/sysmaster/agent/dc/sminst.jar -Xbootclasspath/p:/home/weblogic/sysmaster/agent/dc/sminst.jar: /home/weblogic/sysmaster/agent/dc/sminst_rt.jar -Dsm.property=/home/weblogic/sysmaster/agent/dc/properties/sm3.properties" fi -
WebSphere
Add the setting to the Server xml (1), or configure properties in webadmin (2 & 3).
-
Add to server xml
Add settings in C:\IBM\WebSphere\AppServer\profiles\AppSrv01\config\cells\starkohNode01Cell\nodes \starkohNode01\servers\server1\server.xml
...
genericJvmArguments="-Dwas.vendor=websphere -javaagent:C:\TmaxSoft\SysMaster\agent\was_dc\sminst16_rt_ws85.jar -Dsm.property=C:\TmaxSoft\SysMaster\agent\was_dc\sm_properties/sm.properties_ws85 -agentpath:C:\TmaxSoft\SysMaster\agent\was_dc\dcagent\jvmti\win64\dcagent64.dll" executableJarFileName="" disableJIT="false">
      <bootClasspath>C:\TmaxSoft\SysMaster\agent\was_dc\sminst16_rt_ws85.jar</bootClasspath>
...
-
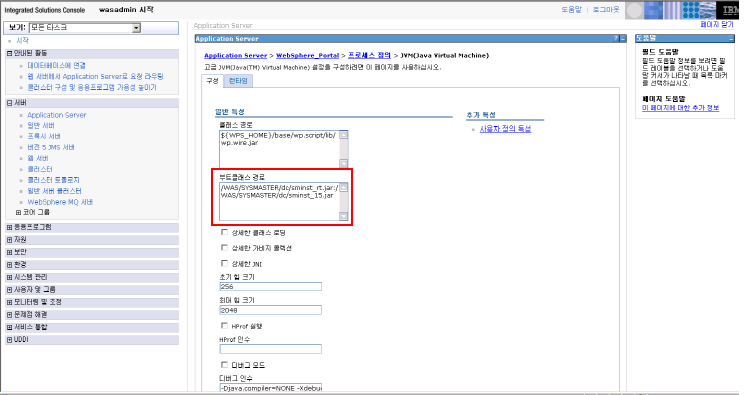
Configure the webadmin property: configure the JVM boot class path.
Select [Application Server] > [server Name] > Server Infrastructure – Manage Java and Process – Define Process > JVM. Configure directory information in the 'Boot Class Path' field of the General Features section.
$WEBLOGIC _HOME/server/bin
-
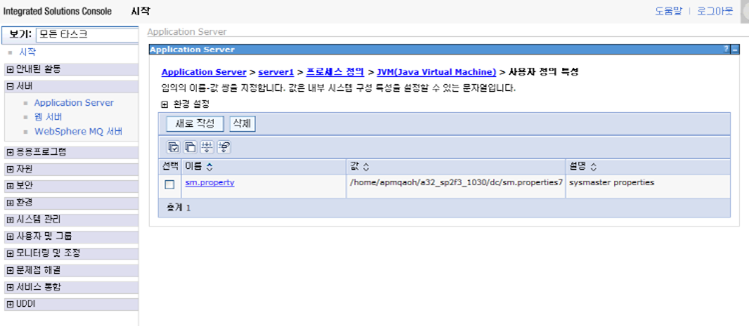
Configure the webadmin property: configure the values in sm.properties.
Select [Application Server] > [server Name] > Server Infrastructure – Manage Java and Process – Define Process > JVMUser Defined Features. Set the sm.properties path to the 'Value' field of the General Features section.
PATH/sm.properties

JBoss
The following describes how to configure JBoss.
-
JBOSS AS 7.0 and 7.1
Pool information cannot be collected because the pool information is not exposed through MBean.
-
Add java options to JBOSS AS 7.3 $JBOSS_HOME/bin/standalone.conf as in the following.
...
JAVA_OPTS="$JAVA_OPTS -agentpath:/home/gmrcb/sysmaster/jboss/was_dc/dcagent/jvmti/linux2.x/libdcagent64.so
-javaagent:/home/gmrcb/sysmaster/jboss/was_dc/sminst_rt.jar -Xbootclasspath/p:/home/gmrcb/sysmaster/jboss/was_dc/sminst_rt.jar
-Dsm.property=/home/gmrcb/sysmaster/jboss/was_dc/sm_properties/sm.properties2 -Djava.util.logging.manager=org.jboss.logmanager.LogManager"
...
-
Add a package to JBOSS AS 7.3
-
Configure the following under $JBOSS_HOME/bin/standalone.conf when in the standalone mode.
if [ "x$JBOSS_MODULES_SYSTEM_PKGS" = "x" ]; then JBOSS_MODULES_SYSTEM_PKGS="org.jboss.byteman,sysmaster,jeus" fi -
When in the domain mode
Modify domain.xml by assuming that -Djboss.domain.default.config is set to domain.xml.
<system-properties>
 <property name="jboss.modules.system.pkgs" value="org.jboss.byteman,com.javaservice,sysmaster,jeus"/>
</system-properties>
Modify host.xml by assuming that -Djboss.host.default.config is set to host.xml.
<server name="server_01" group="group_01" auto-start="true">
 <system-properties>
  <property name="testprop" value="this is test value"/>
 </system-properties>
 <socket-bindings port-offset="2000"/>
 <jvm name="default" debug-enabled="false">
  <jvm-options>
  ….
   <option value="-Djboss.modules.system.pkgs=org.jboss.byteman,com.javaservice,sysmaster,jeus"/>
  ….
  </jvm-options>
 </jvm>
</server>
-
OracleAS
The following describes the configurations in Oracle 9i & 10g (JDK 1.4 & 1.5).
-
OracleAS can execute a multi-process instance. The following shows how to configure a single-instance for a single process and a multi-instance for multiple processes.
-
Single-Instance
Specify the following for the java-options of ias-component in the Opmn.xml file.
-Xbootclasspath/p:PATH/sminst.jar:PATH/sminst_rt.jar
-Dsm.property=PATH/sm.properties
-
Multi-Instance
Specify the following for the java-options of ias-component in the Opmn.xml file.
-Xbootclasspath/p:PATH/sminst.jar;PATH/sminst_rt.jar
-Dsm.autoconfig=true
-Dsm.conids=1:2
-Dsm.configpath=PATH/properties
When using multi-instance, the '-Dsm.autoconfig' setting must be set to true and the range of the IDs used by the instances must be specified. In the previous example, the instances will use 1 or 2 as ID.
-
-
Specify the directory that contains the property files used by the DC.
Similar to other configurations, 'PATH' represents an absolute path and 'properties' is the directory that contains the configuration file. The 'properties' directory contains property files that use the following naming conventions.
sm.propertiesID e.g., sm.properties1, sm.properties2
-
Configure the libdcagent.so file. Place the libdcagent file according to the JDK as shown in the following.
-
JDK 1.4
Copy to 'ORACLE_HOME/bin' directory
-
JDK 1.5
agentpath:PATH/libdcagent.so
-
JEUS and Agent must be restarted in order to apply the configuration changes.
-
Restart WAS
-
WAS Termination
$jeusadmin <HOSTNAME> -U{administrator-id} -P{passwd} jeusexit
-
WAS Start
$ jeus -U{administrator-id} -P{passwd} &
-
-
Restart the SysMaster Agent. For more information about restarting the agent process, refer to "3.5. Starting and Terminating Agent".
If the following error occurs while registering a WAS resource, check the configurations in the following order.
java.lang.UnsatisfiedLinkError: sysmaster/was/datacollector/profile/JVMPIManager5.getCurrentThreadCpuTime()
  at sysmaster.was.datacollector.profile.JVMPIManager5.getThreadCpuTime(JVMPIManager5.java:55)
  at sysmaster.was.datacollector.data.MethodTrace.startTraceAux(MethodTrace.java:107)
  at sysmaster.was.datacollector.data.EnterpriseTraceProxy.startTrace(EnterpriseTraceProxy.java:440)
  at javax.servlet.http.HttpServlet.service(HttpServlet.java)
  at javax.servlet.http.HttpServlet.service(HttpServlet.java:856)
  at jeus.servlet.engine.ServletWrapper.executeServlet(ServletWrapper.java:313)
  at jeus.servlet.engine.ServletWrapper.execute(ServletWrapper.java:214)
  at jeus.servlet.engine.HttpRequestProcessor.run(HttpRequestProcessor.java:283)
-
Check if libdcagent.so generates an error, and then execute the following command from the directory of the sminst.jar file and verify that the cputime is correctly displayed.
-
JDK 1.5
$java –agentpath:PATH/libdcagent.so –classpath sminst.jar sysmaster.was.datacollector.profile.JVMPIManager5
-
IBM JDK J9 1.5
Use the agentlib option instead of the agentpath option.
$java -agentlib:PATH/dcagent -classpath ./sminst.jar sysmaster.was.datacollector.profile.JVMPIManager
-
-
If CPU Time is displayed correctly, it means that the libdcagent.so executes normally. Hence, check the DC settings inside WAS section for issues.
This section describes how to register Oracle resources.
The following is a summary of the Oracle resource registration process.
-
Registering Agent in Web UI
Agent registration will be omitted here since it was already covered in "3.4.2. Agent Registration".
-
Creating DB Users and Tables
-
Registering Resources and Adding Nodes in Web Admin
-
Registering Oracle DC
-
Starting Oracle DC and Restarting Agent
Verify normal monitoring status in Web UI after restarting Oracle DC.
The following are the files needed for registering Oracle DC.
-
ordc(executable file)
-
evmap.cfg, oradc.cfg, and stmap.cfg(configuration file)
-
libsqlora8-2.3.so.0.2.1(create the libsqlora8-2.3.so.0.2.1 link as needed.)
The files can be found in the deployed library in the following path.
$AGENT_HOME/oracle_dc
The following is the description of the oracle_dc directory (the home directory where Oracle DC is installed).
oracle_dc
     +- bin
     +- config
     +- lib
     +- logs
- bin
-
Contains executable files (ordc).
- config
-
Contains configuration files (evmap.cfg, oradc.cfg, and stmap.cfg).
- lib
-
Contains library files. If a certain library cannot be found in the '$SMORADC/lib' directory when $SMORADC/bin/ldd ordc is executed, create a symbolic link or change the file name. (If the library is a lib of oracle account, include it by requesting it from the oracle account.)
The following is an example of creating a symbolic link.
ln –s libsqlora8-2.3.so.0 libsqlora8-2.3.so.0.2.1
ln –s libclntsh.so.11.1 libclntsh.so.10.1
- logs
-
Contains log files.
Create users, tables, and procedures in the target DB by using the following scripts. (in '$AGENT_HOME/oracle_sql')
sysmaster-provider-oracle-ddl-sys.sql
sysmaster-provider-oracle-ddl-base.sql
sysmaster-provider-oracle-procedure_locktree.sql
sysmaster-provider-oracle-procedure_virtual_index.sql
If the default user name, SMADM, is not used, the user defined settings in the sysmaster-provider-oracle-ddl-sys.sql file must be modified. The following SQL statement must be executed with the sysdba privilege. Other SQL statements are executed by using the created user name.
In the Oracle provider, the database account of the data repository executes the MERGE_SQL_EXEC_COUNT procedure to collect SQL statistics. The following privilege must be granted to the repository DB account to execute the SQL invoked by the procedure.
GRANT CREATE TABLE TO {USER};
If the Agent is currently running, stop the Agent before registering Oracle.
-
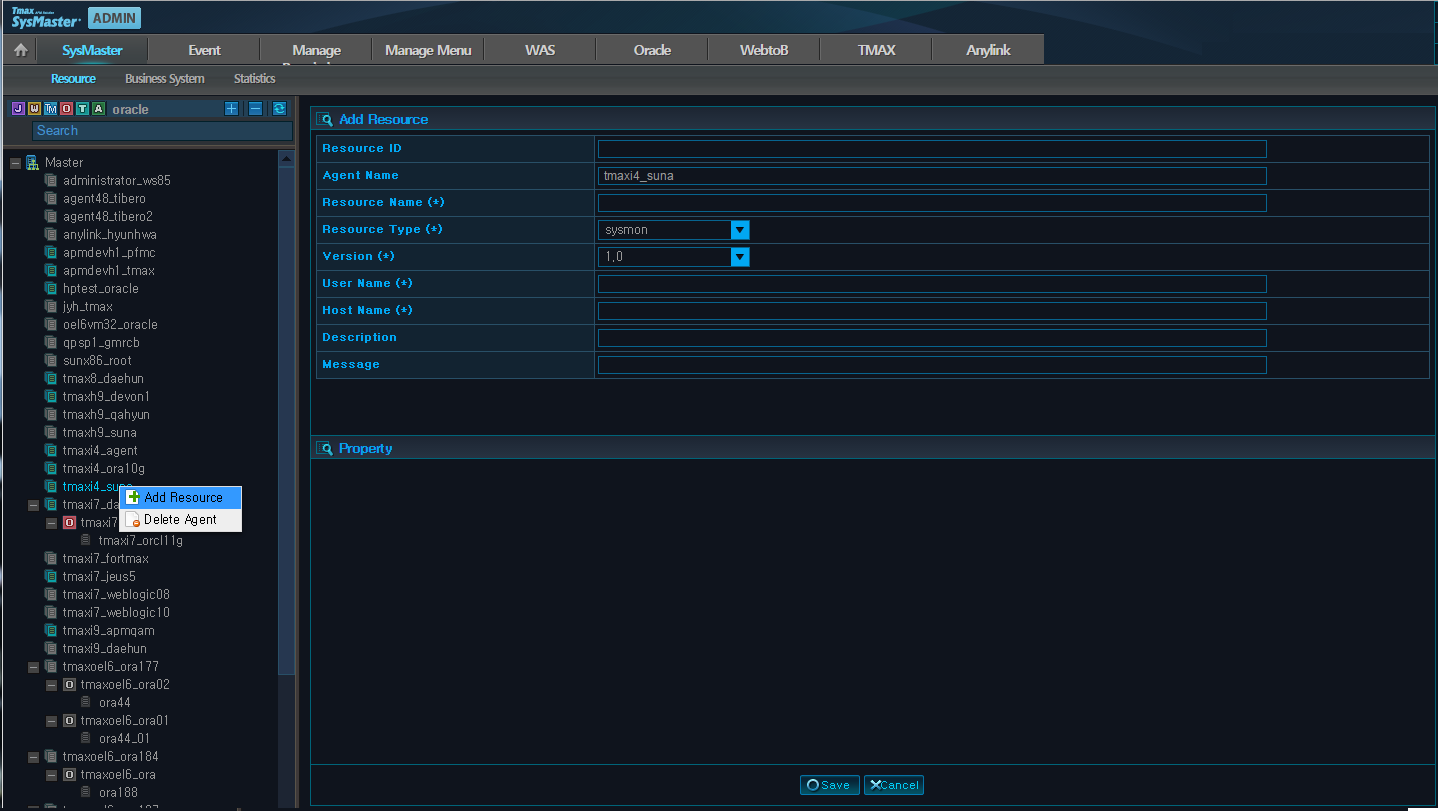
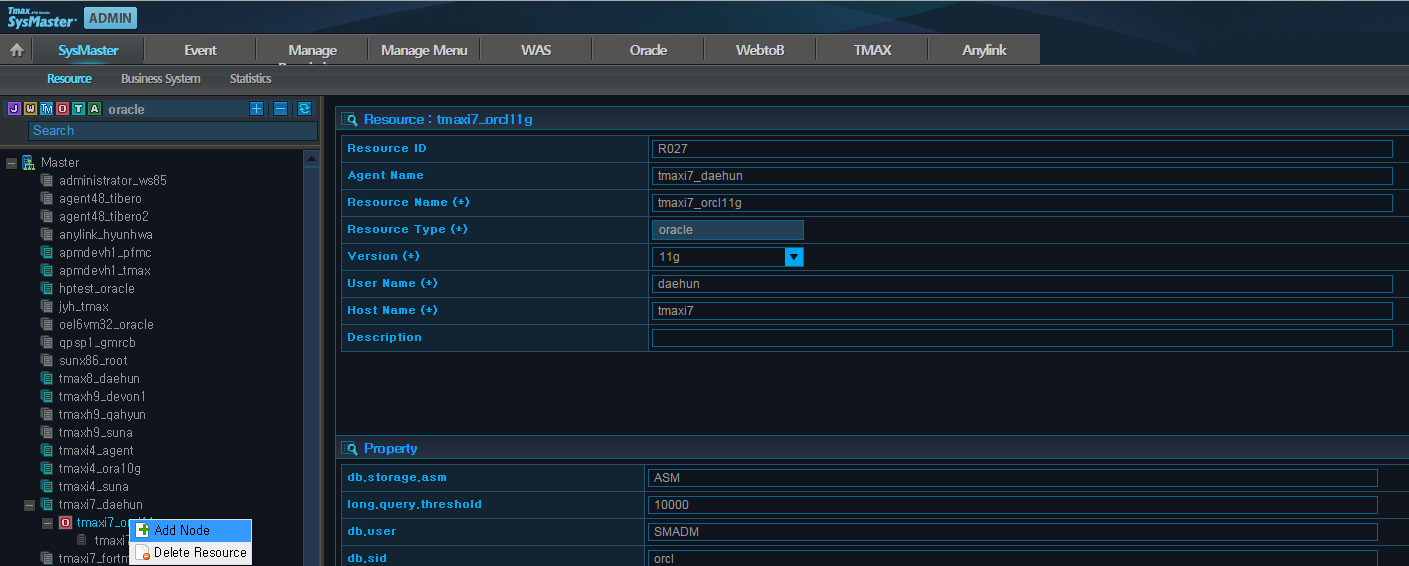
Right-click on the registered Agent from [ADMIN] > [SysMaster] > [Resource] and [Add Resource].
Select [Add Resource] to go to the following screen.
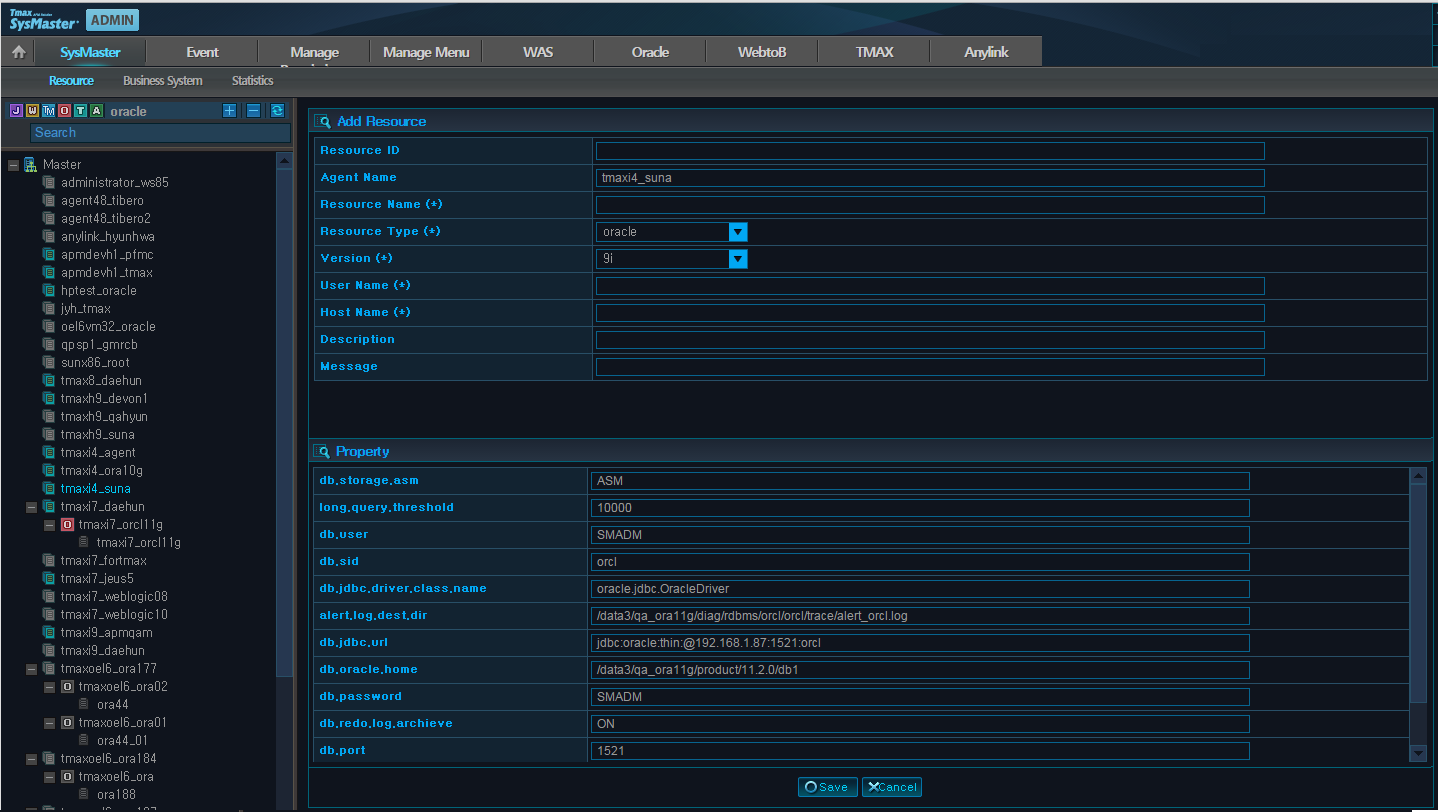
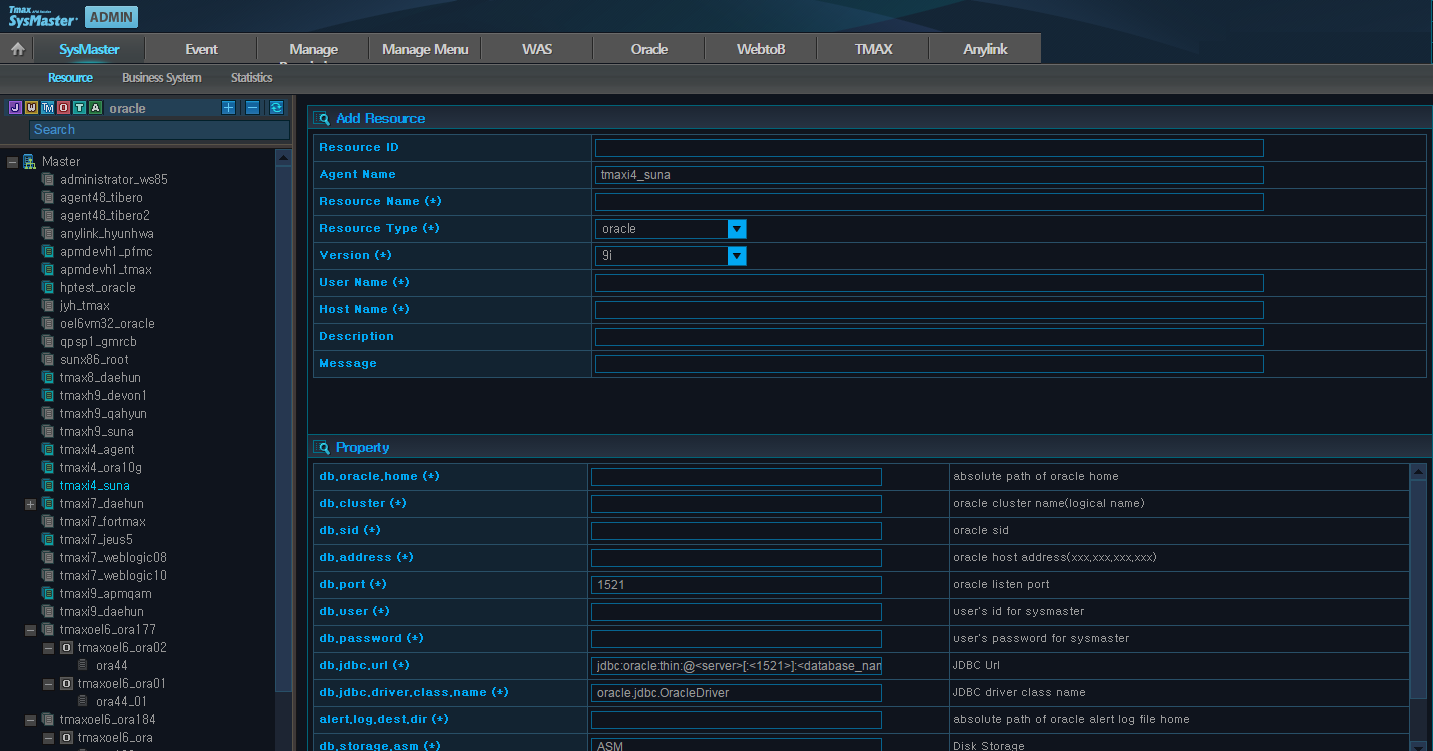
Enter the 'Resource Name(*)' and select 'Oracle' as the 'Resource Type'. The following properties will appear below. Enter all the required fields and click [Save]. The result of resource registration can be seen from the Working Set menu on the left.
The following is description of the fields. Required fields are marked with (*).
Field Required Default Value Description Resource ID O NONE Automatically assigned by the system. (Cannot be modified) Agent Name O NONE Registered Agent Name. (Cannot be modified) Resource name(*) O NONE Identification name for the Working Set. Resource Type(*) O sysmon WAS, oracle or sysmon. Select Oracle. Version(*) O NONE Version of the target ORACLE.
User Name(*) O NONE USER Name of the target ORACLE account. Host Name(*) O NONE Hostname of the monitoring target system. Description X NONE Description of the resource. db.oracle.home(*) O NONE Absolute path to ORACLE_HOME. db cluster(*) O NONE Name of the cluster. A specific value must be specified even if RAC is not configured. It is recommended to use the Oracle DB name. db.sid(*) O NONE Oracle SID.
SID can be checked by executing the following SQL statement.
select instance_name from v$instance;
db.address(*) O NONE IP address of the server where Oracle is installed. (e.g: 192.1.1.1) db.port(*) O 1521 Oracle listener port. db.user(*) O NONE User name for Oracle monitoring. db.password(*) O NONE User password for Oracle monitoring. db.jdbc.url(*) O NONE JDBC URL. Copy the JDBC jar file to the lib directory of the Agent before the Agent is started, or use the class path. db.jdbc.driver. class.name(*)
O oracle.jdbc. OracleDriver
Oracle Jdbc class name. alert.log.dest.dir(*) O NONE Absolute path to the Oracle Alert Log File. This setting is required to access [Error/Alarm] > [Alert Log].
(E.g., '/home/ora11g/diag/rdbms/orcl/ora11g/trace/alert_ora11g.log')
long.query. threshold(*)
O 10000 An event is triggered when this value is exceeded. Used to detect time-consuming SQLs when they are executed in Oracle. -
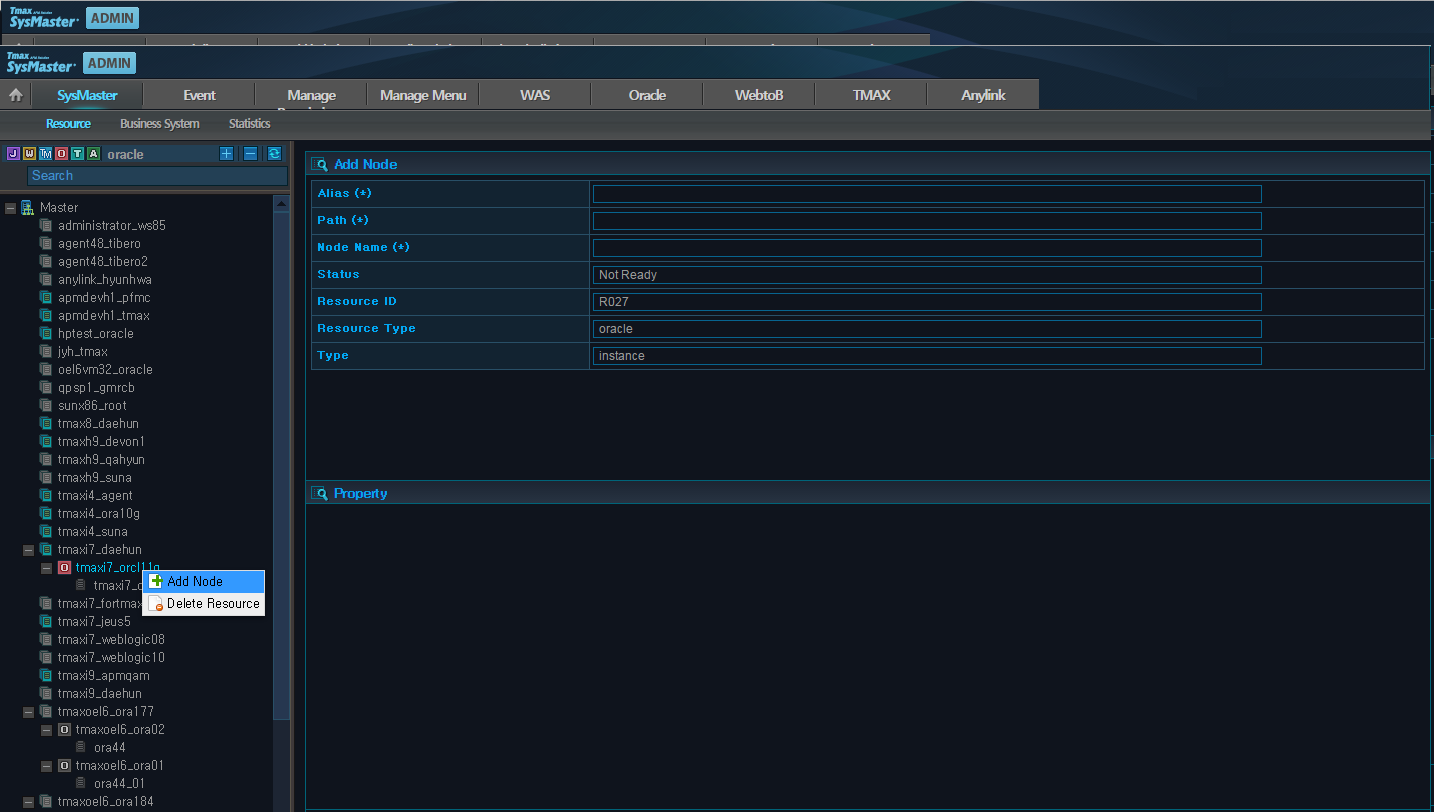
Right-click on the registered resource and click [Add Node] to display the following input screen.
The following is description of the fields. Required fields are marked with (*).
Field Required Default Value Description Alias(*) O NONE Node identification name displayed on the screen. Path(*) O NONE Path used to register the container. Node Name(*) O NONE Name of the Node to add. Status O Not Ready Node status. (Ready or Not Ready) (Cannot be modified) Resource ID O NONE Resource ID. (Cannot be modified) Resource Type O oracle Set to Oracle. (Cannot be modified) Type O instance Set to instance. (Cannot be modified)
Use the following steps to modify oradc.cfg to register Oracle DC.
-
Configure the properties in the $SMORADC/config/oradc.cfg file.
If Oracle DC is configured while installing the Agent, the user can only configure the oradc.resource_id, oradc.resource_name, and oradc.sga.* items.
oradc.db.address=192.168.32.199
oradc.db.port=1521
oradc.db.user=SMADM
oradc.db.password=SMADM
oradc.db.sid=ora11g
oradc.db.priv=

oradc.resource_id=R019
oradc.resource_name=ubun_ora11g
oradc.master.address=192.168.32.199
oradc.master.monitor.port=22006
oradc.master.request.port=22002
oradc.master.transaction.port=22007

oradc.sga.shm_num=1
oradc.sga.shm_ids=720899
oradc.sga.shm_keys=
oradc.sga.shm_addrs=
The following is description of the properties.
Property Description oradc.db.address IP address of the server where ORACLE is installed. oradc.db.port Oracle listener port. oradc.db.user User name for Oracle monitoring. oradc.db.password User password for Oracle monitoring. oradc.db.sid Oracle SID.
SID can be checked by executing the following SQL statement.
select instance_name from v$instance;
oradc.db.priv Set to SYSDBA to access the server as SYSDBA. (like '/as sysdba') oradc.resource_id Resource ID registered in Web Admin. oradc.resource_name Resource Name registered in Web Admin. oradc.master.address IP address of the Master server. oradc.master.monitor.port Monitoring port of the Master server. (BasePort+6) oradc.master.request.port Request port of the Master server. (BasePort+2) oradc.master.transaction.port Transaction port of the Master server. (BasePort+7) oradc.sga.shm_num Number of shared memory keys. (use sysresv or ipcs command) oradc.sga.shm_ids Shared memory ID of Oracle. (use sysresv or ipcs command (DBA group displayed with ipcs –m )) oradc.sga.shm_keys Shared memory key of Oracle. (use sysresv or ipcs command (DBA group displayed with ipcs –m )) oradc.sga.shm_addrs If the Agent installation account is same as that of Oracle, this value is automatically found and bound when smoradc boots.
Select a value based on the following conditions.
-
If there is one shared memory key, comment it out (#).
-
If there are two or more shared memory keys, separate the addresses of the shared memory keys by a colon(:).
For more information about obtaining the oradc.sga.shm_addrs, refer toSysMaster. "Appendix A. How to determine oradc.sga.shm_addrs".
-
In order to apply the configurations, the Agent must be restarted after starting the Oracle DC.
-
Restart Oracle DC.
-
Terminating ordc
$ ordc -d
-
Starting ordc
$ordc -f ../config/oradc.cfg &
-
-
Restart the SysMaster Agent. For more information about restarting an Agent, refer to "3.5. Starting and Terminating Agent".
This section describes how to register Tibero resources.
The following is a summary of the Tibero resource registration process.
-
Registering Agent in Web UI
Agent registration will be omitted here since it was already covered in "3.4.2. Agent Registration".
-
Creating DB Users and Tables
-
Registering Resources and Adding Nodes in Web Admin
-
Configuring $AGENT_HOME/config/sysmaster.properties
-
Configuring .profile
-
Copying Tibero JDBC library
-
Configuring tibero.tip parameters
-
Registering Tibero DC
-
Starting Tibero DC and Restarting Agent
Verify normal monitoring status in Web UI after restarting Tibero DC.
The following are the files needed for registering Tibero DC.
-
tbdc(executable file)
-
evmap.cfg, tbdc.cfg, and stmap.cfg(configuration file)
-
liball4c.so.0.1
The files are distributed as tibero_dc.linux.64.tar.gz. The following is the result of decompressing the file under the Agent installation account.
$AGENT_HOME/tibero_dc
The following is the description of the tibero_dc directory (the home directory where Tibero DC is installed).
tibero_dc
     +- bin
     +- config
     +- lib
     +- logs
- bin
-
Contains executable files (tbsc).
- config
-
Contains configuration files (evmap.cfg, tbdc.cfg, and stmap.cfg)
- lib
-
Contains library files. If a certain library cannot be found in the 'tibero_dc/lib' directory when tibero_dc/bin/ldd tbdc is executed, create a symbolic link or change the file name. (If the library is a lib of tibero account, include it by requesting it from the tibero account.)
The following is an example of creating a symbolic link.
ln –s liball4c.so.0.1 liball4c.so
- logs
-
Contains log files.
Create users, tables, and procedures in the target DB by using the following script. (in '$AGENT_HOME/tibero_sql')
sysmaster-provider-tibero-ddl-sys.sql
If the default user name, SMADM, is not used, the user defined settings in the sysmaster-provider-tibero-ddl-sys.sql file must be modified. The following SQL statement must be executed with the sysdba privilege.
If the Agent is currently running, stop the Agent before registering Tibero.
-
Right-click on the registered Agent from [ADMIN] > [SysMaster] > [Resource] and [Add Resource].
Select [Add Resource] to go to the following screen.
Enter the 'Resource Name(*)' and select 'Tibero' as the 'Resource Type'. The following properties will appear below. Enter all the required fields and click [Save]. The result of resource registration can be seen from the Working Set menu on the left.
The following is description of the fields. Required fields are marked with (*).
Field Required Default Value Description Resource ID O NONE Automatically assigned by the system. (Cannot be modified) Agent Name O NONE Registered Agent Name. (Cannot be modified) Resource name(*) O NONE Identification name for the Working Set. Resource Type(*) O sysmon Select Tibero. Version(*) O NONE Version of the target Tibero.
User Name(*) O NONE USER Name of the target Tibero account. Host Name(*) O NONE Hostname of the monitoring target system. Description X NONE Description of the resource. db.Tibero.home(*) O NONE Absolute path to TB_HOME. db.cluster(*) O NONE Name of the cluster. A specific value must be specified even if TAC is not configured. It is recommended to use the Tibero DB name. db.sid(*) O NONE Tibero SID.
SID can be checked by executing the following SQL statement.
select instance_name from v$instance;
db.address(*) O NONE IP address of the server where Tibero is installed. (e.g.: 192.1.1.1) db.port(*) O 8629 Tibero listener port. db.user(*) O NONE User name for Tibero monitoring. db.password(*) O NONE User password for Tibero monitoring. db.jdbc.url(*) O NONE JDBC URL. Copy the JDBC jar file to the lib directory of the Agent before the Agent is started, or use the class path. db.jdbc.driver. class.name(*)
O com.tmax.tibero. jdbc.ext. TbConnectionPool DataSource
Tibero Jdbc class name. alert.log.dest.dir(*) O NONE Absolute path to the Tibero Alert Log File. Currently this function is not supported but it will be available in the next version. This setting is required to access [Error/Alarm] > [Alert Log]. long.query.threshold(*) O 10000 An event is triggered when this value is exceeded. Used to detect time-consuming SQLs when they are executed in Tibero. sql.elapsed.threshold 1 ~ 4(*)
O 1, 50, 200, 400 Standard used to represent the elapsed time ranges of the currently running sql in different colors.
E.g.,
sql.elapsed.threshold1 : 10
sql.elapsed.threshold2 : 50
sql.elapsed.threshold3 : 200
sql.elapsed.threshold4 : 400
Active service bar color is determined according to the following.
-
10ms or more: Green
-
50ms or more: Blue
-
200ms or more: Orange
-
400ms or more: Pink
-
-
Right-click on the registered resource and click [Add Node] to display the following input screen.
The following is description of the fields. Required fields are marked with (*).
Field Required Default Value Description Alias(*) O NONE Node identification name displayed on the screen. Path(*) O NONE Path used to register the container. Node Name(*) O NONE Name of the Node to add. Status O Not Ready Node status. (Ready or Not Ready) (Cannot be modified) Resource ID O NONE Resource ID. (Cannot be modified) Resource Type O tibero Set to tibero. (Cannot be modified) Type O instance Set to instance. (Cannot be modified)
Enter the Tibero installation account information to retrieve the Tibero instance information.
This configuration is planned to be discarded later by applying a patch that automatically retrieves information from Tibero.
[$AGENT_HOME/config/sysmaster.properties]
tibero.os.user=daehun4
Add Tibero related variables and 'tibero_dc/lib' to the LD_LIBRARY_PATH(LIBPATH for AIX) setting in .profile.
-
Examples of Variables Related to Tibero
export TB_HOME=/home/daehun4/Tibero/tibero5
export TB_SID=tibero
export LD_LIBRARY_PATH=$TB_HOME/lib:$TB_HOME/client/lib
export PATH=$PATH:$TB_HOME/bin:$TB_HOME/client/bin
-
tibero_dc/lib Example
export LD_LIBRARY_PATH=$LD_LIBRARY_PATH:/home/daehun4/sysmaster/agent5_tbr/tibero_dc/lib
Copy the Tibero JDBC library to '$AGENT_HOME/lib' according to the JDK version in use.
[$TIBERO_HOME/client/lib/jar]$ cp tibero5-jdbc.jar $AGENT_HOME/lib
Note
For information about Tibero JDBC library according to the JDK version, refer to "Tibero JDBC Development Guide."
Set the required parameters in tibero.tip, a Tibero configuration file.
[$TIBERO_HOME/config/tibero.tip]
SQL_STAT_HISTORY=Y
SQL_STAT_HISTORY_THRESHOLD=1000
SQL_STAT_HISTORY_QSIZE=1000
GATHER_SQL_PLAN_STAT=Y
The following is description of the parameters.
| Parameter | Description |
|---|---|
| SQL_STAT_HISTORY | Option to log performance history data. |
| SQL_STAT_HISTORY_THRESHOLD | Log performance history data only for queries whose processing time exceeds the specified value. The trace file will not be generated if the query processing time is too long. |
| SQL_STAT_HISTORY_QSIZE | Number of queries per session to log history for. |
| GATHER_SQL_PLAN_STAT | Option to collect execution statistics (sql elapsed time) for SQL statements. |
To register Tibero DC, configure the properties in the tibero_dc/config/tbdc.cfg file as in the following.
tbdc.resource_id=R044
tbdc.config_path=tibero
tbdc.master.addr=192.168.32.199
tbdc.master.monitor.port=22006
tbdc.master.request.port=22002
tbdc.master.transaction.port=22007
tbdc.log.dir=/home/daehun4/sysmaster/agent5_tbr/tibero_dc/logs
tbdc.log.priority=TRACE
tbdc.log.fmt=%d [%P] %m%n
tbdc.trace.interval=1000
tbdc.req.thr_num=1
tbdc.event_map_file=/home/daehun4/sysmaster/agent5_tbr/tibero_dc/config/evmap.cfg
tbdc.stat_map_file=/home/daehun4/sysmaster/agent5_tbr/tibero_dc/config/stmap.cfg
tbdc.transaction.send.interval=1000
tbdc.transaction.send.size=102400
tbdc.max_sql_num=10240
The following is description of the properties.
| Property | Description |
|---|---|
| tbdc.resource_id | Tibero Resource ID registered in Web Admin. |
| tbdc.config_path | Tibero path registered in Web Admin. |
| tbdc.master.addr | IP address of the Master server. |
| tbdc.master.monitor.port | Monitoring port of the Master server. (BasePort+6) |
| tbdc.master.request.port | Request port of the Master server. (BasePort+2) |
| tbdc.master.transaction.port | Transaction port of the Master server. (BasePort+7) |
| tbdc.log.dir | Path to the log file. |
| tbdc.log.priority | Log level. |
| tbdc.log.fmt | Log format. (modification is not required) |
| tbdc.trace.interval | Interval for collecting Tibero performance data. (Use shorter interval for smaller collection space in tibero.tip). |
| tbdc.req.thr_num | Number of threads used to process Master requests. |
| tbdc.event_map_file | Value used to match the event no. |
| tbdc.stat_map_file | Value used to match the stat no. |
| tbdc.transaction.send.interval | Trace data transfer interval. |
| tbdc.transaction.send.size | Trace data transfer size. |
| tbdc.max_sql_num | Limit on the number of sqltext types to prevent re-sending sqltext to the Master. |
In order to apply the configurations, the Agent must be restarted after starting the Tibero DC.
-
Restart Tibero DC.
-
Terminating tbdc
$ tbdc -d
-
Starting tbdc
$ tbdc -f ../config/tbdc.cfg &
Note
Tibero DC must be restarted when the Master is restarted because parts of the sql text sent to the tbdc may get lost while restarting.
-
-
Restart the SysMaster Agent. For more information about restarting an Agent, refer to "3.5. Starting and Terminating Agent".