Table of Contents
This chapter describes how to install a SysMaster Agent.
All hardware and software requirements for an Agent that are described in "1.2. Pre-Installation Tasks" must be met before installing the Agent. Installing an Agent is similar to installing the Master. Once the Master has been installed, Agent installation is simple.
If the root account or the account used to install the resource is used to install the Agent, it is possible to control multiple resources on a single node. Otherwise, the Agent must be installed for each account that was used to install the resources. Therefore, if multiple resources must be managed on a single node, the Agent should be installed using the root account or the account used to install the resources.
The following is a summary of the Agent installation process.
-
Installing Agent
-
Verifying Agent Installation
-
Configuring and Registering Agent Environment
-
Starting and Terminating Agent
Note
For information on installing a SysMaster Agent using the smadmin tool, refer to "SysMaster Administrator's Guide".
This section describes how to install an Agent.
An Agent is installed in the following order.
-
After granting execution permission for the SysMaster5_0_Master_Agent_Standard.bin file, execute the file.
When the following screen is displayed, press <ENTER> to continue.
[sysmaster1@qpsx1 20080000]$ chmod u+x SysMaster5_0_Master_Agent_Standard.bin
[sysmaster1@qpsx1 20080000]$ SysMaster5_0_Master_Agent_Standard.bin
Preparing to install...
Extracting the installation resources from the installer archive...

Configuring the installer for this system's environment...
Launching installer...
Preparing CONSOLE Mode Installation...

===============================================================================
SysMaster5.0                      (created with InstallAnywhere by Macrovision)
-------------------------------------------------------------------------------
Introduction
------------
InstallAnywhere will guide you through the installation of SysMaster5.0.
It is strongly recommended that you quit all programs before continuing
with this installation.
Respond to each prompt to proceed to the next step in the installation.
If you want to change something on a previous step, type 'back'.
You may cancel this installation at any time by typing 'quit'.
PRESS <ENTER> TO CONTINUE:
-
When the license agreement is displayed, press <ENTER> to continue.
=============================================================================== License Agreement ----------------- Installation and Use of SysMaster5.0 Requires Acceptance of the Following License Agreement: SysMaster This Software is made by 'TmaxSoft Co.,Ltd.' and this software is distributed under our license agreement. Software End-User License Agreement Product : SysMaster This is a legal agreement between you (either an individual or an entity) and TmaxSoft, Incorporated. By opening the sealed software package and/or by using the software, you agree to be bound by the terms of this agreement. SysMaster Software License 1. Grant of License: This SysMaster Software License Agreement ("License") permits you to use one copy of the TmaxSoftware product Tmax, on any single computer, provided the software is in use on only one computer at any one time. If this package is a license pack, you may make and use additional copies of the software up to the number of licensed copies authorized. If you have multiple licenses for the software, then at any time you may have as many copies of the software in use as you have licenses. The software is "in use" on a computer when it is loaded into the temporary PRESS <ENTER> TO CONTINUE: -
Enter y + <ENTER> to accept the terms of the agreement.
PRESS <ENTER> TO CONTINUE:
DO YOU ACCEPT THE TERMS OF THIS LICENSE AGREEMENT? (Y/N): y
-
Select the Install Set. For Agent, enter 2 + <ENTER>.
=========================================================================== Choose Install Set ------------------ Please choose the Install Set to be installed by this installer. 1- Master ->2- Agent 3- Only Provider ENTER THE NUMBER FOR THE INSTALL SET, OR PRESS <ENTER> TO ACCEPT THE DEFAULT : -
Select the platform where SysMaster will be installed.
===========================================================================
Choose Platform
---------------
Choose current system ( platform-architecture )
1)HP-UX PA-RISC
2)HP-UX ITANIUM
3)AIX 5L
4)AIX 6L
5)AIX 7L
6)Solaris Sparc 7~10
7)Linux i386/i686
8)Linux ITANIUM
9)Linux x86_64
Quit) Quit Installer

Choose Current System (DEFAULT: 9):
-
Select the kernel bit.
=========================================================================== Choose Kernel Bit Please Choose Kernel Bit? ->1- 32bit 2- 64bit 3- previous ENTER THE NUMBER OF THE DESIRED CHOICE, OR PRESS <ENTER> TO ACCEPT THE DEFAULT: -
Enter JDK directory path.
===============================================================================
Choose JDK Folder
-----------------

Please Choose a Folder:

Input User JDK Folder (DEFAULT: /usr/java5_64):
-
Enter the installation path for the Agent.
===========================================================================
Choose Install Master Folder
----------------------------
Where would you like to install?
(DEFAULT: /home/sysmaster1/sysmaster/agent): /data1/apmqam/sysmaster/agent
-
Configure the Master server to which the Agent will connect to.
================================================================
Choose Master Infomation
------------------------
Master IP (DEFAULT: 192.168.1.87):

Master Base Port (DEFAULT: 22000):

Master Request Port (DEFAULT: 22002):

Master State Port (DEFAULT: 22006):
-
Configure the Agent.
Agent IP (DEFAULT: 192.168.1.87):

Agent JRMP Port (DEFAULT: 22100):
-
When installation is completed, press <ENTER> to exit the installer from the following screen.
===============================================================================
Pre-Installation Summary
------------------------

Please Review the Following Before Continuing:

Product Name:
    SysMaster5.0

Disk Space Information (for Installation Target):
    Required:  17,677,757 bytes
    Available: 213,394,419,712 bytes

PRESS <ENTER> TO CONTINUE:

===============================================================================
Installing...
-------------

 [==================|==================|==================|==================]
 [------------------|------------------|------------------|------------------]


===============================================================================
Installation Complete
---------------------

Congratulations. SysMaster5.0 has been successfully installed to:

   /data1/apmqam/sysmaster/agent

PRESS <ENTER> TO EXIT THE INSTALLER:
[Note]
If there is a blank space in the path that is entered during the installation in Windows, modify the path as in the following. Up to 8 characters can be used for a path by entering 6 characters followed by '~1' or '~2'.
-
Example 1
C:\Program Files\Java\jdk1.5.0_12 --> C:\Progra~1\Java\jdk1.5.0_12
-
Example 2
When both C:\Program Files and C:\Program Files (x86) exist, and Java is installed in C:\Program Files (x86) --> C:\Progra~2\Java\jdk1.5.0_12
-
Example 3
C:\Documents and Settings\Java\jdk1.5.0_12 --> C:\Docume~1\Java\jdk1.5.0_12
This section describes how to verify that the Agent has been installed successfully.
The following directory is created after an Agent has been installed. In the following example, the installation directory for the Agent has been set to 'sysmaster'.
$sysmaster
     +- agent
         |
         +- UninstallerData
         +- bin
         +- config
         +- lib
         +- logs
         +- temp
- UninstallData
-
Contains SysMaster uninstallation files.
- bin
-
Contains executable files such as smagent, etc.
- config
-
Contains property files required for Master operation.
- lib
-
Contains library files.
- logs
-
Contains log files.
- temp
-
Contains the intermediate data results that is processed by the Agent.
This section describes how to set the environment configurations for an Agent and register the Agent with the Master.
Modify the following files to specify the environment configurations of an Agent.
-
sysmaster.properties
-
smagent.env
-
smboot
sysmaster.properties
Specify the environment configurations of an Agent in the following file.
$AGENT_HOME/config/sysmaster.properties
The following are the contents of the sysmaster.properties file.
##############################################################################################
#
#   [ NETWORK(Mandatory) ]
#
#   master.hostname            Master Hostname(IP)
#   master.baseport            Master Base Port
#
#   master.port.req            Master Request Port(default : master.baseport + 2)
#   master.port.stat           Master Statistic Port
#
#   agent.hostname             Agent Hostname(IP)
#   agent.port.jrmpadaptor     Agent Port for JRMP Adaptor Export
#
##############################################################################################
master.hostname=192.168.1.87
master.port.base=22000
master.port.req=22002
master.port.stat=22006

agent.hostname=192.168.1.34

.................Omitted

##############################################################################################
#
#   [ LOGGING ]
#
#   log.level                  Log Level(debug|info|warn|error|fatal|off)
#   log.format                 Log Format([%c:%-5p] %m {%C{1}.%M(%L)}%n)
#   log.redirect               false if u don't want to redirect logs to smlog file
#
##############################################################################################
log.level=debug
log.format=%d{HH:mm:ss} [%c{1}] [%-5p] %m%n
log.redirect=true
log.retention=7
The following is description of the properties.
| Property | Description |
|---|---|
| master.hostname | IP address of Master. |
| master.port.base | Base port number of Master. Applies to SYSMASTER_BASEPORT of smmaster.env. |
| master.port.req | nio port used for real-time user requests. Set to ‘SYSMASTER_BASEPORT + 2’ for default installation. Must be modified when there are 3 or more containers. |
| master.port.stat | Port number used to transfer data from Agent, DC, etc. Set to ‘SYSMASTER_BASEPORT + 6’ for default installation. Must be modified when there are 3 or more containers. |
| agent.hostname | IP address of Agent. |
| log.retention | Expiration date for deleting the logs. |
smagent.env
Check the following file.
$AGENT_HOME/bin/smagent.env
The following are the contents of the smagent.env file.
#
# For customizing SysMaster agent environment.
#

# set up SYSMASTER_HOME.
SYSMASTER_HOME=/data1/apmqam/sysmaster/agent
SYSMASTER_LOG_HOME=$SYSMASTER_HOME/logs

# set up SYSMASTER_BASEPORT.
SYSMASTER_BASEPORT=22000

# set up SYSMASTER_SYSMON_HOME.
SYSMASTER_SYSMON_HOME=$SYSMASTER_HOME/lib/provider/sysmon/aix5L_64

# set up JAVA_HOME
JAVA_HOME=/usr/java5_64

# set up JAVA_ARGS
JAVA_ARGS="-Xms32m -Xmx64m"

export SYSMASTER_HOME SYSMASTER_BASEPORT SYSMASTER_SYSMON_LIB
export JAVA_HOME JAVA_ARGS

... Omitted


# set up BOOTSTRAPPER_OPTION.
BOOTSTRAPPER_OPTION="-Dagent -Dsysmaster.port=$SYSMASTER_BASEPORT -Dsysmaster.home=$SYSMASTER_HOME -Dsysmaster.logpath=$SYSMASTER_LO
G_HOME -Djava.security.manager -Djava.security.policy=$SYSMASTER_HOME/bin/sm-policy.policy"
The following is description of the variables.
| Variable | Description |
|---|---|
| SYSMASTER_HOME | ${AGENT_HOME}. |
| SYSMASTER_LOG_HOME | Path to the Agent log file. |
| SYSMASTER_BASEPORT | Uses Master's base port setting. |
| SYSMASTER_SYSMON_HOME | OS folder. ${AGENT_HOME}/lib/provider/sysmon/os nameThe following platforms are supported. (OS naming convention: [OS Name + bit number])
|
| JAVA_HOME | Java HOME. |
| BOOTSTRAPPER_OPTION NAT | Add the Master IP to the sysmaster.proxy in the BOOTSTRAPPER_OPTION section when the network (NAT) between the Master and Agent do not match. (e.g., -Dsysmaster.proxy=192.168.32.199) |
Create smboot
After registering the Agent in the Web Admin, create the following file. For more information about registering an Agent, refer to"3.4.2. Agent Registration".
$AGENT_HOME/bin/vi smboot
The following are the contents of the smboot file.
#!/bin/sh
smagent -n {Agent name registered in WEB Admin}
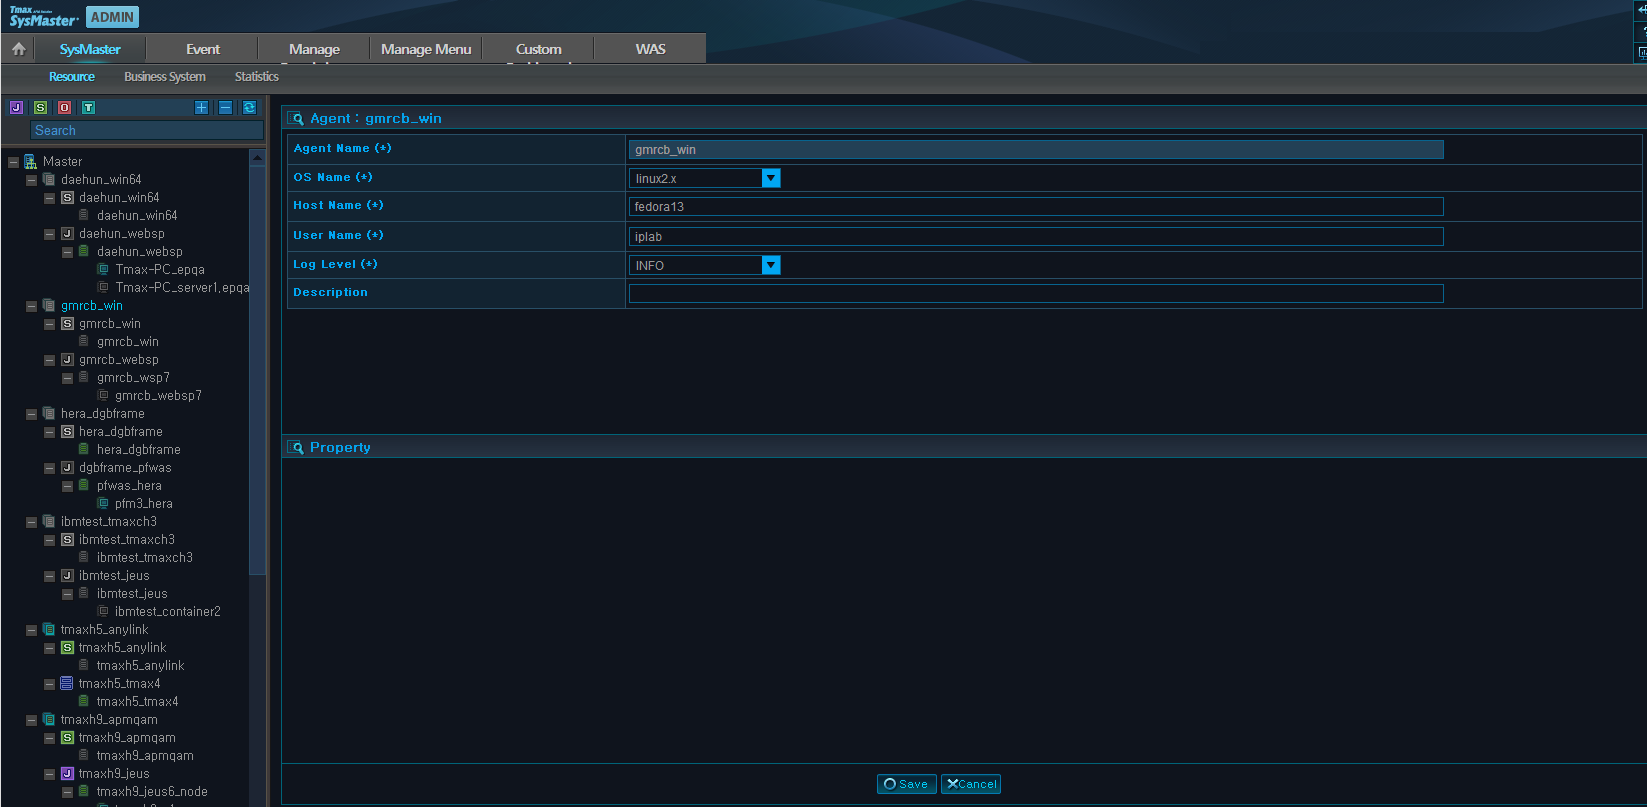
An Agent must be registered with the Master before it can be started. SysMaster Web Admin is used to register the Agent. Once it is registered, the Agent is ready to run.
Start SysMaster Web Admin, go to [ADMIN] > [SysMaster] > [Resource] to register and manage a SysMaster Agent.
Right click on the Master from the top left menu, and then select [Add Agent]. Fill in the required fields, and then click [Save] to complete the registration.
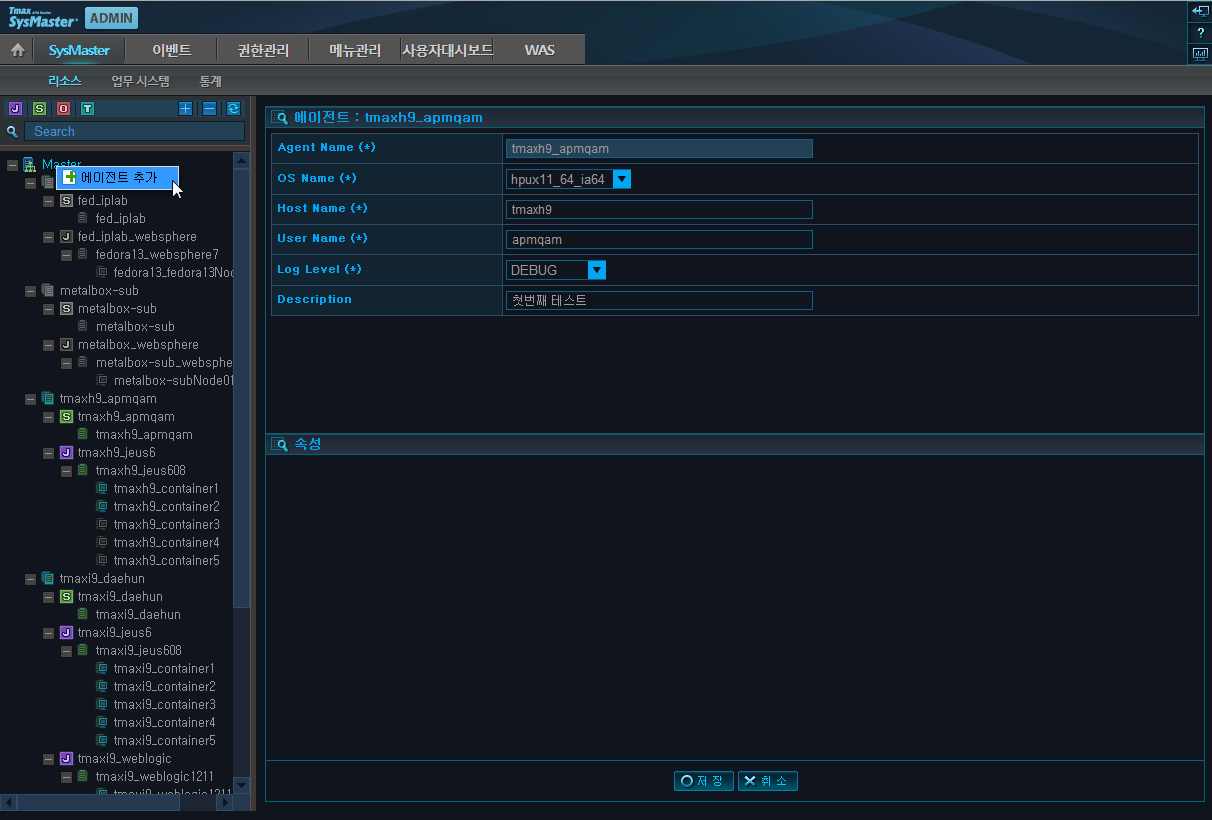
The following describes each field. (*: Required Field)
| Field | Description |
|---|---|
| Agent Name(*) | Set by the user. In general, use the name of the node where Agent will be installed for easy access. (Max length = 32) |
| OS Name(*) | OS of the machine where Agent will be installed. |
| Host Name(*) | Host name of the machine where Agent will be installed. |
| User Name(*) | User name used to install Agent. |
| Log Level(*) | Log Level |
| Sysmon Generate | If set, a Sysmon resource will be automatically created. (This setting must be checked when installing for the first time.) |
| Description | Brief description of Agent. (Max 2000 characters) |
| Message | Full description of Agent. |
Once Sysmon resource registration is completed, the Agent registration information can be viewed as in the following.
By selecting the automatically registered Node, the registration information of the node can be viewed as in the following.
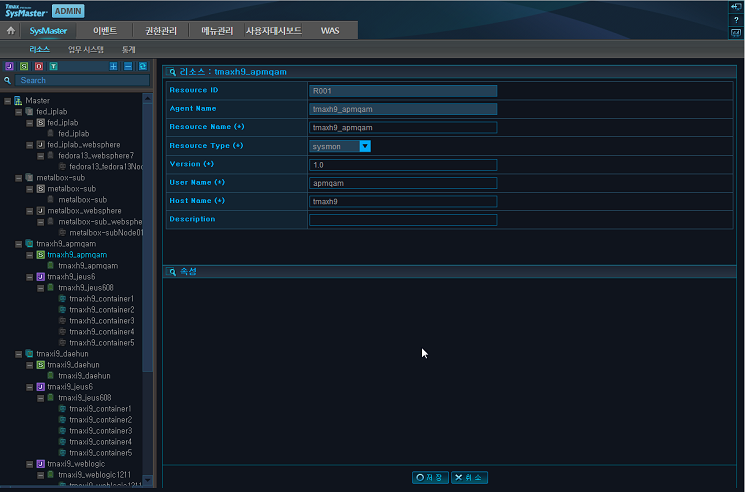
The Sysmon Provider, the Provider that is installed with the Agent, monitors the system resource status.
This section describes how to start and terminate an Agent.
The following are the steps for starting a SysMaster Agent.
-
If smboot was not created, execute smagent from the $AGENT_HOME/bin directory as in the following. The Agent Name is required. Use the name that was used to register the Agent.
$AGENT_HOME/bin/smagent -r -n {Agent Name}The following describes each smagent option.
Option Description -n Start the Agent when smboot is created successfully. -r Re-register the Agent name and start the Agent when there is an error such as a network error between the Master and Agent. -a Add and start the Agent from the console. -v Version information of the Agent. -h Help for smagent. -
If an Agent starts successfully, the following screen is displayed.
[15:09:11] SysMaster agent main server started [15:09:11] *** Initialized Agent MBeans *** JMImplementation:type=MBeanServerDelegate tmaxh9_apmqam:name=sysmaster.agent.action.AgentMainActionMBean tmaxh9_apmqam:name=sysmaster.agent.action.AgentMainActionMonitorMBean tmaxh9_apmqam:name=sysmaster.agent.mbean.AgentAdminMBean tmaxh9_apmqam:name=sysmaster.agent.mbean.FileTransfererMBean tmaxh9_apmqam:name=sysmaster.agent.mbean.MessageReceptorMBean tmaxh9_apmqam:name=sysmaster.agent.mbean.SystemExplorerMBean tmaxh9_apmqam:name=sysmaster.agent.mbean.SystemFileFilterMBean tmaxh9_apmqam:name=sysmaster.agent.monitor.AgentMonitorMgrMBean tmaxh9_apmqam:name=sysmaster.provider.sysmon.agent.init.SysmonResourceInitializerMBean,resid=R001 tmaxh9_apmqam:name=sysmaster.provider.sysmon.agent.manager.SystemResourceMonitorMBean,resid=R001 tmaxh9_apmqam:name=sysmaster.provider.was.agent.init.WasResourceInitializerMBean,resid=R002 tmaxh9_apmqam:name=sysmaster.provider.was.agent.service.WasAgentMBean,resid=R002 [15:09:11] SysMaster agent main started [15:09:11] Resource moniotor [was] scheduler started [15:09:11] Resource resource [R002] monitor task scheduler started [15:09:11] Resource moniotor [sysmon] scheduler started [15:09:11] Resource resource [R001] monitor task scheduler started [15:09:11] Agent jmx context [tmaxh9_apmqam] registered [15:09:12] *** Agent [tmaxh9_apmqam] configuration *** host : tmaxh9 user : apmqam home : /data1/apmqam/sysmaster/agent/ [15:09:12] Agent [tmaxh9_apmqam] registered ====================================================== AGENT [tmaxh9_apmqam] READY... ====================================================== SysMaster agent [tmaxh9_apmqam] boot success... [15:09:12] All stdout,stderr will be redirect to: /data1/apmqam/sysmaster/agent/logs/smlog -
If an Agent starts successfully, the following process can be viewed.
Dagent

ps -ef|grep Dagent
The '-n' option must be used to terminate an Agent.
-
Execute smagent from the $AGENT_HOME/bin directory as in the following.
$ $AGENT_HOME/bin/smdown -n
-
The following describes each smdown option.
Option Description -n Terminates Agent after sending a request to the Master. -i Terminates Agent immediately without sending a request to the Master. -h Help for smdown. -
If an Agent is terminated successfully, the following screen is displayed.
-
Starting agent shutdown...
   15:09:00 SMSTR INFO  Now starting stop agent server...
   15:09:00 SMSTR INFO  [SmNioClientManger] Finish SmNioClientManger Stop
   15:09:00 SMSTR INFO  [ClientSendWorker] Stoped
   15:09:00 SMSTR.WAS INFO  [ReceiveWorker] Stop ReceiveWorker : R002
   15:09:00 SMSTR INFO  [ReceiveWorker] Stop ReceiveWorker : R001
   15:09:00 SMSTR INFO  Trying to shutdown File job client
   15:09:00 SMSTR INFO  Destroy AGENT file job client success.
   15:09:00 SMSTR INFO  Destroy AGENT Sysmonadmin success.
   15:09:00 SMSTR INFO  Resource resource [R001] monitor task scheduler ended
   15:09:00 SMSTR INFO  Resource resource [R002] monitor task scheduler ended
   15:09:01 SMSTR INFO  Destroy AGENT PROVIDER mbeans.xml configurations.
   15:09:01 SMSTR INFO  Master Connector closed
   15:09:01 SMSTR INFO  SysMaster agent main stopped
   15:09:01 SMSTR INFO  Destroy MASTER registration
   15:09:01 SMSTR INFO  Destroy AGENT mbean server
   15:09:01 SMSTR INFO  Destroy AGENT Jrmpadaptor port [22100]
Agent shutdowned...