서버 설치 및 제거
본 장에서는 UNIX 및 Linux 환경에서 AnyAPI 서버를 설치하고 제거하는 방법에 대해 설명합니다.
설치
UNIX 및 Linux 환경에서 제품을 설치하기 위해서 Console Installer를 실행해야 합니다.
|
다음은 UNIX/Linux 환경에서 AnyAPI를 설치하는 과정에 대한 설명입니다.
-
AnyAPI 설치 파일(anyapi1.0_generic_ko.bin)을 서버에 업로드하고 파일이 위치한 디렉터리로 이동합니다.
-
설치 파일이 실행 가능하도록 파일의 실행 권한을 다음과 같이 부여합니다.
chmod u+x anyapi1.0_generic_ko.bin
-
콘솔에서 설치 파일명을 입력한 후 <ENTER> 키를 누릅니다.
test@soft-sqa2:~$ ./anyapi1.0_generic_ko.bin
Preparing to install
Extracting the installation resources from the installer archive...
Configuring the installer for this system's environment...

Launching installer...

===============================================================================
AnyAPI 1.0                                        (created with InstallAnywhere)
-------------------------------------------------------------------------------
-
인스톨러에 대한 간략한 소개 화면이 나타난다. 다음 과정을 수행하기 위해 <ENTER> 키를 누릅니다.
===============================================================================
Introduction
------------

InstallAnywhere will guide you through the installation of AnyAPI 1.0.

It is strongly recommended that you quit all programs before continuing with
this installation.

Respond to each prompt to proceed to the next step in the installation.  If
you want to change something on a previous step, type 'back'.

You may cancel this installation at any time by typing 'quit'.

PRESS <ENTER> TO CONTINUE:
-
라이선스 준수 화면이 나타난다. 라이선스 준수에 대한 정보를 보기 위해 <ENTER> 키를 누릅니다.
=============================================================================== License Agreement ----------------- Installation and Use of AnyAPI 1.0 Requires Acceptance of the Following License Agreement: JEUS (Java Enterprise User Solution) Release JEUS 21 TmaxSoft Co., Ltd. (hereafter, TmaxSoft) End-User License Agreement Product : AnyAPI 1.0 This is a legal agreement between you (either an individual or an company) and TmaxSoft, Incorporated. By opening the sealed software package and/or by using the software, you agree to be bound by the terms of this agreement. TmaxSoft License 1. Grant of License: This TmaxSoft License Agreement ("License") permits you to use one copy of the TmaxSoft product JEUS, on any single computer, provided the software is in use on only one computer at any one time. If this package is a license pack, you may make and use additional copies of the software up to the number of licensed copies authorized. If you have multiple licenses for the software, then at any time you may have as many copies of the software in use as you have licenses. The software is "in use" on a computer when it is loaded into the temporary memory (i.e., RAM) or installed into the permanent memory (e.g., hard disk, CD-ROM, or other storage devices) of that computer, except that a copy installed on a network server for the sole purpose of distribution to other computers is not "in use". If the anticipated number of users of the software will exceed the number of applicable licenses, then you must have a reasonable PRESS <ENTER> TO CONTINUE: -
라이선스 준수에 대한 정보를 모두 확인한 후 라이선스 동의를 위해 Y를 입력한 후 <ENTER> 키를 누릅니다. 만약 동의하지 않으면 더 이상 설치 진행이 불가능합니다.
DO YOU ACCEPT THE TERMS OF THIS LICENSE AGREEMENT? (Y/N): Y
-
플랫폼 목록 중 설치할 플랫폼을 선택합니다. (기본값: Linux x64)
==============================================================================
Choose Platform
---------------

Choose the operating system and architecture :
1)AIX 5.x, 6.x, 7.x PowerPC
2)Linux x64
Quit) Quit Installer

Choose Current System (Default: 2):
-
설치 디렉터리 경로를 입력합니다. (기본값: /home/test/anyapi1.0)
============================================================================== Installation Folder ------------------- Enter the installation folder. Default Install Folder: /home/test/anyapi1.0 ENTER AN ABSOLUTE PATH, OR PRESS <ENTER> TO ACCEPT THE DEFAULT : -
JDK의 위치를 입력합니다. (기본값: 자동으로 인식한 JDK의 위치)
==============================================================================
Enter the JDK path
-------------------

Enter the JDK path:

Enter the JDK path (Default: /usr/lib/jvm/java-11-openjdk-amd64):
-
설치 유형을 선택합니다. (기본값: Master Server)
===============================================================================
Installation type
-----------------

Please choose the Install Set to be installed by this installer.

  ->1- Master Server

ENTER THE NUMBER FOR THE INSTALL SET, OR PRESS <ENTER> TO ACCEPT THE DEFAULT
   :
-
설치 모드를 선택합니다. (기본값: Production Mode)
=============================================================================== Installation Mode ----------------- * Production Mode. - Disables JEUS Hot Swap. - Disables Automatic Reloading. - Displays a warning message and recommends using a full license if a demo license is used. ->1- Production Mode 2- Cancel ENTER THE NUMBER OF THE DESIRED CHOICE, OR PRESS <ENTER> TO ACCEPT THE DEFAULT: -
Domain Admin Server에 사용할 도메인 이름을 입력합니다. (기본값: domain1)
==============================================================================
input JEUS Environments :: JEUS Domain Name
-------------------------------------------

Enter the
- JEUS Domain Name
- Enter alphanumeric characters (case-sensitive).

Domain Name (Default: domain1):
-
Master Server의 이름을 입력합니다. (기본값: adminServer)
===============================================================================
input JEUS Environments :: Master Server Name
---------------------------------------------

Enter the
- Master Server Name
- Enter alphanumeric characters (case-sensitive).

Master Server Name (Default: adminServer):
-
Master Server 포트(Port) 정보를 입력합니다. (기본값: 9736)
===============================================================================
input JEUS Environments :: JEUS BASEPORT
----------------------------------------

Enter the
- JEUS BASEPORT
- Enter digits Only

JEUS BASEPORT (Default: 9736):
-
JEUS 관리자의 ID를 입력합니다. (기본값: administrator)
===============================================================================
input JEUS Environments :: Admin User Name
------------------------------------------

Enter the
- Admin User Name
- Enter alphanumeric characters (case-sensitive).

Admin User Name (Default: administrator):
-
JEUS 관리자의 비밀번호를 입력합니다. 설정한 비밀번호는 JEUS를 기동하는데 필요한 정보이므로 주의 깊게 입력해야 합니다.
===============================================================================
Password Input
--------------

Enter the Password for the administrator account.

Input Password::

Corfirm Password::
-
AnyAPI 서버가 사용하는 Repository DB의 유형을 선택합니다. (현재 Installer에서 지원 가능한 유형: MariaDB, DB2)
=============================================================================== Choose AnyAPI DBMS type ----------------------- ->1- MariaDB 2- DB2 ENTER THE NUMBER OF THE DESIRED CHOICE, OR PRESS <ENTER> TO ACCEPT THE DEFAULT: -
DB 이름을 입력합니다. (기본값: MASTER_DB)
===============================================================================
DataBase NAME
-------------


DB NAME (Default: MASTER_DB):
-
DB가 설치되는 LocalHost의 IP 값을 입력합니다. (기본값: 127.0.0.1)
===============================================================================
DataBase Server IP
-------------------


DB IP (Default: 127.0.0.1):
-
DB 포트를 입력합니다. (MariaDB 기본값: 3306, DB2 기본값: 60000)
==============================================================================
DataBase Port
-------------


Current DB Port (Default: 3306):
-
DB 사용자 이름을 입력합니다. (기본값: anyapi)
===============================================================================
DataBase User ID  (DEFAULT: anyapi):
------------------------------------


DB User ID (Default: anyapi):
-
DB 사용자의 비밀번호를 입력합니다. (기본값: anyapi)
===============================================================================
DataBase PassWord  (DEFAULT: anyapi):
-------------------------------------


DB User PassWord (Default: anyapi):
-
DB 스크립트의 실행 여부를 선택합니다. 처음 설치하는 경우 실행(YES)을 권장합니다.
=============================================================================== anyapi db-schema-generate ------------------------- ->1- YES 2- NO ENTER THE NUMBER OF THE DESIRED CHOICE, OR PRESS <ENTER> TO ACCEPT THE DEFAULT: -
설치에 관련한 요약 정보를 조회합니다. 각 항목을 확인하고 <ENTER> 키를 누릅니다.
=============================================================================== Pre-Installation Summary ------------------------ Review the Following Before Continuing: Product Name: AnyAPI 1.0 Install Folder: /home/test/anyapi1.0 Disk Space Information (for Installation Target): Required: 1,074,186,801 Bytes Available: 41,358,790,656 Bytes PRESS <ENTER> TO CONTINUE: -
설치가 진행되고, 진행 바를 통해 설치 진행률을 확인할 수 있습니다.
===============================================================================
Installing...
-------------

 [==================|==================|==================|==================]
 [------------------|------------------|------------------|------------------]
-
설치가 완료되면 설치 결과를 확인할 수 있습니다.
===============================================================================
Installation Complete
---------------------

AnyAPI 1.0 has been successfully installed to:

     /home/test/anyapi1.0

PRESS <ENTER> TO EXIT THE INSTALLER:
필수 라이브러리 추가
스테이지 배포를 위해 아래의 경로에 필수 라이브러리들을 추가해야 합니다.
/home/{$USER NAME}/anyapi1.0/domains/domain1/lib/application다음은 추가해야 할 필수 라이브러리에 대한 설명입니다.
| 라이브러리 | 설명 |
|---|---|
failureaccess-1.0.1.jar |
Java의 내부 동작과 예외 처리에 관련된 접근 권한을 제공하는 라이브러리 |
guava-20.0.jar |
Java 애플리케이션을 보다 효율적으로 개발 가능하도록 지원하는 라이브러리 |
guava-concurrent-19.0.0.jar |
Guava 라이브러리의 일부이며, Java의 동시성 프로그래밍에 관련된 유틸리티 클래스와 기능을 제공하는 라이브러리 |
protobuf-java-3.8.0.jar |
프로토콜 버퍼 메시지 생성, 수정, 분석하는데 필요한 도구를 제공하는 라이브러리 |
protobuf-java-util-3.6.1.jar |
메시지 조작 및 직렬화/역직렬화 작업의 처리를 지원하는 라이브러리 |
설치 확인
설치 및 필수 라이브러리 추가가 완료되면 정상적으로 기동되는지 확인합니다.
웹 어드민 접속
AnyAPI Webadmin에 정상적으로 접속이 되는지 확인합니다.
-
Master Server 기동
JEUS Master Server를 기동합니다.
-
사용법
$startMasterServer -domain <domain_name> -u administrator -p <password>인자 설명 <domain_name>
Domain Admin Server에 사용할 도메인 이름
<password>
JEUS 관리자의 비밀번호
-
예시
$startMasterServer -u administrator -p administrator -domain domain1 -server adminServer
-
-
Managed Server 기동
Managed Server를 기동합니다. Managed Server의 경우 AnyAPI 설치 시 자동으로 설치되며, JEUS Webadmin 접속 후 [서버] 탭에서 확인이 가능합니다.
-
사용법
$startManagedServer -domain <domain_name> -server <server_name> -u administrator -p <password>인자 설명 <domain_name>
Domain Admin Server에 사용할 도메인 이름
<server_name>
Managed Server의 이름 (server1로 고정)
<password>
JEUS 관리자의 비밀번호
-
예시
$startManagedServer -domain domain1 -server server1 -u administrator -p administrator -masterurl 192.168.15.60:4000
-
-
JEUS WebAdmin 접속
Master Server가 정상적으로 기동되었다면 웹 브라우저의 주소 입력란에 다음과 같이 JEUS WebAdmin 접속 주소를 입력합니다.
http://{server ip}:9736/webadmin다음과 같이 로그인 화면이 나타나면 아이디와 비밀번호를 입력한 후 [로그인] 버튼을 클릭합니다. 이때 기본적으로 아이디와 비밀번호는 모두 admin으로 설정되어 있습니다.
 JEUS WebAdmin 로그인 화면
 -
JEUS 서버 상태 확인
JEUS WebAdmin 메인 화면의 [서버] 탭에서 adminServer와 server1의 Status가 RUNNING 상태인지 확인합니다.
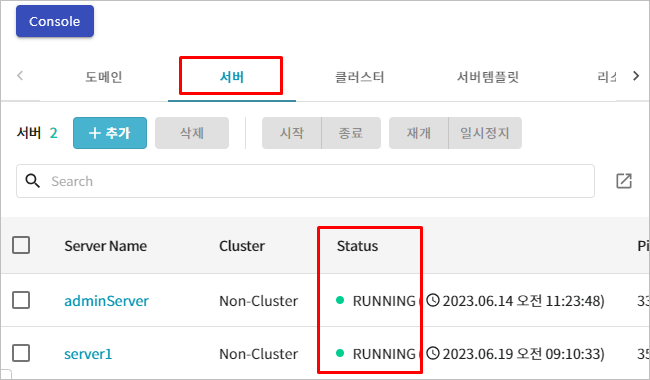 JEUS Webadmin 메인 화면 - [서버] 탭
 -
애플리케이션 상태 확인
JEUS WebAdmin 메인 화면의 [애플리케이션] 탭에서 AnyAPI 설치 시 자동으로 배포된 애플리케이션(AnyAPI MASTER, AnyAPI ADMIN)의 상태가 RUNNING 상태인지 확인합니다.
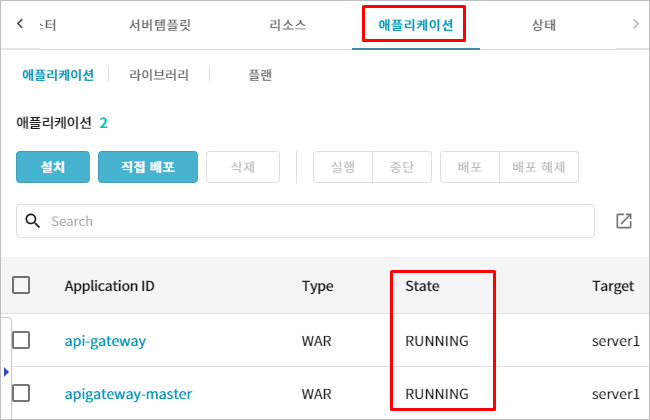 JEUS Webadmin 메인 화면 - [애플리케이션] 탭
 -
AnyAPI WebAdmin 접속
JEUS WebAdmin을 통해 애플리케이션이 정상적으로 배포된 것을 확인한 후 웹 브라우저의 주소 입력란에 다음과 같이 AnyAPI WebAdmin 접속 주소를 입력합니다.
이때 Port는 1180으로 고정이며, Context Path는 api-gateway로 설정되어 있습니다.http://{server ip}:1180/api-gateway다음과 같이 로그인 화면이 나타나면 아이디와 비밀번호를 입력한 후 [로그인] 버튼을 클릭합니다. 이때 기본적으로 아이디와 비밀번호는 모두 anyapi로 설정되어 있습니다.
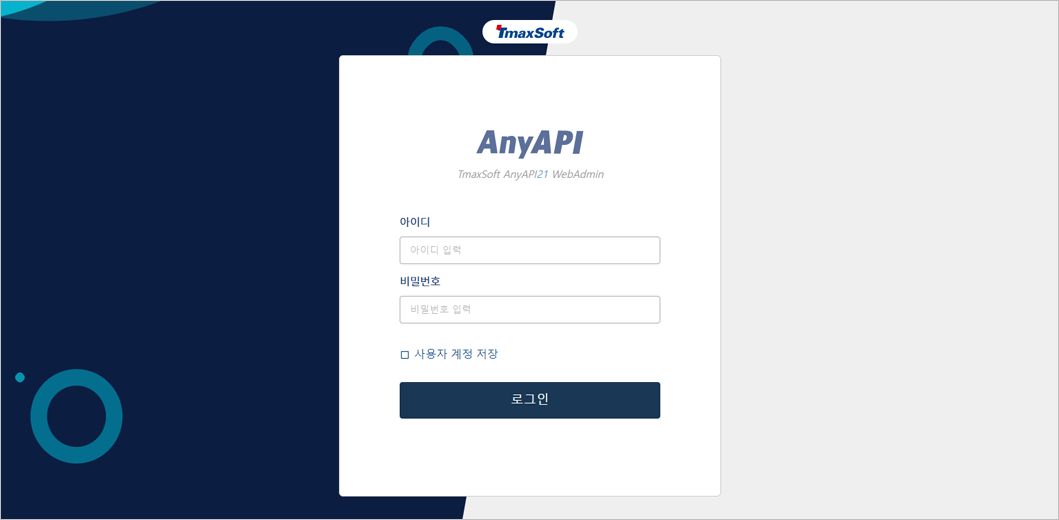 AnyAPI WebAdmin 로그인 화면
게이트웨이 디렉터리 구조
게이트웨이는 AnyAPI 인스톨러 설치 시 자동으로 설치됩니다.
설치가 완료되면 다음의 디렉터리 구조가 설치 경로에 생성됩니다.
${GATEWAY_HOME}
     |---- bin
     |---- inc
|---- lib- bin
-
실행 파일이 있는 폴더입니다.
- inc
-
게이트웨이 헤더 파일이 위치한 폴더입니다.
- lib
-
게이트웨이 실행에 필요한 라이브러리들이 있는 폴더입니다.
게이트웨이 기동 및 종료
API Gateway 엔진의 기동 및 종료가 정상적으로 수행되는지 확인합니다. 각 명령어는 tagw 파일이 있는 경로에서만 적용 및 확인이 가능합니다.
|
Alias 등록을 통해 API Gateway 엔진의 기동 및 종료 명령을 간략하게 사용할 수 있습니다. |
-
기동
다음의 명령어를 실행해서 API Gateway를 기동합니다.
[test@soft-sqa2:~/anyapi1.0/gateway/bin$]$ ./gwboot -c /home/test/anyapi1.0/gateway/config/defaultApiGateway1.0 -b -
종료
다음의 명령어를 실행하여 엔진을 종료합니다.
[test@soft-sqa2:~/anyapi1.0/gateway/bin$]$ ./gwdown
제거
설치된 AnyAPI 서버를 삭제합니다.
다음은 콘솔 모드에서 AnyAPI를 삭제하는 과정에 대한 설명입니다.
-
AnyAPI가 설치된 경로에서 $AnyAPI_HOME/UninstallerData/AnyAPI 1.0/Uninstall을 실행하여 AnyAPI 설치 디렉터리를 삭제합니다.
anyapi@soft-sqa2:~/anyapi1.0/UninstallerData/AnyAPI 1.0$ ./Uninstall
-
삭제 과정이 진행됩니다. 제거가 완료되면 완료되었다는 메시지가 표시됩니다.
===============================================================================
AnyAPI 1.0                                        (created with InstallAnywhere)
-------------------------------------------------------------------------------

Preparing CONSOLE Mode Uninstallation...


===============================================================================
Uninstall AnyAPI 1.0
-------------------

About to uninstall...

AnyAPI 1.0

This will remove features installed by InstallAnywhere.  It will not remove
files and folders created after the installation.

PRESS <ENTER> TO CONTINUE:


===============================================================================


Please Wait
-----------

Check JEUS process...
-

===============================================================================
Uninstalling...
---------------


...*
*
*************************
*************************
*************************
************************
...*
*
*************************
*************************
*************************
************************
...*
*
*************************
*************************
*************************
************************
...*
*
*************************
*************************
*************************
************************
...*
*
*************************
*************************
*************************
************************
...*
*
*************************
*************************
*************************
*************************


===============================================================================
Uninstallation Complete
-----------------------

All items were successfully uninstalled.