Basic Functions
This chapter describes how to use the WebTerminal.
1. Screen UI
The following figure shows the WebTerminal page, wsgateway.html, that is the main client page displayed when you connect to the OpenFrame GW server.
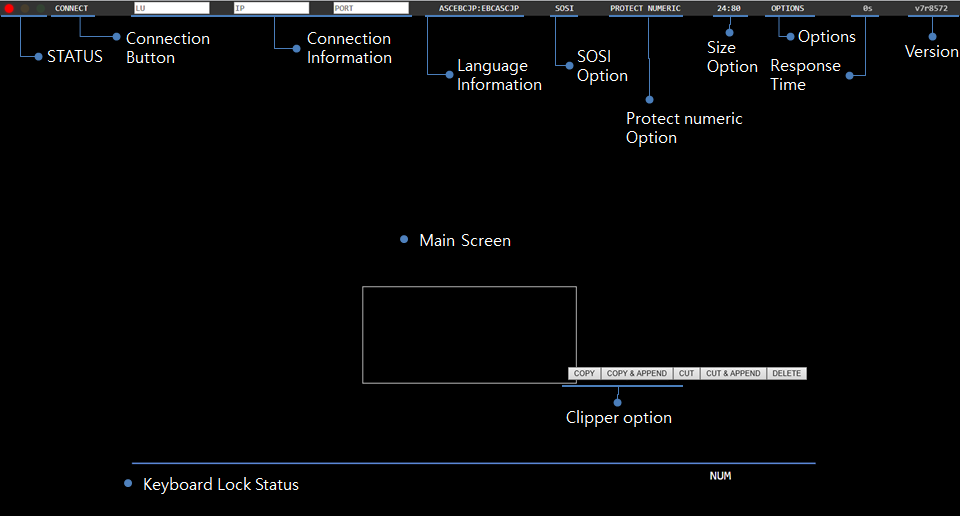
The following describes each screen element.
-
Menu Bar
Menu bar consists of CONNECT, SETTINGS, INFO sections that contain client menu items.
-
CONNECT section
Item Description Displays the current WebTerminal status. Click on a button to change the connection status.
Connects to OpenFrame GW.
LU, IP, and PORT of the target server.
-
SETTINGS section
Item Description CPM table used for data processing.
SOSI character processing option.
Controls the type of input value in the NUMERIC input field.
Controls the screen size.
Consists of SHORTCUT, COPY SCREEN, KEYBOARD, NUMPAD, and KEYPAD menu items.
-
INFO section
Item Description Time elapsed for processing each page request (unit: sec).
WebTerminal version info.
-
-
Main Screen
Main screen is displayed as an HTML frame that displays the data from OpenFrame server in HTML. Displays the server data in HTML format when connecting to OpenFrame. You can select the clipper options by dragging the output screen. The options in the selected area include copy (COPY), add after current clipboard (COPY & APPEND), cut (CUT), cut and add after current clipboard (CUT & APPEND), and delete (DELETE).
[PASTE] is displayed by right-clicking and you can enter the clipboard contents in the input field by clicking the button.
Reading clipboard data (PASTE, COPY & APPEND, CUT & APPEND) are disabled when clipboard data cannot be read (if HTTPS is not used in a browser other than IE or access to clipboard data is blocked).
-
Keyboard Status
 Status Bar for Keyboard Input Mode
Item Description Keyboard Lock Status
When attempting to connect or waiting for a response for a user request, the WebTerminal is switched to Keyboard Lock state. In this state, 'X SYSTEM' is displayed at the left of the status bar and the input fields are locked to prevent user input.
As when the FREEKB option is omitted, the <L-Ctrl> key can unlock the Keyboard Lock to exit from the 'X SYSTEM' state.
Insert Status
Current keyboard insert mode. Use the <Insert> key to turn insert mode on and off.
When insert mode is off, the cursor overwrites text in the current location when typing. If insert mode is on, 'INSERT' is displayed on the status bar and the cursor inserts a character at its current position pushing all characters after it one position further. If the cursor is at the end of the field, input is ignored.
Caps Lock Status
Caps lock status. If Caps Lock is on, 'CAPS' is displayed on the status bar. If the caps_lock item is set in the properties file, 'CAPS' is always displayed.
Numlock Status
Numlock status. When Numlock status is on, 'NUM' is displayed.
2. CONNECT
The CONNECT section consists of the Status Indicator, [CONNECT] button, and LU Name, IP, and PORT input fields.

The following describes each item.
-
Status Indicator
Click on a button to change the current connection status.
Item Description 
Disconnected state. Click on the button to connect to OpenFrame GW.

Attempting to connect or waiting for a response to a user request.

Connected or received a response to a user request. Click on the button to disconnect from OpenFrame GW.
-
[CONNECT]/[DISCONNECT]
-
[CONNECT]
Connects to the server by using the settings in the ofgw.properties file as shown below. For information about the settings, refer to OpenFrame GW Administrator’s Guide.
gw.name =gateway_name
 :
lu.autoalloc = {yes|no}
 :
Item Description lu.autoalloc
-
yes: if LU Name is not specified, use the auto-allocated LU Name to connect to the server (default value).
-
no: LU Name is required to connect to the server.
If [CONNECT] is pressed without specifying the LU Name field, the following warning message is displayed.
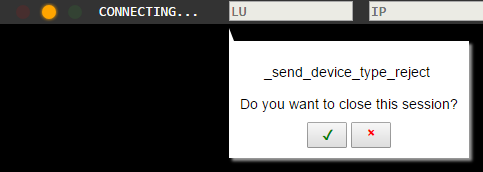 Connect - Warning Message (1)
If an already connected LU name is specified, the following warning message is displayed.
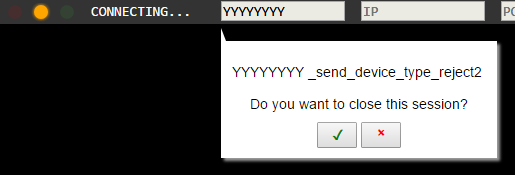 Connect - Warning Message (2)
 -
-
[DISCONNECT]
Disconnects from the server. If JEUS shuts down, the WebTerminal screen is initialized and changed to the DISCONNECT state. When JEUS starts up again, the page must be refreshed to reconnect to the server.
If the browser is closed without clicking [DISCONNECT], browser termination message is displayed and the server connection is also closed.
-
-
Connection Info
Item Description LU
LU (Logical Unit) name of the target server.
Up to 8 alphanumeric characters allowed.
If lu.autoalloc is set to 'yes' in ofgw.properties, leave this blank.
IP
IP address of the target gateway server.
If only LU Name is specified, the IP and PORT are read from ofgw.properties.
PORT
Port number of the target gateway server.
If only LU Name is specified, the IP and PORT are read from ofgw.properties.
3. SETTINGS
This section describes the functions of the SETTINGS section and the settings that can be configured from the WebTerminal.

3.1. LANGUAGE
WebTerminal uses the CPM table to convert user input from EBCDIC to ASCII and output it on screen. The user can also select a language option for the CPM table.
| Item | Description |
|---|---|
ASCEBCUS:EBCASCUS |
CPM table for English. |
ASCEBCJP:EBCASCJP |
CPM table for Japanese. |
ASCEBCKR:EBCASCKR |
CPM table for Korean. |
ASCEBCFI:EBCASCFI |
CPM table for Finnish. |
ASCEBCFR:EBCASCFR |
CPM table for French. |
ASCEBCTW:EBCASCTW |
CPM table for Taiwanese. |
The language option can be preconfigured with the cpm item in the webterminal.properties file and is used as the default setting when the WebTerminal starts up. For more information, refer to Configuration File.
3.2. SOSI Option
The SOSI option is used to select the appropriate data conversion method depending on whether or not the map contains a hexadecimal that points to SOSI. Click [SOSI] to enable or disable this option.
| Item | Description |
|---|---|
|
Display SOSI from the map to the terminal as space. |
|
Does not display SOSI from the map to the terminal as null. |
The SOSI option can be preconfigured with the sosi item in the webterminal.properties file and is used as the default setting when the WebTerminal starts up. For more information, refer to Configuration File.
3.3. PROTECT NUMERIC Option
When the attribute of an unprotected input field includes a numeric attribute that allows only numbers to be entered, it determines the processing of character input in the corresponding field. Click [PROTECT NUMERIC] to enable or disable this option.
| Item | Description |
|---|---|
|
Allows to enter only numbers (-.0123456789). |
|
Allows to enter characters other than numbers (-.0123456789). |
The PROTECT NUMERIC option can be preconfigured with the protect_numeric item in the webterminal.properties file and is used as the default setting when the WebTerminal starts up. For more information, refer to Configuration File.
3.4. Size Option
The size option sets the screen size.
| Item | Description |
|---|---|
|
24 rows x 80 columns. Alternate screen size for EWA (Erase/Write Alternate) commands is set to 24 rows and 80 columns. |
|
24 rows x 80 columns. Alternate screen size for the EWA (Erase/Write Alternate) command is set to 32 rows and 80 columns. |
|
24 rows x 80 columns. Alternate screen size for the EWA (Erase/Write Alternate) command is set to 43 rows and 80 columns. |
|
24 rows x 80 columns. Alternate screen size for the EWA (Erase/Write Alternate) command is set to 27 rows and 132 columns. |
The size option can be preconfigured with the size item in the webterminal.properties file and is used as the default setting when the WebTerminal starts up. For more information, refer to Configuration File.
3.5. OPTIONS
[OPTIONS] menu consists of [SHORTCUT], [COPY SCREEN], [KEYBOARD], [NUMPAD], and [KEYPAD] menu items.
-
[SHORTCUT] Menu
Click [OPTIONS] > [SHORTCUT] to create or edit a shortcut.
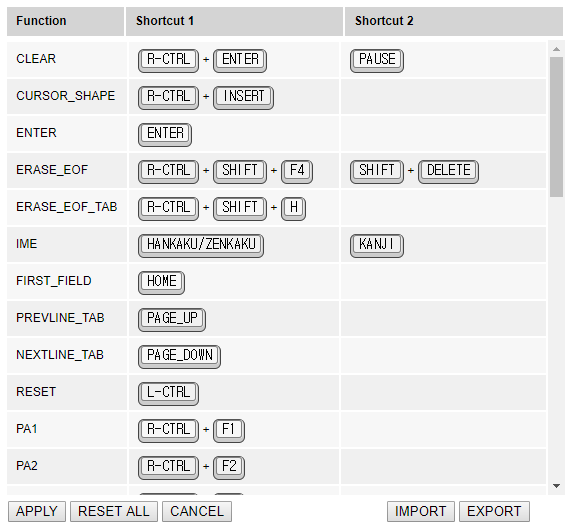 [SHORTCUT] Screen
The following describes the shortcut functions.
Function Description AID Key
Executes the predefined function.
-
CLEAR
-
ENTER
-
PA1 ~ PA3
-
PF1 ~ PF24
-
RESET
Other
Any key other than the AID Key.
-
CURSOR_SHAPE: changes the cursor shape to a block.
-
ERASE_EOF: clears the current field from the current cursor location to the end of the field.
-
ERASE_EOF_TAB: clears the current field from the current cursor location to the end of the field, and then moves the cursor to the next field.
-
IME: displays the Input Method Editor used to change the language setting. It can be used only when use_ime_input=true is defined in webterminal.properties.
-
FIRST_FIELD: moves the cursor to the first field of the terminal.
-
NEXTLINE_TAB: moves the cursor to the first field of the next row.
-
PREVLINE_TAB: moves the cursor to the first field of the previous row.
-
HELP: displays the help window for the current screen. It can be used only when help_url is defined in webterminal.properties.
-
DISCONNECT: Displays 'Terminate connection' window.
-
SELECT_ALL: Displays the clipper options after selecting the entire screen.
Two types of control keys are:
-
L-CTRL: left control key
-
R-CTRL: right control key
Change a shortcut as follows:
-
Click the Shortcut 1 or Shortcut 2 cell of the function to set. This clears the cell. Up to 2 shortcuts can be set for each function.
-
Press a keyboard combination. The combination is displayed as icons in the cell.
-
To apply the change, click [APPLY]. The information is stored in the browser’s local storage. If the local storage is initialized, the shortcut information is also initialized.
-
To initialize the shortcut information, click [RESET ALL]. It is not applied until you click [APPLY].
-
To cancel the change and close the [SHORTCUT] screen, click [CANCEL].
-
To import a shortcut information file, click [IMPORT]. It is not applied until you click [APPLY] .
-
To export shortcut information to a local computer file, click [EXPORT].
If there is a conflict in shortcut settings when clicking [APPLY], the change is not applied. If a function’s shortcut is included at the beginning of another function’s shortcut, a conflict occurs. For example, if PAUSE is used for CLEAR and PAUSE + SCROLL_LOCK is used for CURSOR_SHAPE, a conflict occurs because a function to perform cannot be selected when pressing PAUSE.
-
-
[COPY SCREEN] Menu
Click [OPTIONS] > [COPY SCREEN] to copy the current screen to the clipboard as text which can be copied to a text editor such as Notepad, Word, or WordPad.
-
[KEYBOARD] Menu
Click [OPTIONS] > [KEYBOARD] to display the KEYBOARD popup. Use the mouse to input from the KEYBOARD and drag it with the mouse to move it to another location in the browser.
 [KEYBOARD] Pop-up
 -
[NUMPAD] Menu
Click [OPTIONS] > [NUMPAD] to display the NUMPAD popup. Use the mouse to input a number from the NUMPAD and drag it with the mouse to move it to another location in the browser.
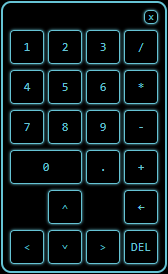 [NUMPAD] Pop-up
 -
[KEYPAD] Menu
Click [OPTIONS] > [KEYPAD] to display the KEYPAD popup that consists of the keys PF1 ~ PF24, PA1 ~ PA3, RESET, CLEAR, and ENTER. Drag the KEYPAD with the mouse to move it to another location in the browser.
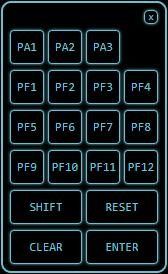 [KEYPAD] Pop-up
4. INFO
Information about the WebTerminal is displayed to the right of the screen.

-
Response Time
Response Time, second item from the right on the Menu Bar, displays the system response time in seconds.
-
Version Information
WebTerminal version, right most item on the Menu Bar, is displayed as Major+Revision.


