Batch
This chapter describes the key features of the [Batch] menu in OpenFrame Manager.
1. Overview
[Batch] displays various OpenFrame/Batch functions grouped by function in a single page, and the user can interact with the server through the web browser. It also manages the web server that communicates with the OpenFrame/Batch server.
For user convenience, Batch Manager provides a friendly and easy-to-use GUI for tasks that were performed through the tjesmgr command tool. These tasks include job execution and monitoring, dataset creation, modification, deletion, and querying, and JCL Runner administration.
Click [Batch] at the top and then click a menu from the left navigation pane.
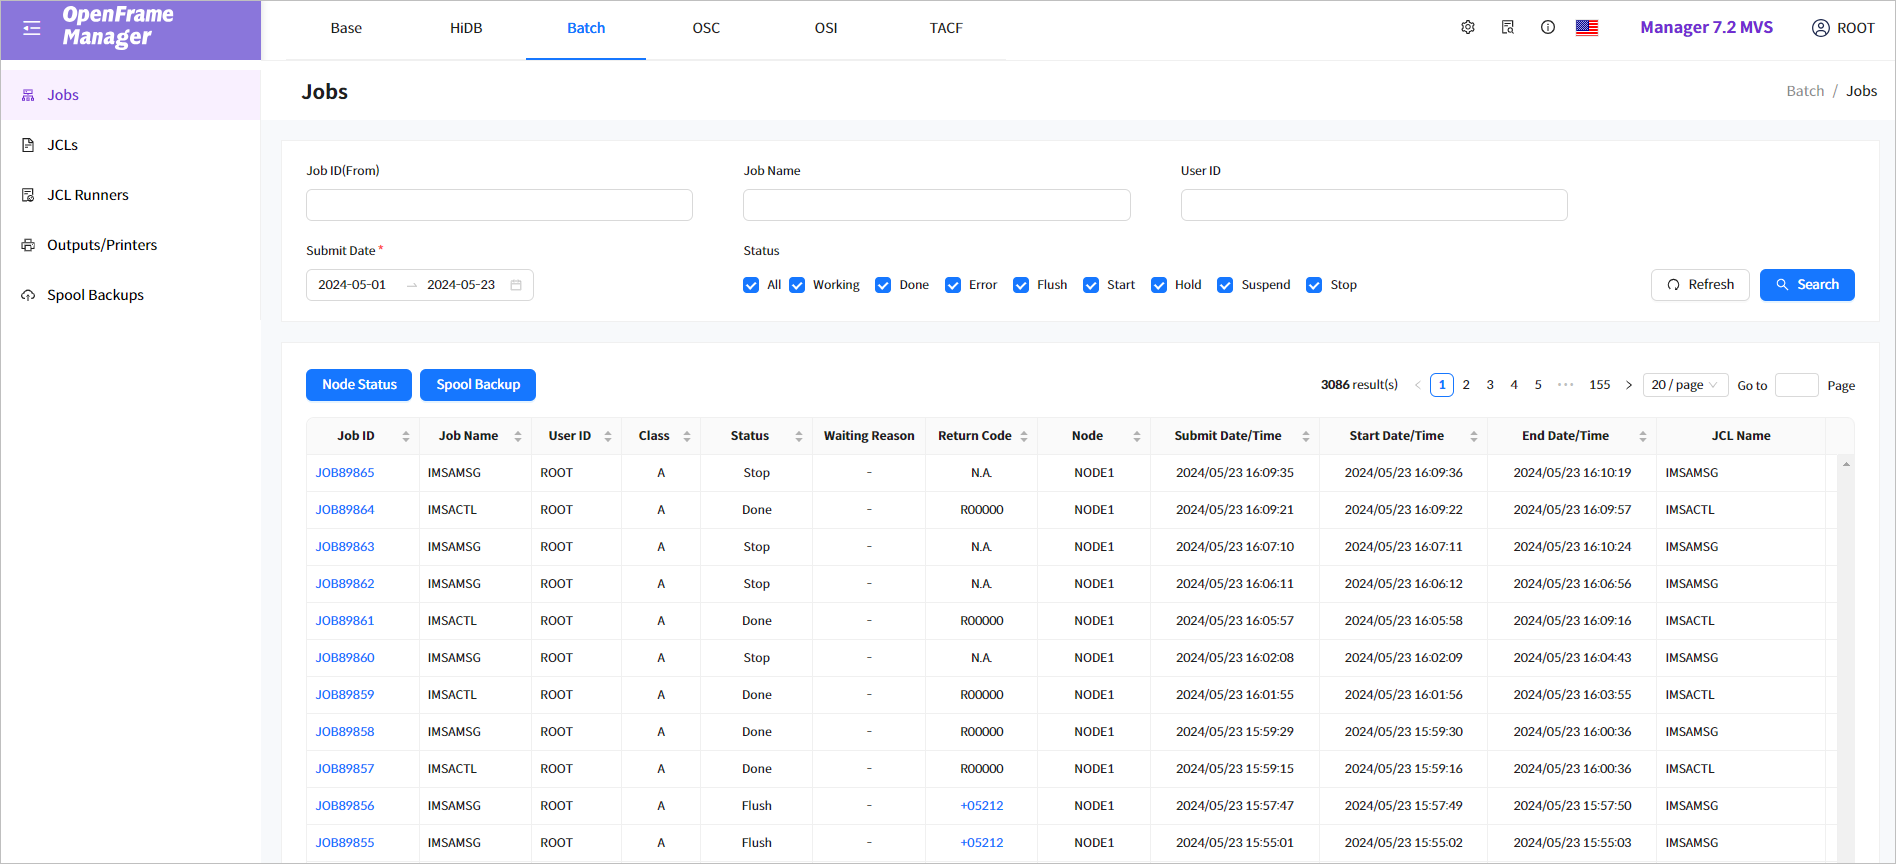
The following describes the menus in the navigation pane.
| Menu | Description |
|---|---|
Display a list of jobs, and manage jobs such as changing job status. |
|
Display a list of JCLs, and view, submit, or start (from a specific step) a JCL, or run SCAN/JEM on a JCL. |
|
Display a list of submitted JCLs, and change the status and Runner class of a JCL. |
|
Display a list of outputs and printers. |
|
Display a list of spool backups by date and Job ID. |
|
Search for spools whose Output class is W and view their contents. |
2. Jobs
Click Jobs from the navigation pane to display a list of jobs and manage individual jobs. The user can view a job’s details including information about the JCL that submitted the job and the job spool, and change the job status.
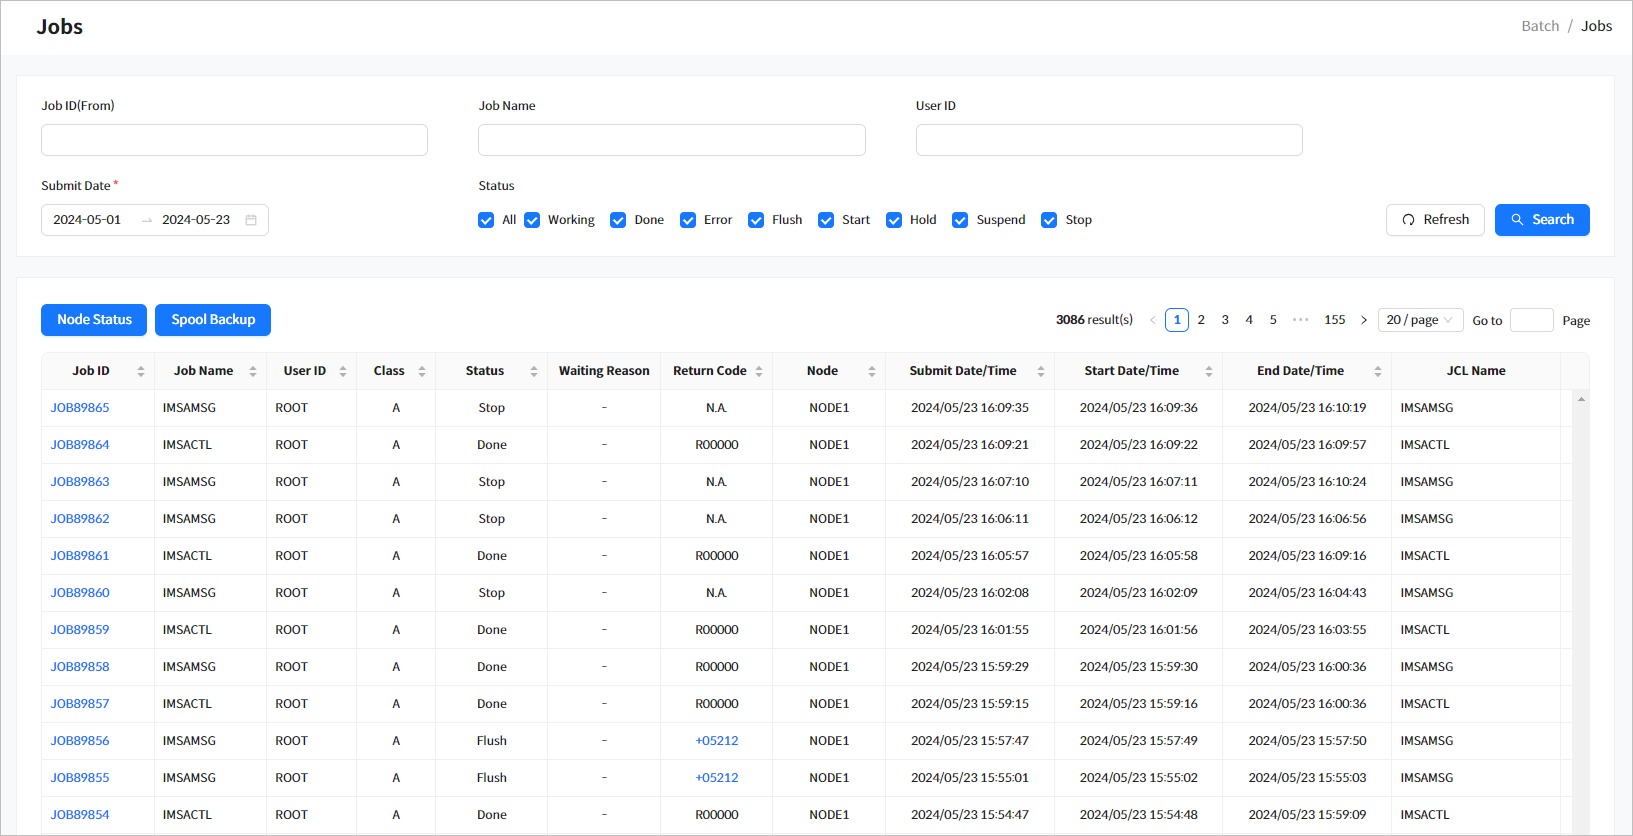
Enter the search conditions from the Jobs page and then click [Search] to display the results. If no conditions are specified, the search is performed for the default date range set ('Submit Date'). To refresh the list, click [Refresh] above the list.
-
Search Conditions
The following describes the job search conditions.
Item Description Job ID (From)
Job ID.
Searches for IDs that start with 'XXX' using wildcard (*) operator. A list of jobs that match the Job ID (JOBXXXXX or J0XXXXXX format where X is a number) condition is retrieved.
User ID
User ID. This is the Exec ID that ran the job. To search the user ID, the wildcard (*) can be used.
Job Name
Job name (full match).
Job Status
Job status.
Check All to select all options. By default, all options are selected.
Submit Date
Searches for jobs that were submitted or started between the specified dates.
-
Search Results
The following describes the search result columns. For more information about each item, refer to Job Details.
Column Description Job ID
Job ID.
Click this to go to the Job Details page ([Batch] - Job Details). For more information about the page, refer to Job Details.
Job Name
Job name.
User ID
User ID. This is the Exec ID that ran the job.
Class
JOB CLASS.
Status
Current job status.
-
Working
-
Done
-
Error
-
Flush
-
Start
-
Hold
-
Suspend
-
Stop
Waiting Reason
Reason for wait when the job is in the wait state.
Return Code
Return code.
If enabled, click this to open the Error Code Search window ([Batch] - Jobs - Error Code Search).
Node Name
Node where the job is executed.
Submit Date/Time
Submit date/time of the job.
Start Date/Time
Start date/time of the job.
End Date/Time
End date/time of the job.
JCL Name
JCL that submitted the job. Since JCL can be modified immediately in OpenFrame Manager, create a temporary file in a pre-specified directory and then submit it to keep the original JCL.
When you click an enabled return code, the following Error Code Search window opens.
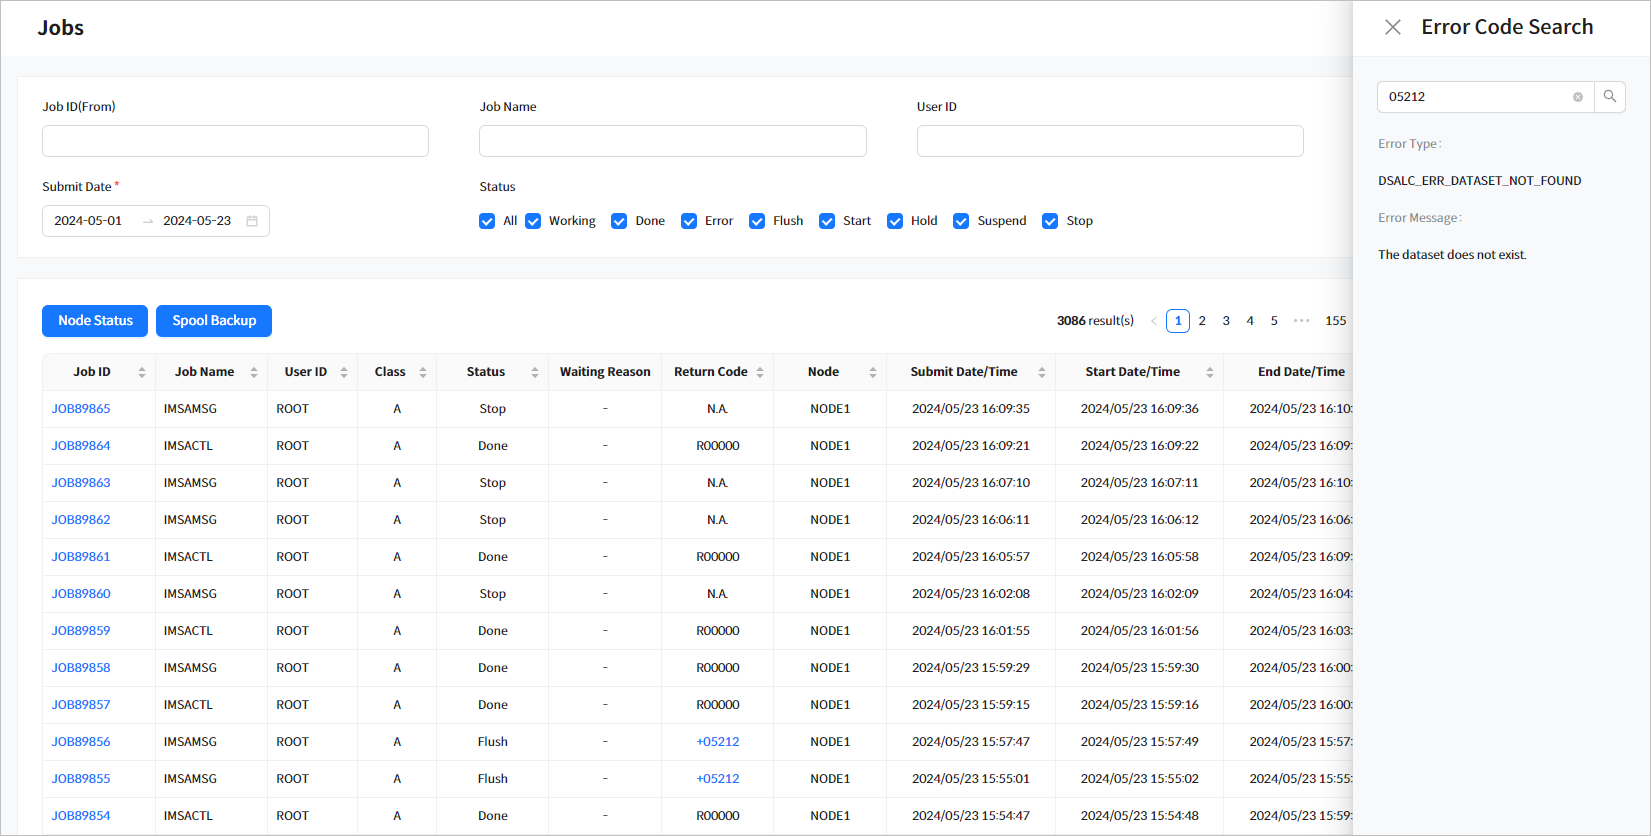 [Batch] - Jobs - Error Code Search
 -
-
Tool Buttons
The following describes the buttons above the Jobs list.
Button Description [Node Status]
Displays TJES server status by node ([Booted] or [Downed]), or boots/shuts down a node.
[Spool Backup]
Backs up the job spool. The result can be checked from the [Spool Backups] menu.
Enter either the start and end Job IDs or Submit Data/Time to insert the backup command.
-
[Job ID]: back up jobs with IDs between the entered start and end IDs.
-
[Submit Date/Time]: back up the spool of Jobs submitted until the date/time.
-
2.1. Job Details
Click a Job ID from the Jobs list in the Jobs page ([Batch] - Jobs) to go to the Job Details page. Click the [<] icon before the page title to return to the previous page. The page is refreshed every second for a job in progress. To view the latest information, click the [Refresh] button to the right of Job ID.
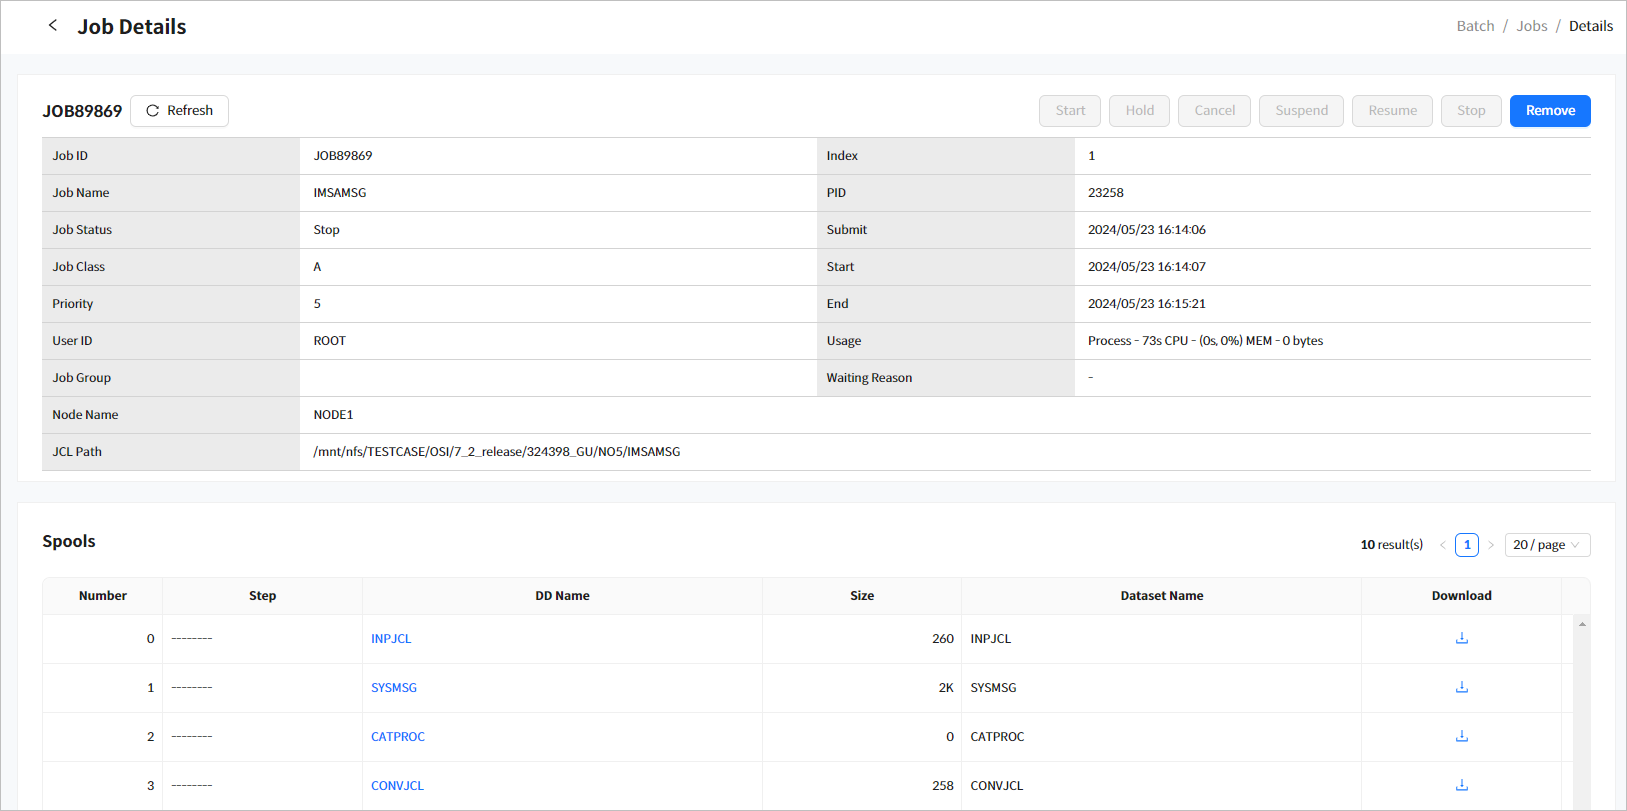
The Job Details page consists of the following sections.
Job Information
Displays detailed information about a job and provides a tool strip bar at the top right for job management.

-
Search Items
The following describes each item.
Item Description Job ID
Job ID.
Job Name
Job name.
Job Status
Job status.
-
Working
-
Done
-
Error
-
Flush
-
Start
-
Hold
-
Suspend
-
Stop
Job Class
Job class.
Priority
Job priority.
User ID
User ID that ran the job.
Job Group
Job group.
Node Name
Nod that executed the job.
Index
Runner slot index of the running job.
PID
Process ID.
Submit
Date/time when the job was submitted.
Start
Start date/time of job execution.
End
End date/time of job execution.
Usage
Resource usage of the job.
Waiting Reason
Reason for wait if the job is in wait state.
-
None: reason is unknown.
-
Already Lock: dataset is already locked.
-
Job Name Duplicate: there is a duplicate job name.
JCL Path
Path of JCL that submitted the job.
-
-
Buttons
Use the buttons in the tool strip at the top right to change the job status. The available statuses for change depend on the current job status.
The following describes each button in the tool strip.
Button Description [Start]
Enabled if 'Job Status' is 'Hold'.
[Hold]
Enabled if 'Job Status' is 'Start'.
[Cancel]
Enabled if 'Job Status' is 'Start' or 'Hold'
[Suspend]
Enabled if 'Job Status' is 'Working'.
[Resume]
Enabled if 'Job Status' is 'Suspend'.
[Stop]
Enabled if 'Job Status' is 'Working' or 'Suspend'.
[Remove]
Enabled if 'Job Status' is 'Done', 'Flush', 'Error', or 'Stop'.
|
Permissions for changing the job status is authenticated through TACF. For more information about changing the job status, refer to "Chapter 2 JOB Management" in OpenFrame TJES Guide. |
Spools
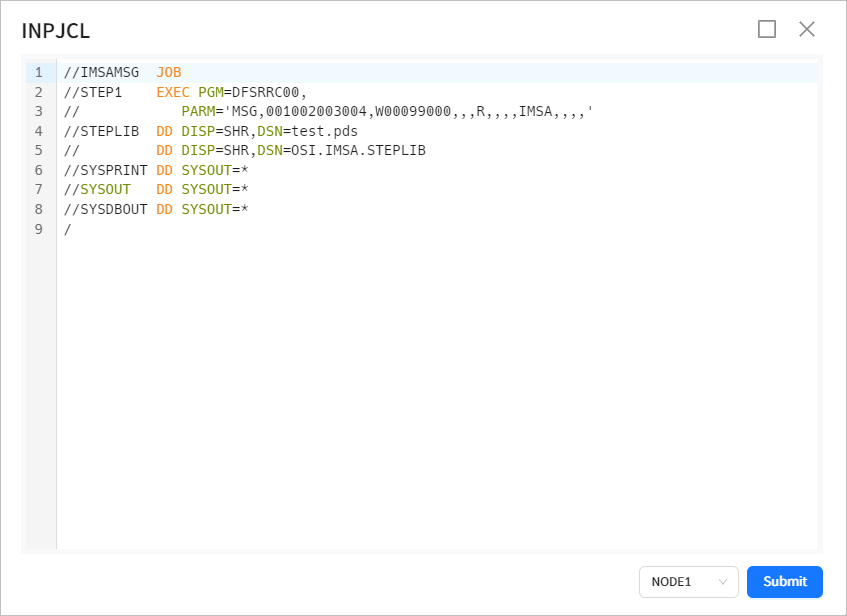
Displays information about job spools. Click a spool from the list to open the Viewer ([Batch] - Job Details - Spool Viewer) window.
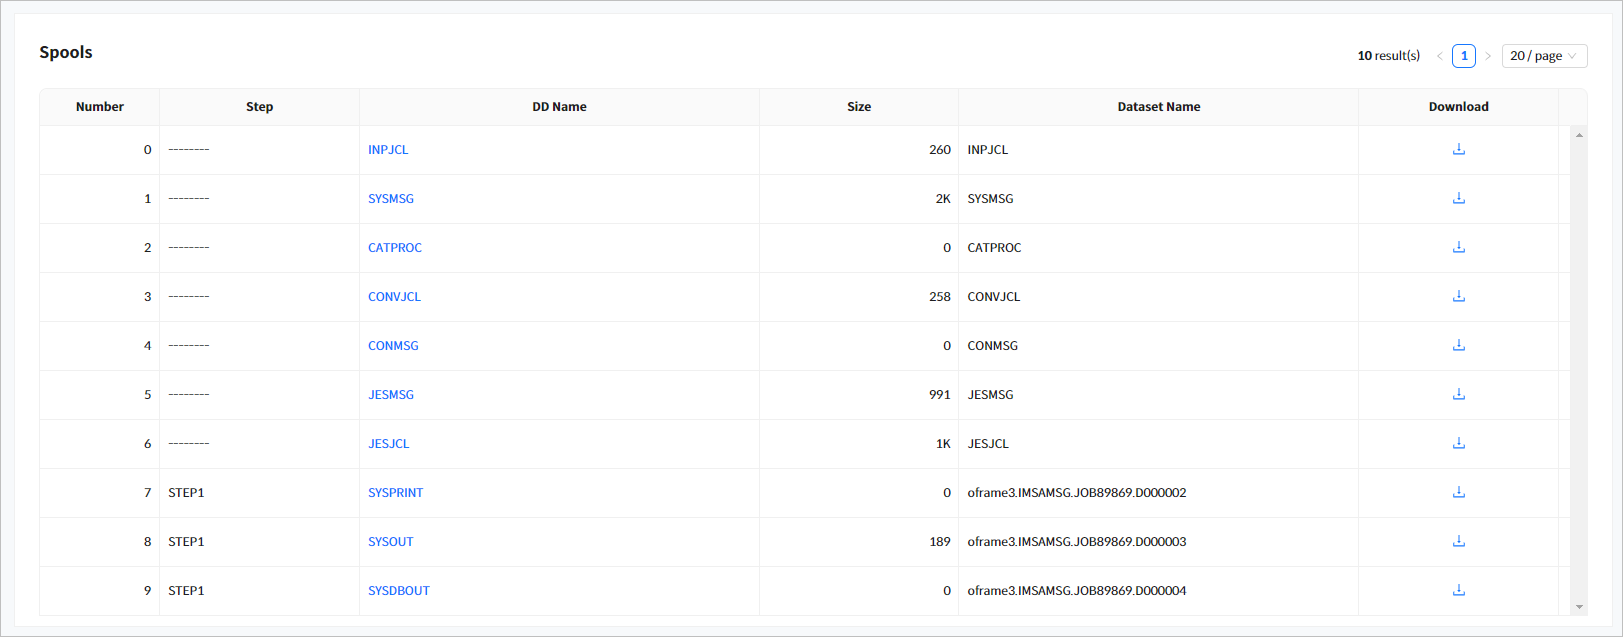
The following describes each item.
| Item | Description |
|---|---|
Number |
Serial number. |
Step |
Step name. |
DD Name |
DD name specified in the JCL. To view the details of the spool in the Spool Viewer window, click 'DD Name'. (refer to [Batch] - Job Details - Spool Viewer) |
Size |
Spool file size. (Unit: byte) |
Dataset Name |
Dataset name specified in the JCL that records the spool. |
Download |
The contents of each spool are saved as text by clicking the icon on each row. |
The following is the Spool Viewer dialog box that appears when clicking 'INPJCL' in 'DD Name' of the spool list.
Steps
Displays information about each job step.

The following describes each item.
| Item | Description |
|---|---|
Steps |
Step name. |
RCODE |
Return code (exit code). |
Start |
Start date/time of the step. |
End |
End date/time of the step. |
CPU |
CPU time spent executing the step. (Unit: sec) |
Processor time |
Processor time spent executing the step. (Unit: sec) |
DDs
Displays information about DDs in each step.

The following describes each item.
| Item | Description |
|---|---|
Steps |
Step name. |
DD Name |
DD name. |
Dataset Name |
Dataset name. |
Insert |
Number of records inserted into the data set during the job. |
Retrieve |
Number of records retrieved from the data set during the job. |
Update |
Number of records updated in the data set during the job. |
Delete |
Number of records deleted from the data set during the job. |
3. JCLs
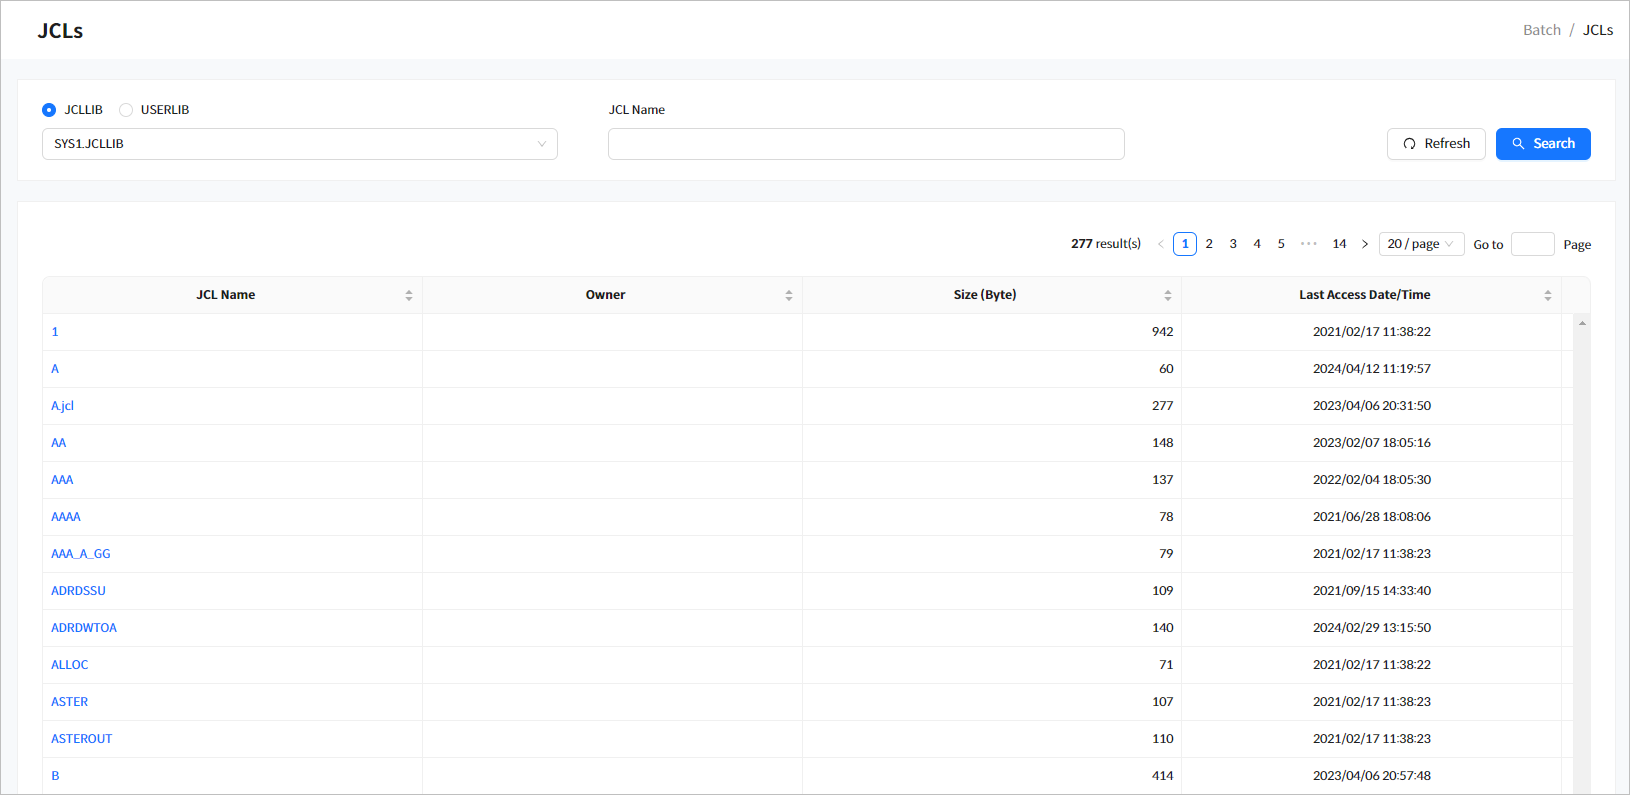
Click JCLs from the navigation pane to display a list of JCLs for the selected dataset. The user can click a JCL Name to view JCL details, and use the Run, Start from Step, Scan, and JEM functions.
Enter the search conditions from the JCLs page and then click [Search] to display the results. If no conditions are specified, all JCLs in the default JCL library (SYS1.JCLLIB) are displayed. Click [Refresh] to refresh the list.
-
Search Conditions
The following describes the JCL search conditions.
Item Description JCLLIB/USERLIB
JCL library. This is the library specified in the JCLLIB/USERLIB setting under the PROCLIB section in the tjes subject of openframe_batch.conf file.
JCL Name
JCL name. (LIKE prefix search)
Fore more information about openframe_batch.conf file, refer to OpenFrame Configuration Guide.
-
Search Results
The following describes the search result columns.
Column Description JCL Name
JCL name. Click this to go to the JCL Details page ([Batch] - JCLs - JCL Details (1)). For more information, refer to JCL Details.
Owner
File owner.
Size (Byte)
File size. (Unit: bytes)
Last Accessed Date/Time
Last date/time the JCL was accessed.
3.1. JCL Details
Click a Name from the JCLs list in the JCLs page ([Batch] - JCLs) to go to the JCL Details page. Click the [<] icon before the page title to return to the previous page.
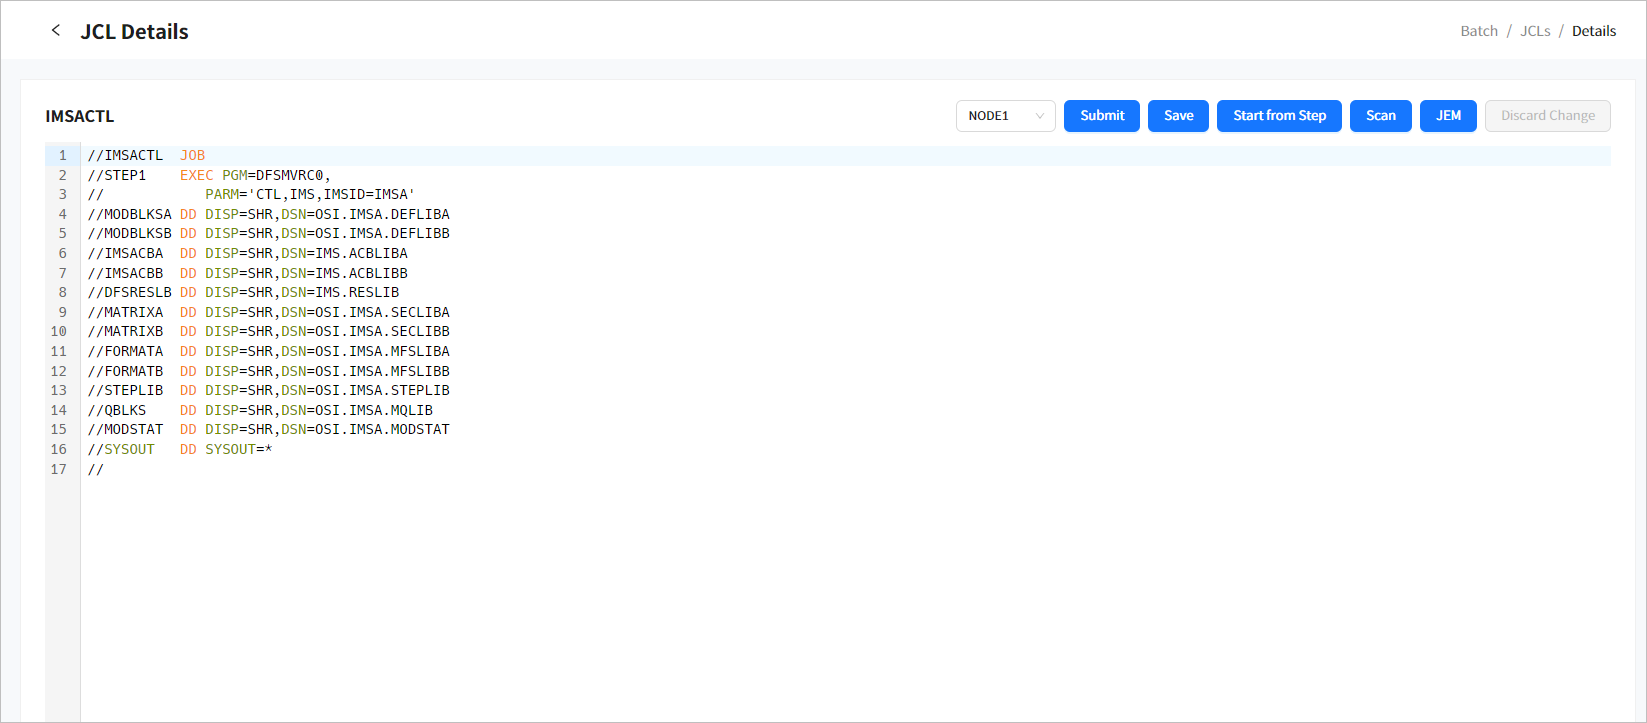
The following describes each button.
| Button | Description |
|---|---|
[Submit] |
Submits all steps of the JCL. Unix format is supported, but DOS format (text written on Windows) is not supported. |
[Save] |
Saves information about the modified JCL. The [Save] button modifies the resource’s original data, so it is controlled by configuration in ofmanager.properties. If 'ofmanager.jclSave = yes' is set, the [Save] button can be viewed in the JCLs Details page. The [Save] button is not displayed if 'ofmanager.jclSave = no' is set. |
[Start from Step] |
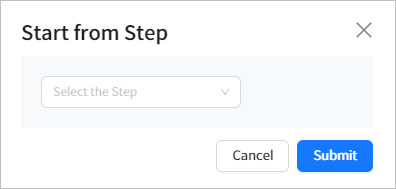
Submits starting from the specified step. When clicking this button, the Start From Step page ([Batch] - JCLs - Start From Step) appears where you can select a step. Clicking this button after modifying JCL opens a pop-up window saying that JCL is modified. Do not modify JCL when using this button. |
[Scan] |
Executes the JCL by specifying 'typerun=scan' which scans it for syntax errors without actually executing it. |
[JEM] |
Runs JCL with 'typerun=JEM'. This does not actually execute the job. It scans the JCL to validate if PGMs, datasets, and data catalogs exist. |
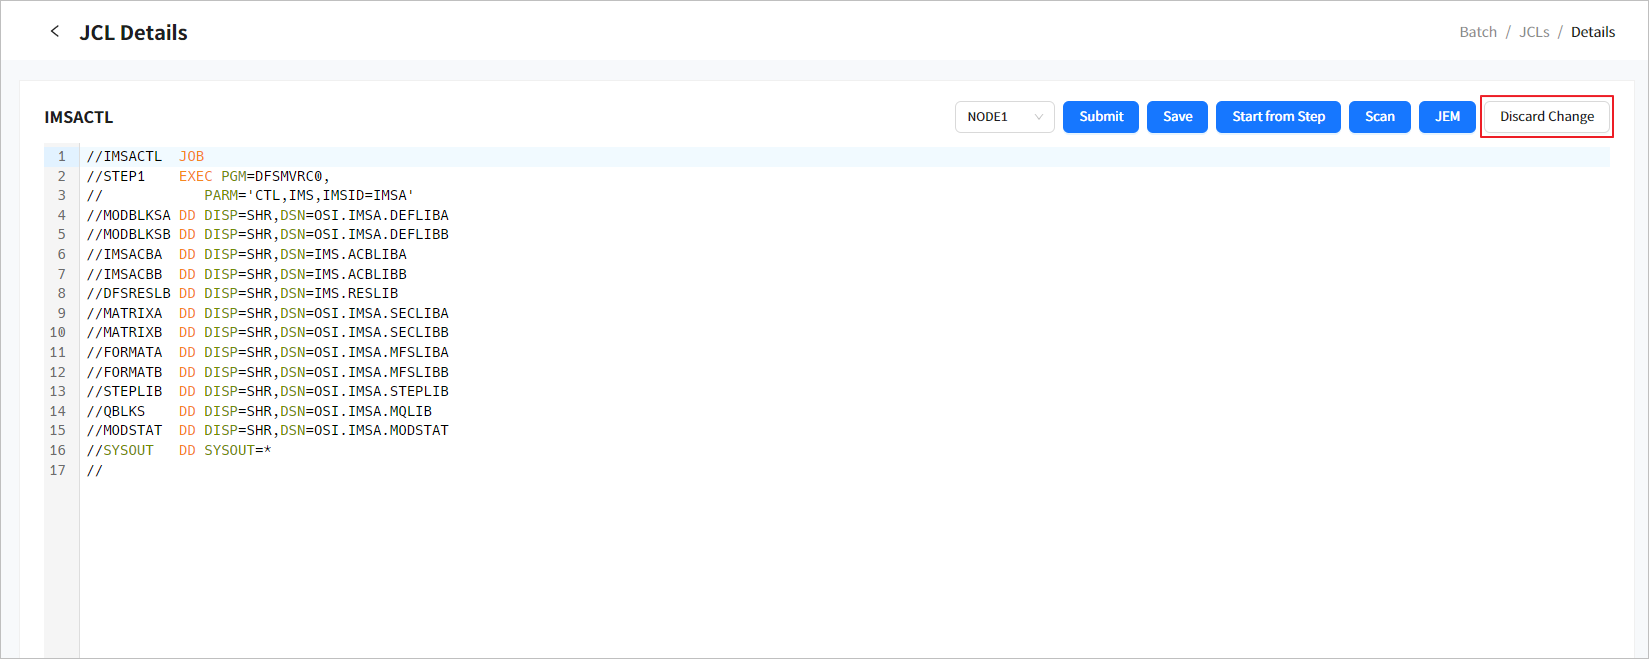
[Discard Change] |
If you modify the JCL, [Discard Changes] is enabled. Click this button to revert back to the original JCL (refer to [Batch] - JCLs - Details (2) ). |
Click [Start from Step] to open the following dialog box for step selection.
If you modify the JCL, [Discard Changes] is enabled.
4. JCL Runners
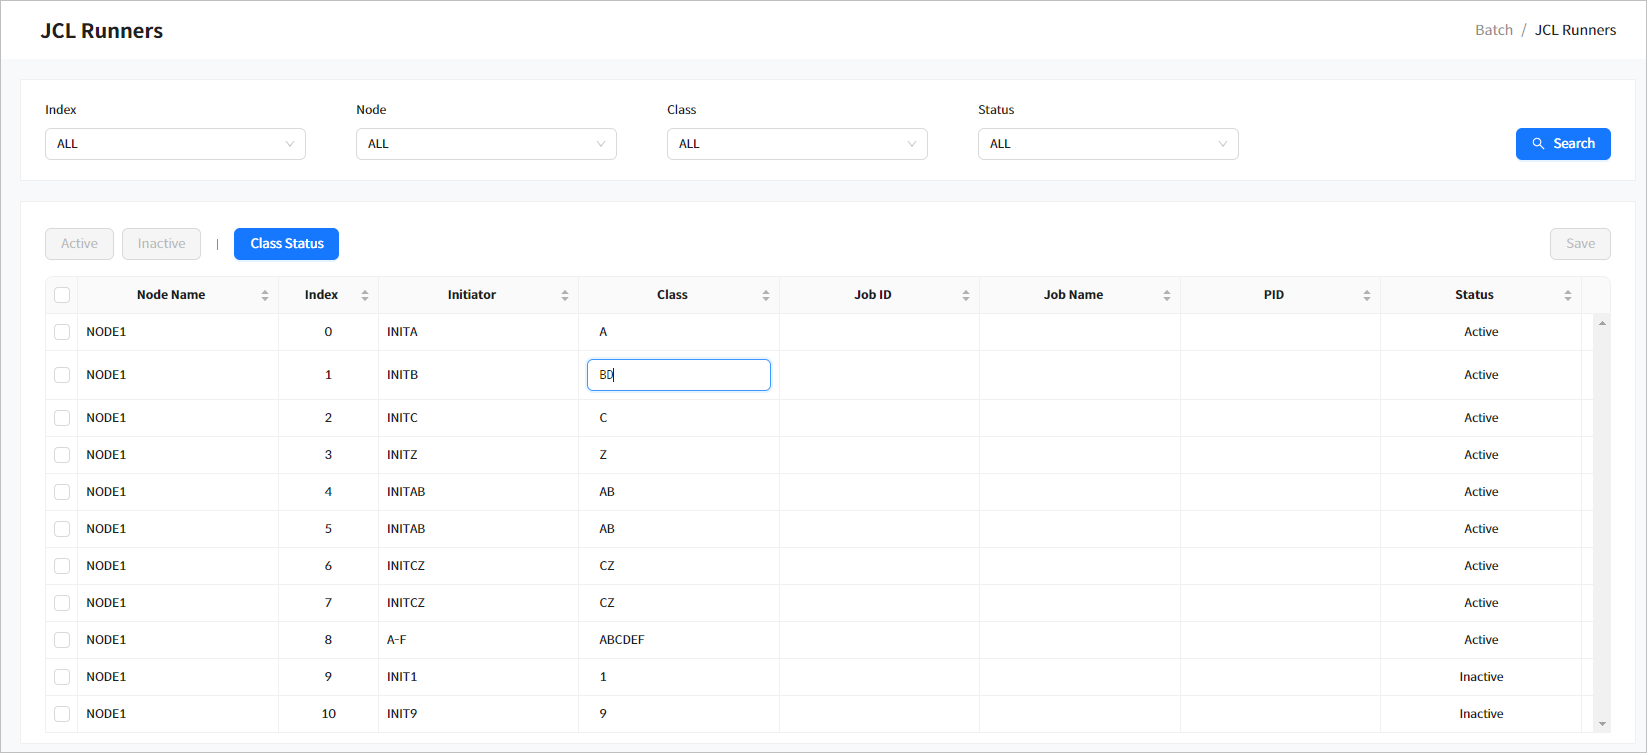
Click JCL Runners from the navigation pane to display a list of JCL runners, and change their status and class. If you select a class, runners of the class are displayed, and can be classified by status. By default, all classes are displayed.
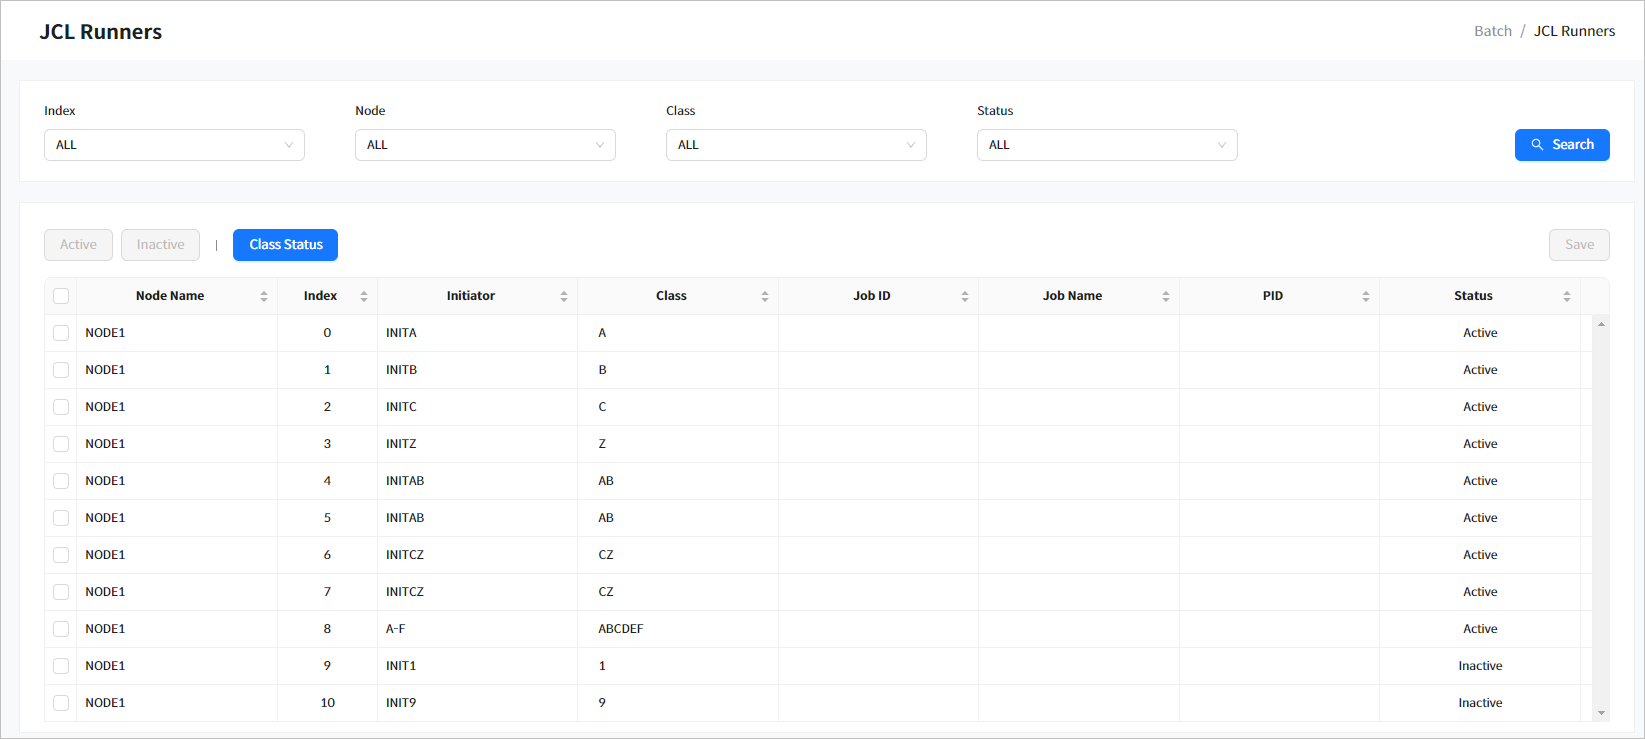
-
Search Conditions
The following describes the JCL runner search conditions.
Item Description Index
Index.
Node Name
Node name. All node names configured in OpenFrame Manager environment are provided as options.
Class
Class. All runners that include the class are displayed. All classes are searched by default.
Status
Status of the JCL runner to view. (either Active or Inactive).
-
Search Results
The following describes the search result columns.
Column Description Node Name
Node name.
Index
Runner index.
Initiator
Runner slot name set to the INITDEF section in tjes subject of openframe_batch.conf file.
Class
Classes allocated in the runner slot.
Job ID
ID of the job running in the runner.
Job Name
Name of the job running in the runner.
PID
PID of the runner executing the job. This is only applicable to the node where the runner is running.
Status
Option to change the runner status (Active or Inactive). For more information about changing the runner status, refer to "Changing the status of a single runner" in Changing JCL Runner Status.
For more information about openframe_batch.conf file, refer to OpenFrame Configuration Guide.
4.1. Changing JCL Runner Status
Check the check boxes of multiple runners in the JCL Runners list and then click [Activate] or [Inactivate]) to change their status. Select/deselect all rows by checking/unchecking the check box in the list header.
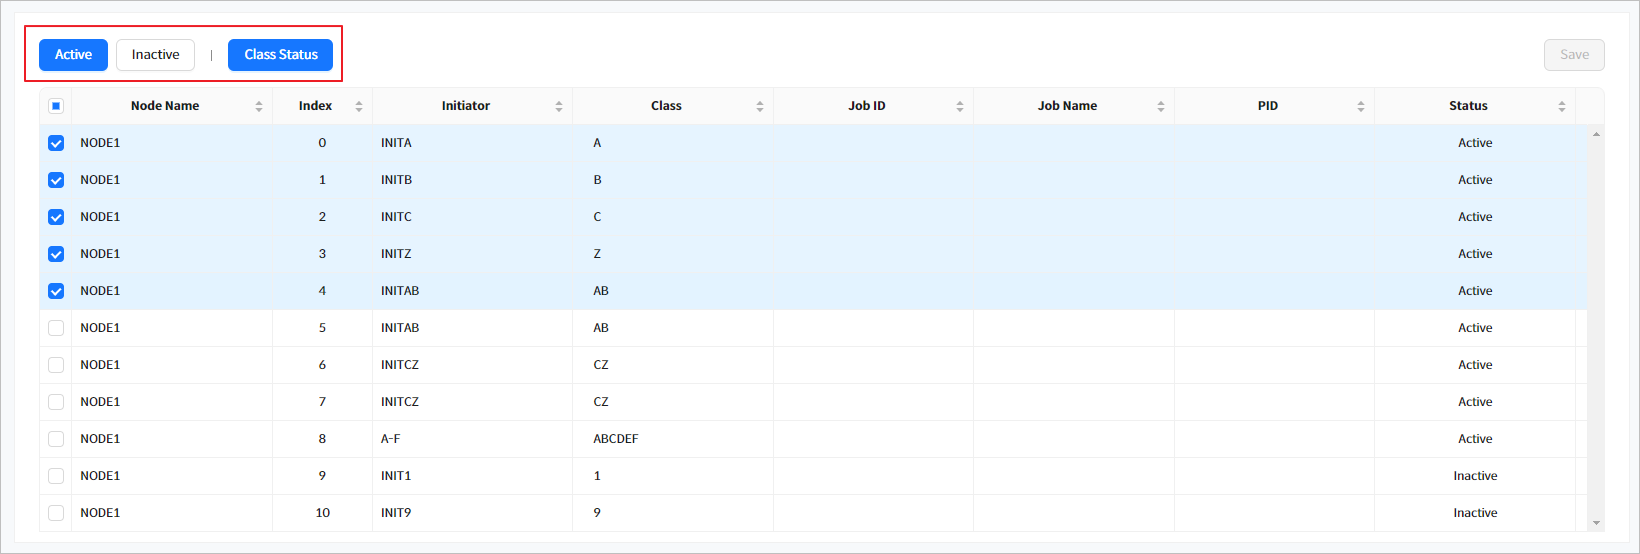
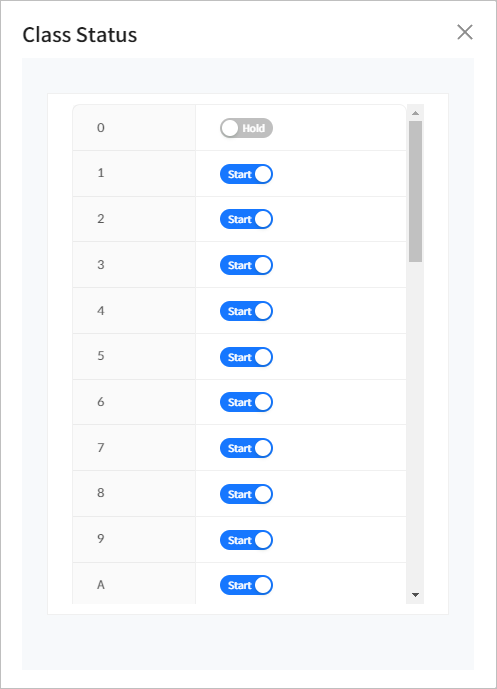
To check job queue status, click [Class Status]. You can change each class status by using the toggle button.
5. Outputs/Printers
Click [Outputs/Printers] from the navigation pane to go to the Outputs/Printers page. This page consists of the [Outputs] tab for displaying a list of outputs, purging or changing status of an output, and the [Printers] tab for displaying a list of printers.
5.1. [Outputs] Tab
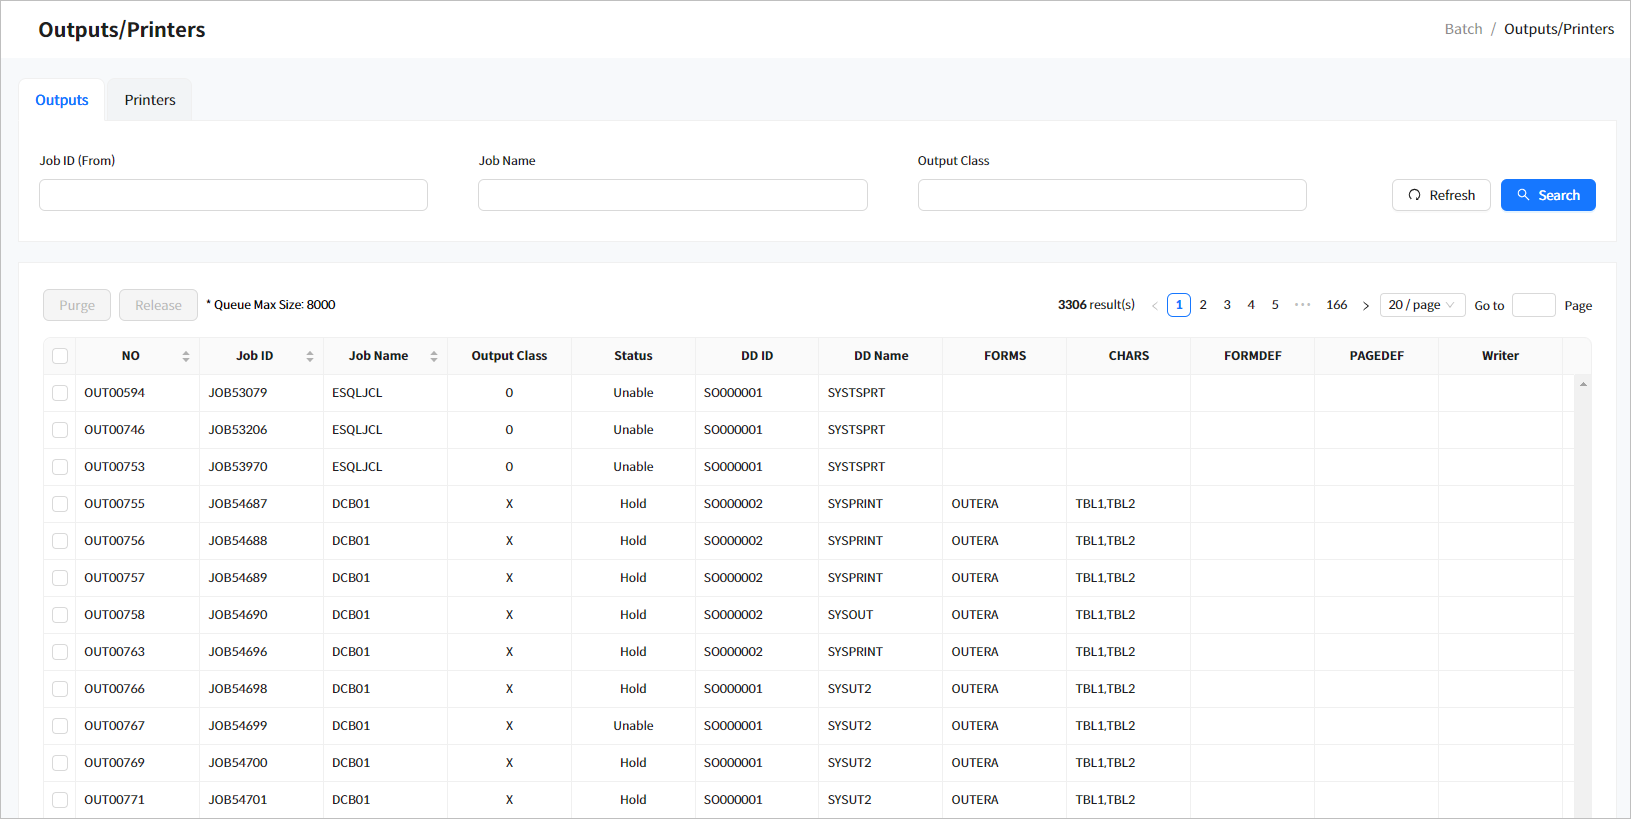
Click the [Outputs] tab to display a list of jobs in output queue.
Click [Refresh] above the list to refresh the list. Enter the search conditions and then click [Search] to display the results.
To change the DISPOSITION status of selected job’s output, use [Purge] and [Release]. To remove an output from output queue, click [Purge]. To change the job status from 'Hold' to 'Write', click [Release].
-
Search Conditions
The following describes the search conditions.
Item Description Job ID (From)
Job ID.
Searches for IDs that start with 'XXX' using wildcard (*) operator. A list of jobs that match the Job ID (JOBXXXXX or J0XXXXXX format where X is a number) condition is retrieved.
Job Name
Job name.
Output Class
Output class.
-
Search Results
The following describes the search result columns.
Column Description No
Number.
Job ID
Job ID.
Job Name
Job name.
Output Class
Output class.
Status
Output status.
Select one of:
-
Hold
-
Unable
-
Ready
-
Print
-
Error
DD ID
DD ID.
DD Name
DD name.
FORMS
Form of the SYSOUT dataset.
CHARS
Names of one or more coded fonts for printing the dataset.
FORMDEF
Member name of a form definition.
PAGEDEF
Member name of a page definition.
Writer
Name of an external writer to process output.
-
5.2. [Printers] Tab
Click the [Printers] tab to display a list of printers.

-
Search Results
The following describes the search result columns.
Column Description Printer Name
Printer name.
Output Class
Output classes.
Command
Print command.
Driver
Path to the printer library.
6. Spool Backups
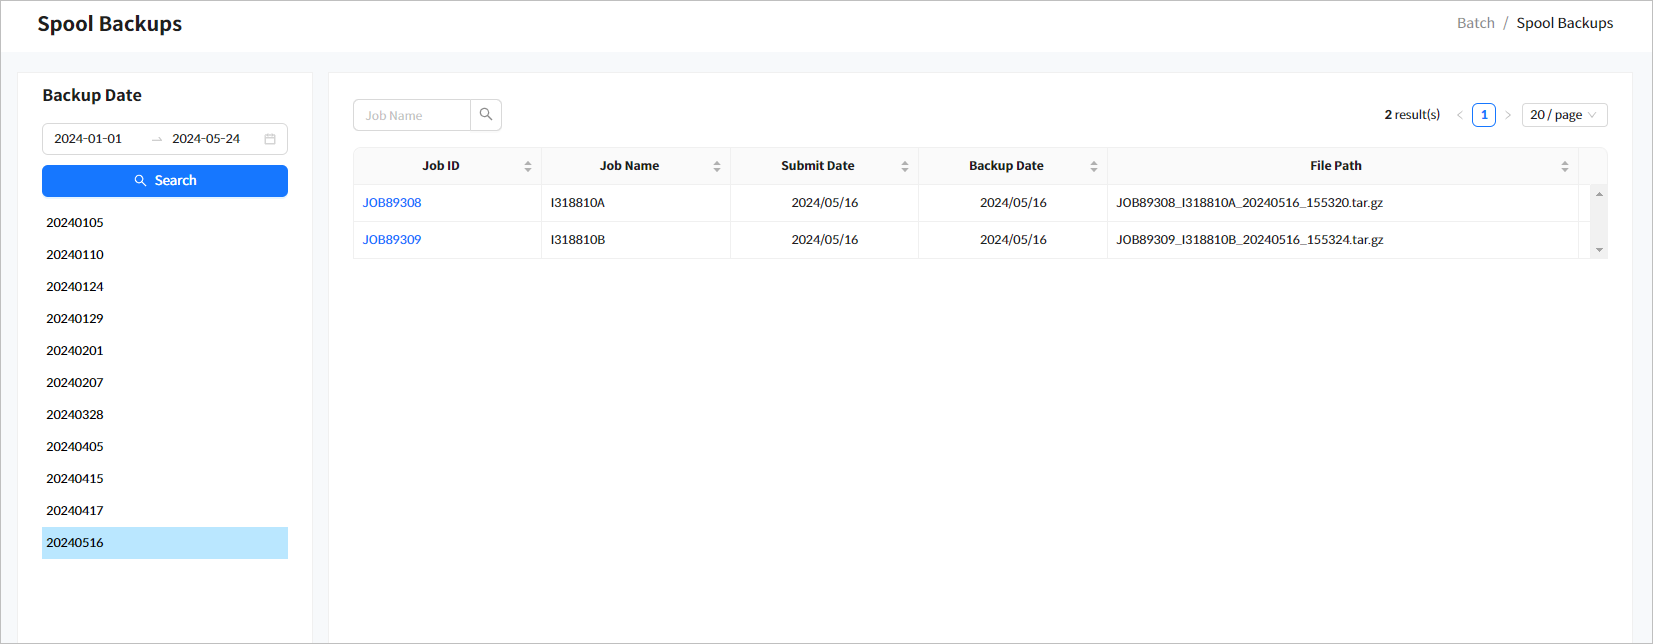
Click [Spool Backups] from the navigation pane to display a list of spool backups by date and job name.
Specify a desired period in Backup Date and then click [Search] to display the results. You can enter a job name as a search condition.
-
Backup Date
Specify a desired period and then click [Search] to display the results. The search returns spool backups that were ran during the period. Select a date to display the spooled jobs in the Jobs list.
-
Jobs
-
Search Conditions
The following describes the search conditions.
Item Description Job Name
Job name. (LIKE (prefix) search method)
-
Search Results
The following describes the search result columns.
Column Description Job ID
Click this to go to the Spool Backup Details page ([Batch] - Spool Backups - Spool Backup Details). For more information, refer to Spool Backup Details.
Job Name
Job name.
Submit Date
Job submission date.
Backup Date
Spool backup date.
File Path
Backup file path.
-
6.1. Spool Backup Details
Click a job ID from the Jobs list to go to the Spool Backup Details page ([Batch] - Spool Backups). Click the [<] icon before the page title to return to the previous page. The Spool Backup Details page consists of the 'Job Information', 'Spools', 'Steps', and 'DDs' sections. For more information about each section, refer to Job Details.
Click a spool from the Spools list to open the Spool Viewer dialog box ([Batch] - User Spool - Spool Details) to view its contents.
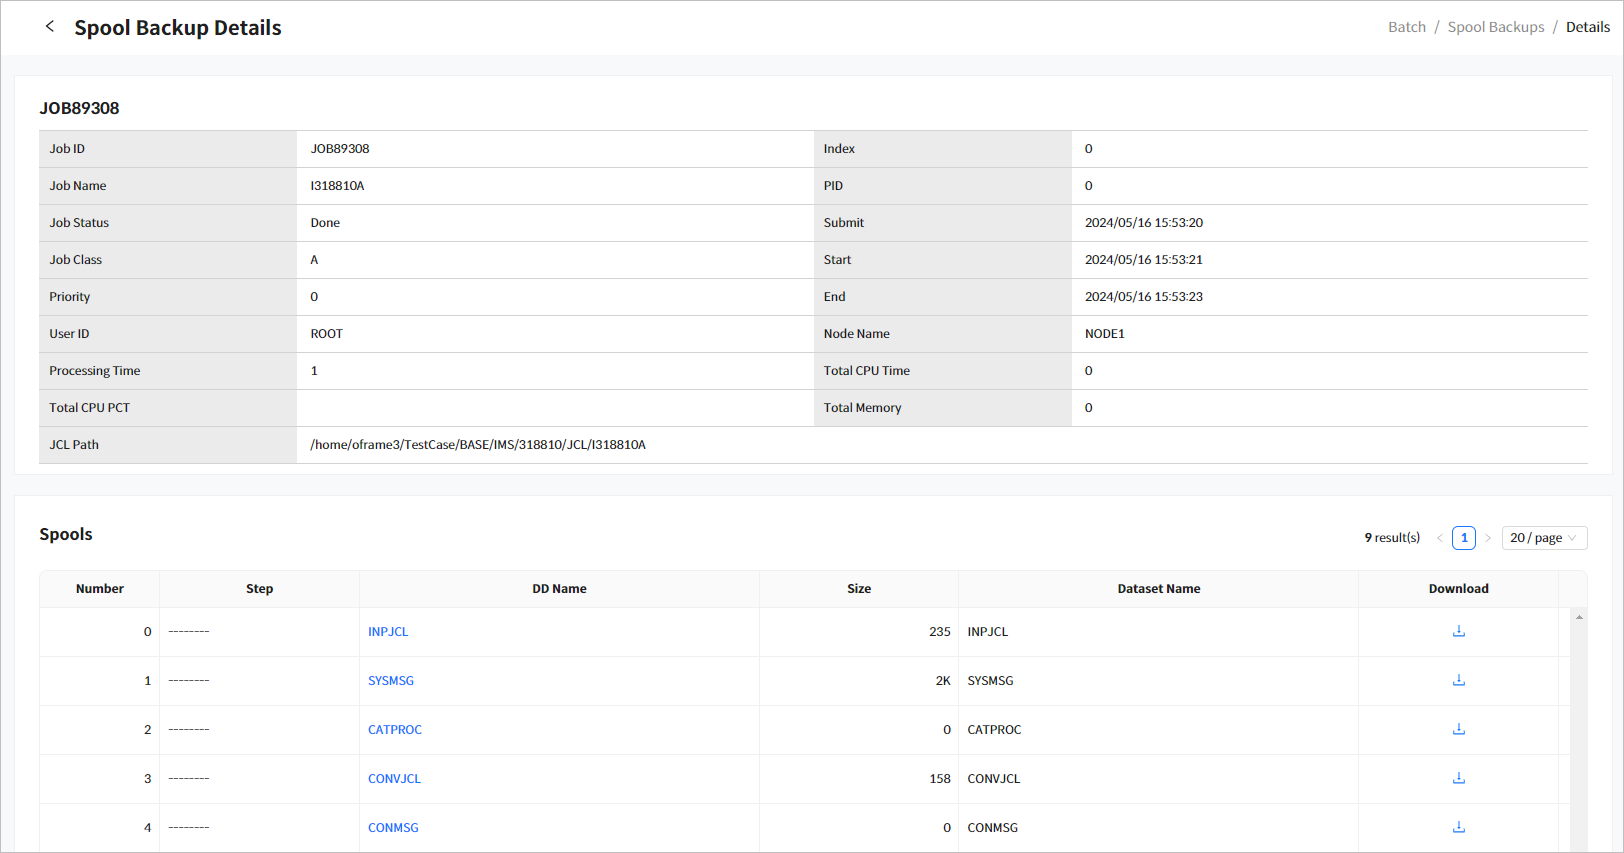
The following describes each item.
| Item | Description |
|---|---|
Job ID |
Job ID. |
Job Name |
Job name. |
Job Status |
Job status.
|
Job Class |
Job class. |
Priority |
Job priority. |
User ID |
User ID that ran the job. |
Node Name |
Node that executed the job. |
Index |
Runner slot index of the running job. |
PID |
Process ID. |
Ready |
Date/time when the job was submitted. |
Start |
Start date/time of job execution. |
End |
End date/time of job execution. |
Processing Time |
Total processing time (excluding CPU time) spent processing the job. |
Total CPU Time |
Total CPU time spent executing the job. |
Total CPU PCT |
Total percent of CPU time spent executing the job. |
Total Memory |
Total memory used by the job. |
JCL Path |
Path of JCL that submitted the job. |
7. User Spool
Click User Spool from the navigation pane to display a list of spools whose Output class is W. User Spool menu is available to users with at least READ permission for the BM.USERSPOOL resource of the TACF OFMANAGR class.
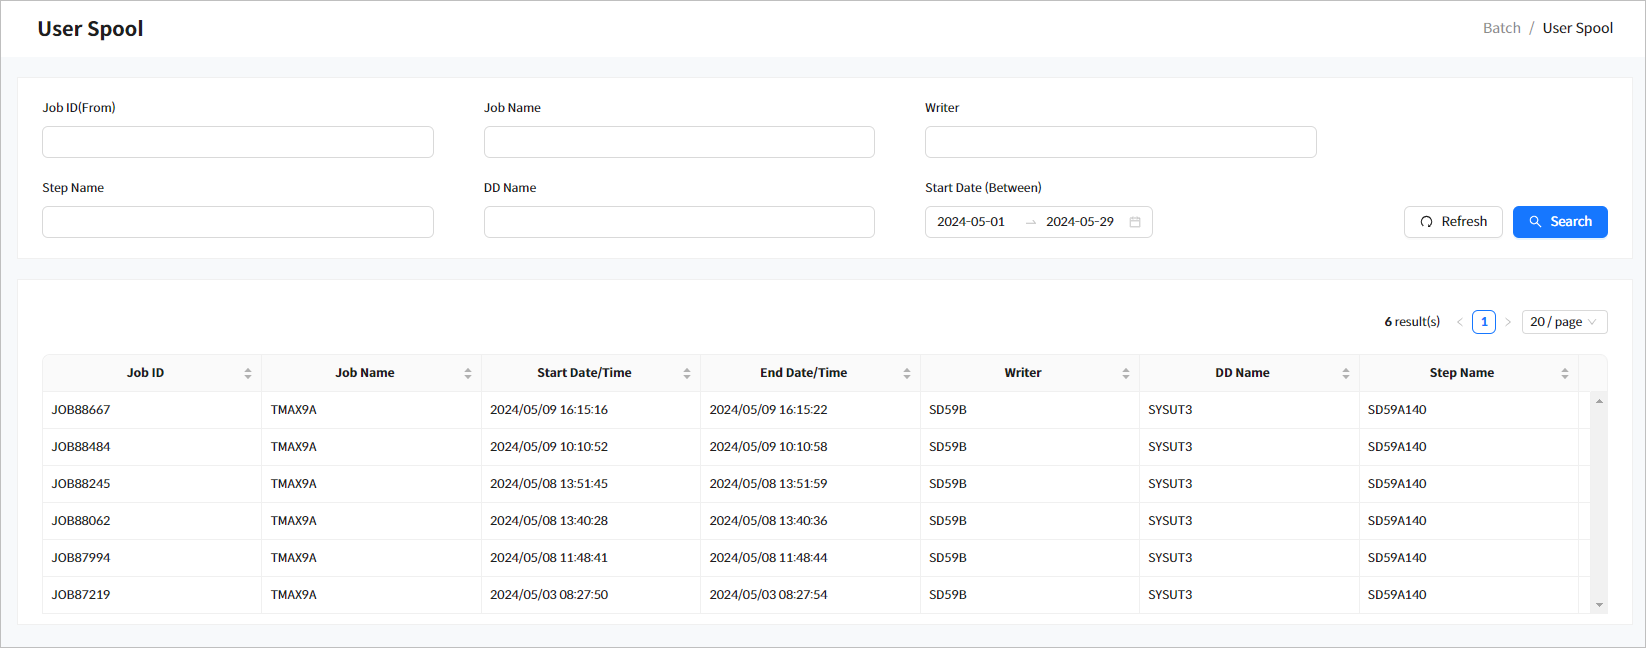
-
Search Conditions
The following describes the search conditions.
Item Description Job ID (From)
Job ID.
Searches for IDs that start with 'XXX' using wildcard (*) operator. A list of jobs that match the Job ID (JOBXXXXX or JXXXXXXX format where X is a number) condition is retrieved in ascending order.
Job Name
Job name (Exact search method).
Writer
Writer specified in the JCL SYSOUT (Exact search method).
Step Name
JCL step name (Exact search method).
DD Name
JCL DD name (Exact search method).
Start Date (Between)
Search period during which a job was submitted (Exact search method).
-
Search Results
The following describes the search result columns. For more information about each item, refer to Job Details.
Column Description Job ID
Click this to go to the Job Details page ([Batch] - Job Details). For more information, refer to Job Details.
Job Name
Job name.
Start Date/Time
Start date/time of job execution.
End Date/Time
End date/time of job execution.
Writer
Writer specified in the JCL SYSOUT.
DD Name
JCL DD name.
Step Name
JCL step name.
Click a spool from the search results to view its details. To maximize the window, click the [Maximize] button. To close the window, click the [X] button.
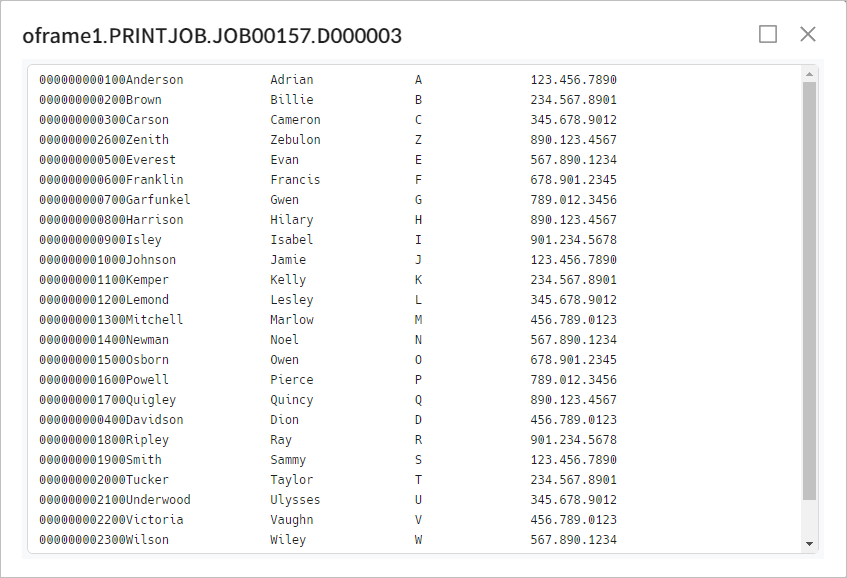 [Batch] - User Spool - Spool Details
