Creating Datasets
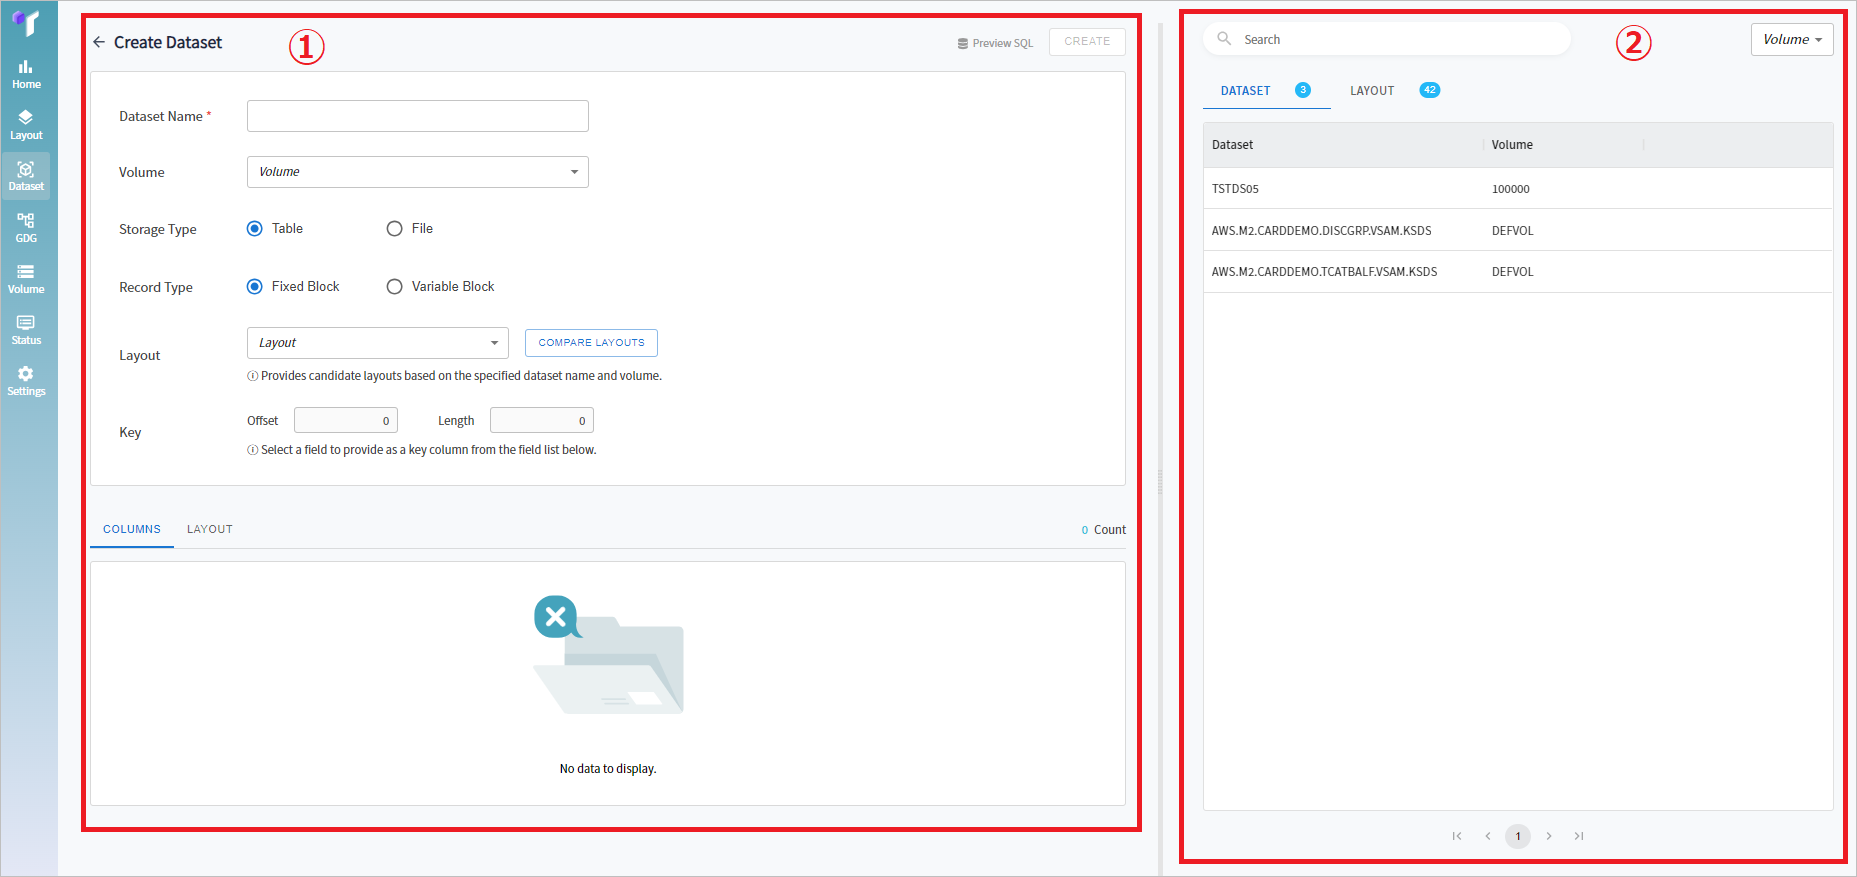
If you click the [CREATE] button in the Dataset screen, the Create Dataset page opens and you can create a dataset.
The Create Dataset page consists of the Create Dataset pane where you can enter information to create a dataset, and the Candidate Dataset List pane where you can check the candidate dataset that have not been created. If necessary, you can resize the panes by moving the split bar.

-
① Create Dataset
Specifies information to create a new dataset.
-
② Candidate Dataset List
Displays a list of candidate datasets that have not been created and a entire layout list.
When selecting a dataset from the list on the [DATASET] tab, the name and other settings fields in the settings section are automatically completed.
When clicking on a layout from the layouts list in the [LAYOUT] tab, its existing settings information in the settings section is auto-completed.
Settings
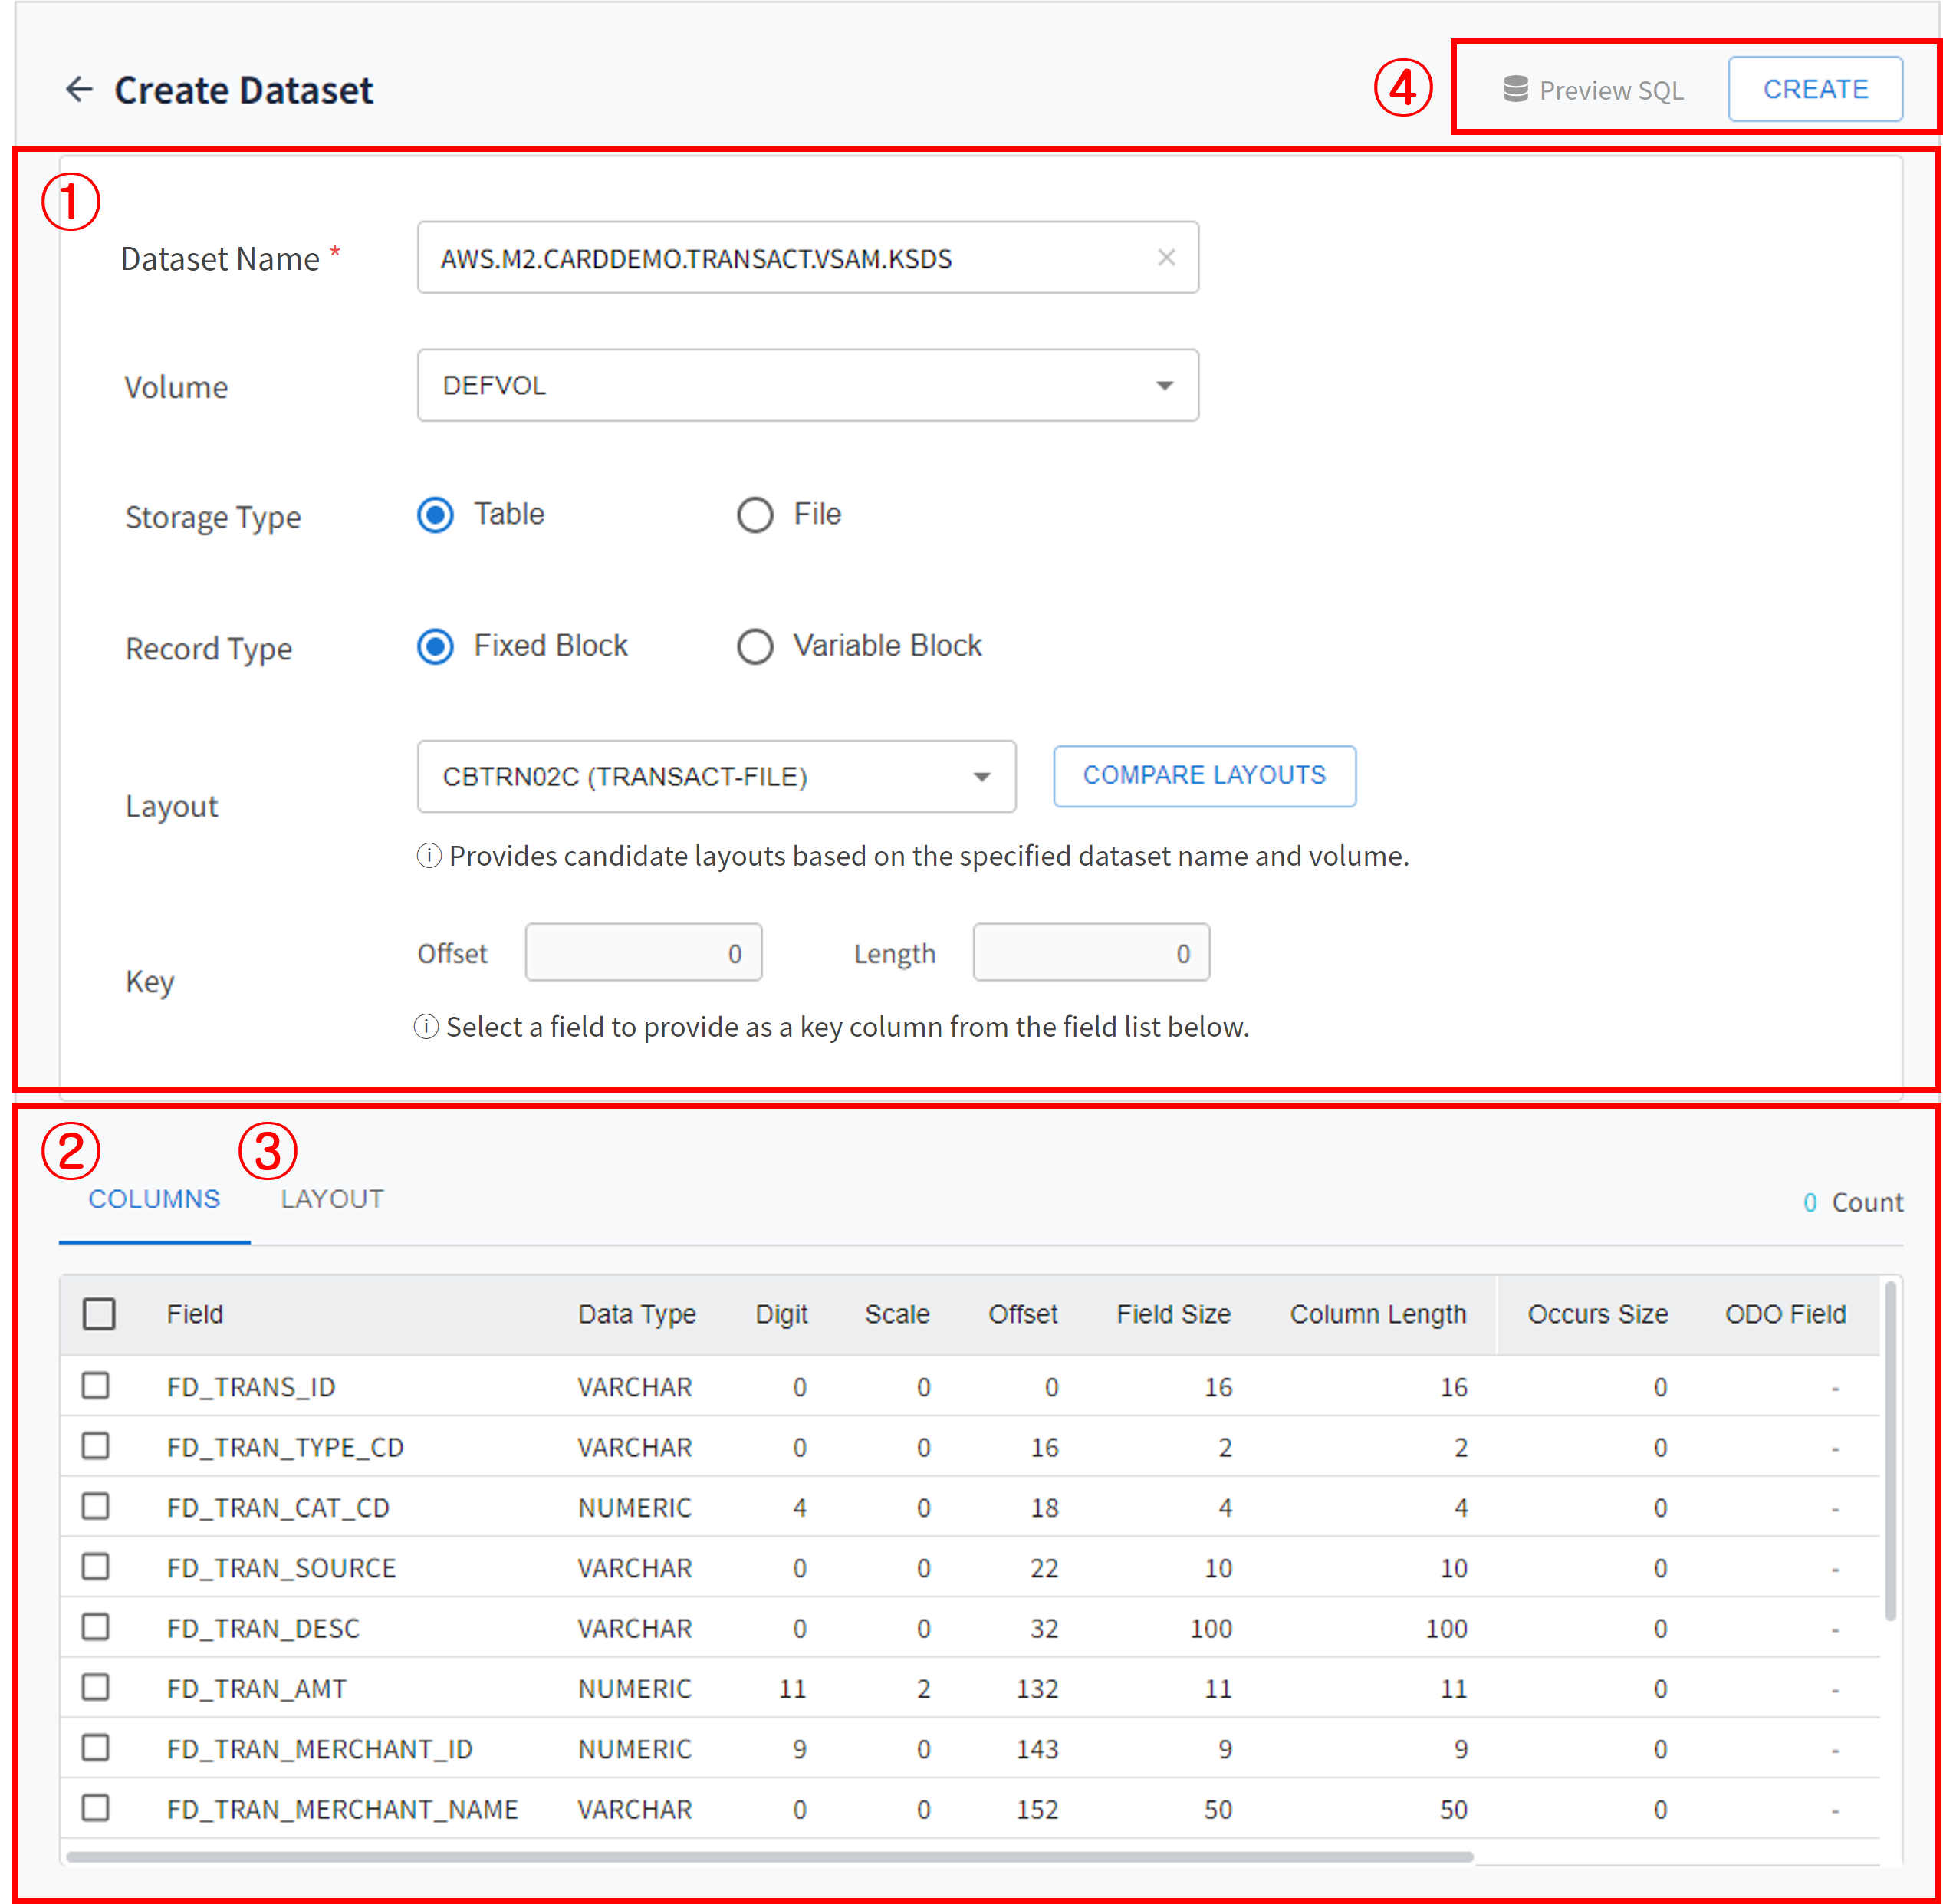
The Create Dataset pane consists of the Input Fields section where you can enter dataset information, the [COLUMNS] tab where you can select the primary key of the dataset, and the [LAYOUT] tab where a layout list is displayed. The [CREATE] button is located in the upper right corner.

The following describes features of the Create Dataset pane.
-
① Input Fields
Specifies information to create a dataset.
The following describes each item.
Item Description Dataset Name
Name of the dataset. Specify the name directly, or select a dataset from the candidate list to have the name automatically entered.
Volume
Volume of the dataset. Select a volume in the combo box, or select a dataset on the candidate dataset list so that the corresponding volume is automatically entered.
Storage Type
Type of storing datasets. If you select the 'File' type, additionally specify File Dataset Path.
-
Table: Stores as table format.
-
File: Stores as file format.
Record Type
Dataset record type.
-
Fixed Block: Fixed-length block
-
Variable Block: Variable-length block
Layout
Layout to use when creating a dataset.
Based on the entered dataset name and volume, you can select a candidate layout. The layout name is displayed in the
PROGRAM_NAME(FD)format. If there is no candidate layout for the specified dataset and volume, the layout list does not appear in the combo box.If you click [COMPARE LAYOUTS], you can compare all loaded layouts.
For more information, see Compare Layouts.
Key
Offset and length of the selected primary keys.
The offset and length of the fields selected in the [COLUMNS] tab are automatically calculated and entered, and the user can not change the values. A dataset can still be created without specifying a primary key.
-
Offset: Starting position of the key
-
Length: Length of the key
-
| The record type of the dataset depends on the format of EBCDIC assets that will be migrated. If the EBCDIC assets include record descriptor word (RDW), select the 'Variable Block' type; otherwise, select 'Fixed Block'. |
-
② [COLUMNS] Tab
Displays a list of fields to be created as columns based on the selected layout. You can specify the primary key by selecting a checkbox.
-
③ [LAYOUT] Tab
Displays a field list of the selected layout. The field list is shown in a tree table, which can be expanded or collapsed by level.
-
④ Function Buttons
Button Description [Preview SQL]
Provides a preview of the SQL CREATE statement for the dataset to be created. Hover the mouse over the button to open the preview.
[CREATE]
Creates a dataset. In the following cases, the button is not activated.
-
If the dataset name is not specified
-
If the volume is not selected
-
If the layout is not selected
-
If the primary key fields are not selected consecutively
-
Specifying Primary Keys
The [COLUMNS] tab displays the fields that will be created as columns from the field list of the layout selected in the Input Fields section. You can specify fields as primary keys by clicking on the checkbox of each field. Fields to be specified as primary keys must be selected consecutively.

But, if non-consecutive fields are selected, an error message is displayed and the [CREATE] button is deactivated.

Compare Layouts
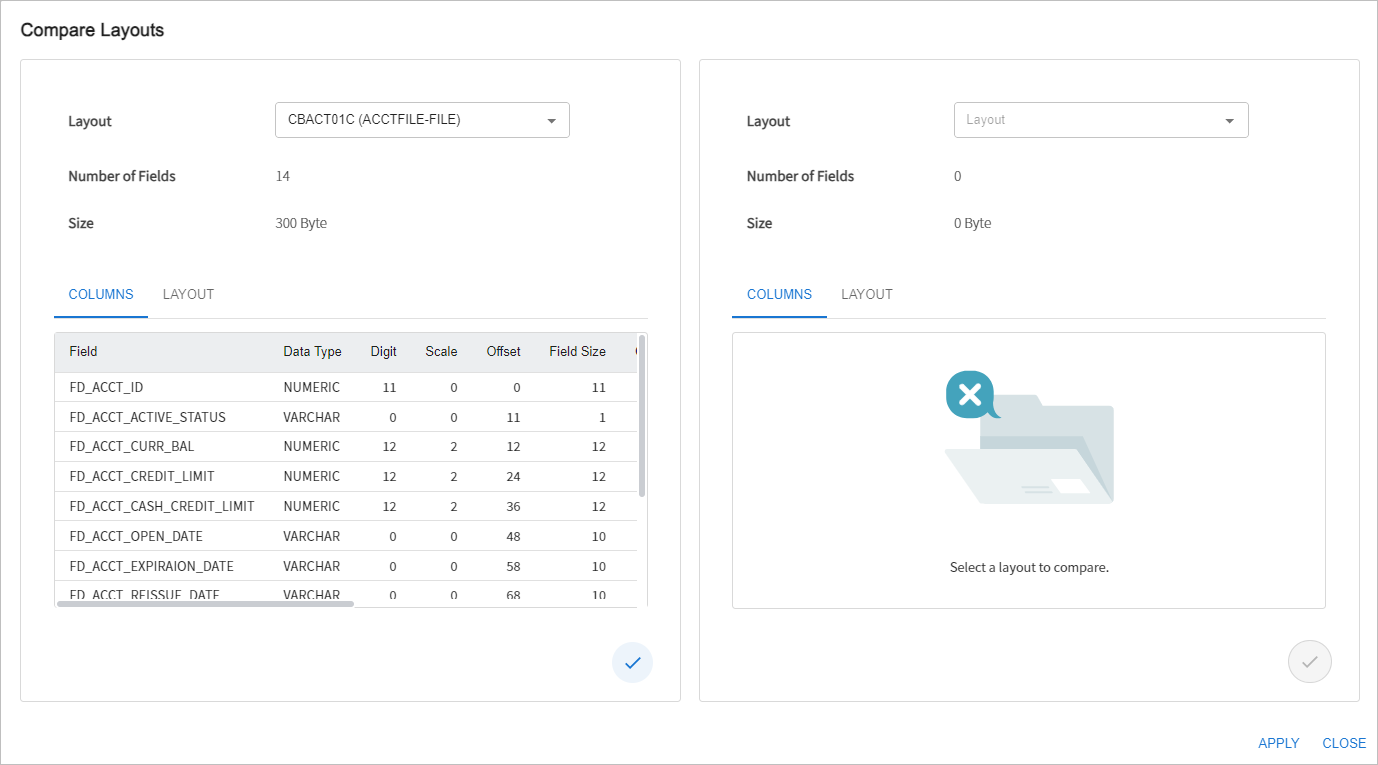
If you click [COMPARE LAYOUTS] in the 'Layout' field of the Input Fields section, the Compare Layouts modal window opens, and you can compare all loaded layouts.
On the left side of the screen, the information of the layout selected in the 'Layout' field is displayed.

If you select the check toggle (![]() ) at the bottom right corner and click [APPLY], the layout is applied to the Input Fields section. If you click [CLOSE], the selected layout is not applied, and the modal window is closed.
) at the bottom right corner and click [APPLY], the layout is applied to the Input Fields section. If you click [CLOSE], the selected layout is not applied, and the modal window is closed.
The following describes each item and tab.
| Item | Description |
|---|---|
Layout |
Selected layout in the |
Number of Fields |
Number of fields of the selected layout. |
Size |
Size of the selected layout. |
[COLUMNS] tab |
Displays the fields that will be created as columns from the field list of the selected layout. |
[LAYOUT] tab |
Displays a field list of the selected layout. |
The following describes buttons.
| Button | Description |
|---|---|
Check Toggle ( |
Selects the layout you want to apply. |
[APPLY] |
Applies the layout selected with the check toggle to the Input Fields section. If any check toggle is not selected, this button is deactivated. |
[CLOSE] |
Does not apply the selected layout, and closes the modal window. |