Managing Assets
Provides the ability to efficiently organize and manage the uploaded assets.
Classifying Assets
You can classify uploaded assets into specific types.
|
The [Entry Points] view does not provide asset analysis functionality, and assets in the 'Classifying' state cannot be classified. |
-
Select the [Analysis] from the top navigation bar.
-
Select a specific view icon from the left panel (except the [Entry Points] view).
-
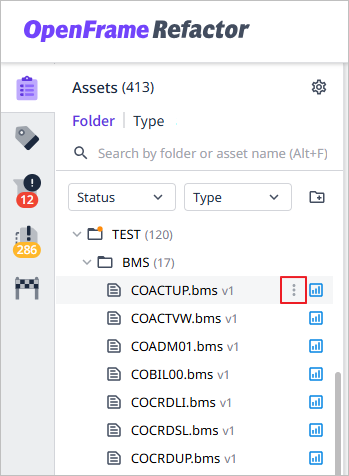
When you hover over the item to be classified in the list, the
 icon on the right will be activated.
-
Click the activated
 icon to display a drop-down list. Select the [Classify] and choose one of the provided classification methods.
The following describes the classification options available based on the target selected in the previous step.
-
[Assets] View
Target Classification Option Description Folder
Unclassified Assets Only
Classify only the unclassified asset types among all assets in the selected folder.
All Assets
Classify all assets in the selected folder.
Asset File
Asset Type Classification
Classify only the selected asset.
Asset Type
-
Classify all assets of the selected asset type.
-
[Tags] View
Target Classification Option Description Tag
Unclassified Assets Only
Classify only the unclassified asset types among all assets included in the selected tag.
Selected Assets
Classify all assets included in the selected tag.
Folder
Unclassified Assets Only
Classify only the unclassified asset types among all assets in the selected folder.
All Assets
Classify all assets in the selected folder.
Asset File
Asset Type Classification
Classify only the selected asset.
Asset Type
-
Classify all assets of the selected asset type.
-
[Issues] / [Duplicates] View
Target Classification Option Description Asset File
Asset Type Classification
Classify only the selected asset.
-
-
When the Classify dialog box opens, set the classification information and click the [Classify] button. (*: Required)
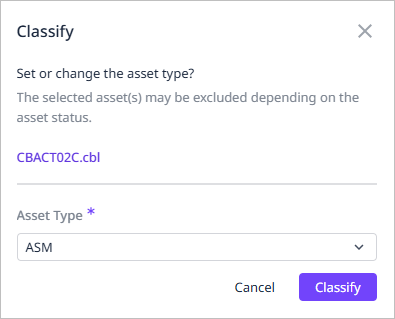
Item Description Asset Type *
The type to which the asset will be newly classified.
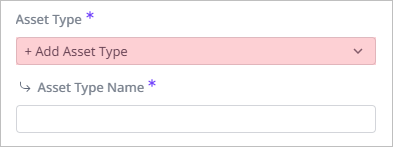
Asset Type Name *
The name of the new asset type to be added.
[Note] This field is only activated when '+ Add Asset Type' is selected for 'Asset Type.'
- ☞ Learn more
-
You can also classify assets using the following methods:
-
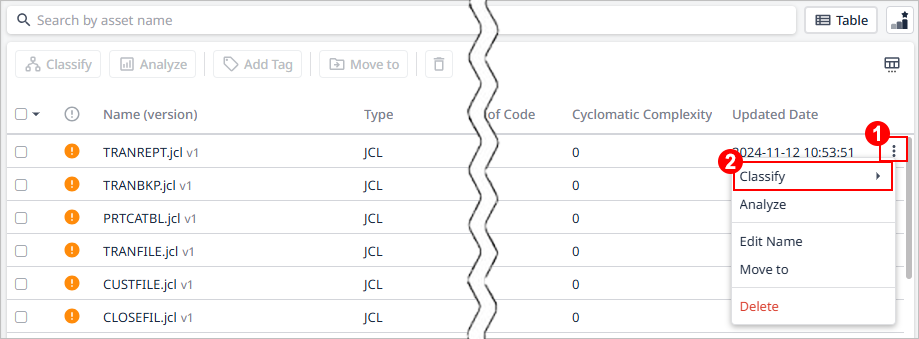
In the asset information area, select the checkbox for a specific asset from the asset list, then click the [Classify] button.

-
In the asset information area, click the
 icon of a specific asset in the list, and select [Classify] from the drop-down list.
-
In the asset details area, click the
 icon to open the drop-down list, then select [Classify].
-
Changing Asset Name
You can change the name of the uploaded asset.
|
The [Entry Points] view does not offer the functionality to rename assets. |
-
Select the [Analysis] menu from the top navigation bar.
-
Select a specific view icon from the left panel (except the [Entry Points] view).
-
When you hover over a specific asset in the asset list, the
 icon will be activated on the right.
-
Click the activated
 icon, and select the [Edit Name] from the drop-down list.
 -
When the Edit Name dialog box opens, set the new name and then click the [Save] button. (*: Required)
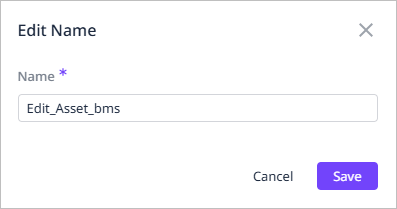
Item Description Name *
The name of the asset.
- ☞ Learn more
-
You can also rename an asset using the following methods:
-
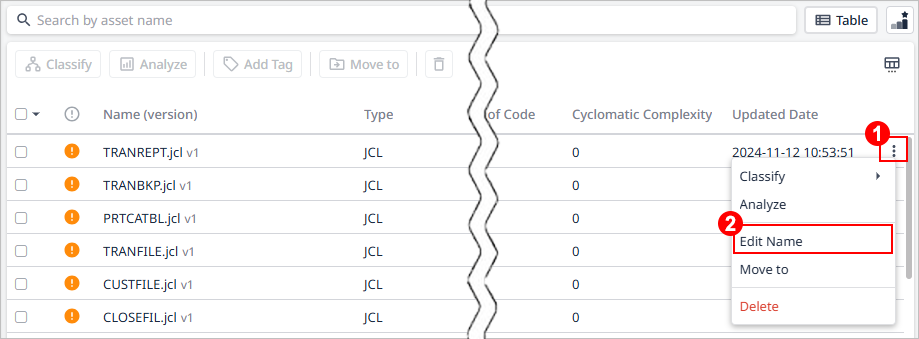
In the asset information area, click the
 icon of a specific asset in the list, and select [Edit Name] from the drop-down list.
-
In the asset details area, click the
 icon to open the drop-down list, then select [Edit Name].
-
Moving Assets
You can change the location of uploaded assets to reorganize the asset structure.
|
The [Entry Points] view does not provide the functionality to move assets. |
-
Select the [Analysis] from the top navigation bar.
-
Select a specific view icon from the left panel (except the [Entry Points] view).
-
When you hover over a specific asset in the asset list, the
 icon will be activated on the right.
-
Click the activated
 icon, and select the [Move to] from the drop-down list.
 -
When the Move to dialog box opens, set the directory information for the asset to move, and then click the [Move] button. (*: Required)
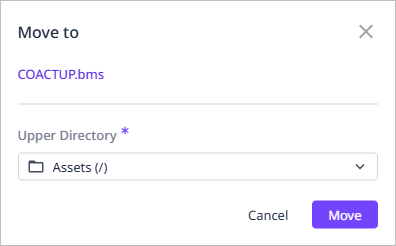
Item Description Upper Directory *
The parent folder where the asset will be moved.
- ☞ Learn more
-
You can also move assets using the following methods:
-
In the asset information area, select the checkbox for a specific asset from the asset list, then click the [Move to] button.

-
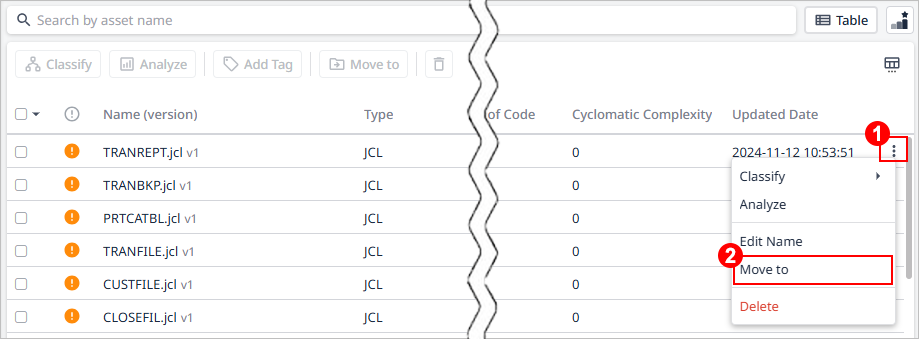
In the asset information area, click the
 icon of a specific asset in the list, then select [Move to] from the drop-down list.
-
In the asset details area, click the
 icon to open the drop-down list, then select [Move to].
-
Assigning Tags
You can apply existing tags or add new ones to specific assets.
|
The [Entry Points] view does not support tag assignment functionality. |
-
Select the [Analysis] menu from the top navigation bar.
-
Select a specific view icon from the left panel (except the [Entry Points] view).
-
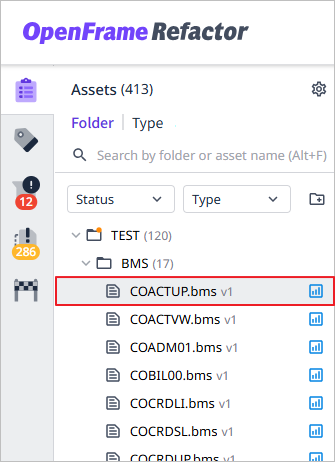
Click on a specific asset in the asset list.
-
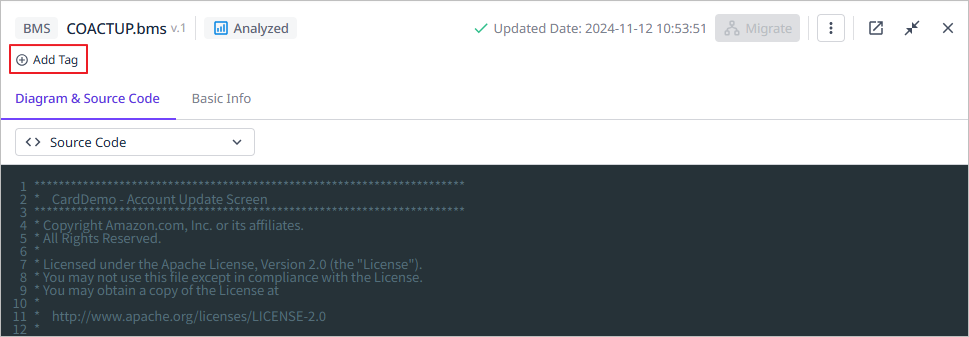
When the details of the selected asset are displayed, click [Add Tag] at the top left.
-
When the Add dialog box opens, set the tag information to assign, and then click the [Add] button. (*: Required)
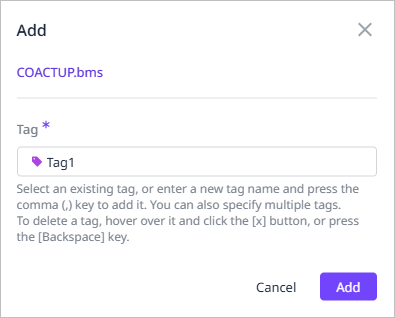
Item Description Tag *
The tag to assign to the asset.
[Register]
-
After entering the tag name, press the comma (,) key.
-
If there are existing tags, select from the drop-down list.
[Delete]
-
Use the <Backspace> key.
-
Hover over the tag you want to delete, and click the
 button.
-
- ☞ Learn more
-
You can also assign tags to assets using the following method:
-
In the asset information area, select the checkbox for a specific asset from the asset list, then click the [Add Tag] button.

-
Deleting Assets
You can delete uploaded assets.
|
The [Entry Points] view does not provide any functionality to delete assets. |
|
Deleted assets cannot be recovered. |
-
Select the [Analysis] menu from the top navigation bar.
-
Select a specific view icon from the left panel (except the [Entry Points] view).
-
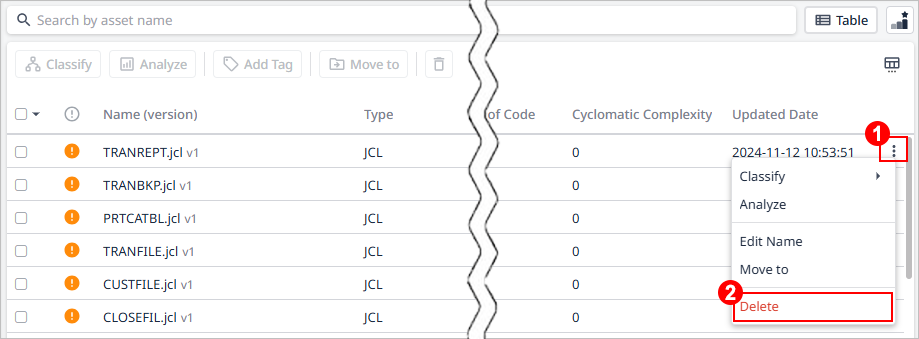
When you hover over a specific asset in the asset list, the
 icon on the right will be activated.
-
Click the activated
 icon, and select the [Delete] from the drop-down list.
 -
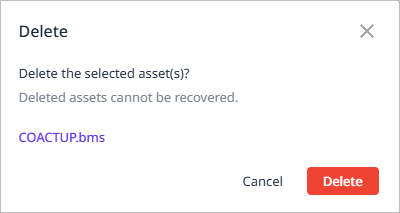
When the Delete dialog box opens, click the [Delete] button.
- ☞ Learn more
-
You can also delete assets using the following methods:
-
In the asset information area, select the checkbox for a specific asset from the asset list, then click the
 button.
-
In the asset information area, click the
 icon of a specific asset in the list, then select [Delete] from the drop-down list.
-
In the asset details area, click the
 icon to open the drop-down list, then select [Delete].
-