Commands
This chapter describes commands available in Tmax.
1. cfl
To run a program, a Tmax configuration file must be defined and its validity verified. The cfl command compiles a Tmax text configuration file and converts it into a binary configuration file with a default name of <tmconfig>.
If an error occurs during compilation of the configuration file, compilation will stop and a binary configuration file will not be created. The binary file is used by gst, tmboot, tmdown, and other commands. To compile a text configuration file of a particular node in a multi-node environment, use the [ -n node_name ] option.
The following figure shows a multi-node monitoring environment:
The following shows how to use the command.
-
Usage
$ cfl [-i text Tmax configuration file name] [-o binary Tmax configuration file name] [-h] [-g] [-V]
      [-n node_name] [-A] [-v num__] [-I] [-r] [-x]
Option Description [-i text Tmax configuration file name]
The name of a Tmax text configuration file to be compiled. The path to the file can also be specified. If a path is not specified, the $TMAXDIR/config directory will used.
If the configuration file cannot be found, an error message will be displayed.
[-o binary Tmax configuration file name]
The name of an output binary Tmax configuration file. The path to the file can also be specified. If a path is not specified, the $TMAXDIR/config directory will be used. If this option is omitted, an output binary file will be named <tmconfig>.
[-h]
Displays command help.
[-g]
Option to specify the same RGWADDR and RGWPORTNO for different gateways. Applied to all gateway types.
[-V]
Shows the version of an executable file.
[-n node_name]
Used to compile a configuration file of a specific node in a multi-node environment. To manage another node in this environment, set a racd.
[-A]
Valid only when service access control (3-level security) is used.
Distributes $TMAXDIR/config/group, acl, and user files of a current node to the $TMAXDIR/config directory of other nodes in the same domain because access rights to the ACL service within a domain must be applied to all nodes.
Before using this option, group, acl, and user files must be created in advance using mkgrp, mkpw, and mkacl. Because the created files are used by all nodes in a domain, all users in the domain must be considered. group_name, group_id, user_name, and user_id must be unique in a domain.
Because a password file is not distributed with this option, the file is required to be created in each node or copied to each node.
[-v num]
Input options:
-
0: num is set to 0 when all nodes in a multi-node environment have the same machine type and an administrator manages a separate configuration file for each node. The compiled binary file is copied to each machine and managed there.
-
1: The configuration file is automatically compiled with a racd. This is the default value.
[-I]
If the value set in a SHMKEY in the DOMAIN section of a configuration file is used when a cfl command is executed, the UID of the current value will be compared with a specified value. If the values do not match, an error will occur.
[-r]
Informs users of the maximum number of FDs available in a system, which is displayed by ulimit -n while using a cfl. This option checks the maximum number of FDs that can be opened by a CLH.
(I) CFL9991 Current Tmax Configuration: Number of client handler(MINCLH) = 2
Supported maximum user per node = 1380
Supported maximum user per handler = 691 [CFL5065]
If the number of FDs used in a Tmax system is greater than a configured value, the following error will occur.
(E) CFL9990 Current Tmax configuration contains more servers or nodes than current system can support[CFL5056]
[-a Tmax configuration file name]
An option to dynamically add a Tmax configuration file. If a file is dynamically added without this option, an (E) ADM2048 error will occur. For more information, refer to cfgadd(ca) in Tmax Administration Guide.
[-Z]
Option to remove the limit to a MAXSACALL/MAXCACALL, which is set to 1024 by default.
e.g.,)
- cfl -Z -i sample.m
[-x]
Checks whether a server or service name exists when an -x option is used for a TARGET and a CLOPT in the SERVER section of a configuration file. If this option is used when a server or service exists, a cfl will be successfully handled but the following errors will occur when a Tmax system starts.
(E) CFL3184 line %d(line in which the server is declared): invalid target server name %s(server name specified in TARGET)
(E) CFL3183 line %d(line in which the server is declared): invalid service name %s(service name specified using -x)
[-P]
Option to display the total size of the shared memory.
shmsize info:
shmkey = 80001, shmsize = 552652
shmkey = 80002, shmsize = 111968
shmkey = 80003, shmsize = 120224
shmkey = 80004, shmsize = 8192
shmkey = 80005, shmsize = 0
-
-
Environment
This command can be used in a system with a Tmax system installed.
-
Examples
-
The following compiles a text Tmax configuration file named <basic> in /user1/tmax/temp into a binary file named <tmconfig> in a current directory.
$ cfl -i /user1/tmax/temp/basic
-
The following compiles a text Tmax configuration file named <ex_config> in the default directory into a binary file named <tmconfig> in /user1/tmax/bin.
$ cfl -i ex_config -o /user1/tmax/bin/tmconfig
-
2. etmm / eclh
Using more FDs with an event-based communication method rather than with an existing communication method increases performance. The event-based etmm and eclh commands can be replaced by the tmm and clh commands, respectively, in a $TMAXDIR/bin. The environments that can support the commands differ depending on the platform used.
-
Environment
Check the supporting environments for each platform.
Platform Supported Environment HP, SUN
/dev/poll
LINUX
epoll
IBM AIX 5.3
pollset
|
Event-based tmm and clh are not included in a Tmax 5 default binary. Submit a request to TmaxSoft to use those commands. |
3. fdlc
Unlike the method for transferring a structure in data communication between server and client, the field key method transfers only required items. To transfer an item, a unique key that identifies an item is required. The fdlc command compiles a text field key table to create the unique field keys.
The following shows how to use the command.
-
Usage
$ fdlc {-a|c|d|u} [-f] [-h header file name] [-k] {-i field key table file name} [-jc|ji]
       [-o result name] [-p package name] [-x] [-r output file name][-V]
Option Description {-a}
Compiles a text field key table and adds required sections to a binary file. A target file can be specified with the [-f] option. The default file is <tmax.fdl>. A duplicate field is replaced with a new value.
{-c}
Compiles a text field key table into a binary file. If a binary file already exists, it is overwritten with new content. This is the default option.
{-d}
Compiles a text field key table and removes required sections from a binary file. A target file can be specified with the [-f] option. The default file is <tmax.fdl>.
{-u}
Compiles a text field key table and adds or modifies required sections in a binary file. A target file can be specified with the [-f] option. The default file is <tmax.fdl>.
[-f]
A target file. Used with the \{-a}, \{-d}, or \{-u} options.
[-h header file name]
Renames a header file. If this option is not used, the fdl header file name will be <field key table name_fdl.h>.
[-k]
Creates a class or interface name using the name of a java file specified with the [-h] option.
Must be used together with the [-jc|-ji] and [-h] options. Otherwise, an error occurred.
{-i field key table file name}
A file that defines a field key table to be used by a client and server programs. This option is mandatory. The path also can be specified.
[-jc|ji]
A field definition class type to be created. Used in WebT. Input options:
-
ji: The interface type of a field definition class file.
-
jc: The class type of a field definition Java file.
[-o result name ]
Renames the result file. If this option is not used, the fdl file name will be <tmax.fdl>.
[-p package name]
The package name of a created field definition class. Used in WebT.
[-x]
Maintains original values for duplicate fields. Must be used with the [-a] option.
[-r output file name]
Converts a binary file into a text file.
This option must be used with the [ -f fdl file name ] option.
[-V]
Shows the version of an executable file.
-
-
Environment
This command is supported in UNIX, Windows, and Intel x86 platforms.
When the server and client use different operating systems (for example, UNIX and Windows) or architectures (such as Intel x86), differences in byte ordering may cause errors. To avoid this, you must run fdlc on each platform.
-
Examples
-
The following creates a Java file with a [-jc|ji] option.
'number' can be between 0 and 16,777,215.
<demo.f>
#demo.f
#name   number  type    flags   comments
INPUT   101     string  -       -
OUTPUT  102     string  -       -
$> fdlc -c -i demo.f -ji -jc webtdemo
-
The following is the content of a <demo_fdl.java> file.
package webtdemo; public interface demo_fdl { public int INPUT = (469762149); /* number: 101 type: string */ public int OUTPUT = (469762150); /* number: 102 type: string */ } -
The following compiles a <demo.f> field key table in a current directory. <tmax.fdl> and <demo_fdl.h> are created, and <demo_fdl.h> is a header file in which a field key is defined.
$ fdlc -c -i demo.f
-
The following changes a binary fdl file into a text file. The field key table defined in a <tmax.fdl> is created in a <tmax_text.f> file as a text file after execution.
$ fdlc -f tmax.fdl -r tmax_text.f
-
Field Key
A FDL method is used to send data using a field key buffer in server and client data communication. A Field Definition Language (FDL) exchanges data between processes with a field key buffer. The field key buffer has an identifier and data value pair that corresponds to the identifier. The identifier is created by a combination of a unique identification number and a data type. The identifier is a field key.
For readability, a field name is used instead of a field key in an application. Each field name is converted into a field key by referring to a binary field key file and then saved in a buffer.
In the FDL method, a field type and length can be used without modifying programs that use the field. Data types supported in the C language, such as Char, Short, Integer, Long, Float, Double, String, and Carray, can be used. The length of a field name can be up to 16 characters.
The fdlc compiler compiles a text field key definition file into a binary file. Field keys are referenced by a user program. A field key definition file is a text file, and the extension of a table file must be .f. If a compilation is successful, <tmax.fdl> and <field key definition file name_fdl.h> will be created. A server program can save and read field data after a program is compiled by referring to a created header file. A client must register a file created with a fdlc command in a FDLFILE configuration variable.
One advantage of a field key buffer is that it is data independent. When a structure buffer is used, the entire structure buffer is sent even if it contains unused fields. However, in a field key buffer, fields can be selected and sent. In addition, various field key manipulation functions are supported to improve development productivity.
|
For more information about field key manipulation functions, refer to Tmax FDL Reference Guide. |
4. gst
The gst command creates a service table for servers by referring to the SERVER and SERVICE sections in a binary Tmax configuration file created by a cfl command. The table is a list of services provided by a server process. It is written and compiled with a server program and used to find the location of a service while a server process runs.
Successful execution of this command results in a <server name_svctab.c> file being created in the svct directory under a specified TMAXDIR directory (see the NODE section in the source configuration file). The server name will be the name set in the SERVER section, and the contents of each file will be service names provided by the corresponding server set in the SERVICE section.
Services set in a Tmax configuration file must be set in the service table of a corresponding server. If there are any changes to a server name, service name, or SVRNAME of a service in the SERVER or SERVICE section of a Tmax configuration file, the service table and the server program must be recompiled with a gst command.
The following shows how to use the command.
-
Usage
$ gst [-f binary Tmax configuration file name| -v server_name | -h | -n node_name | -V]Option Description [-f binary Tmax configuration file name]
A binary Tmax configuration file to be used. The binary configuration file is the result of executing a cfl command and is referenced by tmboot and tmdown. The path to the file can also be specified. If a path is not specified, the <tmconfig> in the $TMAXDIR/config directory will be used.
[-v server_name]
A service table that corresponds to a server name.
[-h]
Displays command help.
[-n node_name ]
In a multi-node environment, this option creates a service table of another node’s server process in the $TMAXDIR/svct directory of the current node.
[-V]
Shows the version of an executable file.
-
Environment
This command can be used in the operating system where the Tmax system is installed.
-
Example
The following is an example of creating a service table for each server by referring to a <exconfig> configuration file in a /user1/park/tmax/bin directory.
$ gst -f /user1/park/tmax/bin/exconfig
In the following configuration file, service tables named <svr1_svctab.c> and <svr2_svctab.c> are created in the /user1/park/tmax/bin directory.
          ….
*SERVER
svr1         SVGNAME = svg1
svr2         SVGNAME = svg1
*SERVICE
svc1         SVRNAME = svr1
svc2         SVRNAME = svr2
5. mkcli
The mkcli command creates a Tmax client module with a cc compiler. All options must be specified within 1024 characters.
The following shows how to use the command.
-
Usage
$ mkcli {-o outfile} {-f firstfiles} [-v] [-l lastfiles] [(-32)|-64] [-V]
        [-u UserCompileOption]
Option Description {-o outfile}
A client module name.
{-f firstfiles}
If a user definition file is specified, the file will be linked and compiled before a client library provided by Tmax is compiled. A user definition file usually specifies a client program.
[-v]
Displays the progress of a compilation in the verbose mode in a console.
[-l lastfiles]
If a user definition file is specified, the file will be linked and compiled after a client library provided by Tmax is compiled. A user definition file usually specifies a client program.
[(-32)| -64]
Specifies whether a client module to be created is 32 bit or 64 bit.
-
[-32]: A Tmax library path is set to $TMAXDIR/lib. This is the default value.
-
[-64]: A Tmax library path is set to $TMAXDIR/lib64.
[-V]
Shows the version of an executable file.
[-u UserCompileOption]
Replaces default compilation options for a platform specified by a mkcli command with user-defined compilation options. Be aware that options related to libraries and included files are not applicable.
To specify two or more options, use whitespace as a delimiter.
-u opt1 opt2
-
-
Environment
This command can be used in a system with a Tmax system installed.
6. mkacl
Service access rights (3-level security) are controlled by user groups. A service can be accessed by a user in a group that has permission to access the service. To access the service, a group file, a user file included in the group, and an acl file that specifies user groups with service access permission must be created. To create a acl file, use a mkacl command.
The following shows how to use the command.
-
Usage
$ mkacl [-a] [-d] [-G group_name] [-t type] [-s service_name] [-h] [-V]Option Description [-a]
Adds a new acl service to an existing acl file. If an acl file already exists, the new service will be added to the end of the file. If no acl file exists, a new acl file will be created and the new service will be added to the file.
[-d]
Deletes a acl service specified by a [-s] option from an acl file. This option must be specified with [-G], [-s], and [-t] options, and the [-G] option must match the service.
[-G group_name]
The name of a group allowed to access a service specified with a [-s] option. The name must be specified in $TMAXDIR/config/group.
[-t type]
Specifies the acl type. Currently, only 'SERVICE' is supported.
[-s service_name]
Specifies the name of the service to which an acl is applied. The service can be accessed only by a user in a single server group specified with a [-G] option.
[-h]
Displays command help.
[-V]
Displays the Tmax version.
-
Result
A $TMAXDIR/config/acl file is created, and the type and contents are as follows:
service_name:type:group_id
TOUPPER1:SERVICE:1
TOUPPER5:SERVICE:5
TOUPPER7:SERVICE:7
TOUPPER9:SERVICE:9
|
To use this command in a multi-node environment, see the [-A] option in cfl. |
7. mkgrp
Service access rights (3-level security) are controlled by user groups. A service can be accessed by a user in a group that has permission to access the service. To access the service, a group file, a user file included in the group, and an acl file that specifies user groups with service access permission must be created. To create a group file, use a mkgrp command.
The following shows how to use the command.
-
Usage
$ mkgrp {-a} {-G group_name} {-g group_id} [-d] [-h] [-V]Option Description {-a}
Adds a new user group to an existing group file. If a user group file already exists, the new group will be added to the end of the file. If no user group file exists, a user group file will be created and the new user group is added to the file.
{-G group_name}
The name of a group to be created. The name must be unique.
{-g group_id}
The ID of the group to be created. The ID must be unique.
[-d]
Deletes a group with an ID specified by a {-g} option. This option must be specified with {-G} and {-g} options.
[-h]
Shows command help.
[-V]
Displays the Tmax version.
-
Result
A $TMAXDIR/config/group file is created, and the type and contents are as follows.
Group_name:x:Group_id
grp1:x:1
grp2:x:2
grp3:x:3
grp4:x:4
grp5:x:5
grp6:x:6
grp7:x:7
grp8:x:8
grp9:x:9
grp10:x:10
8. mkpw
Tmax supports the following security check mechanisms:
-
No security
-
Domain security check
-
User security check
-
Service access control
To use a security mechanism, a user name and password must be registered in a password file located in a $(TMAXDIR)/config directory. The mkpw command is used to manage the password file.
The following shows how to use the command.
-
Usage
$ mkpw [-f file_name] [-a | -d | -i | -n | -p | -h | -V] [-G group_name]
       [-u uid]
Option Description [-f filename]
Specifies the name of the password file. The default file is $(TMAXDIR)/config/passwd.
[-a]
Adds a user.
[-d]
Deletes a user.
[-i]
Changes user information.
[-n]
Creates a new password file.
[-p]
Changes the password of a user. If no parameter is given, the following is used by default.
$ mkpw -f $(TMAXDIR)/config/passwd -p
[-h]
Shows command help.
[-V]
Displays the version information.
[-G group_name]
Specifies the name of a group that has a corresponding user. To use a security function for a service access control, a group file and a user file must be created, and users must exist in a group. Use a mkpw command to create a user file and a password file. When making the password file, use a [-G] option to create the file using a method that is different from the previous version to call an ACL service.
When specifying a group name with the [-G] option, use a [-u] option to ensure that a group from the group file is specified.
[-u uid]
Specifies the unique ID for a corresponding user. This option is used with a [-G] option and is specified only when a level 3 service access control is used.
-
Results
The following are the type and contents of a password file and user file when [ -G] and [ -u] options are used.
-
passwd file
The following format applies:
username:passwd:user_id:group_id:Description:x:x
<passwd file sample>
starbj1:UnQGcdDkNqXNc:1:1:starbj1:x:x
starbj2:mPLY7VZtNvRXs:2:2:starbj2:x:x
starbj3:aiu6Mt36rqwe6:3:3:starbj3:x:x
starbj4:vVdS9naV02jA.:4:4:starbj4:x:x
starbj5:568kCzyzYXriQ:5:5:starbj5:x:x
starbj6:ouKrHf/89QMW6:6:6:starbj6:x:x
starbj7:Mx8PaESrqWR4I:7:7:starbj7:x:x
starbj8:LL59popHJp59U:8:8:starbj8:x:x
starbj9:RG/S5BetAPeFs:9:9:starbj9:x:x
starbj10:Ebbzv1Ecx0abE:10:10:starbj10:x:x
-
user file
The following format applies:
user file:username:user_id:group_id
<user file sample>
starbj1:1:1
starbj2:2:2
starbj3:3:3
starbj4:4:4
starbj5:5:5
starbj6:6:6
starbj7:7:7
starbj8:8:8
starbj9:9:9
starbj10:10:10
-
-
Environment
This command can be used in a system with a Tmax system installed.
9. mksvr
The mksvr command creates a Tmax server module with a cc compiler. This command allows a service to be dynamically registered without being registered in a Tmax configuration file. All options must be specified within 1024 characters.
The following shows how to use the command.
-
Usage
$ mksvr {-s {@filename | service[,service...] [:func]}} [-o outfile]
        [-f firstfiles] [-v] [-r rmname] [-S sdlfilename] [-l lastfiles]
        [-t servertype] [(-32)|-64] [-V] [-a autotran] [-T svctime]
        [-u UserCompileOption] [-d]
Option Description [-s {@filename|service[,service…] [:func]}]
Aservice name. One or more service names are recorded in a file specified by a 'filename', which is preceded by an '@' character. A single service name is written on each line of the file. No whitespace is allowed when specifying multiple service names separated by a semicolon (;). When specifying a 'func', a request for a service is handled in the 'func'.
Options can be specified multiple times.
e.g.,)
-s TOUPPER -s TOLOWER
Information about AUTOTRAN and SVCTIME can be specified with double quotation marks ("). The result of the following is the same as ' -s TOUPPER -a 1 -T 10'. This setting can also be used in a function list file.
e.g.,)
-s "TOUPPER 1 10"
[-o outfile ]
A server module name.
[-f firstfiles]
If a user definition file is specified, the file will be linked and compiled before a server library provided by Tmax is compiled. A user definition file usually specifies a server program.
[-v]
Displays the progress of a compilation in a verbose mode in a console.
[-r rmname]
A resource manager connected to a server module to be created.
Specify the rmname in the $TMAXDIR/config/RM file according to the following format:
rmname:stub:XA libraries
A stub is set to a DBMS stub (<liboras.so>, <libsybs.so>, <libinfs.so>, and <libdb2s.so>), which is provided by Tmax. If this option is specified, the stub and XA libraries will be linked and compiled by a cc compiler. If this option is not specified, <libnodb.so> will be linked by default.
[-S sdlfilename]
The object file of a sdl file (.s) for a server module that uses a SDL buffer.
If this option is not specified, $TMAXDIR/lib/sdl.o will be linked by default.
[-l lastfiles]
If a user definition file is specified, the file will be linked and compiled after a server library provided by Tmax is compiled. A user definition file usually specifies a server program.
[-t servertype]
The value of a SVRTYPE in the SERVER section of a Tmax configuration file. If this option is not specified, a server type will be regarded as a STD and <libsvr.so> will be linked during compilation. If this option is specified, Tmax libraries will be linked during compilation.
[(-32) | -64]
Specifies whether a server module to be created is 32 bit or 64 bit.
-
[-32]: The Tmax library path is set to $TMAXDIR/lib. This is the default value.
-
[-64]: The Tmax library path is set to $TMAXDIR/lib64.
[-V]
Shows the version of an executable file.
[-a autotran]
Option to use an AUTOTRAN for a dynamically registered service.
-
0 : NO
-
1 : YES
[-T svctime]
A SVCTIME for a dynamically registered service.
-
0: SVCTIME is set to infinity.
-
A number greater than 0: SVCTIME is set to that number.
[-u UserCompileOption]
Replaces default compilation options for a platform specified by a mksvr command with user-defined compilation options. Be aware that library and included related options are not applicable.
To specify two or more options, specify as follows.
-u opt1 opt2
[-d]
Builds a service without referencing the existing svctab.c when using the mksvr command. This option allows the service to be dynamically registered independently of the existing environment configuration.
-
-
Environment
This command can be used in Windows NT and Windows 2000 where Tmax 3.8.16 or later is installed.
-
Caution
There are constraints when dynamically registering a service in a server module with a COUSIN or BACKUP commands. Since COUSIN and BACKUP server groups manage services registered in multiple nodes, a service dynamically registered with a mksvr command cannot be released.
A service can be moved and removed in a general server group if the service is re-registered with a mksvr after executing a tmdown for a corresponding server. COUSIN and BACKUP server groups do not allow a service to be released.
Consider the following when dynamically registering a service with a mksvr command.
-
The server group type of a corresponding server
-
Whether a corresponding service has already been registered
-
10. racd
The racd command centralizes the management of nodes in a distributed, multi-node environment. racd is a daemon process that runs on each node, allowing a single node to manage a Tmax system composed of multiple nodes within a domain. Note that the node managing the Tmax system is not required to run racd.
racd enables a node in a domain to manage all nodes either via tmadmin or a configuration file, which can then be applied to all nodes in the domain using cfl.
Key features of racd include:
-
When tmdown or tmboot is executed through racd, it waits for 60 seconds by default for the operation to complete. For CLH and TDL requests, it waits indefinitely.
-
If a timeout or an error occurs while racd executes a command, the cfl, tmboot, tmdown, and racdr utilities log the related information.
-
Any SIGPIPE signal from cfl executed through racd is ignored.
If IPv6 is used, the following must be specified in a configuration file.
SYSTEM_IPV6=Y
To use the [-k] option for racd, the following must be specified in an environment variable.
TMAX_RAC_IPV6=Y
The following shows how to use the command.
-
Usage
$ racd [-d] [-f binary Tmax configuration file name] [-h] [-k] [-i filename] [-l label]
       [-P umask] [-V] [-t wait_time]
Option Description [-d]
Enables debug mode when executing racd.
[-f binary Tmax configuration file name]
Specifies the binary Tmax configuration file to be used. The binary configuration file is the result of executing a cfl command and is referenced by tmboot and tmdown. The path to the file can also be specified. If a path is not specified, <tmconfig> in the $TMAXDIR/config directory will be used.
[-h]
Displays command help.
[-k]
Option to use a binary Tmax configuration file. If this option is specified, the configuration file will not be used. A racd is usually executed with this option (passive listen mode).
If this option is used when IPv6 is used, 'TMAX_RAC_IPV6=Y' must be set because the configuration file will not be used.
[-i filename]
Used to define multiple logical nodes in a single physical machine.
If the NODETYPE of a logical node is SHM_RACD, a racd must be executed for each logical node and each node must have a unique RACPORT. A TMAX_RAC_PORT environment variable must be set before executing a racd. When there are too many logical nodes, the name of the file that defines TMAXHOME, TMAXDIR, and TMAX_RAC_PORT can be specified, because it is difficult to set the variable for each node. For more information, see the examples in the following sections.
[-l label]
A delimiter used for information registered in a configuration file. When information of two or more systems is registered in a single file, the delimiter separates the information of each system.
[-P umask]
Allows a user to create a file with desired permissions for a process started by a racd.
[-V]
Shows the version of an executable file.
[-t wait_time]
Option to control the waiting time from start to completion when executing tmdown or tmboot through racd. If a negative value is specified, racd waits indefintely. A value of 0 is not allowed. If a positive value (≥1) is specified, racd waits for that amount of time.
-
Environment
This command can be used in a system with a Tmax system installed.
-
Examples
-
The following sets a desired umask by specifying the -P option to a racd.
<tmax.racd>
[tmaxs1]
TMAXHOME = /user2/starbj81/tmax32
TMAXDIR = /user2/starbj81/tmax32
TMAX_RAC_PORT = 3333
[NODE1]
TMAXHOME = /user2/starbj81/tmax32
TMAXDIR = /user2/starbj81/proj1
TMAX_RAC_PORT = 4335
[NODE2]
TMAXHOME = /user2/starbj81/tmax32
TMAXDIR = /user2/starbj81/proj2
TMAX_RAC_PORT = 4337
-
Create a configuration file.
*DOMAIN tmax1 SHMKEY = @SHMEMKY@, MINCLH = 1, MAXCLH = 3, TPORTNO = @TPORTNO@, BLOCKTIME = 30, RACPORT = 3255 *NODE @HOSTNAME@ TMAXDIR = "@TMAXDIR@", APPDIR = "@TMAXDIR@/appbin", PATHDIR = "@TMAXDIR@/path", @RMTNAME@ TMAXDIR = "@RMTDIR@", APPDIR = "@RMTDIR@/appbin", PATHDIR = "@RMTDIR@/path", *SVRGROUP svg1 NODENAME = "@HOSTNAME@", COUSIN = "svg2" svg2 NODENAME = "@RMTNAME@" *SERVER svr2 SVGNAME = svg1, CLOPT = "-o $(SVR).out -e $(SVR).err" *SERVICE TOUPPER SVRNAME = svr2 -
Start racd in a remote node.
$ export TMAX_RAC_PORT = 3255
$ racd –k –P 055
-
Start all Tmax instances in a HOST node (tmboot).
-
Check the permission for the <svr2.out> file in the ULOGDIR of the RMT node.
-
-
The following executes racd in NODE 1.
$ racd -k -i tmax.racd -l NODE1
-
The following uses only information from another command, such as tmboot, without referencing a configuration file.
$ racd -k
-
|
11. racdr
This command is used to execute commands and transfer files across nodes in a distributed environment, such as a multi-node or multi-domain configuration. The nodes to be managed must be running the racd daemon. Ensure that the configuration file is written according to the defined format.
The follownig shows how to use the command.
-
Usage
$ racdr [-f racdr configuration file name] [-n node name]
        [[[[-W shell program | -w] -e] -c command] | [-s file name] [-d path to store file]
        [-r]] [-h] [-V]
Option Description [-f racdr configuration file name]
Specifies the name of the configuration file containing information of nodes in other domains.
If not specified, the racdr.cfg file in the current directory or the $TMAXDIR/config/racdr.cfg file is used by default.
[-n node name]
Specifies the name of a node defined in the configuration file. All requests will be redirected to the racd of the specified node.
[-W shell program]
Executes the command with the [-e] and [-c] options using the specified shell program, such as ksh, tsh, or bash.
[-w]
Executes the command with the [-e] and [-c] options using a shell program. By default, "sh" is used. To use a different shell program, specify it with the [-W] option.
When using a wildcard character in a command parameter, wrap the parameter or the entire command line in single quotes to pass the wildcard literally to racd.
[-e]
Executes commands that are not allowed by the [-c] option. This option must be specified before [-c]. To execute the commands through a shell program, add the [-w] option.
[-c command]
Executes the specified command through racd.
All parameters entered after this option are treated as command-line arguments. Therefore, any other racdr options must be entered before this option. The allowed commands are limited to tmboot, tmdown, cfl, and gst. To execute other commands or a shell script, use the [-e] option.
[Caution]
When executing tmboot or tmdown through racd, an internally used option is added at the end of the command line. If the last parameter is an option that requires an argument but is given without one, abnormal behavior may occur.
For example:
racdr -c tmboot -d
Normally, this would print an error because -d requires an argument. However, when run through racd, the internally added option may be interpreted as the missing argument, causing unintended behavior. Make sure to enter parameters correctly when running these commands.
[-s file name]
Transfers the specified file to the node. This option must be used together with [-d].
If a file with the same name already exists in the target directory, the existing file is renamed and the transferred file is saved with the original name. The old file name is appended with the current date in the format YMDHMS. If that name already exists, an underscore and number (e.g., _no) are added at the end.
If the transfer fails, the new file is deleted and the original file is restored. To skip backup of the original file, use the [-r] option.
[-d path to store file]
Specifies the directory where transferred files are stored. Up to three paths can be specified. The paths are defined in the configuration file with a directory number (dest_no) for each.
The first path (dest1) corresponds to 1, the second (dest2) to 2, and the third (dest3) to 3.
[-r]
Skips creating a backup of the original file if the destination node already contains a file with the same name.
[-h]
Displays the command help.
[-V]
Displays the version of an executable file.
-
Environment
The racdr file and its configuration file are required.
-
Caution
-
The -n option must be specified as a command argument to execute the command for the specified node only.
-
Commands that require interactive input cannot be processed. Ensure that command arguments are configured to avoid requiring input.
Example) $ tmdown Do you really want to down whole Tmax? (y : n): --> $ tmdown -n node1 -
The execution result screen is sent to the client after the command completes.
-
In the result screen, the STDOUT and STDERR may be printed in a different order.
-
For tmboot, STDERR output is not included in the racdr execution result.
-
While executing a command, racd cannot process another request.
-
-
Example
-
The following shows a sample racdr configuration file that manages three nodes.
<racdr.cfg>
#nodename  ip-address    racport  dest1(appbin)  dest2(applib)  dest3(config)
tmnode1    192.168.1.1   5000     /tmax/appbin   /tmax/applib   /tmax/etc
tmnode2    192.168.1.2   5000     /tmax/appbin   /tmax/applib   /tmax/config
othnode    192.168.10.2  9999     /tmax/appbin   /tmax/applib   /tmax/config
-
Transfers the /app/svr2 file to the /tmax/appbin directory in the tmnode1 node.
$ racdr -f config.txt -n tmnode1 -s /app/svr2 -d 1
-
Executes the cfl command in the tmnode1 node.
$ racdr -f config.txt -n tmnode1 -c "cfl -i tmaxconfig.m"
-
Executes the tmboot command in the tmnode1 node.
$ racdr -f config.txt -n tmnode1 -c "tmboot -n node1"
-
Shuts down a specific server with the tmdown command in the tmnode1 node.
$ racdr -f config.txt -n tmnode1 -c "tmdown -n node1 -S svr2"
-
12. sdlc
There are several methods of communication between a server and a client. One method uses a structure. To use a structure for data communication, the structure must be recognized by a Tmax system. The sdlc command compiles a file that defines structures.
SDL (Structure Data Language) is a standard structure data type defined by Tmax. Data types, such as Integers, Floats, and Doubles, have the following problems when used to communicate between heterogeneous nodes.
-
Type Length
-
Machine Type - Big / Little Endian
-
Alignment
To address these problems, SDL, which supports Integer, Float, and Double, was developed.
Structures used in both a client program and a server program must match. If a structure is changed, the structure must be recompiled for both the client and the server with a sdlc command. A newly created <structure file name_sdl.c> file must be recompiled with a server program. The structure file to be used will have a .s extension and the result will have a <structure file name_sdl.c> format. A buffer type structure used for communication between a server and a client is defined in a structure file, and the name of the structure is used in tpalloc(), tpcall(), and tpacall(), as well as other functions with a communication buffer.
A file created with a sdlc command must be registered in the SDLFILE environment variable in a client.
The following shows how to use the command.
-
Usage
$ sdlc [-c] [-h header file name] {-i structure file name} [-o result name]
       [-s] [-v VIEW definition file] [-32] [-4vb|-4dp] [-f] [-V]
Option Description [-c]
Used for a client program. This option compiles a structure file used by a client program and converts it into a binary structure definition file with a standard data type.
<structure file name.sdl> is used to send and receive standard communication data when a client program is executed.
If this option is used, multiple structure files can be compiled together (e.g., sdlc -c -i *.s or sdlc -c -i demo.s sam.s abc.s). The default name of a sdl file created is <demo.sdl>. To rename the file, use a [-o] option.
If this option is not used, a sdlc command will create a program that encodes (converts a node data type into a standard data type) and decodes (converts a standard data type into a node data type) by compiling a structure file. Compiling the program with a server program creates a <structure file name_sdl.c> file, which has standard SDL type data.
[-h header file name]
Changes the name of a sdl header file from a default name, which is <structure file name_sdl.h>.
{-i structure file name}
A file that defines the structures used in server and client programs. This option is mandatory. The length of a structure name can be up to 16 characters.
[-o result name]
Changes the name of a resulting sdl file from the default name, which is <structure file name.sdl>.
[-s]
Used for a server program, this option creates a binary structure definition file. The file created is the same as a file created with a [-c] option.
Compiling a structure file creates a program that encodes and decodes each field of a structure according to a SDL type. A created file name is <structure file name_sdl.c>. This file is required to be compiled with a server program.
The -s and -c options are mutually exclusive. If -c is not specified, -s is used by default.
[-v VIEW definition file]
This option must be used to create a binary structure definition file for a conversation between a structure buffer and a field key buffer, . A service can be requested by saving structure buffer data in a field key buffer or by saving field key buffer data in a structure buffer.
The fbftos() and fbstof() functions can be used. For more information, see the examples in the following sections.
[-32]
Compiles a structure file into a 32 bit file to use 32 bit libraries in a 64 bit environment.
[-4vb]
Creates a Visual Basic interface file.
[-4dp]
Creates a Delphi interface file.
[-f]
A Visual Basic file name or a Delphi interface file name. This option must be used with [-4vb] or [-4dp] options.
[-V]
Shows the version of an executable file.
-
Environment
This command is supported in UNIX and MS-DOS.
-
Examples
-
The following is the structure of a VIEW definition file:
<demo.v>
VIEW demo
#type   Cname   fldkey count  flag size null
String  Demodata       INPUT  5    -    20     “”
Int     Num     INTDATA       5    -    -       0
END
Item Description type
The data type of member variables in a structure.
Cname
The name of a member variable.
fldkey
A field key mapped to a specified member variable.
count
The maximum sequential number of a field that can be saved in a structure.
flag
Currently not used.
size
A string type array size.
null
An initial value.
The following command creates a binary structure definition file:
$ sdlc -c -v demo.s -o tmax.sdl
-
The following compiles a <demo.s> structure file in a current directory for a server. As the result, <demo.sdl> and <demo_sdl.c> files are created, and <demo_sdl.c> is used to create a server program.
$ sdlc -i demo.s
-
The following compiles a <demo.s> structure file in a current directory for a client. As the result, a binary data file <demo.sdl> is created.
$ sdlc -c -i demo.s
-
13. svcrpt
The svcrpt command analyzes and displays log records related to service execution while a Tmax system is running. It shows the server name, service name, execution time, and the average service run time in seconds, minutes, and hours within a specified time range. If the -l option is set in the CLOPT section of each server, service logs are saved every five minutes in $ULOGDIR, in files named <svclog.mmddyyyy>.
The following shows how to use the command.
-
Usage
$ svcrpt [-T | -N | -A] [-s svcname] [-v svrname] [-x] [-S] [-d mm:dd]
         [-f hh:mm:ss] [-t hh:mm:ss] [-V] -i logfile [-n h|m|s] [-a]
Option Description [-T|(-N)|-A]
-
[-T] : Sorts results by the order of total service run time.
-
[-N] : Sorts results by the service execution count. This is the default value.
-
[-A] : Sorts results by the average processing time.
[-s svcname]
Specifies the service name to be displayed.
[-v svrname]
Specifies the server name to be displayed.
[-x]
Shows detailed information such as a server program name and maximum/minimum run times.
[-S]
Shows a service summary.
[-d mm:dd]
Specifies the date of the service logs to analyze.
[-f hh:mm:ss]
Specifies the start time for analysis.
[-t hh:mm:ss]
Specifies the end time for analysis.
[-V]
Shows the version of an executable file.
-i logfile
Specifies the name of the log file to analyze.
[-n h|m|s]
Displays the results in hours, minutes, or seconds. (Default: h)
[-a]
Displays the time, num, or other items at the specified interval, even if no service is called.
-
-
Environment
This command can be used in a system with a Tmax system installed.
-
Examples
-
The following analyzes a log file named 'svclog.07092025' and displays the result every hour.
$ svcrpt -i svclog.07092025
-
The following analyzes the 'svclog.07092025' log file and displays the result every minute.
$ svcrpt -i svclog.07092025 -n m
-
The following analyzes the 'svclog.07092025' log file, and displays, every second, the number of executions and the average processing time of the 'ACCOUNT' service, starting July 9 at 05:00.
$ svcrpt -s ACCOUNT -d 07:09 -f 05:00:00 -t 12:00:00 -i svclog.07092025 -n s
-
The following sorts the data in the 'svclog.07092025' log file by the average processing time.
$ svcrpt -i svclog.07092025 -A Services issued between Wed Jul 9 05:15:06 2025 and Wed Jul 9 12:31:17 2025 ACCOUNT Time Num Avg ------------ ------------ ------------ 05:00:00 1 0.100112 06:00:00 3 0.100270 07:00:00 1 0.100136 09:00:00 1 0.100515 10:00:00 2 0.100315 11:00:00 1 0.100165 12:00:00 1 0.100102 ------------ ------------ ------------ total 10 0.100247 TOLOWER Time Num Avg ------------ ------------ ------------ 05:00:00 2 0.000048 06:00:00 2 0.000031 08:00:00 2 0.000032 09:00:00 2 0.000031 10:00:00 5 0.000035 11:00:00 6 0.000033 12:00:00 5 0.000031 ------------ ------------ ------------ total 24 0.000034 TOUPPER Time Num Avg ------------ ------------ ------------ 05:00:00 3 0.000033 06:00:00 2 0.000029 07:00:00 3 0.000028 08:00:00 3 0.000033 09:00:00 3 0.000032 10:00:00 3 0.000031 11:00:00 1 0.000030 12:00:00 4 0.000033 ------------ ------------ ------------ total 22 0.000031 TOTAL Time Num Avg ------------ ------------ ------------ 05:00:00 6 0.016718 06:00:00 7 0.042990 07:00:00 4 0.025055 08:00:00 5 0.000033 09:00:00 6 0.016779 10:00:00 10 0.020090 11:00:00 8 0.012549 12:00:00 10 0.010039 ------------ ------------ ------------ total 56 0.017928 -
The following sorts the data in the 'svclog.07092025' log file by the number of service executions and displays a summary.
$ svcrpt -i svclog.07092025 -N -S Services issued between Wed Jul 9 05:15:06 2025 and Wed Jul 9 12:31:17 2025 SVC Num Avg ------------ ------------ ------------ TOLOWER 24 0.000034 TOUPPER 22 0.000031 ACCOUNT 10 0.100247 ------------ ------------ ------------ total 56 0.017928 -
The following two examples analyze the svclog.07032025 log file in seconds. The second example uses the [-a] option, allowing you to compare the results with and without this option.
$ svcrpt -i svclog.07032025 -n s

Services issued
        between Thu Jul  3 17:37:30 2025
        and     Thu Jul  3 17:37:37 2025

TOUPPER

           Time            Num            Avg
   ------------   ------------   ------------
       17:37:30              1       0.000164
       17:37:33              2       0.000035
       17:37:34              1       0.000012
       17:37:36              1       0.000058
   ------------   ------------   ------------
          total              5       0.000061
$ svcrpt -i svclog.07032025 -n s -a Services issued between Thu Jul 3 17:37:30 2025 and Thu Jul 3 17:37:37 2025 TOUPPER Time Num Avg ------------ ------------ ------------ 17:37:30 1 0.000164 17:37:31 0 0.000000 17:37:32 0 0.000000 17:37:33 2 0.000035 17:37:34 1 0.000012 17:37:35 0 0.000000 17:37:36 1 0.000058 ------------ ------------ ------------ total 5 0.000061
-
14. tdlclean
The tdlclean command removes outdated libraries or unnecessary files in a run directory. To remove a dynamic module from shared memory, use [-m] or [-M] options.
|
Note the following precautions when using the tdlclean command:
|
The following shows how to use the command.
-
Usage
$ tdlclean [-p TDL root directory path] [-m library name] [-M function name] [-b]
           [-d yyyymmddhhmi] [-D “n hour|day” [-N number] [-v | -V] [-h]] [-f]
Option Description [-p TDL root directory path]
Specifies the TDL root directory. By default, this is either $TDLDIR or $TMAXDIR. To specify a different directory, use this option.
[-m library name]
Deletes the specified library and its related files from TDL shared memory and the run directory.
[-M function name]
Deletes only the specified function from shared memory while retaining the related files in the run directory. However, if VERSION=1 is set, this option behaves the same as [-m].
[-b]
Skips backup of shared memory files even if the BACKUP parameter is specified in the TDL configuration file (tdl.cfg). Can be used with either [-m] or [-M].
[-d yyyymmddhhmi]
Deletes all files of older library versions prior to the specified time (yyyymmddhhmi). Cannot be used with [-m] or [-M].
[-D “n hour|day”]
Deletes all files of older library versions prior to the specified hour or day. Cannot be used with [-m] or [-M].
[-N number]
Deletes all files of older library versions except for the specified number of files. Cannot be used with [-m] or [-M].
[-v | -V]
Shows the version information.
[-h]
Shows the command help.
[-f]
Registers all library information from the run directory into heap memory, and then performs a comprehensive comparison with the functions in the latest libraries in TDL shared memory.
This option can improve performance. Cannot be used with [-N], [-m], or [-M].
-
Examples
-
The following removes outdated library files:
$ tdlclean
-
The following removes library files that were created before 00:00 on February 1st, 2009:
$ tdlclean –d 200902010000
-
The following removes library files older than five days:
$ tdlclean -D "5 day"
-
The following removes mylibrary from TDL shared memory and the outdated files:
$ tdlclean -m mylibrary
-
15. tdlinit
The tdlinit command initializes a TDL shared memory and dynamic modules. This command is executed only once when Tmax is installed and before Tmax starts. This command can be executed only in a master node in a multi-node environment.
The following shows how to use the command.
-
Usage
$ tdlinit [-p TDL root directory path] [-x export function extraction script file path] [-f] [-b]
          [-B backup file path] [-i] [-v | -V] [-h]
Option Description [-p TDL TDL root directory path]
Specifies the TDL root directory. By default, this is either $TDLDIR or $TMAXDIR. To specify a different directory, use this option.
[-x export function extraction script file path]
Specifies the directory containing the script file that extracts the export functions.
[-f]
Initializes already existing shared memory by force.
[-b]
Restores shared memory from a backup file.
[-B backup file path]
Restores shared memory from the specified backup file.
[-i]
Checks the run directory after a backup. Can be used with the [-b] or [-B] option.
[-r]
Reconstructs hashes when creating shared memory from a backup file generated after TDL patching. Must be used together with the [-b] or [-B] option; otherwise, an error may occur during hash construction.
[-v | -V]
Shows the version information.
[-h]
Shows the command help.
-
Examples
-
The following initializes shared memory and modules using a TDL configuration file <tdl.cfg>:
$ tdlinit
-
The following backs up shared memory from a backup file in the event of a system failure or restart:
$ tdlinit -b
-
-
Note
A script file that extracts an export function is required if VERSION is set to 4.
/* Example of exp file */
/* dlib.exp */

#! dlib.so
TmaxSoft::Airplain
Car
16. tdlnm
The tdlnm command retrieves a list of functions that are automatically exported to a specified library when VERSION is set to 2 or higher.
The following shows how to use the command.
-
Usage
$ tdlnm [-p TDL root directory path] [-x export function extraction script file path]
        [-m library name] [-v | -V] [-h]
Option Description [-p TDL root directory path]
Specifies the TDL root directory. By default, this is either $TDLDIR or $TMAXDIR. To specify a different directory, use this option.
[-x export function extraction script file path]
Specifies the directory containing the script file that extracts the export function.
[-m library name]
Specifies the name of the library that retrieves a list of automatic export functions.
[-v | -V]
Shows the version information.
[-h]
Shows the command help.
-
Example
The following retrieves a list of export functions in the mylibrary.
$ tdlnm -m mylibrary
17. tdlrm
The tdlrm command removes shared memory when a TDL is no longer used. tdlcall() cannot be called after this command is executed.
The following shows how to use the command.
-
Usage
$ tdlrm [-p TDL root directory path] [-v | -V] [-h]Option Description [-p TDL root directory path]
Specifies the TDL root directory. By default, this is either $TDLDIR or $TMAXDIR. To specify a different directory, use this option.
[-v | -V]
Shows the version information.
[-h]
Shows the command help.
-
Example
The following removes TDL shared memory.
$ tdlrm
18. tdlseqno
This command retrieves the sequence number of a specific module and function .
The following shows how to use the command.
-
Usage
$ tdlseqno [-m library name|-M function name[-p TDL root directory path]] [-V] [-h]Option Description [-p TDL root directory path]
Specifies the TDL root directory. By default, this is either $TDLDIR or $TMAXDIR. To specify a different path, use this option.
[-m library name]
Specifies the library name.
[-M function name]
Specifies the function name.
[-V]
Displays the version information.
[-h]
Displays command help.
-
Examples
-
The following retrieves the sequence numbers of the specified module and functions from $TDLDIR or $TMAXDIR.
$ tdlseqno -m library1 -M module1
-
The following retrieves the sequence numbers of the specified module and functions from the specified directory.
$ tdlseqno -m library1 -M module1 -p dirname
-
19. tdlshm
The tdlshm command retrieves information about TDL shared memory and enables/disables statistics monitoring and modules.
The following shows how to use the command.
-
Usage
$ tdlshm [-p TDL root directory path] [-r] [-S] [-n node name] [-m library name]
         [-M function name] [-C] [-c start_index end_index] [-s e|d|r]
         [-u e|d] [-I mincol] [-v | -V] [-b] [-B backup file path] [-a] [-h]
Option Description [-p TDL root directory path]
Specifies the TDL root directory. By default, this is either $TDLDIR or $TMAXDIR. To specify a different directory, use this option.
[-r]
Displays information about modules currently undergoing synchronization updates in a multi-node environment.
[-S]
Displays statistical information for dynamic modules. The retrieved information includes the AVG, MIN, and MAX execution time of each module, as well as the AVG, MIN, and MAX CPU time.
[-n node name]
Specifies the node from which to retrieve information in a multi-node environment.
[-m library name]
Specifies the name of the library to retrieve.
[-M function name]
Specifies the name of the function to retrieve.
[-C]
Executes dlopen and dlsym for all modules.
[-c start_index end_index]
Executes dlopen and dlsym for the modules within the specified index range.
[-s e|d|r]
Configures statistics monitoring for dynamic modules.
-
e : Enable
-
d : Disable
-
r : Reset
[-u e|d]
Configures a dynamic module.
-
e : Enable
-
d : Disable
This option must be used with [-m] or [-M] options because only a single module can be set at a time.
-
The [-m] option must be specified if VERSION is set to 1 or 2 because the module name must be unique for all libraries. The function name used as an argument of the [-m] option must be unique.
-
[-m] and [-M] options must be specified if VERSION is set to 3, because, in this case, functions with different libraries can use the same name. The [-M] option must be used with the [-m] option.
[-I mincol] (Uppercase I)
Displays a comparison count, in the "Collision=n" format, when a hash collision occurs in a module. If n is 0, only one comparison was found.
mincol is a minimum comparison count. The value must be greater than 0. When displaying each module, only information about modules with a comparison count greater than a specified value are displayed. Set mincol to a large value to quickly find a function with a high comparison count.
This option can be used with [-p], [-m], [-M], and [-r] options.
[-v | -V]
Shows the version information.
[-b]
Retrieves information from the files defined by the BACKUP parameter in the TDL configuration file(tdl.cfg), instead of from shared memory data.
[-B backup file path]
Retrieves information from the specified backup file, instead of from shared memory data.
[-a]
Displays any discrepancies between the files defined by the BACKUP parameter in the TDL configuration file (tdl.cfg) and the shared memory data.
When used with [-B backup file path], it compares the specified file with the shared memory data, and displays any discrepancies detected. If the compared information matches, SUCCESS is printed on the last line. If there are differences, the number of discrepancies (headers, modules, and indexes) is printed.
[-h]
Shows the command help.
-
-
Examples
-
The following is the basic usage of tdlshm:
$ tdlshm TDLNAME = REGION1
- TDLDIR = /home/jeffry/tmax LOGDIR = /home/jeffry/tmax/log/dlog
- BACKUP = /home/jeffry/tmax/log/dlog/tdl.bak VERSION = 2, SHMKEY = 0x90000,
- IPCPERM = 0750 MAXMODULES = 256, CURMODULES = 3, Global SEQNO = 45e27d28,
- MONITOR = Y MODE = SINGLE, DOMAINID = 1 Index = 125, Funcname = myfunction1,
- Libname = myfunction1, Seqno = 45e27d28, Active = Y Index = 126,
- Funcname = myfunction2, Libname = myfunction2, Seqno = 45e27d28, Active = Y,
- Index = 127, Funcname = myfunction3, Libname = myfunction3, Seqno = 45e27d28,
 Active = Y
-
The following retrieves information about TDL statistics:
$ tdlshm -S TDLNAME = REGION1
- TDLDIR = /home/jeffry/tmax LOGDIR = /home/jeffry/tmax/log/dlog
- BACKUP = /home/jeffry/tmax/log/dlog/tdl.bak VERSION = 2, SHMKEY = 0x90000,
- IPCPERM = 0750 MAXMODULES = 256, CURMODULES = 3, Global SEQNO = 45e27d28,
- MONITOR = Y MODE = SINGLE, DOMAINID = 1 Index = 125, Funcname = myfunction1,
- Libname = myfunction1, Seqno = 45e27d28, Active = Y Count = 0 SVC: Avg = 0.000,
- MinTime = 0.000, Maxtime = 0.000 CPU: Avg = 0.000, MinTime = 0.000,
- Maxtime = 0.000 Index = 126, Funcname = myfunction2, Libname = myfunction2,
- Seqno = 45e27d28, Active = Y Count = 0 SVC: Avg = 0.000, MinTime = 0.000,
- Maxtime = 0.000 CPU: Avg = 0.000, MinTime = 0.000, Maxtime = 0.000 Index = 127,
- Funcname = myfunction3, Libname = myfunction3, Seqno = 45e27d28, Active = Y,
- Count = 0 SVC: Avg = 0.000, MinTime = 0.000, Maxtime = 0.000 CPU: Avg = 0.000,
- MinTime = 0.000, Maxtime = 0.000
-
The following is the result when [-s] or [-u] options are used:
$ tdlshm -s r
$ tdlshm -s e
$ tdlshm -s d

# VERSION=1|2
$ tdlshm -u e -M myfunction
$ tdlshm -u d -M myfunction

# VERSION=3
$ tdlshm -u e -m mylibrary -M myfunction
$ tdlshm -u d -m mylibrary -M myfunction
-
The following is the result when [-C] or [-c] options are used:
$ tdlshm -C
$ tdlshm -c 0 1024
$ tdlshm -c 1024
-
20. tdlsync
The tdlsync command synchronizes a backup file with TDL shared memory. This command is necessary when automatic backup is disabled.
The following shows how to use the command.
-
Usage
$ tdlsync [-p TDL root directory path] [-B backup file path] [-v | -V] [-h]Option Description [-p TDL root directory path]
Specifies the TDL root directory. By default, this is either $TDLDIR or $TMAXDIR. To specify a different directory, use this option.
[-B backup file path]
Specifies the backup file directory.
[-v | -V]
Shows the version information.
[-h]
Shows the command help.
-
Example
The following example backs up shared memory with a file specified as a BACKUP in the TDL configuration file <tdl.cfg>:
$ tdlsync
21. tdltrace
This command retrieves the configuration and statistical information of TDL.
The following shows how to use the command.
-
Usage
$ tdltrace [-p directory path] [-P PID] [-V] [-h] [-c]Option Description [-p directory path]
Specifies the TDL root directory. By default, this is either $TDLDIR or $TMAXDIR. To specify a different directory, use this option.
[-P PID]
Displays the information of the specified server process.
[-V]
Displays the version information.
[-h]
Displays the command help.
[-c]
Identifies zombie processes and removes their information.
-
Examples
$ tdltrace
$ tdltrace -P 20113
$ tdltrace -P 20113 -p dirname
$ tdltrace -c
22. tdlupdate
The tdlupdate command updates a specified dynamic module. A library name must be specified with a [-m] option. If a specified library is already registered, the library will be updated. If the library is not registered, it will be added. This command can be executed both in the Master node and a slave node within a multi-node configuration.
The following shows how to use the command.
-
Usage
$ tdlupdate [-p TDL root directory path] [-r directory path]
            [-x export function extraction script file path] [-f] [-m library name] [-b]
            [-c] [-l file name] [-i] [-Q seqno] [-C [cp | mmap | self]] [-e] [-N] [-v|-V] [-h]
Option Description [-p TDL root directory path]
Specifies the TDL root directory. By default, this is either $TDLDIR or $TMAXDIR. To specify a different directory, use this option.
[-r directory path]
Specifies the TDL root directory (TDLDIR) of a remote node to execute tdlupdate.
When the [-p] option is used and multiple TDL root directories exist, the [-r] option is required to distinguish the target directory.
[-x export function extraction script file path]
Specifies the directory containing the script file that extracts the export functions.
[-f]
When VERSION=2, forces the update even if the same function name already exists in another library.
[-m library name]
Specifies the library name to update. To specify multiple libraries, separate them with commas (,) without spaces.
There is no limit to the number of libraries or functions that can be registered in each library. However, in a TDL multi-node environment, each library can contain a maximum of 1,024 registered functions.
[-b]
Skips the backup of shared memory files even if the BACKUP parameter is specified in the TDL configuration file (tdl.cfg).
[-c]
Synchronizes data across nodes in a multi-node configuration.
[-l file name]
Updates libraries listed in the specified file. All files are checked, and updates are performed only if no issues are detected. If an issue is found, a rollback is performed. To specify multiple files, separate them with commas (,) or newlines (Enter).
There is no limit to the number of libraries or functions that can be registered in each library. However, in a TDL multi-node environment, each library can contain a maximum of 1,024 registered functions.
[-i]
Continues updating with the next file even if a target file does not exist.
[-Q seqno]
Uses the specified sequence number instead of the current time.
[-C [cp|mmap|self]]
Specifies the file copy method, overriding the COPY parameter setting in the TDL configuration file (tdl.cfg).
Choose one of the following:
-
cp
-
mmap
-
self
[-e]
Returns an error code if tdlupdate fails on certain nodes in a multi-node configuration (MODE=SHARED).
If this option is not set, the Master node returns the success value (0) even if tdlupdate fails on certain nodes.
[-N]
Selectively synchronizes modules to be updated with tdlupdate in a multi-node configuration (MODE=SHARED).
If this option is not specified, all modules registered in SRUNDIR are synchronized with those in LRUNDIR, which may take more time.
In a multi-node environment (MODE=SHARED), using the [-N] option is not recommended, as it may cause unstable synchronization. If synchronization issues occur, it is recommended to perform a full synchronization with 'tdlupdate -c' during a low-traffic period.
[-v | -V]
Shows the version information.
[-h]
Shows the command help.
-
-
Examples
-
The following updates the <mylibrary.so> file:
$ tdlupdate -m mylibrary
-
The following updates multiple modules. The delimiter is a comma (,), and spaces are not allowed.
$ tdlupdate -m mylibrary,mylibrary2,mylibrary3
-
The following creates a file that contains a list of modules to be updated, and then updates the modules.
$ tdlupdate -l update.list
-
The following is a list of libraries in the <update.list> file. A comma (,) and newline can be used as a delimiter:
mylibrary,mylibrary2
mylibrary3
-
The following synchronizes nodes when there is an inconsistency in shared memory in a multi-node environment:
$ tdlupdate -c
-
The following uses the -e option in a multi-node environment.
$ tdlupdate -m func001 -e
TDLUPDATE.redhat73.14389.174419:(E) TDLUTIL0028 socket connect error: nodename = node2, racport = 3478 [TDL0018]
TDLUPDATE.redhat73.14389.174419:(I) TDLUTIL0095 /home/tmaxha/tmax/run/func001.64d5f4e3 is being processed [TDL0417]
TDLUPDATE.redhat73.14389.174419:(I) TDLUTIL0118 Synchronization succeeded [TDL0064]
TDLUPDATE.redhat73.14389.174419:(I) TDLUTIL0083 func001.64d5f4e3 updated successfully [TDL0443]
$ echo $?
9
-
-
Note
If VERSION=4, a script file that extracts export functions is required.
/* Example of exp file */
/* dlib.exp */

#! dlib.so
TmaxSoft::Airplain
Car
23. tencrypt
The tencrypt command encrypts the OPENINFO section in a configuration file. The OPENINFO section is not encrypted whenever a cfl is executed. However, data specified by a [-e] option is encrypted with an encryption tool and encrypted data is added to the OPENINFO section of a configuration file.
The following shows how to use the command.
-
Usage
$ tencrypt [-e sentence [-d]] [-g]Option Description [-e sentence [-d]]
Specifies the sentence to be encrypted. When used with the -d option, the decrypted result is also displayed.
[-g]
Generates a file containing a secret key shared by all modules and nodes for SEED encryption. Encryption and decryption are possible only with this secret key file. If the secret key changes, the encryption process must be performed again.
To use the same secret key across all nodes in a multi-node configuration, copy the generated secret key file to the other nodes. For non-SEED (conventional) encryption modes, no secret key file is generated.
-
Example
$ tencrypt [-e ORACLE_XA+Acc=P/scott/tiger+SesTm=6]
Please insert the following text in the configuration file "OPENIFNO" field.
[@@QEAzMWU4Y0lOYXd2Y2lkSzdpTW1lL0F4U0d1NCswekkxSFlaMjJweldOTERaM2ptVT0jQEBvNV
JPVUE9PQ==@@]

> Enter the output printed in the brackets '[]' into the desired OPENINFO section of the configuration file.
OPENINFO="@@QEAzMWU4Y0lOYXd2Y2lkSzdpTW1lL0F4U0d1NCswekkxSFlaMjJweldOTERaM2ptVT
0jQEBvNVJPVUE9PQ==@@"

> Run cfl and start tmax.
24. tmadmin
The tmadmin command starts tmadmin, a monitoring program provided as a command interpreter to dynamically manage a Tmax system. It displays information such as the configuration for a running system, the running status of a server process, and a service status, by reading information in the shared memory used by a Tmax system.
The following shows how to use the command.
-
Usage
$ tmadmin [-l] [-s|m] [-h] [-f [config_file]] [-n [node_name]] [-v] [-V]
          [-p] [-t] [-i lic_info]
Option Description [-l]
Manages only local nodes when a system that consists of multiple nodes with a racd is managed by a single node. Each node can manage only its own system with this option.
[-s]
Allows up to 10 tmadmin tools to be executed in a read-only mode. This option prevents dynamic changes to an environment and is the default value.
[-m]
Converts to Master mode, which allows an environment to be dynamically changed.
It is recommended that only one user uses Master mode because a critical system failure can occur if multiple users change the environment. The configuration file does not change.
[-h]
Shows the command help.
[-f [config_file]]
Manages a specified binary file. If an environment file is not tmconfig, a file name must be specified when tmadmin starts.
[-n [node_name]]
An option to monitor a specified node.
This option enables easier system management when running tmadmin in a multi-node environment.
[-v]
Shows the Tmax version. This option allows you to check the version from any location, regardless of whether the system is started or not.
[-V]
Shows the version of an executable file.
[-p]
Displays the results of the st -p, st -s, si, ci, and cfg commands, one screen at a time (similar to the more command).
[-t]
Displays the start and the end time of a command execution.
It displays the result as follows:
-
Format
[TIME][Type ] : hh:MM:ss:millisec
The following describes each type.
-
START : Displays the start time of a command.
-
END : Displays the end time of a command in the console, including the time taken for execution on remote nodes.
-
R_END : Displays the end time when a command executed from the console completes on a remote node. This time is recorded on the local node where tmadmin is executed, not on the remote node.
-
RP_START : Displays the start time before executing a command when using a tmadmin repeat command.
-
RP_END : Displays the elapsed time for executing a command when using a tmadmin repeat command, including the time taken by remote node execution.
-
[-i lic_info]
Displays the license information of the specified license.dat file.
-
-
Environment
This command can be used in a system with a Tmax system installed.
-
Examples
The following executes tmadmin and shows that tmadmin is running:
$ tmadmin
Executing tmadmin displays the following message and prompt:
--- Welcome to Tmax Admin (Type “quit” to leave) --- $$1 (tmadm):
Commands Available in tmadmin
The following commands can be used after a tmadmin has been executed:
-
Configuration information commands
Command Description tmaxinfo(ti)
Displays Tmax system information.
config(cfg)
Displays configuration.
configopt(cfgopt)
Displays current settings that can be modified dynamically among the configured options such as TMMOPT.
licinfo
Displays license information.
-
Status information commands
Command Description stat(st)
Provides statistics on process and service states.
gwinfo
Checks the channel states of the gateways defined in the GATEWAY section.
txgwinfo(txgwi)
Displays Tmax gateway information.
nontxgwinfo
Displays Tmax non-transaction gateway information.
jgwinfo
Displays JEUS gateway information.
ajgwinfo
Displays JEUS async gateway information.
wsgwinfo
Displays Web service gateway information.
smtrc
Checks the service status using GID.
clhsinfo
Checks the connection status between CLHs in a multi node environment.
tmmsinfo
Checks the connection status between TMMs in a multi node environment.
repeat(r)
Repeats the command.
clientinfo(ci)
Displays information about clients connected to the system.
svrinfo(si)
Displays server information.
txquery(txq)
Displays information about transaction processing.
rqstat(rqs)
Displays RQ status, or processes services accumulated in the disk queue.
-
Administrative commands
Command Description suspend(sp)
Suspends a running server process.
resume(rs)
Resumes a server process.
advertise/unadvertise
Advertises/unadvertises a name of a particular service.
restat
Resets the statistics on a specific server process or all processes.
rebootsvr(rbs)
Reboots a server program.
cfgadd(ca)
Dynamically adds a service.
set
Dynamically modifies the current configuration.
setopt
Dynamically modifies settings among options defined in the configuration, such as TMMOPT.
qpurge(qp)
Deletes tasks that are waiting in the queue.
discon(ds)
All clients currently connected are forcibly disconnected from the system.
logstart / logend
Starts/ends logging.
chtrc
Manages trace activity.
chlog
Dynamically changes the log level of TMM, CLH, or a specific server at runtime.
txcommit / txrollback
Reissues Commit or Rollback to terminate the transaction, if a fault occurs during transaction processing.
wsgwreload
Applies or modifies service information of a web service gateway.
restart
Restarts a server process.
notify_reconnect_clh(nrc)
Notifies the server process to reconnect to a specific CLH process.
cleandynsvc(cleands)
Removes dynamically registered services on servers containing 0 server process.
reconnect_clh
Reconnects CLH to other nodes.
admnoti(an)
Sends events to TCS, UCS, and RDP servers through admin.
-
Others
Command Description history(hist)
Displays a list of previously used commands.
!
Repeats the previous command.
quit(q)
Terminates tmadmin.
help(h)
Displays a list of available options.
nodeset(ns)
Limits tmadmin to only monitor information from the specified node.
nodeunset(nus)
Releases restriction of monitoring information only from a specific node.
tmd
Starts a virtual client emulator, which can be used to check services without creating an actual client.
|
For more information about the usage and results of each command, refer to tmadmin in Tmax Administration Guide. |
25. tmapm
The Tmax system configures service timeout setting by using a signal alarm. A tmapm is a separate server used to set and use service timeout setting when a signal alarm is not available.
tmapm and a USC server are configured in the SERVER section of a configuration file as follows:
*SERVER
tmapm    CLOPT = [-i sec] [-r sec] [-c command] [-l [0 | 1 | 2]]
| Option | Description |
|---|---|
[-i sec] |
Specifies the interval (in seconds) for checking service time. Shorter intervals increase system load. A decimal number is allowed. |
[-r sec] |
Specifies the command execution timeout (in seconds) after a service time is exceeded. Only an integer is allowed. |
[-c command] |
Specifies the command that will be executed when a corresponding service is still in a RUNNING state after an execution time (SCVTIME + command execution timeout) has expired. Use a shell command or a script file. The option passes the following parameters.
|
[-l [0|1|2]] |
Specifies the user log level. The default value is 0, and a larger value outputs more detailed information. |
The following is an example of configuring tmapm.
*SERVER
tmapm    SVGNAME = svg,
         SVRTYPE = UCS,
         CLOPT = "-o ulog  --  -i 5 -r 1 -c kill.sh -l 1"
26. tmaxlibver
The tmaxlibver command retrieves the version of a Tmax library. This command is available starting from Tmax 5 SP1. From Tmax 5 SP2 Fix4 onward, tmaxlibver has been enhanced to display library version information without requiring compilation.
If the CFLAGS environment variable is set, tmaxlibver uses only the compilation options specified in CFLAGS.
The following shows how to use the command.
-
Usage
$ tmaxlibver {-l filename} {-d | -s} [-6] [-L directory]
             [-h] [-V] [[-C]|[-o arg]|[-c arg]|[-u file]]
Option Description {-l filename}
Specifies the name of the library to retrieve.
{-d|-s}
Specifies whether the library is dynamic (-d) or static (-s).
[-6]
Specifies whether the library is 64-Bit. If not specified, the command defaults to 32-Bit.
If this option is set without the [–L] option, libraries in the $TMAXDIR/lib64 directory are automatically referenced.
[-L directory]
Specifies the directory containing the library to retrieve. Enter either an absolute path or relative path. If not specified, the default directory is determined by the [-6] option.
[-h]
Shows the command help.
[-V]
Shows the version of tmaxlibver.
[-C]
Uses the compilation mode (older version mode).
[-o arg]
Specifies the temporary file path to be generated during execution. If not specified, the command creates files named after "/tmp/tmaxlibver_stub", and deletes them after the execution completes. This feature is effective only when used with the -C option.
[-c arg]
Specifies the compiler name. (Default: cc)
This option is used to generate temporary executable files when checking the library version. This feature is effective only when used with the -C option.
[-u file]
Changes the libc library path.
When checking a dynamic library, the libc library is retrieved using the ldd command, and if this fails, you can use this option to specify the correct path. This feature is effective only when used with the -C option.
-
Example
$ tmaxlibver -l libsvr.a -s -6
libsvr.a for Tmax Version 5.0 Sp #2 Fix #4 r11808 fd 16384 64bit Aix71 patch
|
The version check feature is not supported for the DB stub library and some other libraries. |
27. tmaxtrace
The tmaxtrace command allows a Tmax application administrator or developer to use runtime tracing for each application. Running tracing records the execution of an application. For example, the trace point is the start or end of an atmi function, such as a tpcall(), or the start of a transaction.
The following occurs when a trace point is created:
-
A filter is applied to check the validity of a trace point. If the trace point is valid, a trace record is written in a receiver file and the final action is executed. The action can be a process abort, a system call, etc. A final action is optional.
-
Filter, Receiver, and Trigger are defined according to the specification described in the following section. They can be defined when declaring a TMAX_TRACE environment variable in both a client and server.
To change the specification of a running process, use a chtrc command of tmadmin.
-
When a Trigger option in a TMAX_TRACE is set to 'dye', runtime tracing is executed in server processes that receive a corresponding service’s request. If the option is set to 'dye' in a client, the process that handles the corresponding service becomes an atmi category and runtime tracing is executed.
-
When TMAX_TRACE is used in a client, a ULOGPFX must be specified in a client configuration file, <tmax.env>, or an environment variable.
If the following is specified, a <clilog.date> file is created in the corresponding directory and logs are written in the file.
Example)
ULOGPFX=/data1/tmax50/client/clilog
The following describes the usage of TMAX_TRACE environment variables:
-
Usage
TMAX_TRACE=filter-spec:receiver-spec[:trigger-spec]
-
filter-spec : category
A category for which runtime tracing is executed can be specified. To specify all categories, use an asterisk (*). If filter-spec is not specified, no category is selected.
The following describes each category item:
Category Description atmi
Runtime tracing is executed when an ATMI is called by a user or a TX interface (a function with a name that starts with tp or tx) is called.
iatmi
Runtime tracing is executed when an ATMI is called by a user or a TX interface or an interface internally called by an interface is called.
xa
Runtime tracing is executed when any XA interface is called.
trace
Displays Tmax trace configuration information.
-
receiver-spec : [/regular-expression/]receiver
If receiver-spec is not specified, no trace record is written.
Item Description receiver
Specifies the destination for trace records.
A receiver is a file to which trace records are sent. Currently, ulog, stdout, and stderr receivers are supported. If set to ulog, runtime tracing records are written to the user log. For stdout and stderr, runtime tracing records are written to the standard output stream and the standard error stream, respectively.
Trace records are output in the following format:
process-name.pid.hhmmss: TMAXTRACE:cc data
The cc data varies depending on the category.
-
atmi : at
-
iatmi : dt
-
xa : xa
-
trace : tr
regular-expression
Limits the trace point applied to filter-spec.
-
-
trigger-spec : [/regular-expression/]action
Item Description trigger
Specifies an action executed after sending a trace record to a receiver. This is optional.
action
The following are the available actions:
-
abort : Calls an abort() to terminate a process.
-
ulog(message) : Writes a message to the user log.
-
system(command) : Executes a command using a system(). Windows does not support this action.
-
trace(trace-spec) : Changes the specification of a Tmax trace with a trace-spec.
-
dye : Dyes a message.
-
undye : Does not dye a message.
-
sleep(seconds) : Sleeps for a specified period (in seconds). Windows does not support this action.
-
-
-
Examples
-
The following example executes runtime tracing whenever an atmi interface is called:
export TMAX_TRACE=atmi:ulog
-
The following example executes runtime tracing when a tpcall() is called:
export TMAX_TRACE=atmi:/tpcall/ulog
-
The following example terminates a corresponding server process using an abort() when an atmi/tx interface is called:
export TMAX_TRACE=atmi:ulog:abort
-
The following example executes runtime tracing whenever an atmi/tx interface is called but terminates a corresponding process by using an abort() when a tpend() is called:
export TMAX_TRACE=atmi:ulog:/tpend/abort
-
The following example executes runtime tracing for all categories:
export TMAX_TRACE=*:ulog:dye
-
The following example calls an atmi/tx interface and then changes a trace specification to "*:ulog:dye":
export TMAX_TRACE=atmi:ulog:trace(*:ulog:dye)
-
The following example calls a tpalloc() and then changes a trace specification to "*:ulog:dye":
export TMAX_TRACE=atmi:ulog:/tpalloc/trace(*:ulog:dye)
-
The following example is equivalent to 'TMAX_TRACE=atmi:ulog:dye':
export TMAX_TRACE=on
-
The following does not use a tmaxtrace. This is the default setting.
export TMAX_TRACE=off
-
The following only logs the tx and tp functions.
export TMAX_TRACE='*:/t[px].*/ulog:undye'
-
28. tmboot
The tmboot command starts a Tmax system (or a portion of it) using a Tmax configuration file. When this command is executed without an option or only with a [-f] option, all Tmax management processes and all server processes registered in the SERVER section of a Tmax configuration file are executed.
Tmax management processes are executed in all nodes registered in a NODE section. The execution order is TMM, CLL, and finally CLH. If an OPENINFO is registered in the SVRGROUP section in a server group, TMS processes are executed by referring to TMSNANE and MINTMS for each server group. Tmax management processes are executed in the bin directory under a TMAXDIR directory defined by each node.
After Tmax management processes are created, all application server processes in a SERVER section are executed. The application server processes are executed in the order they were registered in a section. The tmboot command initializes the server processes with tpsvrinit() and then executes them after they are initialized. The number of application server processes executed by a tmboot command is defined by a MIN value. If MIN is not specified, the default value will be 1.
The tmboot command uses CLOPT, MIN, and MAX values for servers in a SERVER section. These values are the boot parameters used by a tmboot when starting a server process. Other items are runtime parameters used by a system after a server starts. For more information about how to set parameters, refer to the SERVER section in a source configuration file.
All application server processes are executed from a APPDIR directory defined for a running node.
The following shows how to use the command:
-
Usage
$tmboot [-A] [-b] [-c] [-f binary Tmax configuration file name]
        [-g servergroup_name [-a] [-i][-s] [-S]][-h] [-V] [-n node_name]
        [-o clopt_string] [-q rq_svg_name] [-s server_name [-k count] [-a]]
        [-S server_name [-a]] [-t tms_name [-g svg_name] [-k all]] [-B trb_node]
        [-T] [-w] [-d boot_time] [-W] [-D] [-e clh | cas | tlm | tsm] [-R]
        [-G tms_svg_name]
Option Description [-A]
Starts all application server processes defined in the SERVER section of the Tmax configuration file.
[-b]
Arbitrarily starts the server process specified as a backup.
[-c]
Starts an additional CLH process. The number of CLH processes cannot exceed the MAXCLH value, which is defined in the Tmax configuration file.
[-f binary Tmax configuration file name]
Specifies the binary Tmax configuration file (the result of compiling a source file with a cfl) with a path.
If the [-f] option is not specified, <tmconfig> in the config directory under the TMAXDIR is used by default.
[-g servergroup_name [-a]
[-i] [-s] [-S]]
Starts a server process in a specified server group. The server group name is registered in the SVRGROUP section of a Tmax configuration file.
If the [-a] option is also used, a TMM process, not a TMBOOT process, will start a server.
If the [-i] option is not used, a server booting process will be stopped if a server reaches the maximum number of times it can be restarted. However, if an [-i] option is used, even if a server reaches the maximum number of times it can be restarted., a following server will be started and the entire process will proceed. If all servers reach the maximum number of times it can be restarted., the following message will be displayed.
(I) BOOT3022 all servers in group (svgname) reached max [BOOT0039]
If used with the [-s] or [-S] option, a process with the specified server name within the specified server group is targeted only.
[-h]
Shows the command help.
[-V]
Shows the version of an executable file.
[-n node_name]
Starts server processes in the specified node. The node name must be previously registered in the NODE section of the Tmax configuration file.
[-o clopt_string]
Appends a string to the value of CLOPT after \--. If a CLOPT value is already set for the server section in shared memory, the existing value after -- is removed, and the new string is appended. If the string contains spaces, enclose it in double quotation marks ("").
[-q rq_svg_name]
Starts a RQS.
[-s server_name [-k count] [-a]]
Starts a specified server processes. The server processes must be previously registered in the SERVER section of a Tmax configuration file.
The total number of server processes cannot exceed the MAX value defined in the SERVER section. If server processes are already running, only up to the remaining capacity (MAX minus the current number of processes) can be added, even if the specified value is larger.
If the [-k] option is not specified, only one server process is executed. When used with the -a option, the server is executed by the TMM process instead of the TMBOOT process.
[-S server_name [-a]]
Starts the specified server processes up to the configured MIN value. If the MIN value exceeds the remaining capacity, only as many processes as possible are started without exceeding the 'MAX' limit.
When used with the -a option, the server is started by the TMM process instead of the TMBOOT process.
When used with the [-g] option, only the specified server group is targeted. Without using the [-g] option, all server groups with the same server name are started.
[-t tms_name [-g svg_name] [-k all]]
Starts an additional TMS process. This is allowed only if the total number of TMS processes does not exceed the MAXTMS value specified in the Tmax configuration file. If the same TMS_name exists in multiple server groups, all TMS processes with that name are started.
When used with the [-g svg_name] option, only the TMS processes in the specified server group are started. This behavior is the same as the [-G] option.
When used with the [-k all] option, transaction recovery is enabled. Recovery is executed when all groups are terminated and then restarted, and it is performed by each TMS group. Use this option to start and terminate all TMS processes with the specified name.
[-B trb_node]
Starts the TRB node.
[-T]
Starts Tmax system processes (TMM, CLL, CLH, and TMS) only.
[-w]
Starts processes sequentially. If no option is used for the tmboot command, all registered server processes start at the same time. Some server processes may not start normally because certain OSs cannot create sufficient resources.
-
LOCK usage condition when server processes connect to TMM (LOCK | NOLOCK)
-
WAIT condition when server processes start (NO-WAIT | FINITE-WAIT)
-
Behaves the same as "-d -1000000 (1sec)".
-
When the [–d] option is used, this option will be ignored.
-
[-d boot_time]
Starting multiple server processes simultaneously can cause a problem because a CLH can overload with registration requests. To solve this problem, this option allows a registration interval to be adjusted by specifying the period spent to start server processes. (Default value: LOCK and NO-WAIT, unit: usec)
-
LOCK usage condition when server processes connect to TMM (LOCK | NOLOCK)
-
WAIT condition when server processes start (NO-WAIT | FINITE-WAIT)
-
-d val < 0 : LOCK, |VAL| FINITE-WAIT *
-
-d val = 0 : NO-LOCK, NO-WAIT
-
-d val > 0 : NO-LOCK, |VAL| FINITE-WAIT
-
If the val for the [–d] option is not 0, an absolute value (|VAL|) is used in usec.
-
-
For FINITE-WAIT, the |VAL| value specifies the maximum WAIT time of each process, not the total WAIT time of all processes.
-
When a server process sends the signal, WAIT is released. This means that it attempts to start the next process immediately after receiving the signal, without waiting until the specified |VAL| time. If VAL is a negative number, LOCK is used. Using this option ignores the [-w] option.
[-W]
Causes tmboot to wait for each server process to complete initialization before starting the next one.
[-D]
Similar to the -d option, but continues waiting until the specified |VAL| time has elapsed, even if a signal arrives during finite wait.
[-e clh | cas | tlm | tsm]
Starts CLH, CAS, and/or TLM Tmax engine processes. This option is used when an error occurred while using a tmboot command or when an engine process is terminated by a kill command. The tmdown command does not support this option.
-
clh : Starts a CLH.
-
cas : Starts a CAS.
-
tlm : Starts a TLM.
-
tsm : Starts a TSM.
[-R]
Starts a Tmax system in a remote node via a remote shell (rsh or remsh).
With this option, processes started by tmboot do not inherit tmboot’s standard input or output.
-
Usage
(remote)
 rsh $HOSTNAME tmboot.sh
 - tmboot.sh
 TMAXDIR=/data3/starbj81/tmax64; export TMAXDIR
 PATH=$PATH:$TMAXDIR/bin; export PATH
 export LD_LIBRARY_PATH=$LIBPATH:$TMAXDIR/ (BIT)
 export LIBPATH=$LIBPATH:$TMAXDIR/ (BIT)
 exec tmboot -R
 echo "tmboot success"
 exit 0
[-G tms_svg_name [-k all]]
Starts one TMS server in the specified server group.
When used with the [-k all] option, transaction recovery is enabled. Recovery is executed when all groups are terminated and then restarted, and it is performed by each TMS group. Use this option to start and terminate all TMS processes with the specified name.
-
-
Environment
This command can be used in a system with a Tmax system installed.
-
Examples
-
The following starts all Tmax processes and application server processes by referring to the <tmconfig> file in the config directory under the TMAXDIR directory:
$ tmboot
-
The following starts all TMS processes created with tms_name:
$ tmboot -t tms_name -k all
-
In the following, a configuration option of a server group is used. When several server groups use the same tms_name, the name of a server group that includes the corresponding TMS can be specified with the [-g] option. If the name is not specified, the TMS in the first server group with the specified name is started.
$ tmboot -t tms_name -k all -g svgname
-
The following starts all application server processes defined in the SERVER section by referencing the <tmconfig> file:
$ tmboot -A
-
The following starts application server processes in the cosmo node registered in the NODE section by referencing the <exconfig> configuration file in the /user1/tmax/con directory:
$ tmboot -n cosmo -f /user1/tmax/con/exconfig
-
The following starts 5 svr1 processes by referencing the <tmconfig2> configuration file.
$ tmboot -s svr1 -k 5 -f tmconfig2
-
Considerations when starting nodes in a multi-node configuration
In a multi-node environment, nodes attempt to connect to each other simultaneously. This can cause connection conflicts or timing issues, potentially resulting in connection failures or other errors.
As the number of nodes increases, the likelihood of such problems also increases. To avoid these issues, follow these guidelines:
-
Start nodes using 'racd' from the administrative node.
-
If starting nodes manually, start them one at a time with a certain interval between each.
tmconfig path reference in tmboot
When the tmboot command is used to start Tmax, the <tmconfig> binary configuration file in $TMAXDIR/config/ is copied to $TMAXDIR/path/ and the configuration file under $TMAXDIR/path is used. However, if $TMAXDIR/config/tmconfig is referenced to start a specific server with the -S or -s option and a Tmax engine is already started, a problem can arise under the following conditions.
-
Configuration File
<Original file>
*SVRGROUP
svg1       NODENAME = "tmaxh4"
*SERVER
svr1       SVGNAME = svg1
svr2       SVGNAME = svg1
*SERVICE
TOUPPER1   SVRNAME = svr1
TOUPPER2   SVRNAME = svr2
<Modified file during runtime>
*SVRGROUP
svg1       NODENAME = "tmaxh4"
*SERVER
svr1       SVGNAME = svg1
svr3       SVGNAME = svg1
svr2       SVGNAME = svg1
*SERVICE
TOUPPER1   SVRNAME = svr1
TOUPPER3   SVRNAME = svr3
TOUPPER2   SVRNAME = svr2
Execute the cfl command to re-compile the configuration file modified during runtime as follows:
$ cfl –i node1.m
Start the newly added server.
$ tmboot –S svr3
If executing tmboot -S after changing the configuration file during runtime, the following error may occur:
(E) BOOT3007 maxsvr (1) is over for svr(svr3:svr2): nodeno = 0, svri = 5, cur = 1, ksvr = 1 [BOOT0015]
When cfl is executed in a production environment, changes are applied only to $TMAXDIR/config/tmconfig, while shared memory continues to use the previous configuration defined in $TMAXDIR/path/tmconfig. As a result, if a new server process is started through tmboot -S, an already running server process may be restarted, which can cause errors. The cfl command is not permitted once a Tmax engine has been started. If cfl is executed in that state, the resulting errors can be difficult to diagnose.
Therefore, during Tmax engine operation, the <tmconfig> file referenced by tmboot when using the -S, -s, -g, -q, -t, or -A options is $TMAXDIR/path/tmconfig, not $TMAXDIR/config/tmconfig. (When the engine itself is started, $TMAXDIR/path/tmconfig is also referenced.)
$ cfl –i new_config.m –o tmchg
$ tmadmin : cfgadd –I tmchg
$ tmboot –S new_svr –f tmchg
|
When executing tmboot, if a specific binary configuration file is designated using the [-f] option, $TMAXDIR/config/tmconfig will be used to start the server. To dynamically add a server, a specific configuration file must be designated by using the [–f] option. The server is then started by using the changed binary configuration file placed in $TMAXDIR/config/. |
29. tmd
The tmd command is used to test a server program. This allows developers to easily check a server program.
|
The tmd command is not supported in Windows NT and Windows 2000. |
The buffer types supported by tmd are string, CARRAY, FIELD, and structure. A CARRAY buffer only supports data that can be printed. String and CARRAY data that contains whitespace must be bound by double quotation marks because whitespace indicates end of data. A struct buffer can only support a single structure with matching transmission and reception types. For example, a buffer that has the same buffer type as a receiving buffer must be used as the argument in a tpreturn() function.
If buffer types do not match, the following error message will be displayed.
(E) 3004 not supported output type
The following shows how to use the command.
-
Usage
$ tmd [-X] [-T time(sec)] [-t time(sec)] [-s] [-V] [-i file_name] [-l size(byte)] [-q]Option Description [ -X ]
Specifies whether to use transactions. Once this flag is set, a given service will be processed as a transaction.
[ -T time(sec) ]
Specifies the transaction timeout. Provides the same functionality as tx_set_transaction_timeout (time).
[ -t time(sec) ]
Specifies the block timeout. Provides the same functionality as tpset_timeout (time).
[ -s ]
Allows tpstart information to be received from a console so user information can be transferred to the system. With this option, a domain password, user name, and user password are required to execute tmd.
[ -V ]
Shows the version of an executable file.
[ -i file_name ]
Defines the service to invoke.
[ -l size(byte) ]
The number of bytes to be read from each line of a file specified by the [-i] option. The default is 1024 bytes.
[ -q ]
Handles string data, including \", in a file specified by the [-i] option. \" is replaced with " and treated as a part of a string.
-
Examples
-
The following is an example of using the tmd command:
$ tmd -i input_data
$ tmd -i tmdTest
$ tmd -i tmd.sh -s
$ tmd -i tmdTest -l 4096
-
The example below show a FIELD buffer that starts with an asterisk (*). The first line contains a function name, service name, and buffer type. The following lines list field names and data. As an indication of service execution, 'newline' is entered.
Input File  ( input_data )
*tpcall BR_ADD FIELD
BRANCH_ID     1
LAST_ACCT     9999
LAST_TELLER   99
ADDRESS      “25 Powell St. San Francisco, CA 94188”
PHONE         415-753-9000
-
When a STRING buffer is used, enter STRING as the buffer type instead of FIELD.
<tmdTest File example>
*tpcall TOUPPER STRING
abc
-
30. tmdown
The tmdown command shuts down the Tmax system entirely or partially. It references the Tmax configuration file to shut down the system, the binary Tmax configuration file (the source configuration file) must be compiled through the cfl command and the compiled output must be specified with the path by using the [-f] option.
If the [-f] option is not specified, the <tmconfig> file in the TMAXDIR/config directory will be used by default. If only the [-f] option is used, tmdown will end all Tmax management processes and all server processes registered in the SERVER section of the Tmax configuration file, and remove IPC resources related to the Tmax system. The system is terminated in the following order:
-
Application server processes registered in the SERVER section are ended.
-
Any active TMS process in each server group is terminated.
-
Tmax management processes are terminated: first CLH, second CLL, and then TMM. However, if the MIN value of CLH is not 1, CLL may be terminated before CLH.
Assume that there is a service that has been dynamically registered in a backup server, and now the service is removed from shared memory because the server is entirely shut down. In this case, after failure recovery (all backup servers were terminated and servers on normal nodes are restarted.), naming services cannot be provided to clients that accessed the backup node. Therefore, dynamic services of backup servers should not be deleted from shared memory even after the server is shut down.
The following shows how to use the command.
-
Usage
$tmdown [-A] [-f binary Tmax configuration file name] [-g servergroup_name] [-h] [-V][-i] [-b]
        [-n node_name] [-p server_num] [-q rq_svg_name]
        [-s server_name [-k count]] [-S server_name] [-t tms_name [-g svg_name]
        [-k all]] [-w wait_time] [-B trb_node] [-R] [-y] [-G tms_svg_name]
Option Description [-A]
Terminates all application server processes.
[-f binary Tmax configuration file name]
Specifies the binary Tmax configuration file with a path.
If the [-f] option is not specified, the tmconfig file in the config directory under the TMAXDIR is used by default.
[-g servergroup_name]
Terminates server processes in the specified server group.
When used with the [-s] or [-S] option, only the processes with the specified server name within the specified server group are terminated.
When used with the [-t] option, one TMS server matching the specified tms_name in the specified server group is terminated.
[-h]
Shows the command help.
[-V]
Shows the version of an executable file.
[-i]
Causes tmdown to terminate all processes immediately.
By default, tmdown shuts down the system after gracefully terminating all running processes. When using the [-i] (immediately) option, however, all running processes are forcibly terminated. Use this option with caution.
[-b]
Prevents the POD server from being automatically started by the ASQCOUNT setting before tmboot is explicitly invoked. Must be used with the [-S], [–g], and [–A] options.
[-n node_name]
Terminates all server processes on the specified node. The specified node name must be registered in the NODE section of the Tmax configuration file.
[-p server_num]
Terminates the specified server process.
Unlike the [-s] option, the -p option terminates a server process using its process number (spr_no). The process number can be obtained with "tmadmin st -p".
[-q rq_svg_name]
Terminates RQS.
[-s server_name [-k count]]
Terminates a single server process with the specified name.
The specified server process name must be registered in the SERVER section of the Tmax configuration file. When used with the [-k] option, the number of server processes to terminate can be specified. Even if the specified number exceeds the currently running processes, all running processes are terminated without error. Without the [-k] option, only one server process is terminated.
[-S server_name]
Terminates all server processes with the specified name. If more than one process matches, all matching processes are terminated.
When used with the [-g] option, only processes in the specified server group are terminated. Without the [-g] option, all server groups with the specified name are targeted.
[-t tms_name [-g svg_name] [-k all]]
Terminates one TMS process in all server groups with the specified TMS process name. If the same TMS_name exists in multiple server groups, all TMS processes with that name are targeted.
When used with the [-g svg_name] option, only the TMS processes in the specified server group are terminated. This behavior is the same as the [-G] option.
When used with the [-k all] option, transaction recovery is enabled. Recovery is executed when all groups are terminated and then restarted, and it is performed by each TMS group. Use this option to start and terminate all TMS processes with the specified name.
[-w wait_time]
Causes tmdown to wait for the specified time before terminating processes.
[-B trb_node]
Terminates the TRB node.
[-R]
Enables rolling down.
[-y]
Causes tmdown to skip the user confirmation prompt (y|n) before shutting down the system.
[-G tms_svg_name]
Terminates one TMS server in the specified server group.
When used with the [-k all] option, transaction recovery is enabled. Recovery is executed when all groups are terminated and then restarted, and it is performed by each TMS group. Use this option to start and terminate all TMS processes with the specified name.
-
Examples
-
The following shuts down an entire Tmax system by referencing the <tmconfig> file in the TMAXDIR/config directory. Tmax management processes and application processes are all terminated.
$ tmdown
-
The following shuts down all TMS processes with the specified tsm_name.
$ tmdown -t tms_name -k all
-
The following uses a server group configuration option. If multiple server groups have the same tms_name, use the [–g] option to specify the name of the server group to which the TMS belongs.
If no server group name is specified, the first server group with the matching TSM name is terminated.
$ tmdown -t tms_name -k all -g svgname
-
The following shuts down an entire Tmax system by referencing the <tmconfig2> file.
$ tmdown -f tmconfig2
-
The following terminates all application server processes in svr1 by referencing the <tmconfig> file.
$ tmdown -S svr1
-
The following forcibly terminates application server processes in svr1 by referencing the <tmconfig> file. Any server process not terminated immediately can be terminated by using the [-i] option.
$ tmdown -S svr1 -i
-
The following forcibly terminates a server process with the specified <spr_no> by referencing the <tmconfig> file. If a server has multiple processes, only the process belonging to a server that is currently in a loop can be forcibly terminated.
$ tmdown -p <spr_no> -i
-
The following terminates all application server processes in the 'cosmo' node registered in the NODE section by using the <exconfig> file in the '/user1/tmax/con' directory.
$ tmdown -n cosmo -f /user1/tmax/con/exconfig
-
The following terminates only one active svr1 process by using the <tmconfig2> file.
$ tmdown -s svr1 -f tmconfig2
-
Rolling Down
In previous versions of Tmax, when a Tmax system was abnormally terminated while processing client requests, requests being processed were completed but enqueued requests would fail, and an error message was reported. However, Tmax 5 provides the Rolling Down function, which allows a server to reply to all requests (including enqueued requests) before the server terminates.
-
Usage
$ tmdown –R –n node_nameOption Description –n node_name
Specifies the name of a node to terminate.
-
Environment
This command can be used in a system with a Tmax system installed.
-
Example
Assume that NODE A and NODE B are part of a multi-node (or multi-domain) system and a total of 100 clients are currently accessing NODE A.
-
When terminating the Tmax system on NODE A:
$ tmdown –R –n NODEA
-
A CLL in NODE A blocks a listening port for a client.
-
A Tmax system in NODE A finishes processing requests currently being handled by a server and then sends the results to the client.
-
The Tmax system in NODE A sends enqueued requests to NODE B, which is set as TMAX_BACKUP_ADDR.
-
The Tmax system in NODE A is shut down.
-
A Tmax system in NODE B handles the requests received from NODE A and directly replies to the client.
-
All clients connected to NODE A get the normal reply.
-
-
When terminating Tmax system of NODE B:
$ tmdown –R –n NODEB
-
A CLH in NODE A distributes 100 clients requests to NODE A and NODE B equally.
-
Enter tmdown -R –n NODEB to terminate the Tmax system in NODE B.
-
A CLL in NODE B blocks a listening port for a client.
-
The Tmax system in NODE B finishes processing requests currently being handled.
-
Because the client is connected to NODE A, the Tmax system in NODE B sends the processing results to CLH in NODE A. CLH in NODE A replies to each client.
-
The Tmax system in NODE B sends enqueued requests to NODE A, which is specified as TMAX_BACKUP_ADDR.
-
The Tmax system in NODE B is shut down.
-
The Tmax system in NODE A processes the requests and replies to each client.
-
All clients connected to NODE A get a normal reply. All 100 clients must get a normal reply.
For NODE B to process client requests instead of NODE A, TMAX_BACKUP_ADDR and TMAX_BACKUP_PORT of the client connected to NODE A must be specified to that of NODE B. Otherwise, when the Tmax system in NODE A is shut down, the enqueued client requests fail and the TPESYSTEM error is reported.
-
-
31. tmmbfgen
A user-written service information file cannot be read from a web service gateway and xwsdlgen. The file must be converted into the binary format using the tmmbfgen command. A file converted by tmmbfgen is called a service information binary file. tmmbfgen checks syntax and parameter types, which allows validation before sending data to a web service gateway. Moreover, this enables management of text files in sections.
The following shows how to use the command.
-
Usage
$ tmmbfgen [-r text_file,] [-i text_file] [-d svc] -o binary_fileOption Description [-r text_file]
A list of service information files (text).
[-i text_file]
Service information files (text).
[-d svc]
A list of services to be deleted.
-o binary_file
A service information binary file (default=sample) to be created (change).
-
Examples
-
The following is an example of creating a new service information binary file. A sample file is created and then service information from sample.txt and sample2.txt is appended to the sample file.
$ tmmbfgen -r sample.txt,sample2.txt -o sample
-
The following is an example of appending service information to an existing binary file. Service information from <sample.txt> is appended to an existing sample file. If a service is already defined in the sample file, it is overwritten.
$ tmmbfgen -i sample.txt -o sample
-
The following is an example that removes target services from a binary file. SVC1 and SCV2 services are removed from a sample file.
$ tmmbfgen -d SVC1,SVC2 -o sample
-
|
For more information about the untmmbfgen command, refer to untmmbfgen. |
32. tmsnmpd
In order to enable system configuration and performance queries via the SNMP protocol, Tmax uses tmsnmpd, an SNMP Agent. The SNMP protocol generally uses UDP port 161, which requires root privileges. For regular user account access, port 1024 and higher can be used. Tmax SNMP Agent runs independent of tmboot, similar to how racd runs. These services run regardless of tmboot/tmdown. The TMAXDIR environmental variable must be configured before starting tmsnmpd.
The following shows how to use the command.
-
Usage
$ tmsnmpd [[-h | -d| -f | -n node_name | -i| -l| -t| -p| -V] [[protocol:][IP:][PORT]]Option Description [-h]
Shows the command help.
[-d]
Enables debug mode.
[-f]
Uses the configuration file in the config_file directory. If not specified, the $TMAXDIR/snmp/tmsnmpd.conf file is used by default.
[-n node_name]
Specifies the name of a node in a multi-node configuration.
[-i]
Specifies the env_file file.
[-l]
Specifies the label to use in the configuration file.
[-t]
Specifies the interval at which to check TMM connection.
[-p]
Specifies the interval at which to collect performance data.
[-V]
Shows the version information
[protocol]
Specifies the protocol. Choose TCP or UDP. (Default: UDP)
[IP]
Specifies the IP address to be monitored.
[PORT]
Specifies the listen port for tmsnmpd to be used when the SNMP utility is connected.
-
Example
Without using root permission, specify the port to execute tmsnmpd as shown in the below example. It can be specified using agentAddress in <tmsnmpd.conf>.
$ tmsnmpd 9999
|
For more information about the tmmbfgen command, refer to tmmbfgen. |
Tmax SNMP MIB
End users can access Tmax Server properties and statistical data according to a definition registered in a Tmax MIB. MIB is part of SNMP. For more information about MIB, refer to www.ietf.org.
-
MIB Browsing
A Tmax MIB file (TMAXSOFT-TMAXMIB.mib) is located under the $TMAXDIR/snmp/mib/ directory. The MIB file can be opened with a text editor or a 3rd-party MIB browser. Tmax does not provide a MIB browser. A MIB browser can be obtained from SNMP application vendors.
-
Object Identification(OID)
OID is a series of integers that uniquely identifies objects for management purposes. OID exploits a tree structure to define a path to each object, and OID is defined in a MIB file. If a SNMP packet containing an OID value is sent to a Tmax SNMP Agent, information about the object with the corresponding OID is returned.
The following figure shows the OID tree structure of Tmax’s MIB. The OID of TmaxSoft Enterprise is 1.3.6.1.4.1.14586. The prefix of all of Tmax’s OID is 1.3.6.1.4.1.14586.200.
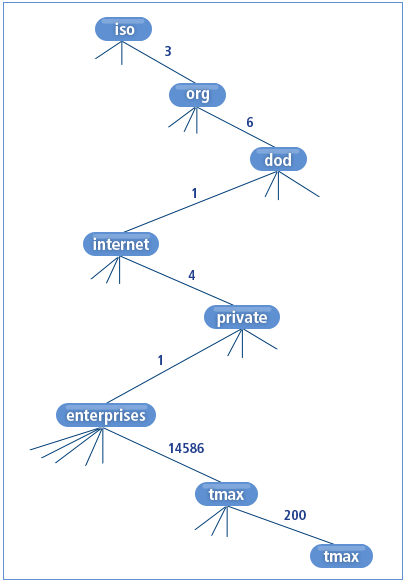
-
Caution
Currently only SNMP v1 and v2c are supported. However, its features are limited to composition and performance queries. (Supports READONLY only). SNMP applications, such as snmpget and snmpwalk, can be obtained from OS vendors or via NET-SNMPP (http://net-snmp.sourceforge.net/).
The following shows how to use NET-SNMP.
$ nmpwalk –v 2c –c tmax 192.168.1.100:9999 1.3.6.1.4.1.14586.200
Environment Configuration
-
Location
Using a SNMP agent (tmsnmpd) requires the $TMAXDIR/snmp/tmsnmpd.conf file.
-
Configuration
Specify a community string used for communication such as retrieving information or setting values by using a SNMP utility (snmpget, snmpwalk, etc.). In Tmax 4 SP1 and later versions, only rocommunity is allowed. Set 'rocommunity6' for the IPv6 communication environment.
rocommunity <string>
-
Example
To open both IPv4 and IPv6 connections in port 9999 as a UDP with a community name of 'tmax', run tmsnmpd and set the $TMAXDIR/snmp/tmsnmpd.conf file as follows:
agentAddress udp:9999, udp6:9999
rocommunity tmax
rocommunity6 tmax
33. tperr
The tperr command provides detailed information about errors based on the Tmax error number and type. Users can use this information to find the cause of an error during Tmax operation.
The following shows how to use the command.
-
Usage
$ tperr {-t error type} {-e errno number} [-f filename] [-h] [-V]Option Description {-t error type}
Specifies the error type. This option is required to specify the module name.
The following describes each error type.
-
TPE : Tmax API error.
-
ADM : Tmax administration tool (tmadmin) error.
-
BOOT : Tmax boot-up tool (tmboot) error.
-
CAS : CAS (Client Authentication Server) error.
-
CFL : CFL (Tmax Configuration File Compiler) error.
-
CLH : CLH (Client Handler) error.
-
CLI : CLI (Client Library) error. (libcli.a, tmax.dll)
-
CLL : CLL (Client Listener) error.
-
DOWN : Tmax shutdown tool (tmdown) error.
-
FDLC : FDLC (FDL File Compiler) error.
-
GST : Service table creation tool (gst) error.
-
MKPW : Password management tool (mkpw) error.
-
RAC : RACD (Remote Access Control Daemon) error.
-
RQS : RQS (Reliable Queue Server) error.
-
SDLC : SDLC (SDL File Compiler) error.
-
SVR : Server library error. (libsvr.a)
-
TCPGW : Custom TCP/IP gateway error. (libtcpgw.a)
-
TMD : Server application test tool (tmd) error.
-
TMGW : Custom TCP/IP Gateway error. (libtcpgw.a)
-
TMM : Tmax management process (tmm) error.
-
TMS : TMS library error. (libtms.a)
{-e errno number}
Specifies the error number. This option is required.
[-f filename]
Specifies the text file that contains detailed information about an error message. If this option is not specified, $TMAXDIR/bin/_tmax_errno will be used. This file is provided by default.
[-h]
Shows the command help.
[-V]
Shows the version of an executable file.
-
-
Environment
This command can be used in a system with a Tmax system installed.
-
Example
(E) BOOT3008 server(svr000) is not in config [BOOT0022]

$ tperr -t BOOT -e 3008
[BOOT3008] : server (svr_name) is not in config.
Type : ERROR
Description : You specified invalid server name.
Action : Check the configuration file for valid server names.
TPEBADDESC (2)

$ tperr -t TPE ?e 2
[TPE 2] : TPEBADDESC
Cause : invalid call descriptor.
Solution : After confirm whether cd is valid, must call again tpstart().
|
For more information about error messages, refer to Tmax Error Message Reference Guide. |
34. uncfl
The uncfl command performs a reverse analysis on the tmconfig file — a binary file generated by compiling the text-based Tmax configuration file — and recovers the original text configuration file.
This command is useful if the text configuration file is accidentally deleted after compilation and execution. It can also help verify which configuration file the system is using when multiple configuration files exist. Additionally, it provides a convenient function for dynamic service addition using the cfgadd command in tmadmin. For more information about the cfadd command, refer to cfgadd(ca) in Tmax Administration Guide.
The following shows how to use the command.
-
Usage
$ uncfl [-i binary Tmax configuration file name] [-o text Tmax configuration file name] [-h] [-V]Option Description [-i binary Tmax configuration file name]
Specifies the name of the binary Tmax configuration file to be converted through a reverse analysis. Can be specified with the path. If no path is specified, the binary configuration file in the current directory is used by default. If this option is not set, a file named tmconfig is used to create a text configuration file by default.
[-o text Tmax configuration file name]
Specifies the name of the text configuration file to be created through a reverse analysis of the binary configuration file. This option is required. Can be specified with the path. If no path is specified, the text configuration file is created in the current directory by default.
[-h]
Shows the command help.
[-V]
Shows the version of an executable file.
-
Environment
This command can be used in a system with a Tmax system installed.
-
Examples
-
The following creates a text Tmax configuration file named <basic.m> in the /user1/tmax/temp directory. The <tmconfig> binary Tmax configuration file located in the current directory is used as the source.
$ uncfl -o /user1/tmax/temp/basic.m
-
The following creates a text Tmax configuration file named <basic.m> in the current directory. The <tmconfig> binary Tmax configuration file located in the /user1/tmax/bin directory is used as the source.
$ uncfl -i /user1/tmax/bin/tmconfig -o basic.m
-
|
For more information about the cfl command, refer to cfl. |
35. untmmbfgen
The untmmbfgen command reverts a service information binary file into a readable text format. For more information, refer to tmmbfgen.
The following shows how to use the command.
-
Usage
$ untmmbfgen -i binary_meta_file -o text_fileOption Description -i binary_meta_file
Specifies the binary service information file to convert.
-o text_file
Specifies the text service information file to create.
-
Example
The following converts a binary service information binary file into a text file that can be read by users.
$ untmmbfgen -i sample -o unsample.txt
36. xwsdlgen
The xwsdlgen command creates a WSDL document, which defines web services. Currently, there are two versions of WSDL documents: 1.1 and 2.0.
xwsdlgen uses a web service gateway configuration file and a service information binary file to create a WSDL document.
The following shows how to use the command.
-
Usage
$ xwsdlgen [options] -g wsgw_config_file -m binary_meta_file -o wsdl_file-
[options]
Option Description -w version
-
0 : WSDL1.1 (Default)
-
1 : WSDL2.0
-b binding_style
-
0 : rpc (Default)
-
1 : document
-
-
Input options
Option Description -g wsgw_config_file
Specifies the web service gateway configuration file.
-m binary_meta_file
Specifies the binary service information file.
-o wsdl_file
Specifies the WSDL file to create.
-