Environment Configuration
This chapter describes how to configure an AnyLink HTTP adapter and outbound rule.
1. Adapter Configuration
Configure an HTTP adapter in WebAdmin.
|
For information about accessing and using AnyLink WebAdmin, refer to AnyLink WebAdmin Guide. |
Log in to AnyLink WebAdmin through a web browser, and go to [System] > [Adapter] to view the adapter list.
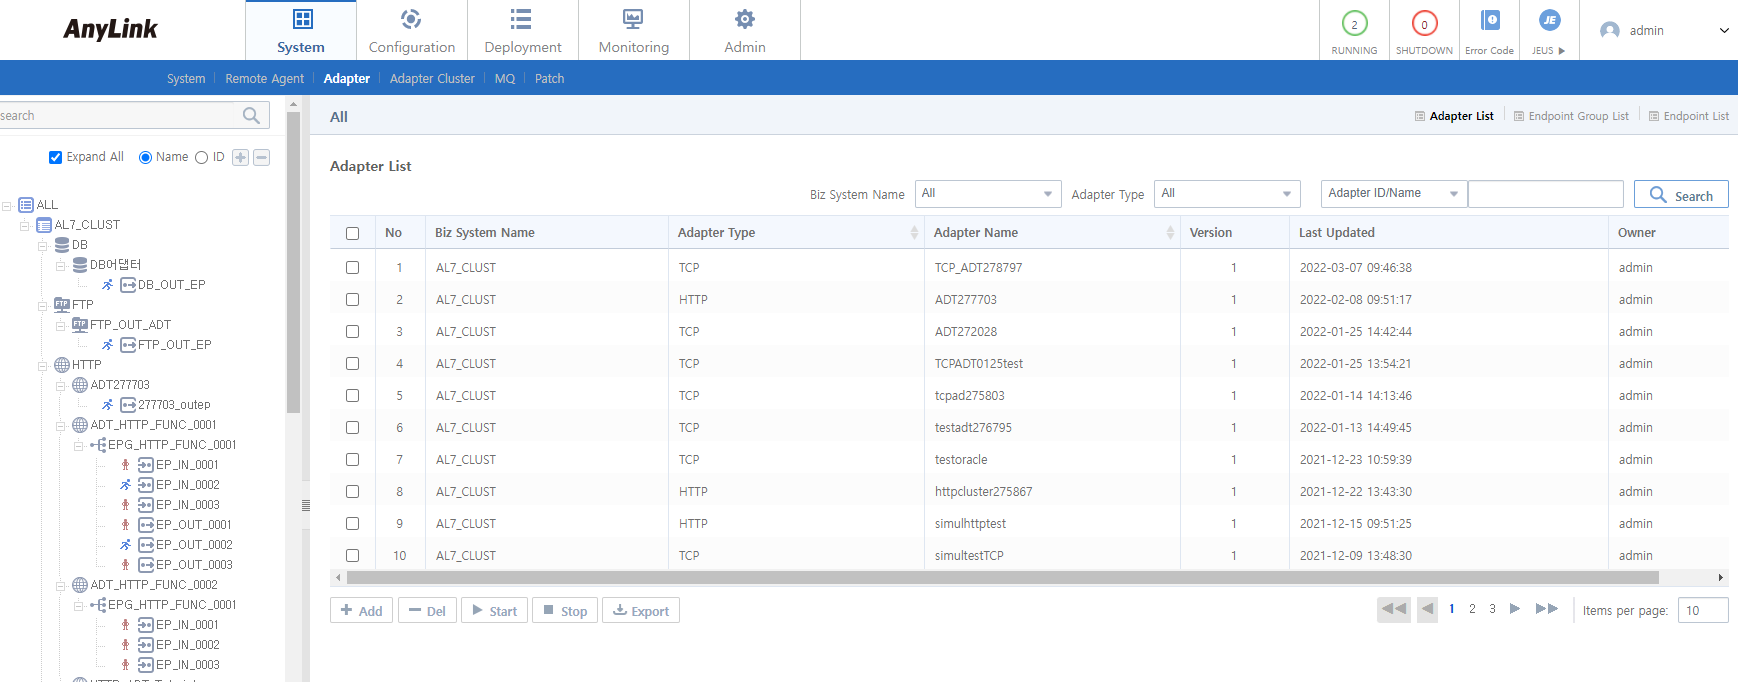
Click [Add] from the Adapter List screen to add an adapter. Enter the required information in the Add Adapter screen, and then click [Save]. If successful, the message "Created successfully." is displayed.

-
Basic Settings (* : Required)
Item Description Adapter ID *
Adapter ID. Only alphanumeric and special (-, _) characters are allowed, and the length must be between 3 and 30 characters. Must be unique within the same business system.
Adapter Name *
Adapter name. Only Korean, alphanumeric, and special (-, _) characters are allowed, and the length must be between 3 and 30 characters.
Adapter Type *
Select 'HTTP' from the list.
-
TCP
-
HTTP
-
Tmax
-
WebService
-
DB
-
FILE
-
FTP
-
MQ
-
SAP
-
UDP
-
SMTP
-
WEBDAV
-
Tuxedo
-
JMS
-
ebXML
-
ISO8583
-
ProObject
Description
Adapter description (optional).
Biz System Name *
Business system to deploy adapter to.
Deployment Purpose
Reason for deployment. Click [Deployment] > [Deployment History] tab to check this information.
-
-
[Advanced Settings] Tab
Item Description Outbound Thread Pool ID
Thread pool ID to be used during an outbound service call. If the specified ID is different from that of the thread pool executed in the engine, the thread is changed to this thread pool during an outbound service call.
This option is used to separate a thread pool for each adapter so that different adapters do not affect each other.
2. Endpoint Configuration
Select the [System] > [Adapter] menu of WebAdmin to display the adapter tree on the left. If you click an adapter to which you want to add an endpoint, adapter details are displayed on the right.
Click the [Endpoint List] tab in the Adapter Details screen to display the endpoint list of the adapter.

Click [Add] below the [Endpoint List] tab to go to the Add Endpoint screen. Enter the required items, and then click [Save] to add the endpoint. Check the result from the tree on the left.
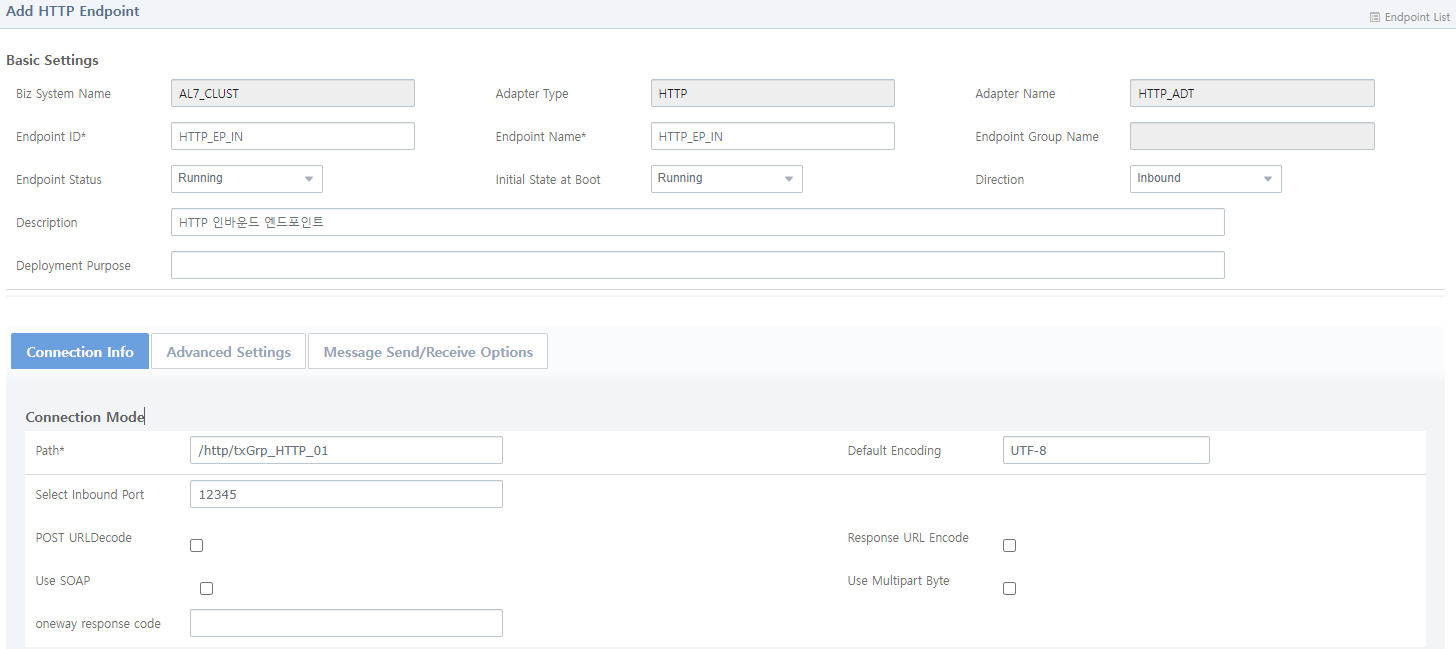
Add Endpoint Screen consists of the Basic Settings pane and [Connection Info], [Advanced Settings], and [Message Send/Receive Options] tabs. Depending on the 'Direction' in Basic Settings, items in these tabs will be different. For more information about tab items for each communication direction, refer to the corresponding section.
-
Basic Settings
The following shows the Basic Settings section of the Add Endpoint screen. (* : Required)
Item Description Endpoint ID *
Endpoint ID. Only alphanumeric and special (-, _) characters are allowed, and the length must be between 3 and 30 characters. Must be unique within the same adapter or endpoint group.
Endpoint Name *
Endpoint name. Only Korean, alphanumeric, and special (-, _) characters are allowed, and the length must be between 3 and 30 characters.
Endpoint Group Name
Endpoint group name.
Endpoint Status
Initial endpoint status.
-
Running : endpoint is running.
-
Stopped : endpoint is stopped.
Initial State at Boot
Initial endpoint state at boot time.
-
Running : endpoint is in Running state at boot time.
-
Stopped : endpoint is in Stopped state at boot time.
Direction
Endpoint’s communication direction.
-
Inbound : endpoint for inbound messages.
-
Outbound : endpoint for outbound messages.
Description
Endpoint description. Optional.
Deployment Purpose
Reason for deployment. Click [Deployment] > [Deployment History] tab to check this information.
-
2.1. Inbound Endpoint
An HTTP inbound endpoint can process external incoming HTTP requests to AnyLink.
The following describes each tab displayed when the 'Direction' is selected as 'Inbound' in the Basic Settings of the Add Endpoint screen (Add Endpoint Screen - Basic Settings).
-
[Connection Info] Tab (* : Required)
 Add Endpoint Screen - [Connection Info] - Inbound
Item Description Path *
Path to be used to call an endpoint. The path consists of Servlet path and TX path of AnyLink. In the example above, /http is Servlet-path, and /txGrp_HTTP_01 is TX path of AnyLink. (Default contextpath in Servlet is deployed as /http.)
Default Encoding
Default encoding to be used in an endpoint. The encoding set in the message is given priority over the default encoding. If no encoding is set in the message and the endpoint, then the system’s default encoding is used.
Select Inbound Port
The endpoint port. If not specified, then all ports in JEUS will be listened.
POST URLDecode
Option to use URLDecode for POST request message. (URLDecode is always executed in GET).
Response URLEncode
Option to use URLEncode for POST request message. (URLEncode is always executed in GET).
Use SOAP
Option to use SOAP message format for communication.
Use Multipart Byte
Option to use multipart byte for inbound. Received multipart requests are not stored in a temporary file, but stored in byte arrays.
-
[Advanced Settings] Tab
 Add Endpoint Screen - [Advanced Settings] - Inbound
Item Description Message Handler
User message handler for the request message.
Message Parameter Name
Value that uses a parsed GET parameter as the key. Only available for GET method.
Multipart Parameter Name
Part name of requested message when receiving multipart message.
BizTx Group/BizTx
BizTx Group/BizTx to be executed by the request received by the endpoint.
-
[Message Send/Receive Options] Tab
Message conversion is performed when receiving messages. This option is applied before 'Message Handler.'
 Add Endpoint Screen - [Message Send/Receive Options] - Inbound
Item Description Original characters
Characters to be replaced in a message. Newline (\n), tab (\r), or special (\u) characters also can be set.
Replaced characters
Characters to replace original characters.
2.2. Outbound Endpoint
HTTP outbound endpoint can send HTTP message from AnyLink to external servers.
The following describes each tab displayed when the 'Direction' is selected as 'Outbound' in the Basic Settings of the Add Endpoint screen (Add Endpoint Screen - Basic Settings).
-
[Connection Info] Tab (* : Required)
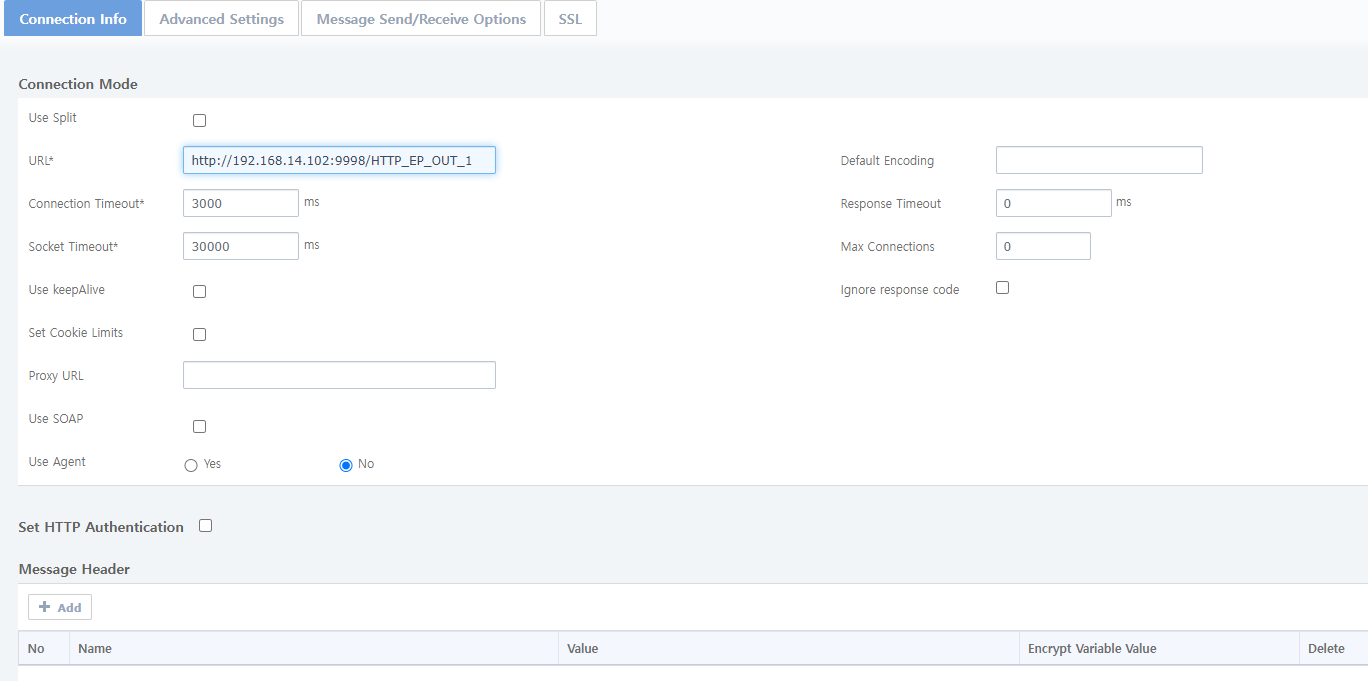 Add Endpoint Screen - [Connection Info] - Outbound
Item Description Use Split
Option to enter each URL for protocol, IP/host, path, and port.
URL *
URL of the destination to be connected through an outbound endpoint.
Default Encoding
Default encoding to be used in the endpoint. The encoding set in the message is given priority over the default encoding. If no encoding is set in the message and the endpoint, then the system’s default encoding is used.
Connection Timeout *
Timeout for getting a connection. (Default: 3000)
Response Timeout
Timeout for getting a response before an endpoint is stopped.
Socket Timeout *
Timeout for waiting to read data from a socket. (Default: 30000)
Max Connections
Maximum number of connections between an external server and an endpoint.
Use KeepAlive
Option to use HTTP header connection as Keep-Alive.
Use SOAP
Option to use SOAP message format for communication.
Use Agent
Option to use an endpoint as an agent. If you click 'Yes,' set the agent ID.
If you use an endpoint as an agent, add the library list below to the ${Agent installation folder}/lib/common path.
-
httpclient-4.3.2.jar
-
httpcore-4.3.2.jar
-
httpasyncclient-4.0.1.jar
-
commons-logging-1.1.3.jar
-
httpcore-nio-4.3.2.jar
Message Header
Add message headers in a key - value pair. If you use Encrypt Variable Value, encrypt the header with the algorithm set in the business system.
-
-
[Advanced Settings] Tab
 Add Endpoint Screen - [Advanced Settings] - Outbound
Item Description Message Handler
User message handler for the response message.
Message Parameter Name
Value with a parameter as the key. Only available for GET method.
-
[Message Send/Receive Options] Tab
Message conversion is performed when receiving messages. This option is applied before 'Message Handler.' For more information, refer to Inbound Endpoint.
-
[SSL] Tab
The following shows the [SSL] tab of the Add Endpoint screen.
 Add Endpoint Screen - [SSL] - Outbound
-
SSL
Item Description Use SSL
Option to use SSL authentication.
Select 'Use without SSL certificate' to use SSL for communication without SSL certificate.
-
Trust Store Setting
Set Trust Store information about SSL. This section is related to the Trust Store (public key, certificate) file settings to be used for SSL authentication.
Item Description Store Location
Storage location of the Trust Store.
Store Type
Storage type of the Trust Store. (Default: jks)
Client Authentication
Option to use the Key Store.
Store Password
Password for accessing the Trust Store.
-
Key Store Setting
Item Description Store Location
Storage location of the Trust Store.
Store Type
Storage type of the Trust Store. (Default: jks)
Private Key Password
Password for accessing the private key.
Store Password
Password for accessing the Key Store.
-
3. Configuring an Outbound Rule
This section describes how to configure an HTTP outbound rule in AnyLink Studio.
|
For more information about AnyLink Studio, refer to AnyLink Studio Guide. |
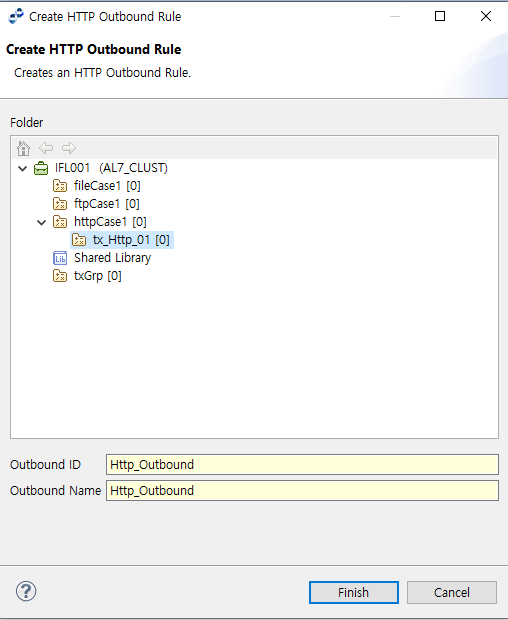
In the Studio BizTx Group navigator, right click on a BizTx/BizTx Group and go to [New] > [Outbound Rule] > [HTTP Outbound Rule] to open the following Create HTTP Outbound Rule screen. Enter the required items, and then click [Finish].
| Item | Description |
|---|---|
Outbound ID |
Outbound rule ID. Only alphanumeric and special (_) characters are allowed, and the first character must be an alphabet character. Must be unique in the same BizTx node. |
Outbound Name |
Outbound rule name. Only Korean, alphanumeric, and special (-, _) characters are allowed. Must follow the XML naming convention. |
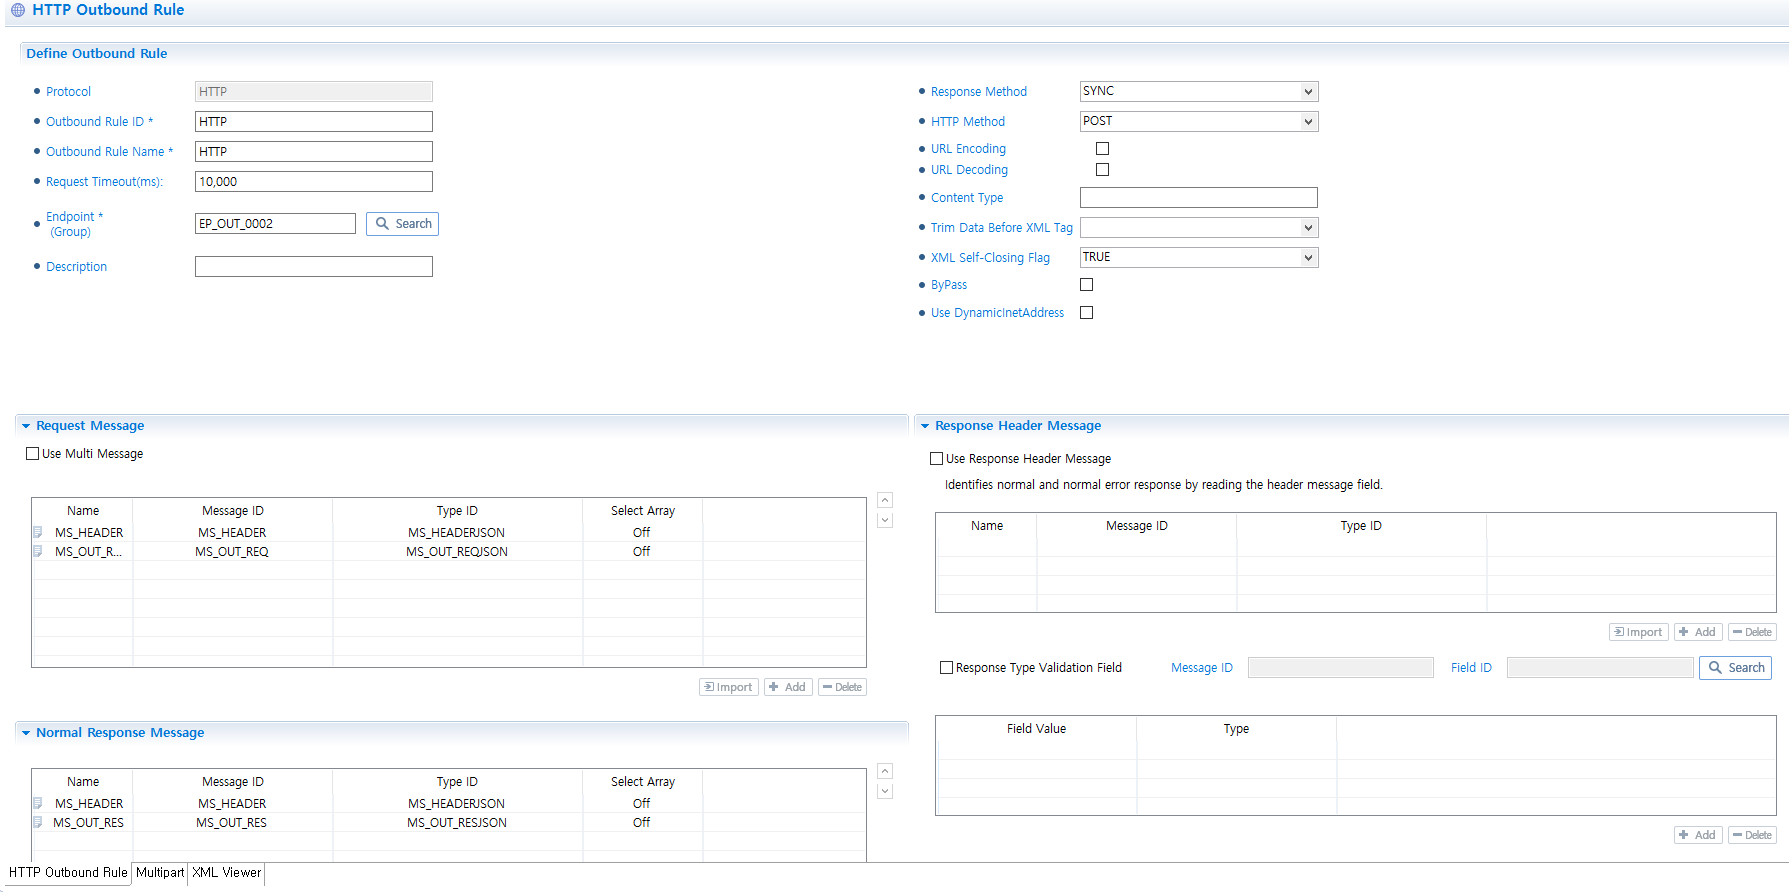
After an outbound rule is created, detailed settings are displayed in the following tabs.
-
Define Outbound Rule (* : Required)
Item Description Outbound Rule ID *
Outbound rule ID. Only alphanumeric and special (_) characters are allowed. Must be unique within the same BizTx node.
Outbound Rule Name *
Outbound rule name. Only Korean, alphanumeric, and special (-, _) characters are allowed.
Request Timeout (ms)
Request processing timeout. Timeout occurs if the server didn’t get connection or an outbound request response during the timeout period starting from the time when the outbound rule is called.
Endpoint (Group) *
Endpoint or endpoint group in which the outbound rule will be added. Must be connected to the server.
Description
Outbound rule description. Optional.
Response Method
Method of receiving a response.
-
SYNC :The endpoint that sends a request receives the response.
-
ONEWAY : No response.
HTTP Method
HTTP request method.
-
GET : Requests data from the URL.
-
POST : Sends data that can be processed by the server.
-
PUT : Stores data in the URL.
-
DELETE : Deletes data in the URL.
-
INBOUND : Sets the same method as a response method for an inbound request. Only available for an inbound request.
URL Encoding
Option to use URL encoding when sending a request to an endpoint URL. Only available for the POST method.
URL Decoding
Option to use URL decoding when receiving a response from an endpoint URL. Only available for the POST method.
Content Type
Content-Type to be specified in HTTP header. Generally it is set to be suitable for the message type. If not set, the default is text/plain.
When using messages in the Key-Value format with "application/x-www-form-urlencoded" Content-Type, the servelet can get the value through getParameter(Key).
Trim Data Before XML Tag
Option to remove blank characters before XML Tag to avoid a parsing error.
XML Self-Closing Flag
Empty XML tag.
-
FALSE : Sets to the '<ELEM></ELEM>' format.
-
TRUE : Sets to the '<ELEM/>' format.
ByPass
Option to call the outbound rule for bypass transaction. If selected, request and response messages are disabled.
Use DynamiclnetAddress
Option to set a host and a port to send request message field values. To select a message ID and a field ID, click [Search].
-
-
Define Outbound Rule Message
Request message and normal response message can be defined for an outbound rule.
Item Description Request Message
Request message for the outbound rule. A request message can be set as a multi-message. A multi-message is used for XML message to specify a namespace URI and local part separately for each message.
Select 'Use Multi Message' to set HTTP Multi Part information. (Refer to HTTP Multipart Settings).
Normal Response Message
Response message for the outbound rule.
Response Header Message
Option to use a response header message. The response header message is used when response messages are divided into normal and error response messages
-
Response Type Validation Field : When using a response header message, enter a message field and its type (normal or error) to identify normal and error response.
-
-
Define HTTP Multi Part
Multipart can be set for an outbound rule.
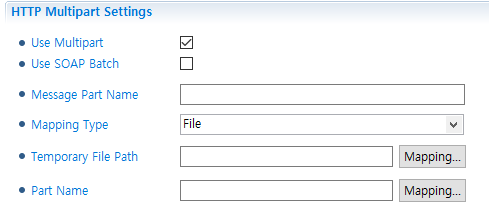 HTTP Multipart Settings
Item Description Use Multipart
Option to use multipart for sending messages.
Use SOAP Batch
Option to send a messages as a SOAP batch header.
If this option is selected, 'Message Part Name' cannot be specified. 'Part Name' for 'File Mapping Type', and 'Part Name' and 'File Name' for 'Byte Mapping Type' can not be set.
Message Part Name
First part name of the request message.
Mapping Type
Choose either of the following options:
-
File: Stored in a temporary file.
-
Byte : Stored in byte.
Temporary File Path
Path of the file to be sent when 'Mapping Type' is selected as 'File.'
Part Name
Part name of the file to be sent.
File Content
File content stored in byte when 'Mapping Type' is selected as 'Byte.'
File Name
File name stored in byte when 'Mapping Type' is selected as 'Byte.'
-