Admin
This chapter describes the functions and uses of the [Admin] menu, which is used to add, manage, and delete users, permissions, and server configurations.
1. Overview
The [Admin] menu is used to add another user.
If a user is added in WebAdmin, the user can log in Studio using the same ID because WebAdmin and Studio settings are automatically integrated. Using the same account, the user can retrieve resources regarding BizTx and BizTx groups to Studio. Similarly, the user can retrieve Studio resources to WebAdmin.
The following describes each menu of [Admin]. For more information about the function and usage of each menu, refer to the relevant section.
| Menu | Description |
|---|---|
Adds, searches, modifies, and deletes AnyLink users. |
|
Adds and deletes AnyLink users' permissions and roles. |
|
Adds and deletes system variables for each Biz System. |
|
Manages metadata for each category. |
|
Manages overall DIS configuration. |
|
Retrieves user login history and the user information. |
|
Retrieves information about DIS libraries added in WebAdmin. |
2. User
The [User] menu is used to manage WebAdmin users.
To go to the User screen, click [Admin] > [User]. Enter search conditions and then click [Search].
To edit a user, click the user from the User list. This opens User Information where you can edit the user. For information about each item, refer to "Adding a User".

-
User List
Item Description User ID
User ID.
User Name
User name.
Email
User’s email address.
Phone Number
User’s phone number.
Organization
Organization that a user belongs to.
Department
Department that a user belongs to.
Date Created
Date when a user was added.
Date Updated
Date when a user was last updated.
Owner
ID of the user who added the relevant user.
-
Buttons
Button Description [Add]
Adds a user. For more information, refer to "Adding a User".
[Del]
Deletes a selected user.
To delete a user, select the user from the list and then click [Del]. In the confirmation dialog box that opens, click [OK].
[Export]
Exports a user list as a .csv file.
[Import]
Imports a user list from a .csv file.
To import a .csv file, click [Select File], select the file, and then click [Import].
Adding a User
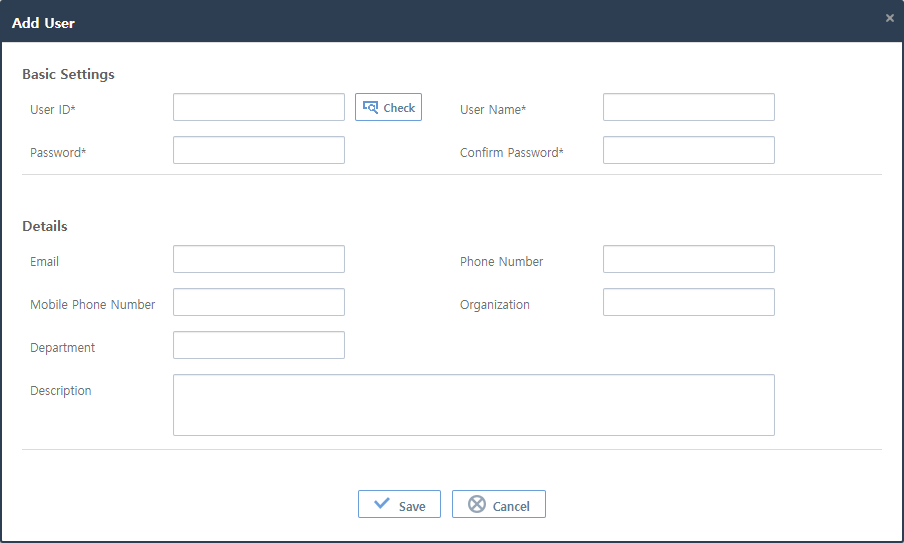
To add a user, click [Add] in the User screen ([Admin] - [User] - User List). This opens the Add User dialog box. Enter information and then click [Save].
-
Basic Settings (*: required items)
Item Description User ID*
Unique user ID.
Only allows alphanumeric, hyphen, and underscore characters with a length of 3-30.
User Name*
User name.
Password*
User password.
Confirm Password*
Enter a password twice to prevent users from typing the wrong password.
-
Details
Item Description Email
User’s email address.
Phone Number
User’s phone number.
Mobile Phone Number
User’s mobile phone number.
Organization
Organization that a user belongs to.
Department
Department that a user belongs to.
Description
Description of a user.
3. Permission Management
A permission represents the range of resources that the user can access. Currently, permissions can be set on channel info, application development, and shared library.
To manage permission for each user, click [Admin] > [Permission Management]. This opens the screen that consists of the following submenus. For more information about each menu, refer to the relevant section.
| Submenu | Description |
|---|---|
Manages permissions used in WebAdmin. |
|
Manages roles used in WebAdmin. |
|
Manages menu access permissions used in WebAdmin. |
|
Manages user roles used in WebAdmin. |
3.1. Permissions
To display permissions added in WebAdmin, click [Admin] > [Permission Management] > Permissions.
Enter search conditions and then click [Search].
To edit a permission, click the permission form the Permission list. This opens the Update Permission dialog box. For information about each item, refer to "Adding a Permission".

-
Permission List
Item Description Permission ID
Permission ID.
Permission Name
Permission Name.
Action
Action that the permission allows.
-
Deploy
-
Start/Stop
-
Search
Biz System
ID of a Biz System to which the permission applies.
Resource ID
ID of a resource to which the permission applies.
-
-
Buttons
Button Description [Add]
Adds a permission. For more information, refer to "Adding a Permission".
[Del]
Deletes a permission.
To delete a permission, select the permission from the list and then click [Del]. In the confirmation dialog box that opens, click [OK].
Adding a Permission
To add a permission, click [Add] in the Permissions screen ([Admin] - [Permission Management] - Permissions). This opens the Permissions dialog box. Enter information and then click [Save].

-
Basic Settings (*: required items)
Item Description Permission ID*
Permission ID.
Permission Name*
Permission name.
Permission Range
Select a permission range from the dropdown list.
The following describes permission ranges and the assigned resources for each permission range.
-
Channel Info: Permissions to add, edit, or delete an adapter, endpoint group, or endpoint.
-
[System] > [Adapter] (adapters, endpoint groups, and endpoints)
-
Undeploy an adapter or schedule from [Deployment] > [Deployment]
-
-
Application Development: Permission to add a task in AnyLink Studio and permissions to add, edit, or delete a BizTx setting.
-
Undeploy BizTxs from [Deployment] > [Deployment]
-
Delete BizTxs from [Deployment] > [Resource Deletion].
-
-
Configuration: Permissions to add, edit, or delete other configurations other than those authorized by channel info and application development.
-
[System] > [Adapter Cluster]
-
[System] > [System]
-
[System] > [Patch]
-
[Configuration] > [BizTx Configuration]
-
[Configuration] > [Job Schedule] > [Schedule Cluster List]
-
[Configuration] > [Thread Pool]
-
[Configuration] > [Log Configuration]
-
[Configuration] > [System Log]
-
[Configuration] > [Masking Configuration]
-
[Configuration] > [Biz System Configuration]
-
Undeploy schedule jobs from [Deployment] > [Deployment]
-
[Monitoring] > [Statistics]
-
-
Job Schedule: Permissions to immediately start jobs and permissions to stop and resume jobs and schedules.
-
Immediately start jobs and stop/resume jobs and schedules from [Configuration] > [Job Schedule]
-
-
Shared Library: Permissions to deploy or undeploy shared libraries in AnyLink Studio.
-
Undeploy shared libraries from [Deployment] > [Deployment]
-
Delete shared libraries from [Deployment] > [Resource Deletion]
-
Deploy/undeploy shared libraries
-
-
Batch Template: Permissions to create, upload, and delete batch templates and permission to create batch BizTx.
-
Retransmit: Permissions for retransmission.
-
[Retransmit] button in the Check Message window that can open in Transaction Trace from [Monitoring] > [Biz System]
-
[Monitoring] > [Batch File Progress]
-
Action
Action that the permission allows.
-
Deploy
-
Start/Stop
-
Search
Biz System
ID of a Biz System to which the permission applies.
If Permission Range is Channel Info or Application Development, a corresponding Biz System is added.
Resource ID
ID of a resource to which the permission applies.
To configure resources of a Biz System, click the Biz System. Click [Search] and select the resource.
-
3.2. Roles
To display roles added in WebAdmin, click [Admin] > [Permission Management] > Roles. A role sets the range of resources that a user can access. Multiple permissions can be assigned to one role.
Enter search conditions and then click [Search].
To edit a role, click the role form the Role list. This opens the Update Role dialog box. For information about each item, refer to "Adding a Role".

-
Role List
Item Description Role ID
Role ID.
Role Name
Role name.
Permission ID
List of permission IDs assigned to a role.
-
Buttons
Button Description [Add]
Adds a role. For more information, refer to "Adding a Role".
[Del]
Deletes a role.
To delete a role, select the role from the list and then click [Del]. In the confirmation dialog box that opens, click [OK].
Adding a Role
To add a role, click [Add] in the Roles screen ([Admin] - [Permission Management] - Roles). This opens the Add Role dialog box. Enter information and then click [Save].

-
Basic Settings (*: required items)
Item Description Role ID*
Role ID.
Role Name*
Role name.
Permission ID
Permission IDs assigned to a role.
To select the permissions, click [Search] and select them from the Search dialog box. One or more permissions can be selected for a role.
3.3. Menu Access Permission
To display menu access permissions added in WebAdmin, click [Admin] > [Permission Management] > Menu Access Permissions. A menu access permission sets menus that a user can access. For example, if [Biz System] and [Adapter] menus of [System] are set, a user can access only the menus. Accessible menus can be edited by an administrator. There are 6 default menu access permissions that cannot be edited and deleted.
Enter search conditions and then click [Search].
To edit a menu access permission, click the permission form the Menu Access Permission list. This opens the Edit Menu Access Permission dialog box. For information about each item, refer to "Adding a Menu Access Permission".

-
Menu Access Permission List
Item Description Permission ID
Permission ID registered by a user.
The following are default menu access permissions.
-
default-all: all menus. A user has this permission by default.
-
default-adapter: Channel Info.
-
default-biztx: Application Development.
-
default-commLib: Shared Library.
-
default-jobShcedule: Job Schedule.
-
default-operation: Configuration.
Permission Name
Permission Name registered by a user.
-
-
Buttons
Button Description [Add]
Adds a menu access permission. For more information, refer to "Adding a Menu Access Permission".
[Del]
Delete a menu access permission.
To delete a menu access permission, select the permission from the list and then click [Del]. In the confirmation dialog box that opens, click [OK]. However, the default menu access permissions cannot be deleted.
Adding a Menu Access Permission
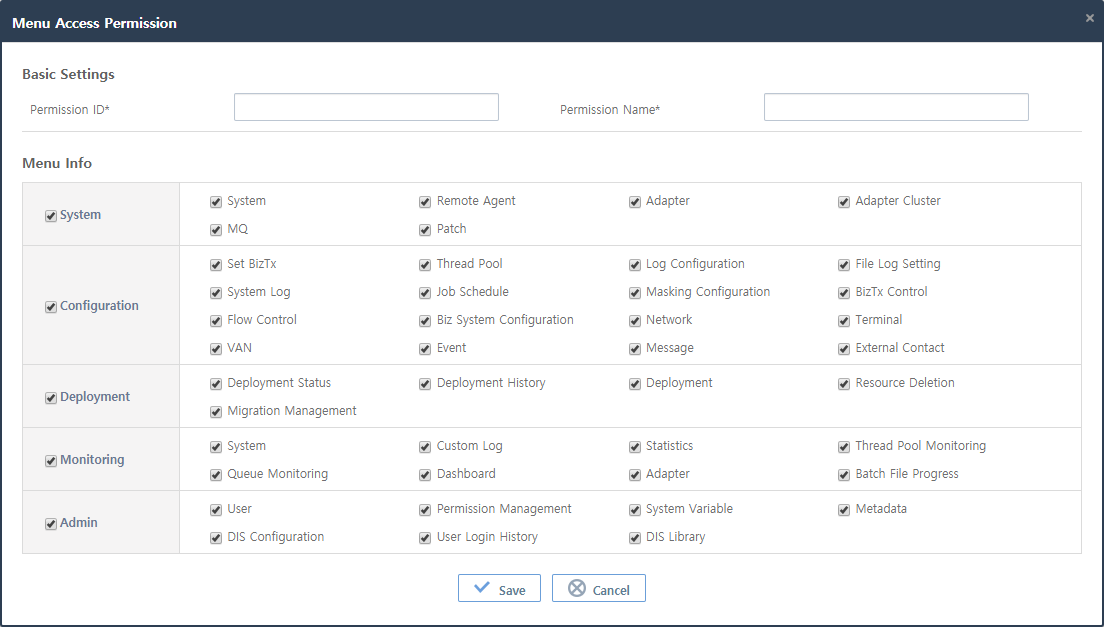
To add a menu access permission, click [Add] in the Menu Access Permission screen ([Admin] - [Permission Management] - Menu Access Permission). This opens the Menu Access Permission dialog box. Enter information and then click [Save].
-
Basic Settings (*: required items)
Item Description Permission ID*
Permission ID.
Permission Name*
Permission name.
Menu Info
Menus to assign to a permission.
Selecting a checkbox of a main menu selects all submenus. Unselecting the checkbox unselects all submenus. Select one or more checkboxes and then click [Save] to apply to the permission.
3.4. User Roles
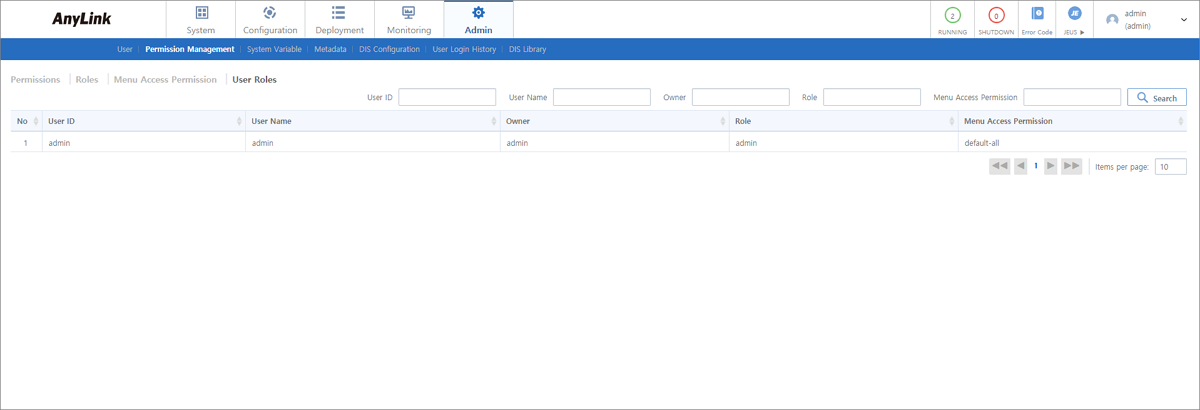
To display roles added in WebAdmin, click [Admin] > [Permission Management] > User Roles. A user role sets roles of a user. For example, if a user is assigned with a role that includes the permission to access operation resources, the user can access the resources. The user assigned with a role that includes the permissions to access operation, application development, and shared libraries resources can access all of them.
Enter search conditions and then click [Search].
To edit a user role, click the role form the User Role list. This opens the User Information dialog box ([Admin] - [Permission Management] - User Roles - User Information). For information about each item, refer to "User Information".
-
User Role List
Item Description User ID
User ID.
User Name
User name.
Owner
ID of the user who added the relevant user.
Role
Role assigned to the user. If a user is not assigned with a role, the role section will appear blank. To assign a role to the user, click the user from the list.
Menu Access Permission
Menu access permission assigned to the user. A user who has a menu access permission can access the set menus.
[Note]
A user must have a menu access permission appropriate for the user’s role. If a user has a menu access permission but no role, the user is not displayed normally.
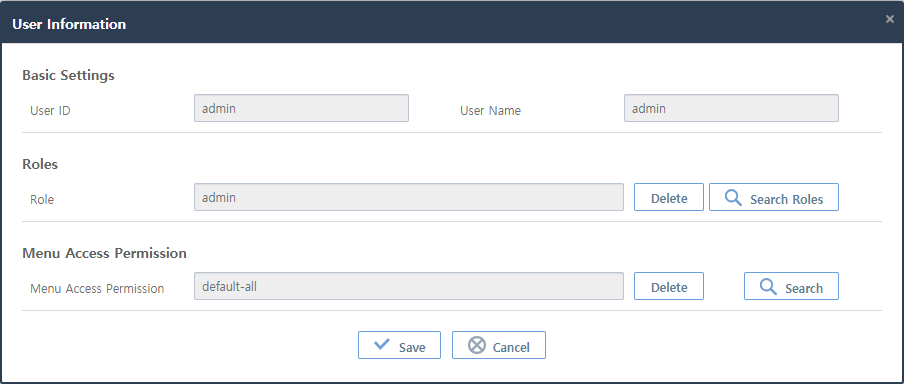
User Information
To edit roles and menu access permissions for a user, select the user from the User Role list in User Roles ([Admin] - [Permission Management] - User Roles). This opens the User Information dialog box where you can edit the roles and permissions.
To assign a role, click [Search Roles] in the Roles section. To revoke a role, click [Delete] in the Roles section.
To assign a menu access permission, click [Search] in the Menu Access Permission section. To revoke a menu access permission, click [Delete] in the Menu Access Permission section.
4. System Variable
Users can define a system variable and use it in WebAdmin. For example, a user can define a frequently used IP address '192.168.1.1' as '${sys:IP}' in AnyLink. In this case, '${sys:IP}' is the variable name, and '192.168.1.1' is the variable value. When the system variable is defined, '${sys:IP}' can be used as a substitute for '192.168.1.1'.
Typing '$' in a text box displays a system variable list. The list is different depending on adapter types.
The following are available system variables.
-
[Connection Info] and [Connection Control] tabs in Adapter Details
-
Adapter type: TCP
-
Available item: IP Rule
-
-
[Connection Info] tab in Endpoint Details
-
Endpoint types: TCP, HTTP, FTP, ebXML, WebDAV
-
Available items: Local IP/Host, Port, Timeout (FTP), Path (ebXML), Connection Info (HTTP)
-
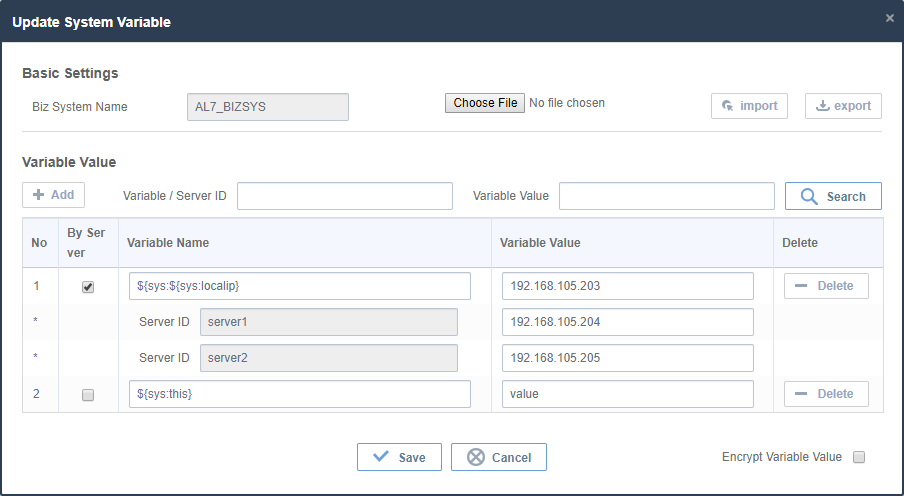
To go to the System Variable List screen, click [Admin] > [System Variable]. Clicking a Biz System from the system variable list opens the Update System Variable dialog box ([Admin] - [System Variable] - Update System Variables) where you can add system variables. One system variable is created for a Biz System by default.

Updating System Variables
Clicking a Biz System from System Variable List ([Admin] - [System Variable]) opens the Update System Variable dialog box where you can add new system variables and search for system variables added in the Biz System.
To search for system variables, enter search conditions ('Variable / Server ID' and 'Variable Value') and then click [Search].
To add a system variable, click [+ Add]. To delete a system variable, click [- Delete].
-
System Variable List
Item Description By Server
Used to set system variable values differently for each server. Only available when the Biz System type is cluster.
For example, if this item is selected, the '${sys:IP}' value for 'server2' can be different from that for 'server3' in 'cluster001'.
Variable Name
System variable name used by the Biz System.
The name can be used as a reserved word. For example, if '${sys:IP}' has a value of '192.168.1.1', the variable name is '${sys:IP}'. When "IP" is entered, $(sys: } is automatically entered.
Variable Value
System variable value used by the Biz System.
For example, if '${sys:IP}' has a value of '192.168.1.1', the variable value is '192.168.1.1'.
Encrypt Variable Value
Option to encrypt system variable values.
The encryption method set in [Configuration] > [Biz System Configuration] is used.
[Note]
The values are encrypted and saved in a system variable file stored in filesystem.
-
Buttons
Button Description [import]
Imports system variables in an external .properties file. Click [Choose File], select the .properties file, and then click [import].
Contents in a .properties file have the following format.
-
For a single server
${sys\:Variable_Name}=Variable_Value -
For a cluster
${sys\:Variable_Name}=Variable_Value${sys\:Variable_Name}^Server_Name^=Server's_Variable_Value${sys\:Variable_Name}^Server_Name^=Server's_Variable_Value
[export]
Exports the system variable list of a current Biz System as a .properties file.
-
5. Metadata
The [Metadata] menu is used to manage metadata for each category. It has the following two submenus.
| Submenu | Description |
|---|---|
Manages user-defined variables under a category. |
|
Manages categories added in WebAdmin. |
5.1. Metadata
To display metadata added in WebAdmin, click [Admin] > [Metadata] > Metadata. Metadata is user-defined variables under a category. If variable name and value are added in a category, user-defined variables can be used in the category.
Enter search conditions and then click [Search]. To edit metadata, click the metadata from the searched list. This opens the Edit Metadata dialog box. For information about each item, refer to "Adding Metadata".

-
Metadata List
Item Description Category Name
Category name.
Variable Name
Variable name.
Variable Value
Variable value used as metadata.
Flag
Identifies data.
Description
Description of metadata.
Created By
User who added metadata.
Date Created
Date when metadata was added.
Updated By
User who updated metadata.
Date Updated
Date when metadata was last updated.
-
Buttons
Button Description [Add]
Adds metadata. For more information, refer to "Adding Metadata".
[Del]
Deletes selected metadata.
To delete metadata, select the metadata from the list and then click [Del]. In the confirmation dialog box that opens, click [OK].
Adding Metadata
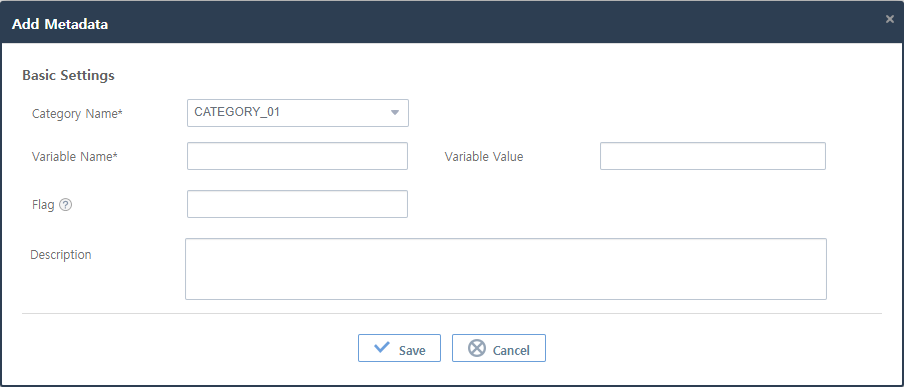
To add metadata, a category must be added in advance (see Categories). Click [Add] in the Metadata screen ([Admin] - [Metadata] - Metadata). This opens the Add Metadata dialog box. Enter information and then click [Save].
-
Basic Settings (*: required items)
Item Description Category Name*
Name of a category that uses metadata.
Variable Name*
Variable name.
Only allows alphanumeric, hyphen, and underscore characters with a length of 3-30.
Variable Value
Variable value used as metadata.
Flag
Identifies data.
None or one letter, digit, or special character (-, _) is allowed.
Description
Description of a variable.
5.2. Categories
To display categories added in WebAdmin, click [Admin] > [Metadata] > Categories.
Enter search conditions and then click [Search]. To edit a category, click the category from the searched list. This opens the Edit Category dialog box. For information about each item, refer to "Adding a Category".

-
Category List
Item Description Name
Category name.
ID
Category ID.
Flag
Identifies data.
Description
Description of a category.
Created By
User who added a category.
Date Created
Date when a category was added.
Updated By
User who updated a category.
Date Updated
Date when a category was last updated.
-
Buttons
Button Description [Add]
Adds a category. For more information, refer to "Adding a Category".
[Del]
Deletes a selected category.
To delete a category, select the category from the list and then click [Del]. In the confirmation dialog box that opens, click [OK].
Adding a Category
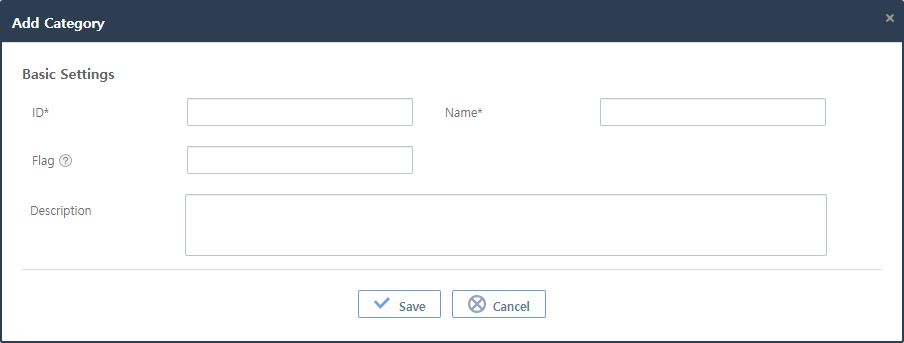
To add a category, click [Add] in the Categories screen ([Admin] - [Metadata] - Categories). This opens the Add Category dialog box. Enter information and then click [Save].
-
Basic Settings (*: required items)
Item Description ID*
Category ID.
Only allows alphanumeric, hyphen, and underscore characters with a length of 3-30.
Name*
Unique category name.
Flag
Identifies data.
None or one letter, digit, or special character (-, _) is allowed.
Description
Description of a category.
6. DIS Configuration
The [DIS Configuration] menu is used to set the path to Data Integration Server (DIS), user classes, shared logging properties, etc. Each item has a default value, but you can change the value if necessary. To change a value, enter a new value and then click ![]() (save) to apply the changes.
(save) to apply the changes.
To restore a current file system to match a database, click [DIS Restore]. For more information, refer to "Restoring DIS".
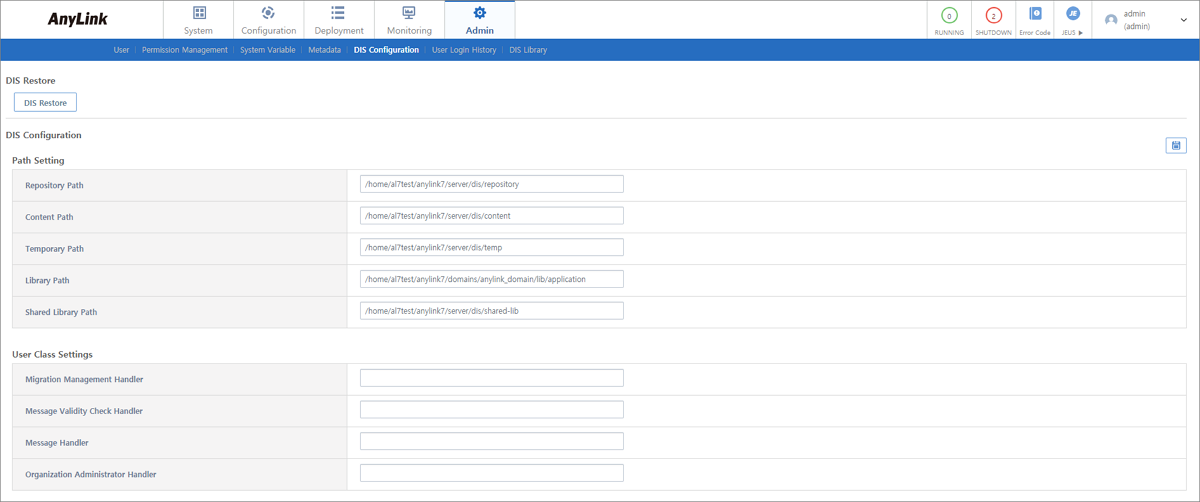
The following describes each item about AnyLink DIS.
-
Path Setting
Sets paths to the frequently used files in DIS.
 [Admin] - [DIS Configuration] - Path Setting
Item Description Repository Path
Path to BizTx files and WAR files.
Content Path
Path to the files added from [Configuration] > [Patch]. This is a directory where the resources migrated from [Deployment] > [Migration Management] are stored.
Temporary Path
Temporary path required during deployment process, such as the conversion of BizTxs or WAR files.
Library Path
Classpath to all files during compilation.
Shared Library Path
Path used to deploy shared libraries.
-
User Class Settings
Sets user-created class information.
 [Admin] - [DIS Configuration] - User Class Settings
Item Description Migration Management Handler
Name of the class to call when managing the migration of BizTxs.
Message Validity Check Handler
Name of the class used to validate AnyLink Studio messages.
Message Handler
Class name of a handler used to call BizTx messages.
A message handler is created and deployed in AnyLink Studio, and the deployed hander is configured here in WebAdmin.
You can check deployed messages and call a handler after selecting a desired message by clicking [Configuration] > [Message].
Organization Administrator Handler
Name of the class used to call administrator information.
For information about AnyLink Studio, refer to AnyLink Studio Guide.
-
Sets user login history’s retention period.
 [Admin] - [DIS Configuration] - User Login History Setting
Item Description Retention Period (in days)
Period to maintain user login history. If set to 0, the history is maintained permanently.
-
SSO Settings
Sets the SSO method.
 [Admin] - [DIS Configuration] - SSO Settings
Item Description SSO Method
SSO method.
-
URL Method: SSO login through URL.
-
UserClass Method: Login method defined by a user-defined class.
-
No: SSO login setting is not used.
-
-
WebAdmin Tree Setting
Sets displayed elements in a navigation tree.
 [Admin] - [DIS Configuration] - WebAdmin Tree Setting
Item Description Default Tree Setting
Option to display elements in a navigation tree.
-
Open All: Display all elements.
-
Close All: Display to the level of Biz Systems and hidden all other elements.
-
-
User Password
Sets a user password format.
 [Admin] - [DIS Configuration] - User Password
Item Description Min Length (<= 1000)
Minimum length of a user password.
Password Rules
User password rule.
-
Include an uppercase letter: Include one or more uppercase letters.
-
Include a lowercase letter: Include one or more lowercase letters.
-
Include a special character: Include one or more special characters.
-
Include a number: Include one or more digits.
After changing the user password settings, there can be an account that has a password that does not match the settings. If a user with the account tries to log in, it goes to the Edit User screen.
-
-
WebAdmin Login History
Sets option to save WebAdmin login history. Saved history can be checked by clicking [Admin] > [User Login History] ([Admin] - [User Login History] - User Login History).
 [Admin] - [DIS Configuration] - WebAdmin Login History
Item Description Save to Database
-
Yes: Save login, permission, and BizTx logs to a database.
-
No: Do not save WebAdmin log. (Default value)
-
-
Monitoring Pop-up Fields Settings
Sets the mouse position to open monitoring pop-up dialog box.
 [Admin] - [DIS Configuration] - Monitoring Pop-up Fields Settings
Item Description Pop-up Fields Settings
-
All: Open Trace Log dialog box when clicking any field.
-
GUID: Open Trace Log dialog box only when clicking the GUID field. (Default value)
-
-
Post-Deployment Processing
Sets the directory where resources deployed from DIS to RTE are saved.
 [Admin] - [DIS Configuration] - Post-Deployment Processing
Item Description Resource Copy-To Directory
Directory where deployed resources are saved.
The full directory is "${Set_Value}\${Biz_System_SYSID}\repository".
-
User Display Setting
Sets the displayed format of User Info Section (see WebAdmin Screen Layout).
 [Admin] - [DIS Configuration] - User Display Setting
Item Description Display As
-
ID: Display a user ID.
-
NAME: Display a user name.
-
ID(NAME): Display a user’s ID and name that is enclosed in parentheses.
-
NAME(ID): Display a user’s name and ID that is enclosed in parentheses.
-
-
User Meta Info
Uploads a config file of AnyLink Studio. This file is used to set a BizTx type for monitoring. For more information, refer to AnyLink Studio Guide.
 [Admin] - [DIS Configuration] - User Meta Info
Item Description Meta Info
config file.
It is checked whether a config file is uploaded. If the file exists, the file contents are stored in a transaction table for each BizTx type.
The config file can be checked by clicking [Monitoring] > [Biz System] (see [Monitoring - [Biz System] - Transaction]). If the config file exists, the 'BizTx Type' column is displayed in the transaction list.
-
Set up user encryption
Sets how to encrypt passwords.
 [Admin] - [DIS Configuration] - Set up user encryption
 [Admin] - [DIS Configuration] - Set up user encryption - SHA256
Item Description Encoding
User password encoding method. (Default value: HEX)
-
When changing only encoding method
The encoding method changes for all users. Users can log in with their current password.
-
When changing the encryption method regardless of encoding method change
WebAdmin password is saved with the entered password and encryption method (WebAdmin login only).
User Encryption Method
Clicking [User Encryption Method] displays a warning message for an encryption method change and enables the 'MD5' and 'SHA256' radio buttons.
Clicking 'SHA256' enables to enter an admin password. Enter the password two times.
Admin who log in with a changed encryption method must manually change the method for non-admin users by re-saving passwords for each user or importing a relevant file.
Password setting is necessary for each user according to the changed encryption method.
-
-
Deploy Log Configuration
Sets the deployment log path and the log retention period.
 [Admin] - [DIS Configuration] - Deploy Log Configuration
Item Description Deployment Log Path
Path in which logs are stored in case deployment fails in the DIS. Initially, it is the same as the value set in the Repository Path item.
Retention Period (in days)
Deployment log retention period in days. After the period, logs are deleted. (Default value: 0, which means that logs are not deleted.)
-
Common Logging Properties
Users can specify the conditions for logging events in DIS.
DIS logs are not stored in ${server.home}/logs by default when AnyLink is first installed, where server.home represents home directories of each server.
 [Admin] - [DIS Configuration] - Common Logging Properties
Item Description Retention Period (in days)
DIS log retention period in days.
File Path
DIS log file pattern (path and file name).
-
Logging Property List
Sets DIS logging properties.
 [Admin] - [DIS Configuration] - Logging Property List
To add a logger, click [Add]. This displays the Logger Settings dialog box. Enter information and then click [Save]. To edit a logger, select the logger from Logging Property List. This displays the Logger Settings dialog box. Change the logger name and log level and then click [Save].
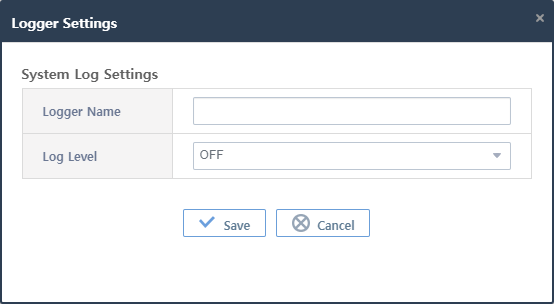 [Admin] - [DIS Configuration] - Logger Settings
Item Description Logger Name
Logger name.
Log Level
Logging level.
-
OFF: Logging is turned off.
-
FINEST: Very detailed trace.
-
FINER: Detailed trace.
-
FINE: Message content only.
-
CONFIG: Static configuration change or status.
-
INFO: General information and warning messages.
-
WARNING: Potential issues.
-
SEVERE: Critical errors.
To delete a logger, select the logger from Logging Property List and then click [Del]. In the confirmation dialog box that opens, click [OK].
-
Restoring DIS
DIS uses a database and a file system to manage data. The file system can be broken and do not work normally. At this time, you can restore the file system to match a database. For this, click [DIS Restore] in the DIS Configuration screen ([Admin] - [DIS Configuration]).
Since the file system is restructured, all the class files, shared library files, and WAR files managed in DIS are removed and newly created.
7. User Login History
The [User Login History] menu is used to retrieve user login history. Each line shows information about a user who logged into AnyLink Studio or WebAdmin. Enter search conditions and then click [Search] to display the user login history.
User login history is maintained according to the value set in Retention Period (in days) of User Login History Setting shown by clicking [Admin] > [DIS Configuration]. For more information, refer to DIS Configuration.

-
User Login History
Item Description ID
User ID.
User Name
User name.
Email
User’s email address.
Phone Number
User’s phone number.
Organization
Organization that a user belongs to.
Department
Department that a user belongs to.
Client IP
User’s IP address.
Login Date
Date when a user logs in to WebAdmin.
8. DIS Library
The [DIS Library] menu is used to retrieve information about DIS libraries added in WebAdmin. Enter search conditions and then click [Search] to display the libraries.
To upload a lib or jar file to apply to DIS, select the library file by clicking [Choose File] and then click [Upload]. The file is added to the list in DIS Libraries, and the library can be used in DIS.
To delete a library, select the checkbox for the library and then click [Del]. In the confirmation dialog box that opens, click [OK].
