Configuration
This chapter describes the functions and uses of [Configuration]. The configuration menu is used to configure and manage a variety of resources necessary to operate a Biz System.
1. Overview
The [Configuration] menu is used to configure and manage the resources necessary to operate a Biz System.
The following describes each Configuration menu. For more information about the function and usage of each menu, refer to the relevant section.
| Menu | Description |
|---|---|
Displays BizTxs added in AnyLink Studio and allocates thread pools to each BizTx. |
|
Manages thread pools to be allocated to each BizTx or Biz System. |
|
Configures log levels of each BizTx or adapter. |
|
Configures file log levels of each BizTx or adapter. |
|
Configures the level and location of logs generated from each server. |
|
Schedules and manages BizTxs to be run routinely. |
|
Configures masking of BizTxs of each Biz System. |
|
Configures rules to manage BizTxs. |
|
Configures flow limit for BizTxs. |
|
Configures rules to manage a Biz System. |
|
Configures network status to be sent to internal systems. |
|
Configures and manages terminals. |
|
Adds and manages VAN information. |
|
Configures and manages event occurrences in AnyLink. |
|
Views the messages deployed in AnyLink, and shares with other systems. |
|
Adds external contacts. |
2. BizTx Configuration
The [BizTx Configuration] menu is used to allocate thread pools to each transaction or transaction group.
By default, a Biz System contains a single thread pool to process all BizTxs. Using a single thread pool, however, can cause management issues. Because BizTxs share one thread pool, they cannot be processed independently from each other. Also, system resources that are shared in the single thread pool cannot be efficiently used by the systems in a server cluster environment.
To prevent such issues, AnyLink enables users to allocate thread pools to each transaction or transaction group. Each transaction can be managed separately from other transactions in this way.
|
This section describes how to allocate thread pools to each BizTx or BizTx Group that has already been added in AnyLink Studio. For information about adding a BizTx Group or BizTx, refer to AnyLink Studio Guide. |
2.1. Configuring a Biz System
A Biz System processes its transactions with the default thread pool if a specific thread pool is not set for an individual transaction.
The default thread pool is created automatically when the Biz System is first created. If necessary, you can configure the priority and the number of thread pools. It is recommended to specify optimal thread pool settings for a Biz System or a server to efficiently use system resources.
To allocate thread pools to each Biz System, the Biz System and thread pools must be configured first. To allocate thread pools to each Biz System, click [Configuration] > [BizTx Configuration], and then select a Biz System in the navigation pane on the left. Configure a thread pool to be used in the Biz System, and then click ![]() (save) at the top right hand corner.
(save) at the top right hand corner.

-
Basic Settings
Item Description Date Created
Date when the Biz System was created.
Created By
User who created the Biz System.
Last Updated
Date when the Biz System was updated.
Updated By
User who updated the Biz System.
Version
Version of the Biz System.
-
Thread Pool
Item Description Thread Pool
Thread pool to be allocated to the Biz System. 'bizSystemDefaultThreadPool' is allocated by default.
2.2. Configuring a BizTx/BizTx Group
In AnyLink, thread pools can be allocated for each BizTx or BizTx Group. Before allocating thread pools, a Biz System, thread pool, BizTx, or BizTx Group must have been set. Note that the settings of a parent item override those of its child item when a BizTx belongs to a BizTx Group in a hierarchical structure.
To allocate thread pools to each BizTx/BizTx Group, click [Configuration] > [BizTx Configuration] and select a BizTx or BizTx Group in the navigation pane on the left. The Set BizTx screen is displayed. Configure a thread pool to be used in the BizTx or BizTx Group and then click ![]() (save) at the top right hand corner.
(save) at the top right hand corner.
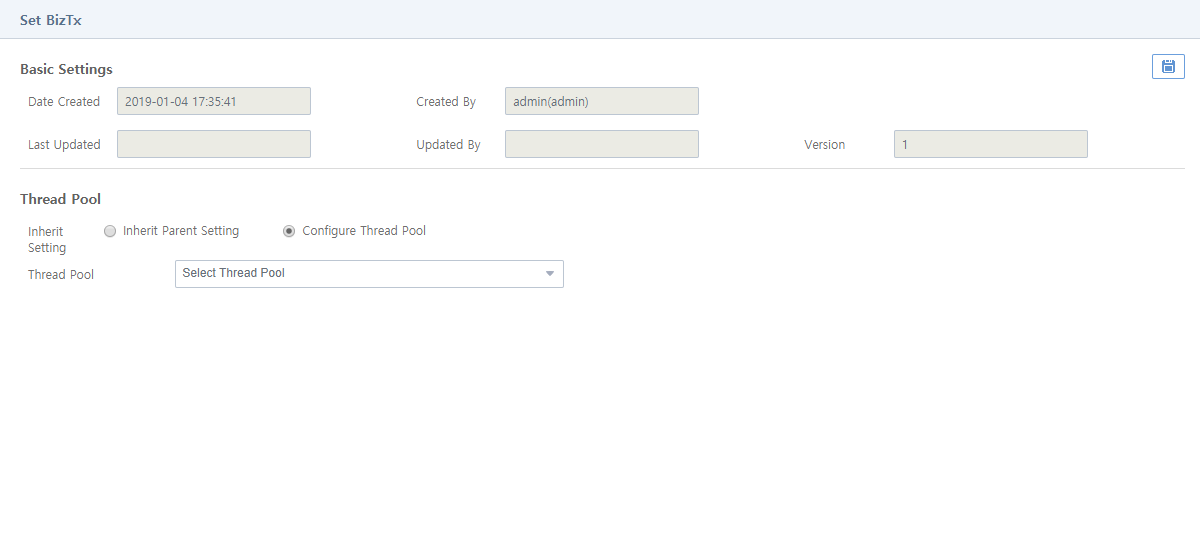
-
Basic Settings
Item Description Date Created
Date when the Biz System was created.
Created By
User who created the Biz System.
Last Updated
Date when the Biz System was updated.
Updated By
User who updated the Biz System.
Version
Version of the Biz System.
-
Thread Pool
Set a thread pool to be used by the BizTx. When Inherit Parent Setting is selected, any other setting is not required. When Configure Thread Pool is selected, a thread pool to be used by the BizTx needs to be specified.
Item Description Inherit Setting
Option to set a thread pool to be used by the BizTx.
-
Inherit Parent Setting: Option to use a thread pool dedicated to the Biz System.
-
Configure Thread Pool: Option to use a thread pool dedicated to the BizTx.
Thread Pool
Specifies a thread pool to be used by the BizTx. This item is applicable when the Configure Thread Pool option has been selected.
-
3. Thread Pool
The [Thread Pool] menu is used to manage thread pools to be used in BizTxs.
In AnyLink, you use multiple thread pools to efficiently process BizTxs. Thread pool settings must be specified with caution because it may affect the performance of the transaction processing in the Biz System.
To use this menu, click [Configuration] > [Thread Pool].

-
Thread Pool List
Item Description Biz System Name
Name of a Biz System to use the thread pool.
Thread Pool ID
Thread pool ID.
Thread Pool Name
Thread pool name.
Queue Size
Queue size for storing jobs that were not allocated to a thread.
Min Size
Minimum number of threads to be maintained in the thread pool.
Max Size
Maximum number of threads to be maintained in the thread pool.
Keep Alive Time
Retention period of threads.
VIP Thread
Highest priority threads.
-
Button
Button Description [Add]
Adds a thread pool. For more information, refer to "Adding a Thread Pool".
[Del]
Deletes a thread pool.
To delete a thread pool, select the thread pool from the list and click [Del]. In the confirmation dialog box that opens, click [OK].
Thread Pool Info
To edit thread pool information, go to [Configuration] > [Thread Pool] and then click the thread pool in the navigation pane. The Thread Pool Info screen is displayed where you can change or delete the thread pool information.
Edit the thread pool information and then click ![]() (save). For more information about each item, refer to "Adding a Thread Pool".
(save). For more information about each item, refer to "Adding a Thread Pool".
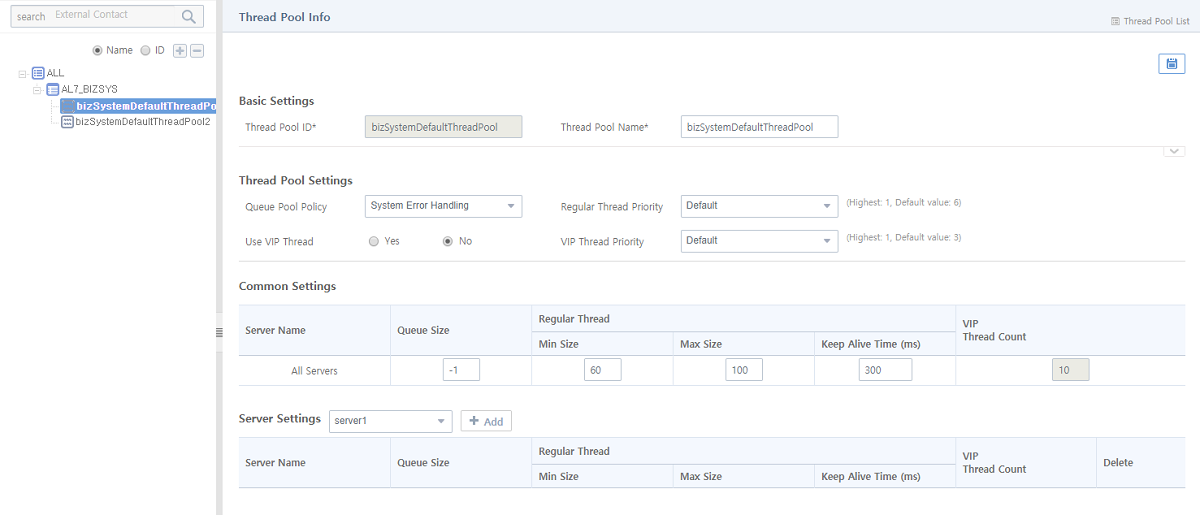
|
If the thread pool is being used, the user should carefully update the thread pool information. This may affect the performance of the transaction processing in the Biz System. |
Adding a Thread Pool
To go to the Add Thread Pool screen, click [Add] below the Thread Pool List ([Configuration] - [Thread Pool]) screen. Enter information and then click [Save].
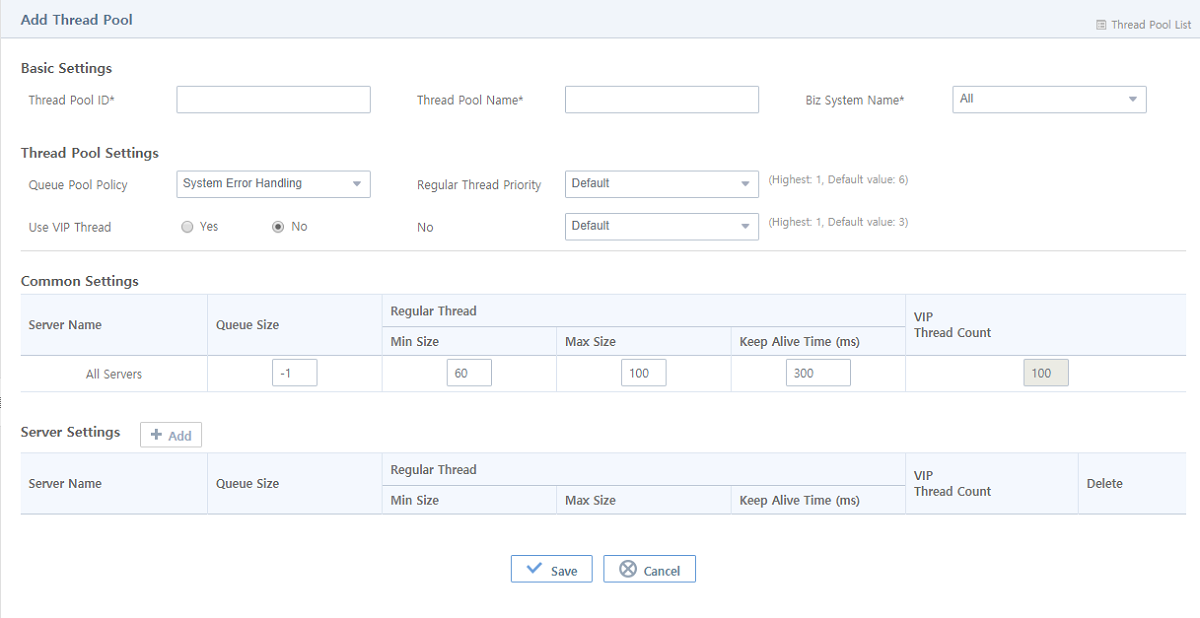
-
Basic Settings (*: required items)
Item Description Thread Pool ID*
Unique thread pool ID.
Only allows alphanumeric, hyphen, and underscore characters with a length of 3-30.
Thread Pool Name*
Thread pool name.
Only allows alphanumeric, hyphen, and underscore characters with a length of 3-30.
Biz System Name*
Biz System that uses the thread pool.
You can configure the thread pool for use by the entire system or specific systems. Note that this item is related to 'Common Settings'.
-
Thread Pool Settings
Item Description Queue Pool Policy
Option to handle requests coming into the thread pool when the queue is full.
-
System Error Handling: Suspend the system processing to generate an error exception.
-
Processed by Caller Thread: Use the caller thread to process the task.
Use VIP Thread
Option to use VIP threads that need to be processed within a certain period of time.
You can prioritize specific business transactions.
Regular Thread Priority
Priority of threads that handle low-priority business transactions. (Highest: 1, Default: 6)
Must not be higher priority compared to VIP threads.
No
VIP Thread Priority. Priority of VIP threads that handle high-priority business transactions. (Highest: 1, Default: 3)
Must not be lower priority compared to regular threads.
-
-
Common Settings
Thread pool settings to be applied to the Biz System selected in 'Basic Settings'. Unless specific servers have their own settings, these settings are shared by all servers in the Biz System.
Item Description Server Name
Fixed to 'All Servers' and cannot be modified by a user.
Common thread pool settings to be used by the Biz System selected in 'Basic Settings'.
Queue Size
Queue size for storing jobs that were not allocated to a thread. When set to -1, the queue size is not limited.
Regular Thread
Number of threads and retention time for handling low-priority jobs.
-
Min Size: Minimum number of threads
-
Max Size: Maximum number of threads if the job cannot be processed with the minimum number of threads.
-
Keep Alive Time: If the number of threads is greater than the minimum number of threads, the excess threads will be terminated if they are idle for longer than the keep alive time.
VIP Thread Count
Number of VIP threads for processing high-priority BizTxs.
-
-
Server Settings
AnyLink optimizes the performance of servers by allowing each server with different specifications and environments to use a different thread pool.
To configure thread pool settings for each server, select a Biz System from 'Server Settings' and then select one of the servers belonging to the Biz System from the drop-down list. Click [Add] to configure thread pool settings for the server.
 [Configuration] - [Thread Pool] - [Add Thread Pool] - Server Settings
The configuration items are the same as 'Common Settings'. The following describes the items unique to Server Settings.
Item Description Server Name
Name of a server selected from the list of servers in 'Server Settings' to configure its own settings. The server cannot be changed by directly entering a name. To edit a server setting, delete the existing setting and then add a new one.
4. Log Configuration
In AnyLink, BizTxs and adapters have hierarchical relationship in which child nodes inherit the settings of its parent node. If a parent node does not record logs, its child nodes also do not record logs even if they are set to. In addition, as AnyLink allows users to monitor resources based on logs, effective monitoring of a Biz System or BizTx requires a logging level TRACE or higher.
The following describes the log content for each logging level.
| Log Level | Description |
|---|---|
OFF |
Does not log messages. |
TRACE |
Message logging with a transaction ID, sequence number, timestamp, logging point ID, and error message. (Default value) |
MESSAGE w/o ATTACHMENT |
TRACE level message logging, except for file attachment to be sent via HTTP. 'ATTACHMENT' indicates that no log file is created for the attachment. To record the log with attachment information, select FULL MESSAGE. |
FULL MESSAGE |
TRACE level message logging including attachment information. |
|
It is recommended to understand the log level before configuring BizTx logs and adapter logs, which will be discussed in the next section. For monitoring, select TRACE, MESSAGE w/o ATTACHMENT, or FULL MESSAGE. |
4.1. Configuring BizTx Logs
You can log each BizTx Group or BizTx and specify a log level for the BizTx’s outbound rule as well.
Logging level of each BizTx is determined based on a tree of relations between BizTx and BizTx Group. Therefore, you must first define a BizTx or BizTx Group in AnyLink Studio before specifying a log level. For more information about how to define a tree of relations between BizTxs, BizTx Groups, and outbound rules, refer to AnyLink Studio Guide.
|
In AnyLink child element inherits the log level settings of its parent element. A BizTx Group can have a BizTx Group and a BizTx as its child element whereas a BizTx can have an outbound rule as its child element. For example, if a BizTx is set not to log transactions, then an outbound rule that belongs to the BizTx will not be logged as well. |
By default, a log level is set for each type of AnyLink resources. An outbound rule has one resource for which to set a log level, but a BizTx has resources such as an inbound adapter or outbound adapter, and a service flow, which require separate log level settings. The following describes how to set log levels for AnyLink resources. This applies the same to all types of AnyLink resources and is thus explained only once as followings.
To set logs per BizTx, click [Configuration]> [Log Configuration] and then click [BizTx Level] in the navigation pane. The log configuration information for each Biz System is displayed in a tree structure. A white icon (![]() ) means that a log level is not configured yet. After it is configured, the icon will be changed to blue (
) means that a log level is not configured yet. After it is configured, the icon will be changed to blue (![]() ).
).
If you select a Biz System or BizTx for which no log level is configured, a dialog box appears asking if you want to configure the log level. To go to the Set BizTx/BizTx Group Log screen ([Configuration] - [Log Configuration] - Set BizTx/BizTx Group Log (1)), click [OK]. For more information, refer to "Setting BizTx or BizTx Group Logs". If you select a Biz System or BizTx for which a log level is configured, the detailed information is displayed on the right side of the screen where you can change or delete the log level settings. To edit the log level settings, modify the information and then click ![]() (save). To delete the log level settings, click [Delete] from the drop-down menu of
(save). To delete the log level settings, click [Delete] from the drop-down menu of ![]() (menu) on the top right hand corner.
(menu) on the top right hand corner.
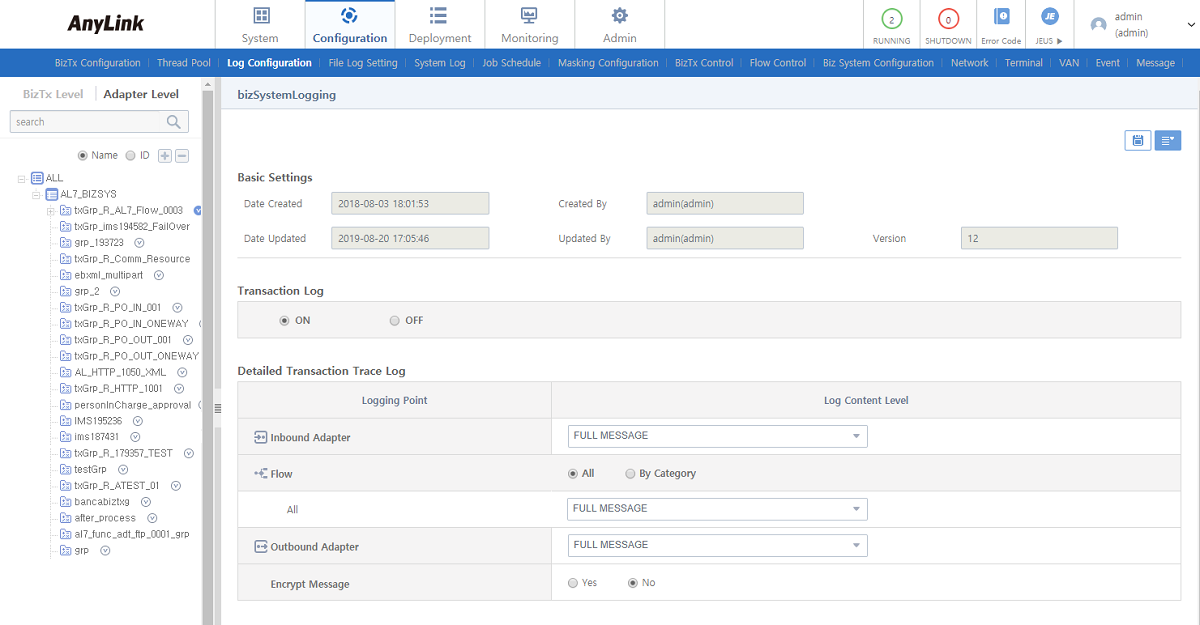
Setting BizTx or BizTx Group Logs
Specify a log level for an inbound or outbound adapter and a flow.
If you select a Biz System or BizTx for which a log level is not configured yet, the Set BizTx/BizTx Group Log screen is displayed.
When AnyLink is first installed and no configuration has been provided yet, 'Transaction Log' is set to the 'ON' state. Accordingly, 'Inbound Adapter', 'Flow', and 'Outbound Adapter' in 'Detailed Transaction Trace Log' are all set to 'TRACE' by default. 'Encrypt Message' is set to No.
Configure each item and then click ![]() (save) at the top right hand corner. The Biz System or BizTx will be displayed with the blue icon (
(save) at the top right hand corner. The Biz System or BizTx will be displayed with the blue icon (![]() ) in the tree with its child elements.
) in the tree with its child elements.
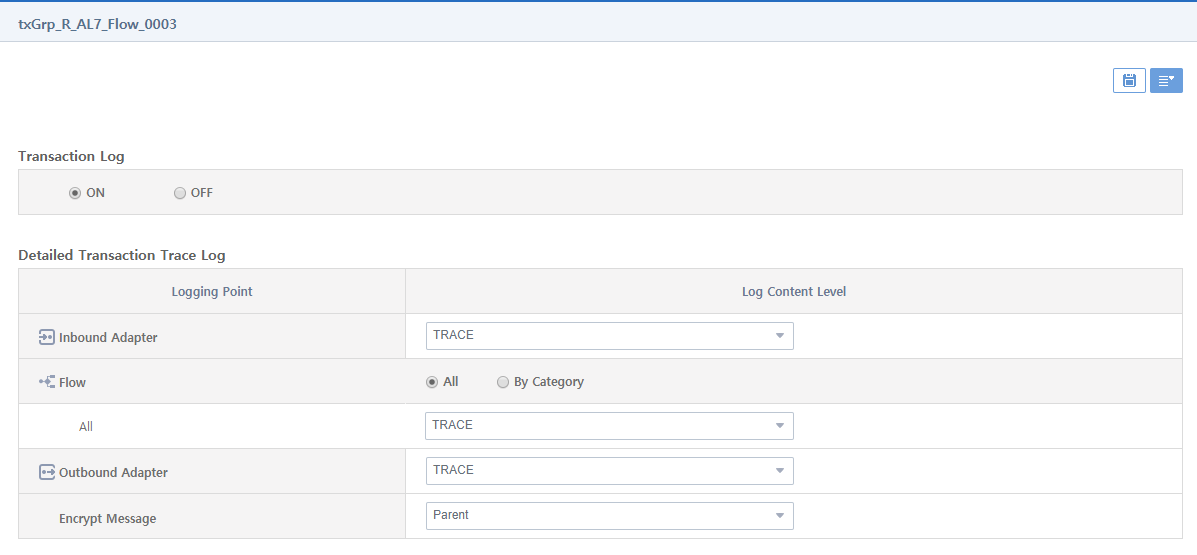
-
Transaction Log
Enable transaction logging for the BizTx or BizTx Group.
-
Detailed Transaction Trace Log
The following describes the resources that consist of a BizTx or BizTx Group and require a log level setting. For more information, refer to AnyLink Runtime Engine Server Guide and AnyLink Studio Guide.
-
When 'Flow' is set to all,
The same log level is applied to the all sections that constitute the 'flow'.
 [Configuration] - [Log Configuration] - Set BizTx/BizTx Group Log (2)
Item Description Inbound Adapter
Logging level for an adapter that sends input data from the BizTx.
Flow
Logging level for a service flow used by the BizTx. The same log level applies to the entire flow.
Outbound Adapter
Logging level for an adapter that receives output data from the BizTx.
Encrypt Message
Option to configure whether to encrypt the message to be logged. Encryption Class must have been configured in default-log-adapter.
-
When 'Flow' is set to 'By Category'
Different log levels can be set for the four categories of the 'flow'.
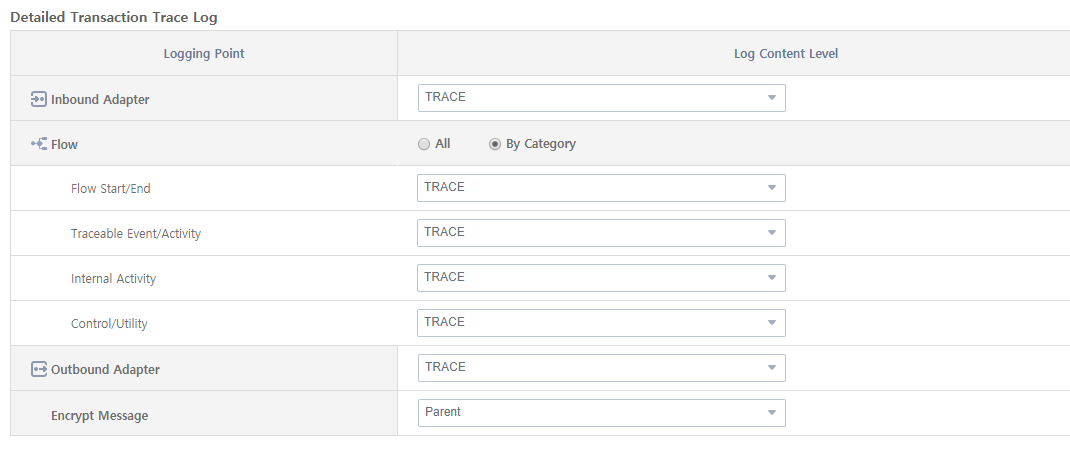 [Configuration] - [Log Configuration] - Set BizTx/BizTx Group Log (3)
Item Description Flow Start/End
Logging level for data that an inbound adapter sends to a flow, or logging level for data that a flow sends to an outbound adapter.
(e.g. Flow start and end)
Traceable Event/Activity
Logging level for a service flow or server flow called by event/activity. (e.g. Message event, adapter activity, response activity)
Internal Activity
Logging level for an activity except services, controls, and utilities. (e.g. User class)
Control/Utility
Logging level for flow control or utility calls. (e.g. JOIN and split gateway)
-
4.2. Configuring Adapter Logs
You can log transactions of adapters configured in WebAdmin.
An adapter includes an inbound endpoint and an outbound endpoint. An inbound endpoint sends input to a specific transaction, and an outbound endpoint sends the output of a specific transaction. Logging levels of inbound and outbound endpoints can be configured in Adapter Level.
An inbound endpoint allows a user to set logging of all transaction sections that range from data input to data output. This is the same as logging configuration of a BizTx or BizTx Group in the 'BizTx Level' configuration. An outbound endpoint inherits the setting of an inbound endpoint by default. The log level of a specific endpoint can be changed when necessary.
To set log levels per Adapter, click [Configuration] > [Log Configuration] and then click [Adapter Level] in the navigation pane. The log configuration for each Adapter is displayed in a tree structure. A white icon (![]() ) means that a log level is not configured yet. After it is configured, the icon will be changed to blue (
) means that a log level is not configured yet. After it is configured, the icon will be changed to blue (![]() ). The tree will display the child elements of the adapter, such as endpoints and endpoint groups.
). The tree will display the child elements of the adapter, such as endpoints and endpoint groups.
If you select an adapter for which no log level is configured, a dialog box appears asking if you want to configure the log level. To go to the the Set Adapter Log screen, click [OK]. If you select an adapter for which a log level is configured, the detailed information is displayed on the right side of the screen where you can change or delete the log level settings. To edit the log level settings, modify the information and then click ![]() (save). To delete the log level settings, click [Delete] from the drop-down menu of
(save). To delete the log level settings, click [Delete] from the drop-down menu of ![]() (menu) on the top right hand corner.
(menu) on the top right hand corner.
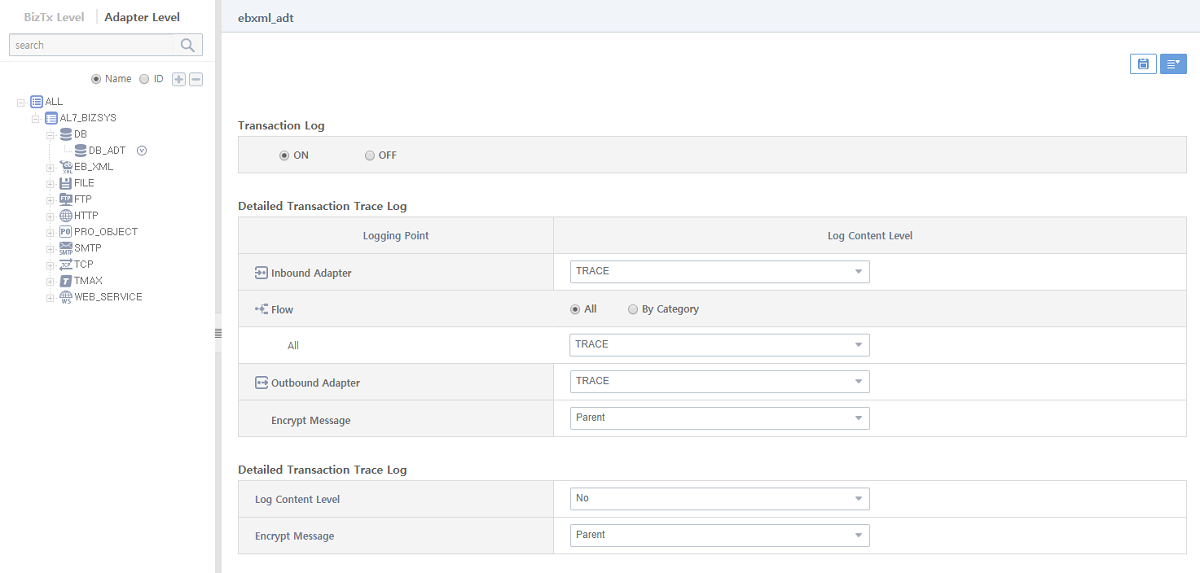
-
Inbound Adapter (
 )
)Set the log level for an inbound or outbound adapter and a flow used by the BizTx or BizTx Group.
 [Configuration] - [Log Configuration] - Inbound Adapter
-
Detailed Transaction Trace Log
The following describes the resources that constitute a BizTx or BizTx Group and require a log level setting. For more information, refer to AnyLink Runtime Engine Server Guide.
Item Description Inbound Adapter
Logging level for an adapter that sends input data from the BizTx.
Flow
Logging level for a service flow run in the BizTx. The same log level can be applied to the entire flow or to specific sections of the flow.
-
Flow Start/End: Logging level for data that an inbound adapter sends to a flow, or logging level for data that a flow sends to an outbound adapter. (e.g. Flow start and end)
-
Traceable Event/Activity: Logging level for a service flow or server flow called by event/activity. (e.g. Message event, adapter activity, response activity)
-
Internal Activity: Logging level for an activity except services, controls, and utilities. (e.g. User class)
-
Control/Utility: Logging level for flow control or utility calls. (e.g. JOIN and split gateway)
For more information about logging levels, refer to AnyLink Studio Guide.
Outbound Adapter
Logging level of an adapter that receives output data from the BizTx.
Encrypt Message
Option to encrypt the message to be logged.
-
-
-
Outbound Adapter (
 )
)Set the log level for an outbound adapter. This setting overrides the log setting of the inbound endpoint.
 [Configuration] - [Log Configuration] - Outbound Adapter
|
For adapters, endpoint groups, and endpoints that support both inbound and outbound communication directions, the same logging levels must be set for both inbound and outbound directions. |
5. File Log Setting
File logs are logs printed as separate files, and their logging levels can be set individually and separately from transaction trace files.
In AnyLink, BizTxs and adapters have hierarchical relationship in which child nodes inherit the settings of its parent node. If a parent node does not record logs, its child nodes also do not record logs even if they are set to. In addition, as AnyLink allows you to monitor resources based on logs, effective monitoring of a Biz System or BizTx requires a logging level Trace with MESSAGE or higher.
File log location and retention period can be configured from 'File Handler Settings' of the Biz System Configuration ([Configuration] - [Biz System Configuration]) screen. To go to the screen, click [Configuration] > [Biz System Configuration]. For more information, refer to Biz System Configuration.
| Number | Physical Name | Logical Name |
|---|---|---|
1 |
Point |
Logging point (AfterCalled, Arrival, etc.) |
2 |
Type |
Object type to be logged (Flow, Endpoint, etc.) |
3 |
Subtype |
Detailed object type to be logged (End, Scheduler, etc.) |
4 |
GUID |
Globally unique ID |
5 |
BiztxId |
BizTx ID |
6 |
Sequence |
Sequence |
7 |
SysId |
Unique ID of adapters, endpoints, and flow activities. |
8 |
NodeId |
Server name |
9 |
CGUID |
Child GUID |
10 |
Datetime |
Time of logging |
11 |
ErrorCode |
Error code |
12 |
ErrorMessage |
Error message |
13 |
RequestIP |
Requested inbound IP |
14 |
TargetId |
Next target ID |
15 |
TraceId |
Trace ID |
16 |
Length |
Message length |
17 |
Encrypt |
Message encryption |
18 |
MessageTypeId |
Message object ID |
19 |
Message |
Message content (Activity message content is outputted to the DTO) |
The following describes the contents of each logging level.
| Log Level | Description |
|---|---|
OFF |
Does not log messages. |
TRACE with MESSAGE |
Trace logs that contain message content. The logs are outputted as log files. For information about message content, refer to "File Log Format". |
FULL MESSAGE |
Trace logs that contain message contents as well as those not logged by the TRACE with MESSAGE logging method. The logs are outputted to a log file. This logging level also records more logs than TRACE with MESSAGE because trace logs without message contents are also written. |
|
It is recommended to understand the logging levels before configuring BizTx logs and adapter logs, which will be explained in the next section. For monitoring, select either TRACE with MESSAGE or FULL MESSAGE. |
File logging can write data received from a flow to a DTO file except IN and OUT messages from adapters. The DTO type is supported for request and response messages. The request message writes data after mapping and the response message writes data before the mapping.
For more information about BizTx/Adapter level configuration, refer to Log Configuration.
5.1. Configuring BizTx Logs
To set file logs per BizTx, click [Configuration] > [File Log Setting] and then click [BizTx Level] in the navigation pane. The log configuration information for each Biz System is displayed in a tree structure. A white icon (![]() ) means that a log level is configured for the resource. After a log level is configured, the icon will be changed to blue (
) means that a log level is configured for the resource. After a log level is configured, the icon will be changed to blue (![]() ).
).
If you select a Biz System BizTx for which no file log level is configured from the tree, a dialog box appears asking if you want to configure a log level. To go to the Set BizTx/BizTx Group File Log screen ([Configuration] - [File Log Setting] - Set BizTx/BizTx Group File Log (1)), click [OK]. For more information, refer to "Set BizTx or BizTx Group File Log".
If you select a Biz System or BizTx for which a file log level is configured, the detailed information is displayed on the right side of the screen where you can change or delete the file log level settings. To edit the file log level settings, modify the information and then click ![]() (save). To delete the file log level settings, click [Delete] from the drop-down menu of
(save). To delete the file log level settings, click [Delete] from the drop-down menu of ![]() (menu) on the top right hand corner.
(menu) on the top right hand corner.
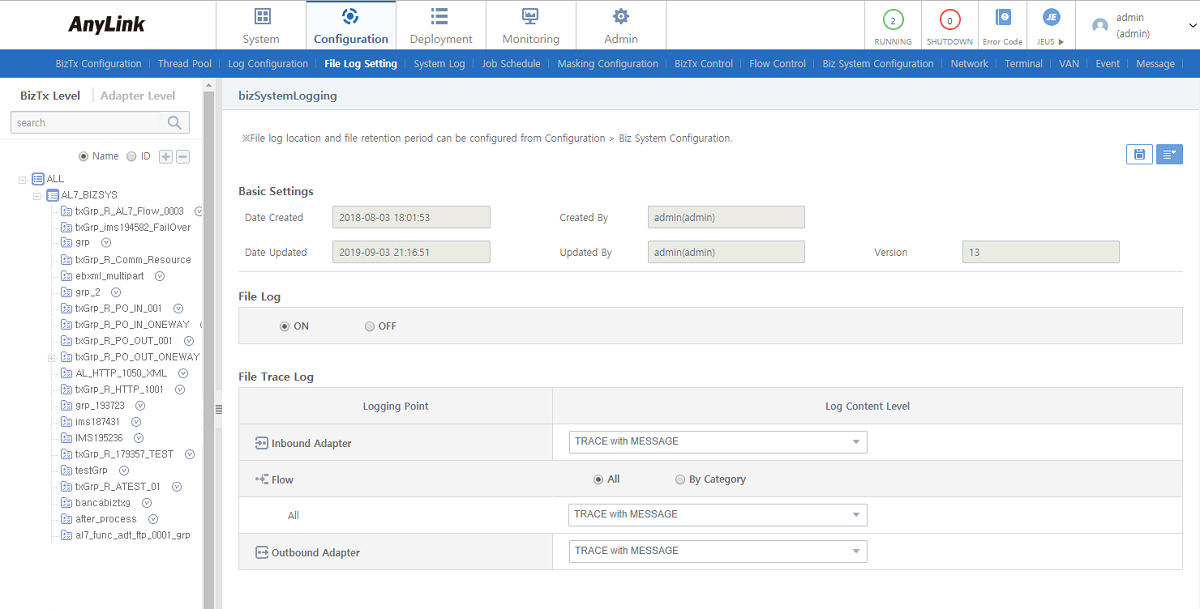
Setting BizTx/BizTx Group File Logs
If you select a BizTx for which a file log level is not configured yet from the BizTx Level tree, the Set BizTx/BizTx Group File Log is displayed. The logging levels of 'Inbound/Outbound Adapter' and 'Flow' can be specified in this section.
Configure each item and then click ![]() (save) at the top right hand corner. The Biz System or BizTx will be displayed with the blue icon (
(save) at the top right hand corner. The Biz System or BizTx will be displayed with the blue icon (![]() ) in the tree on the left.
) in the tree on the left.
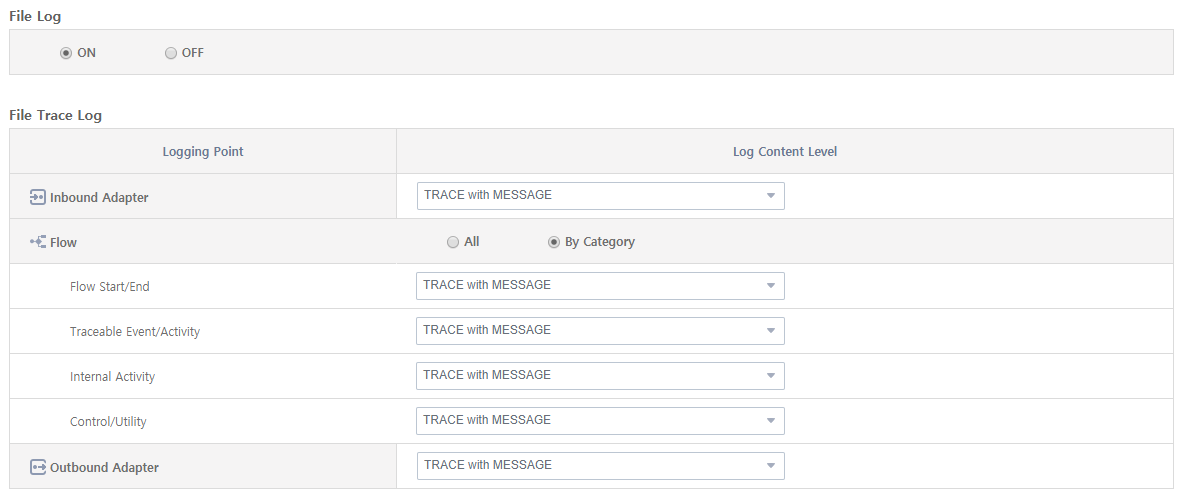
-
File Log
Enable file logging for the BizTx or BizTx Group.
Item Description ON
Enables the logging for the BizTx or BizTx Group. Select the ON option under File Log to display the File Trace Log section. In this section, a detailed BizTx or BizTx log setting can be specified.
OFF
Disables the logging for the BizTx or BizTx Group.
-
File Trace Log
The following describes the resources that consist of a BizTx or BizTx Group and require log level setting. For more information, AnyLink Runtime Engine Server Guide.
Item Description Inbound Adapter
Logging level for an adapter that sends input data from the BizTx.
Flow
Logging level for a service flow used by the BizTx.
The same log level can be applied to the entire flow or to specific sections of the flow.
For more information about logging levels, refer to "Log Content Level Option".
Outbound Adapter
Logging level for an adapter that receives output data from the BizTx.
-
When 'Flow' is set to all
The same log level is applied to the all sections that constitute the 'flow'.
 [Configuration] - [File Log Configuration] - Set BizTx/BizTx Group File Log (2)
 -
'When 'Flow' is set to 'By Category',
Different log levels can be set for the four categories of the 'flow'.
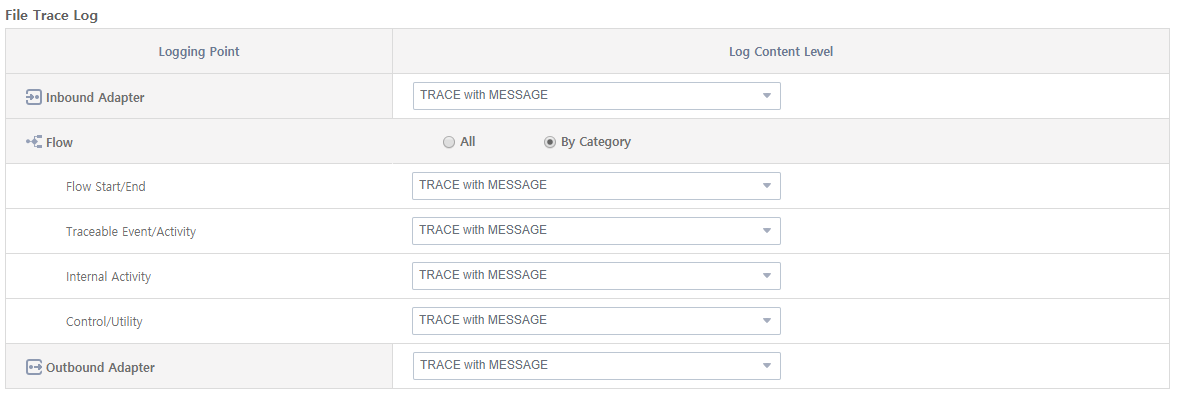 [Configuration] - [File Log Configuration] - Set BizTx/BizTx Group File Log (3)
Item Description Flow Start/End
Logging level for data that an inbound adapter sends to a flow, or log level for data that a flow sends to an outbound adapter.
(e.g. Flow start and end)
Traceable Event/Activity
Logging level for a service/ server flow called by event/activity. (e.g. Message event, adapter activity, response activity)
Internal Activity
Logging level for an activity except services, controls, and utilities. (e.g. User class)
Control/Utility
Logging level for flow control or utility calls. (e.g. JOIN and split gateway)
-
5.2. Configuring Adapter Logs
You can specify file logs of each adapter in WebAdmin.
To set file log levels per Adapter, click [Configuration] > [File Log Setting] and then click [Adapter Level] in the navigation pane. The file log configuration for each Adapter is displayed in a tree structure. A white icon (![]() ) means that a file log level is not configured yet. After it is configured, the icon will be changed to blue (
) means that a file log level is not configured yet. After it is configured, the icon will be changed to blue (![]() ). The tree will display the child elements of the adapter, such as endpoints and endpoint groups.
). The tree will display the child elements of the adapter, such as endpoints and endpoint groups.
If you select an adapter for which no file log level is not configured from the tree, a dialog box appears asking if you want to configure the file log level. To go to the Set Adapter File Log screen, click [OK]. If you select an adapter for which a file log level is configured, the detailed information is displayed on the right side of the screen where you can change or delete the file log level settings. To edit the file log level settings, modify the information and then click ![]() (save). If you want to delete the file log level settings, click [Delete] from the drop-down menu of
(save). If you want to delete the file log level settings, click [Delete] from the drop-down menu of ![]() (menu) on the top right hand corner.
(menu) on the top right hand corner.
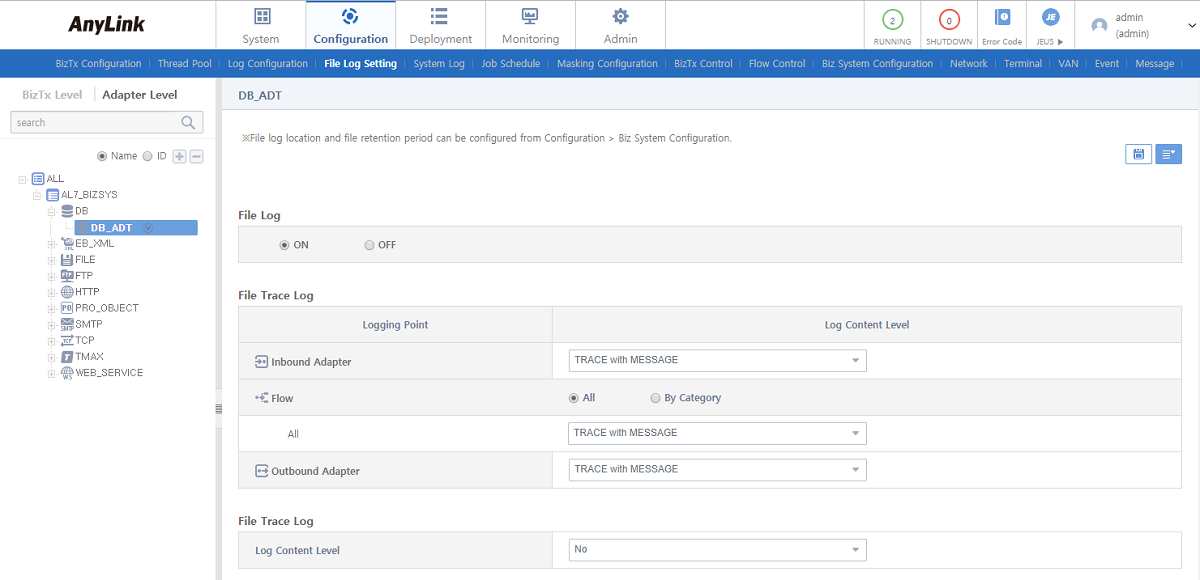
-
Inbound Adapter (
 )
)Set the log content level of an inbound, outbound adapter, and a flow by used the BizTx or BizTx Group.
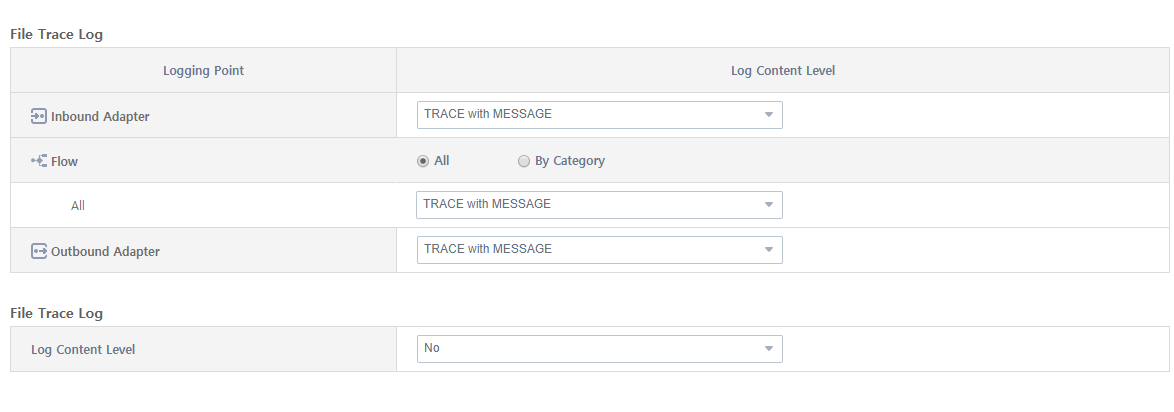 [Configuration] - [File Log Setting] - Inbound Adapter
-
File Trace Log
The following describes the resources that constitute a BizTx or BizTx Group and require a file log level setting. For more information, refer to AnyLink Runtime Engine Server Guide.
Item Description Inbound Adapter
Logging level for an adapter that sends input data from the BizTx.
Flow
Logging level for a service flow run in the BizTx. The same log level can be applied to the entire flow or to specific sections of the flow.
-
Flow Start/End: Logging level for data that an inbound adapter sends to a flow, or logging level for data that a flow sends to an outbound adapter.
-
Traceable Event/Activity: Logging level for a service flow or server flow called by event/activity.
-
Internal Activity: Logging level for an activity except services, controls, and utilities (e.g. User class).
-
Control/Utility: Logging level for flow control or utility calls. (e.g. JOIN and split gateway)
For more information about file logging levels, refer to AnyLink Studio Guide.
Outbound Adapter
Logging level of an adapter that receives output data from the BizTx.
-
-
-
Outbound Adapter (
 )
)Set the log content level of an outbound adapter. This setting overrides the inbound endpoint setting.
 [Configuration] - [File Log Setting] - Outbound Adapter
|
If an endpoint supports both inbound and outbound communication directions, you need to configure both inbound and outbound adapters. |
6. System Log
AnyLink supports system logs that record engine executions and errors in a Biz System or servers that belongs to it. To enable system logging, a Biz System must have been added first.
The logging levels for servers or server clusters can be either inherited from the Biz System that they belong to or can be specified separately in the Inherit Setting section. To set separate logging levels, select the server from the tree in the navigation pane. The Inherit Setting section is displayed where you can enable the Configure System Log option.

To go to the System Log Settings screen, click [Configuration] > [System Log] and then click the Biz System.
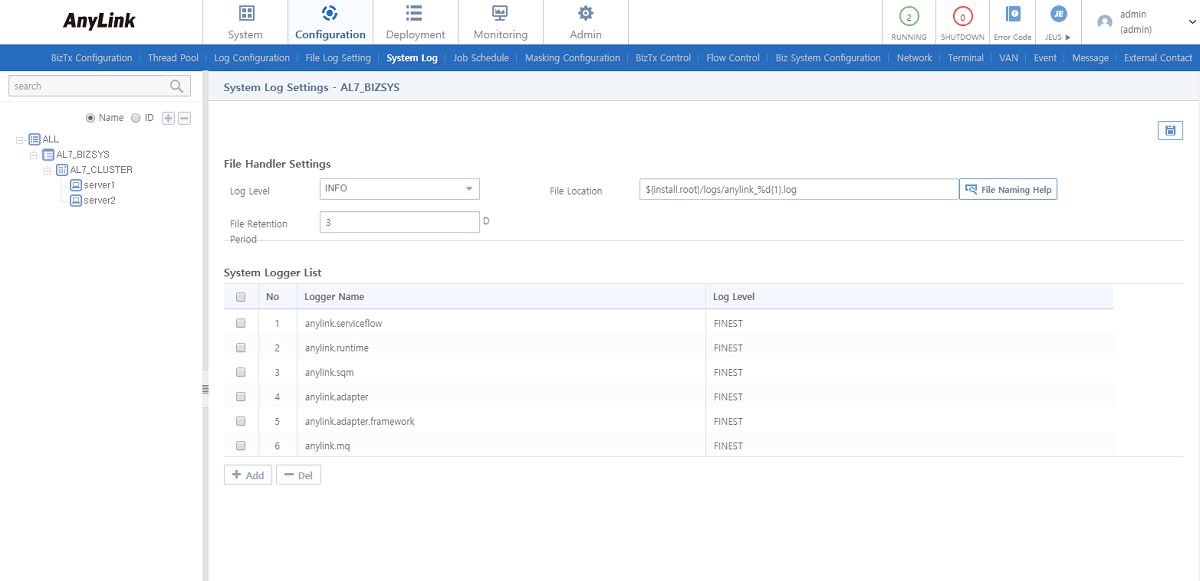
-
File Handler Setting
Item Description Log Level
Logging levels.
-
OFF: Logging is turned off.
-
FINEST: Very detailed trace.
-
FINER: Less detailed trace.
-
FINE: Message content only.
-
CONFIG: Static configuration change or status.
-
INFO: General information and warning messages.
-
SEVERE: Serious errors.
File Location
Location to save logs.
The default value is set to the following path.
${server.home}/logs/AnyLink_rte_%d{1}.log-
server.home: Server home directory
-
domain.home: Domain home directory
-
install.root: Installation directory (= jeus.home)
File Retention Period
Time to keep log files. The unit is set in days. If set to '1', system logs are updated daily and the files of the previous day will be deleted.
-
-
System Logger List
Searches, adds, or deletes system logs.
Item Description Logger Name
System logger name.
Log Level
System logger’s logging level.
-
Button
Button Description [Add]
Add a system logger. For more information, refer to "Adding a System Logger".
[Del]
Delete a system logger.
To delete a system logger, select the system logger from the list and click [Del]. In the confirmation dialog box that opens, click [OK].
Adding a System Logger
To add a system logger, click [Add] in the System Log Setting ([Configuration] - [System Log]) screen. The Logger Settings window opens. Configure the name and level of the logger and then click [Save].
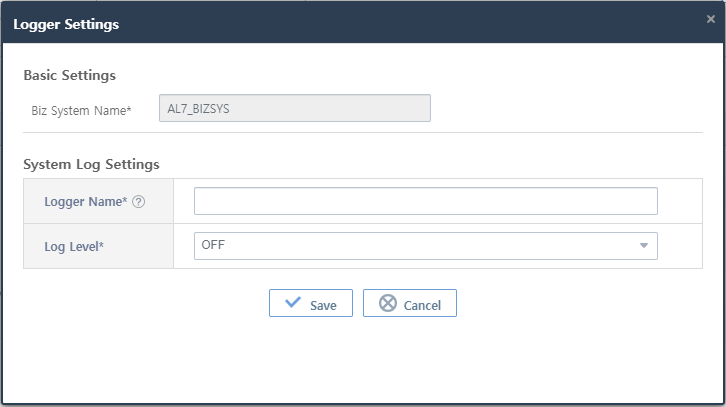
-
Logger Settings (*: required items)
Item Description Logger Name*
To view a list of logger names, click the [?] button next to [Logger Name*].
Log Level*
Same as the 'Log Level' option in the File Handler Setting.
7. Job Schedule
A job is an operation of assigning BizTxs to a Biz System and running the BizTxs. You can schedule a job to run routinely or start it immediately using WebAdmin.
To enable job scheduling, Go to [Configuration] > [Job Schedule]. For more information, refer to the relevant section.
| Tab | Description |
|---|---|
Adds, edits, or views jobs using BizTx IDs. |
|
Schedules job executions and views the list of currently scheduled jobs. |
|
Schedules the running of server cluster. |
|
Views the results and start/end time of scheduled jobs. |
|
Specifies holidays during which the scheduler will not perform a job. |
7.1. Job List
Clicking [Configuration] > [Job Schedule] > [Job List] displays the Job List screen where you can add, change, or view jobs using BizTx IDs. Enter search conditions and then click [Search]. The list of jobs is displayed based on your search conditions. To edit job information, click the job from the list. The Search Jobs screen is displayed where you can modify the information. For more information, refer to "Adding a Job".
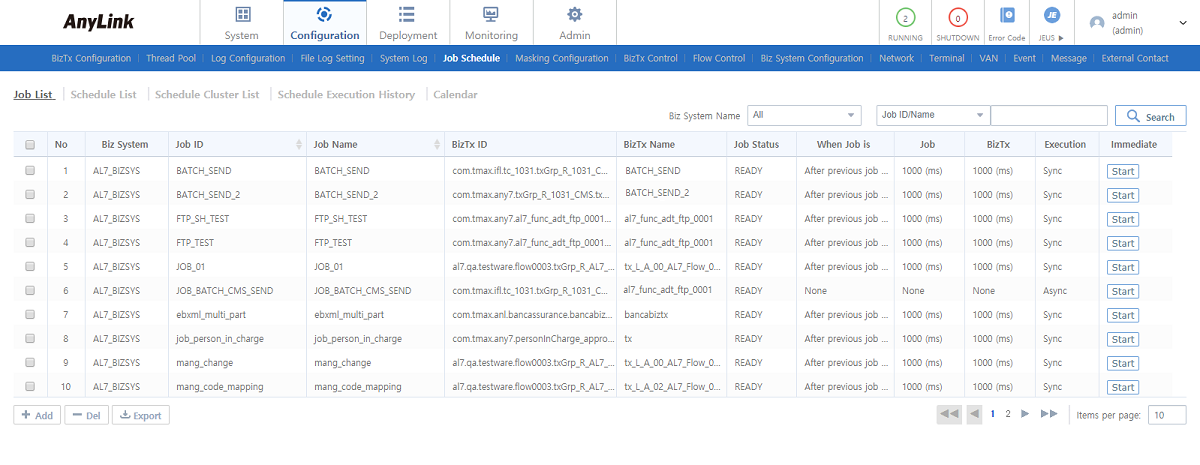
-
Search Conditions
Enter the following search conditions and then click [Search].
Item Description Biz System Name
Biz System name.
Job ID, Job Name,
Job ID/Name
Job ID or Job name.
-
Job List
Item Description Biz System Name
Name of the Biz System to which the job was added.
Job ID
Job ID.
Job Name
Job Name.
BizTx ID
ID of the BizTx to run the job.
BizTx Name
Name of the BizTx to run the job.
Job Status
Job status.
-
READY: Ready to run the job.
-
WAITING: Waiting to run the job.
-
START: Started to run the job.
-
RUNNING: Running the job.
-
FAILED: Failed to run the job.
-
SUCCEEDED: Succeeded to run the job.
-
FINISHED: Finished to run the job.
When Job is Already Running
Option to select if the same job is already running.
-
After previous job ends
-
Cancel execution
Job Response Wait Time
Time to wait for the job response.
BizTx Response Wait Time
Time to wait for the BizTx response.
Execution Mode
Job execution mode.
-
Sync
-
Async
Immediate Start
Click [Start] to run the schedule immediately.
-
-
Button
Button Description [Add]
Adds a job. For more information, refer to "Adding a Job".
[Del]
Deletes a job.
To delete a job, select the job from the list and click [Del]. In the confirmation dialog box that opens, click [OK].
[Note]
Make sure no other schedules use the job. Deleting a scheduled job causes an error.
[Export]
Downloads the job list as a .csv file.
Adding a Job
Clicking [Add] below the Job List ([Configuration] - [Job Schedule] - [Job List]) displays the Add Job window.
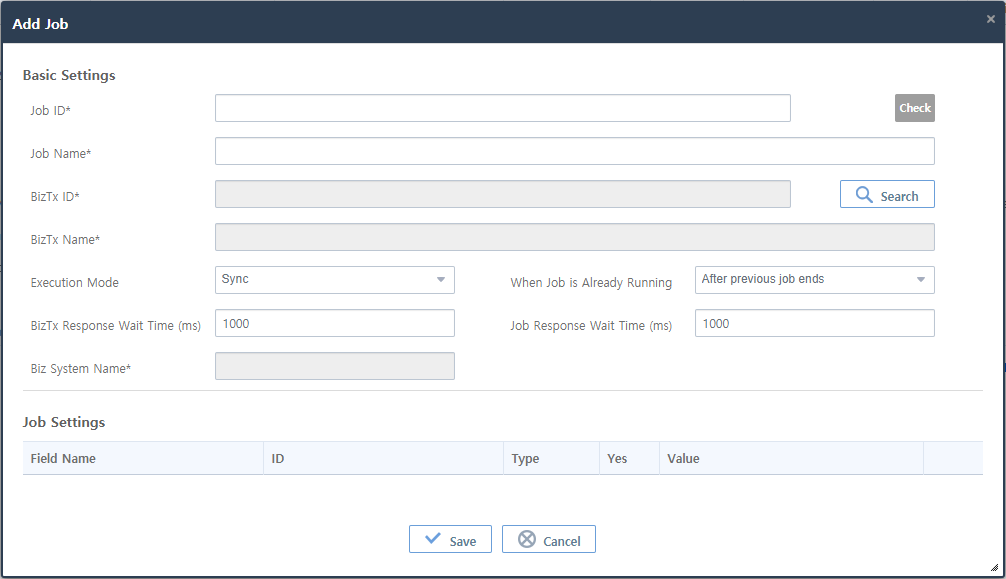
-
Basic Settings (*: required items)
Item Description Job ID*
Unique Job ID.
Only allows alphanumeric, hyphen, and underscore characters with a length of 3-30.
Click [Search] to select a BizTx. Enter a Job ID and then click [Check] to check if the Job ID exists.
[Check] is not enabled until you select a BizTx.
Job Name*
Job Name.
Only allows alphanumeric, hyphen, and underscore characters with a length of 3-30.
BizTx ID* / BizTx Name*
ID and Name of BizTx selected in the Select BizTx ([Configuration] - [Job Schedule] - [Job List] - Search BizTx) window. BizTx ID/Name cannot be modified by user directly.
Execution Mode
Job execution mode.
-
Sync: Waits for the response.
-
Async: Executes the next job.
When Job is Already Running
Option to select when the same job is already running.
-
After previous job ends: When the previous job ends, the new job run. To run the new job, configure BizTx Response Wait Time and Job Response Wait Time.
-
Cancel execution: The current job is canceled to process the previous job. Because the job is canceled after the BizTx Response Wait Time has elapsed, you don’t need to configure Job Response Wait Time.
BizTx Response Wait Time (ms)
Time to wait before changing the job status to READY in case the job does not receive a response from the BizTx.
The job status is changed from RUNNING to READY, regardless of BizTx processing.
The default value is 1000 ms. Set this option to 0 to prevent the same job from running in the BizTx.
Job Response Wait Time (ms)
Time to wait before starting the job when 'When Job is Already Running' is set to After previous job ends.
When a schedule runs a job being used by another schedule, the schedule waits until the previous schedule ends. If the job is still running on the previous schedule after the specified timeout, the schedule is canceled.
Set this option to 0 to run both schedules in order. Note that the sequential processing is not guaranteed.
The default value is 1000 ms.
Biz System Name*
Name of the Biz System selected in the Select BizTx ([Configuration] - [Job Schedule] - [Job List] - Search BizTx) window. Biz System Name cannot be modified by user directly.
To specify a BizTx ID/BizTx Name, click [Search] next to the BizTx ID field. In the Search BizTx window, select a BizTx and then click [OK].
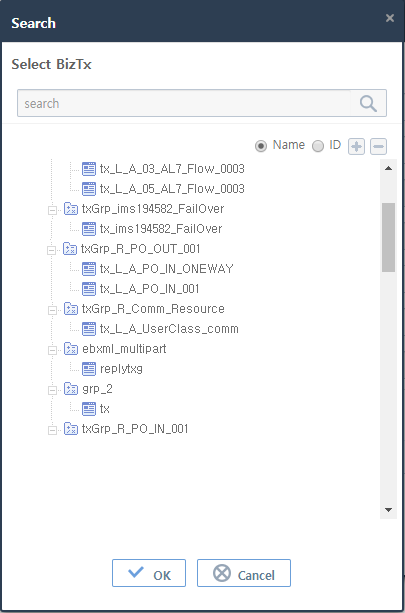 [Configuration] - [Job Schedule] - [Job List] - Search BizTx
 -
-
Job Settings
Specifies data that the job will use as a fixed incoming value. Messages defined as fixed data in AnyLink Studio are displayed in WebAdmin.
The list of messages has each field of request messages, which are fixed to a BizTx or its parent BizTx Group added to the job. For more information about the message list that can be configured in AnyLink Studio, refer to AnyLink Studio Guide.
 [Configuration] - [Job Schedule] - [Job List] - [Add Job] - Job Settings
Item Description Field Name
Name of a field to fix an incoming value.
ID
ID of a field to fix an incoming value.
Type
Data type of a field to fix an incoming value.
Yes
Option to use a fixed incoming value or null.
If 'Use' is checked when the field value is empty, an empty string ("") is entered. If 'Use' is unchecked, null value is entered.
Value
Fixed incoming value.
7.2. Schedule List
The Schedule List screen is used to schedule job executions and to view the list of currently scheduled jobs. To go to the screen, click [Configuration] > [Job Schedule] > [Schedule List]. The default schedule is automatically created when the Schedule List is initially displayed. Its schedule ID is default-instant-schedule'. This list shows the status of the schedules and detailed schedule information.
Clicking a schedule in the list displays the Update Schedule window. For more information about configuration items, refer to "Adding a Scheduler".
|
Changing an adapter of the system that is being used can cause errors. |

-
Search Conditions
Enter the following search conditions and then click [Search].
Item Description Biz System Name
Biz System name.
Status
Schedule status.
ID, Name, ID/Name
Schedule name. Case sensitive. Search term can be part of the schedule name.
-
Schedule List
Item Description Biz System Name
Name of the Biz System selected to add the schedule.
ID
Schedule ID.
Name
Schedule name.
Scheduled Run
Type and configuration value of the schedule.
Status
Schedule status.
-
Running: The schedule is running.
-
Stopped: The schedule is stopped.
-
Ready: The schedule is ready to start immediately. This status is only applicable to default-instant-schedule.
Initial State at Boot
Initial state of the schedule at boot.
Server
Name of the server ready to run the schedule.
Detailed Search
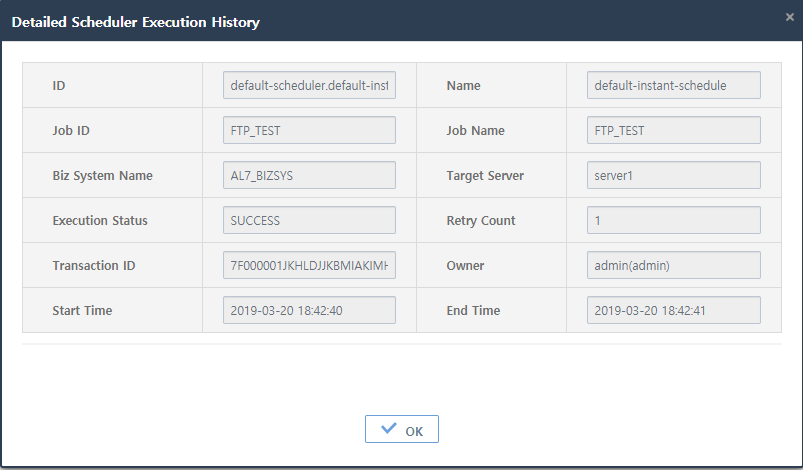
Click [Search] to display the Detailed Scheduler Execution History ([Configuration] - [Job Schedule] - [Schedule List] - [Detailed Search]- Detailed Scheduler Execution History) window. You can check the transaction that last run by this schedule.
Next Scheduled Start Time
Click [Check] to view the next scheduled start.
The next scheduled start time is provided per server. For a cluster of servers, this information is displayed for each server.
When [Search] on the Detailed View column is clicked, the detailed schedule information is displayed such as the start and end time of the schedule’s last execution.
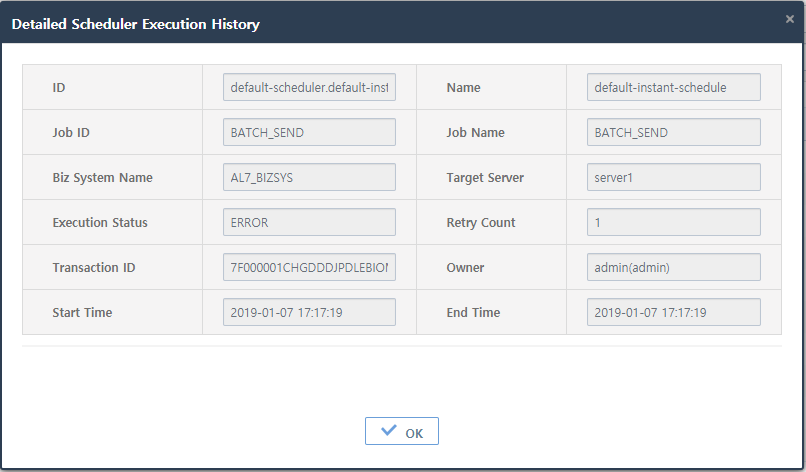 [Configuration] - [Job Schedule] - [Schedule List] - [Detailed Search]- Detailed Scheduler Execution History
 -
-
Button
Button Description [Add]
Adds a schedule. For more information, refer to "Adding a Schedule".
[Del]
Deletes a schedule.
To delete a schedule, select the schedule from the list and click [Del]. In the confirmation dialog box that opens, click [OK].
[Excel]
Downloads the schedule list as a .csv file.
[Start]
Starts a schedule. The status of the schedule is RUNNING.
Multiple schedules can be simultaneously started by checking them in the list.
[Stop]
Stops a schedule. The status of the schedule is STOPPED.
Multiple schedules can be simultaneously stopped by checking them in the list.
Adding a Schedule
Schedules can be configured with business days. To configure business day settings, a Biz System must be added to the calendar first. If a Biz System is not added to a calendar, no business calendar will be available in schedule settings. To add a Biz System to the calendar, refer to "Adding a Calendar" and "Editing a Calendar". If holiday is not considered for a schedule, the calendar setting is not necessary.
Clicking [Add] below the Schedule List ([Configuration] - [Job Schedule] - [Schedule List]) displays the Add Schedule window. Edit the schedule information and click [Save].
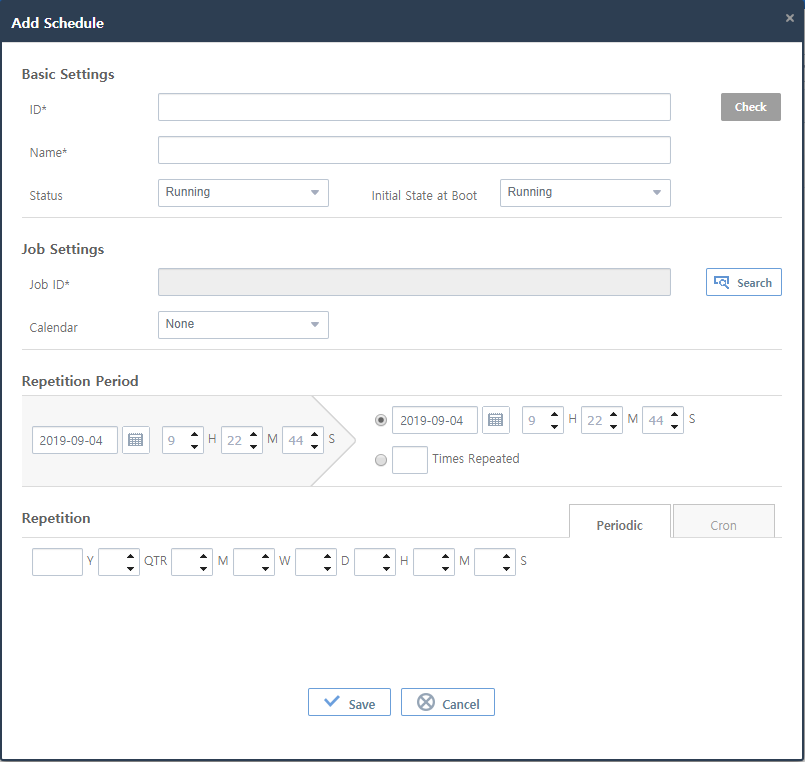
-
Basic Settings (*: required items)
Item Description ID*
Unique schedule ID.
Only allows alphanumeric, hyphen, and underscore characters with a length of 3-30.
Click [Search] in Job Settings to select a Job, and then click [Check] to check if the schedule ID exists.
Name*
Schedule name.
Only allows alphanumeric, hyphen, and underscore characters with a length of 3-30.
Status
Status of the schedule.
-
Running: Running the schedule.
-
Stopped: Stopped the schedule.
Initial State at Boot
Initial state of the schedule at boot.
-
Running: Running the schedule at boot.
-
Stopped: Stopped the schedule at boot.
-
-
Job Settings
Item Description Job ID*
ID of the scheduled job. The job ID cannot be specified directly by a user.
Click [Search] to display the Search Jobs ([Configuration] - [Job Schedule] - [Schedule List] - Add Schedule - Search Jobs) window, and then select a job.
Calendar
Calendar with holidays in which a job runs or not run. For more information about how to configure a calendar, refer to Calendar.
[Note]
A Biz System must have been added to a calendar prior to selecting a calendar. For more information, refer to "Editing a Calendar."
Select a job in the Search Jobs window, and then click [Select].
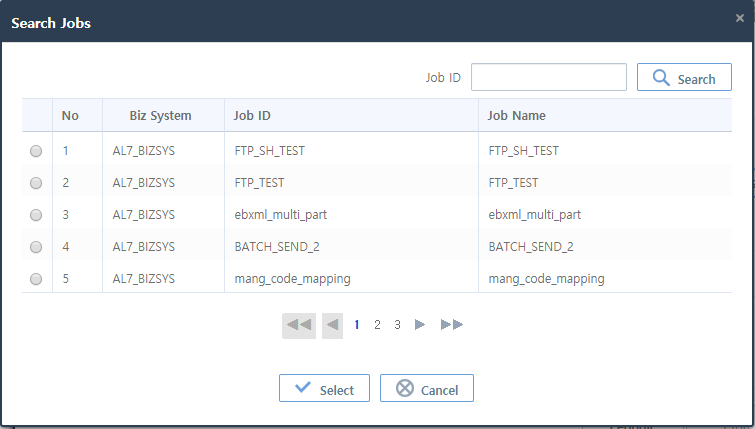 [Configuration] - [Job Schedule] - [Schedule List] - Add Schedule - Search Jobs
 -
Repetition Period
Specify when to start scheduling from in the left section of 'Repetition Period'.
 [Configuration] - [Job Schedule] - [Schedule List] - Add Schedule - Repetition Period
There are two options to repeat a job.
Option Description End Time Setting
Duration of the job repetition. A scheduled job is repeated until the specified time.
Repetition Times Setting
Number of times to repeat a job. A scheduled job is repeated for the specified number of times.
-
Repetition
-
Periodic
Specify the repetition frequency.

-
Cron
Enter a cron expression. This value must be entered in Cron expression.

A cron expression is a string comprising of 6 to 7 fields separated by blank space. Each field contains seconds, minutes, hours, day of month, month, day of week, and year in the specified order. A year value can be left out. Click [Validate] to confirm that the cron expression is valid. A cron expression must be validated before saving the schedule.
The following is an example of using a cron expression.
Every noon: 0 0 12 * * ?
Every 10:15 AM: 0 15 10 ? * *
10:15 AM on the 15th of every month: 0 15 10 15 * ?
Every minute between 2:00 PM and 2:59 PM daily: 0 * 14 * * ?
※ It returns a number from 1 (Sunday) to 7 (Saturday) to represent the day of the week of a date.
-
7.3. Schedule Cluster List
The Schedule Cluster List Settings screen is used to schedule the running of server cluster.
Click [Configuration] > [Job Schedule] > [Schedule Cluster List] to display the Schedule Cluster Details screen. The number of servers and the priority of each server are specified in this screen.
At startup, the schedule cluster is not yet configured, and the tree in the navigation pane shows only the Biz System and the default-scheduler with a white icon ( ). After configured in the Create Schedule Cluster screen, the tree displays the cluster’s child schedules and the white icon is changed to blue (
 ). If the Biz System consists of only of servers, the tree is not shown on the left.
|
If no schedule cluster was configured when AnyLink is installed, all booted servers belonging to the cluster run the schedule. |
If you select a schedule for which cluster is not configured yet, a dialog box appears asking if you want to configure a schedule cluster. Click the [OK] button to navigate to the Create Schedule Cluster ([Configuration] - [Job Schedule] - Create Schedule Cluster) screen. For more information, refer to "Adding a Schedule Cluster".
If you select a schedule for which cluster is configured, the Schedule Cluster Details screen is displayed on the right side of the screen. Edit the information and then click ![]() (save) at the top right hand corner. To delete a schedule cluster, select a schedule with the blue icon (
(save) at the top right hand corner. To delete a schedule cluster, select a schedule with the blue icon (![]() ) from the tree and then click [Delete] from the drop-down menu of
) from the tree and then click [Delete] from the drop-down menu of ![]() (menu) on the top right hand corner.
(menu) on the top right hand corner.

Adding a Schedule Cluster
Click [Configuration] > [Job Schedule]> [Schedule Cluster List] and then click a scheduler from the tree in the navigation pane. A dialog box appears asking if you want to create a schedule cluster. To go to the Create Schedule Cluster screen, click [OK]. Configure the Schedule Cluster settings and click [Save]. The white icon for the schedule will be changed to blue ( ).
).

-
Basic Settings
Item Description ID
Scheduler ID.
Name
Scheduler name.
-
Cluster Settings
Item Description ActiveCount
Actual number of servers to run within a cluster. A warning message will appear if this value is greater or less than actual number of servers.
Server Name
List of servers belonging to the cluster.
Priority
Priority of each server belonging to the cluster. Specify a value between 1 and the number of servers. This value can be changed.
Cluster Member
Option to enable a server belonging to the cluster.
7.4. Schedule Execution History
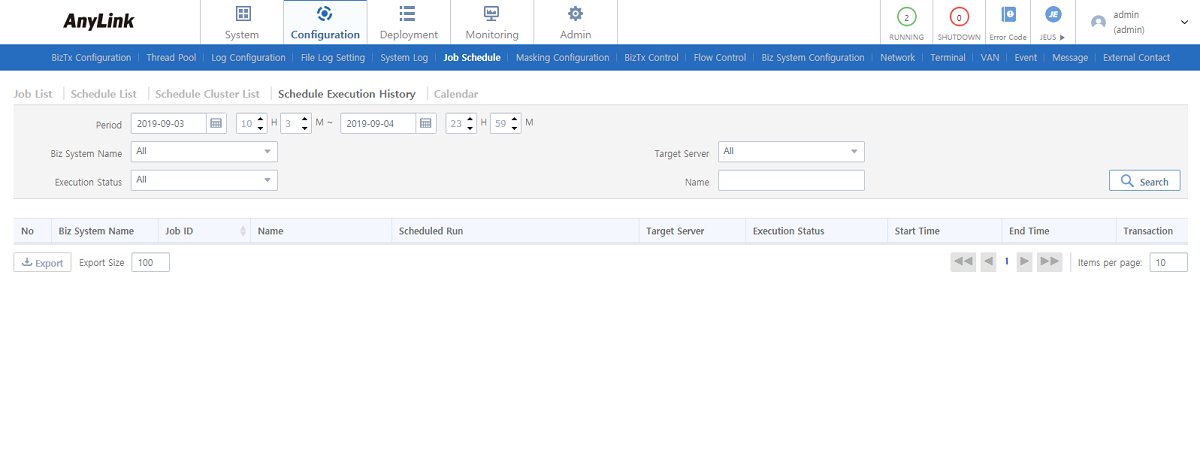
The Schedule Execution History screen is used to view the results and status of scheduled jobs. Click [Configuration] > [Job Schedule] > [Schedule Execution History] to display the Schedule Execution History screen. The screen lists the jobs that were executed by scheduling or immediate-start. Clicking a schedule execution in the list opens the Scheduler Execution History List ([Configuration] - [Job Schedule] - [Schedule Execution History] - Detailed Scheduler Execution History) window.
-
Search Conditions
Enter the following search conditions and then click [Search].
Item Description Period
Length of time to run the schedule. Enter the period, or select it by clicking the Calendar icon.
Biz System Name
Name of the Biz System.
Target Server
Server.
Execution Status
Server status.
Schedule Name
Name of the schedule to search for.
-
Schedule Execution History List
Item Description Biz System Name
Biz System that the schedule is added to.
Job ID
ID of the job that was executed based on the schedule.
Name
Schedule name.
Scheduled Run
Type and configuration of the schedule.
Target Server
Server to run the schedule.
Execution Status
-
SUCCESS: Successfully completed the job.
-
FAIL: Failed to complete the job.
-
RUNNING: Running the job.
-
START: Before starting to run the job. A BizTx is started yet.
-
ERROR: An error occurred while running the job.
Start Time
Schedule start time.
End Time
Schedule end time.
Transaction
Click [OK] to check the transaction trace logs of the schedule in the Transaction Trace ([Configuration] - [Job Schedule] - [Schedule Execution History] - Transaction Trace) window.
To view the transaction trace logs of the schedule, click [OK] below the 'Transaction' field in the Detailed Scheduler Execution History screen. For more information, refer to "Transaction Trace" of Biz System.
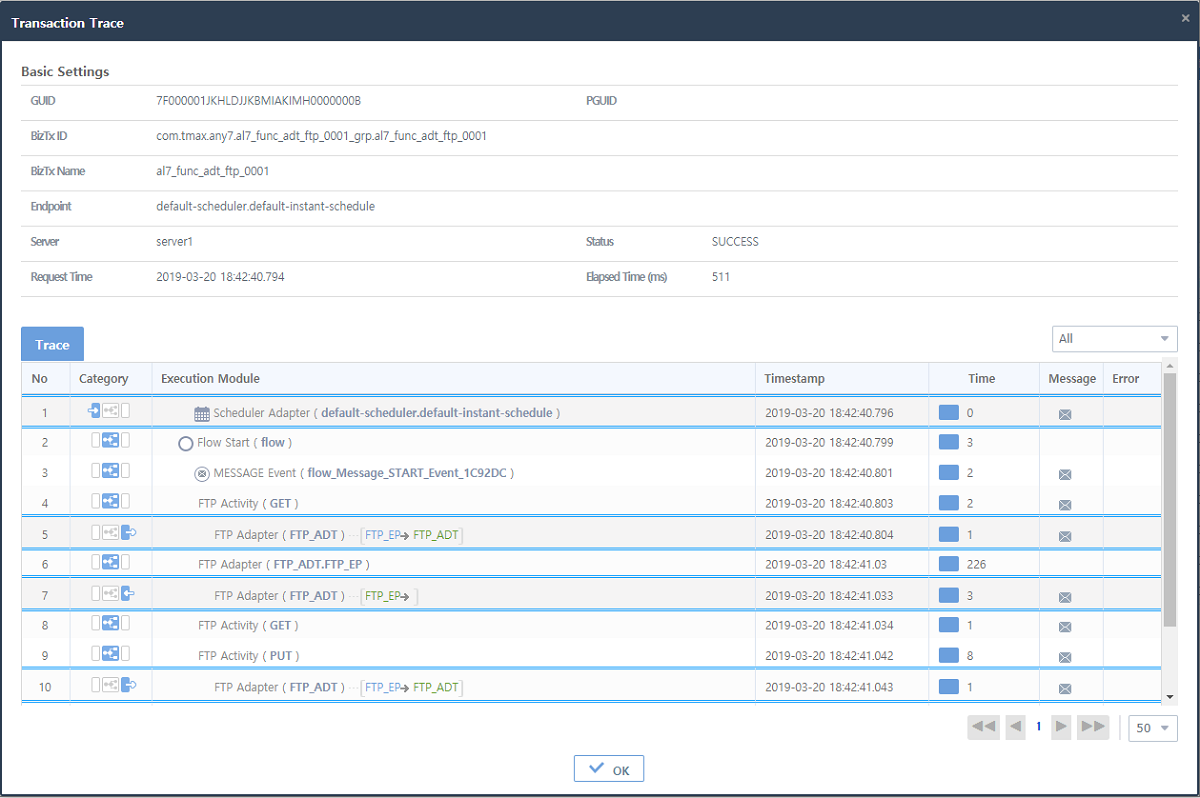 [Configuration] - [Job Schedule] - [Schedule Execution History] - Transaction Trace
 -
-
Button
Button Description [Excel]
Downloads the schedule execution history as a .csv file.
An error may occur due to time-consuming downloads. The default export size is 100. The export size cannot exceed 10,000. The export size can be modified by the user.
Detailed Scheduler Execution History
To go to the Detailed Scheduler Execution History ([Configuration] - [Job Schedule] - [Schedule Execution History]) window, click a specific line from the list in the Scheduler Execution History screen.
7.5. Calendar
The Calendar screen is used to specify holidays during which the scheduler will not perform a job. Schedules can be configured with holidays. Add a calendar in the Calendar tab and set a Biz System to use holidays. Then, a calendar becomes available in schedule settings. To go to the Calendar screen, click [Configuration] > [Job Schedule] >[Calendar]. Calendar with business days setting are viewed and managed in this screen.
To edit a calendar, click the calendar from the list of calendars. The Detailed Calendar Settings ([Configuration] - [Job Schedule] - [Schedule Execution History] - Detailed Scheduler Execution History) section will be displayed where you can edit the calendar settings. For more information, refer to "Editing a Calendar".
To view the list of specific calendars, enter search conditions and then click [Search].
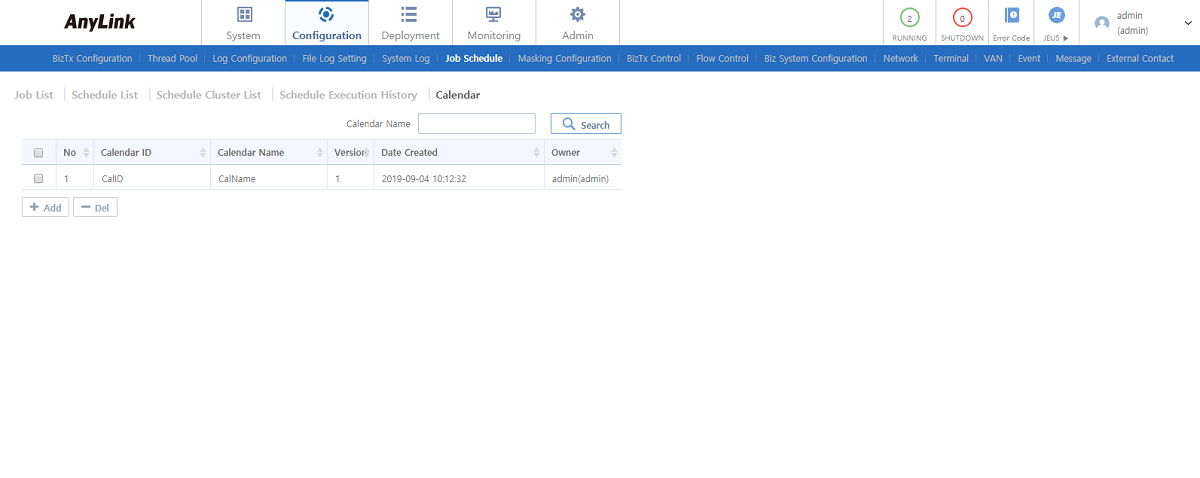
-
Calendar List
Item Description Calendar ID
Calendar ID.
Calendar Name
Calendar name.
Version
Calendar version. Version is incremented by 1 each time the calendar is updated.
Date Created
Date when the calendar was added to.
Owner
ID of the user who added the calendar.
-
Button
Button Description [Add]
Adds a calendar. For more information, refer to "Adding a Calendar".
[Del]
Deletes a calendar.
To delete a schedule, select the schedule from the list and click [Del]. In the confirmation dialog box that opens, click [OK].
Editing a Calendar
To edit a calendar, click a calendar from the list of calendars in the Calendar screen ([Configuration] - [Job Schedule] - [Calendar]). The Detailed Calendar Settings section will be displayed on the right. The screen displays basic calendar information and daily schedules for the calendar.
Edit the calendar information and then click [Save]. For more information about configuration items, refer to "Adding a Calendar".
|
Before editing a calendar, a Biz System must have been added to the calendar. If you edit the calendar of the system being used, you will get an error. |
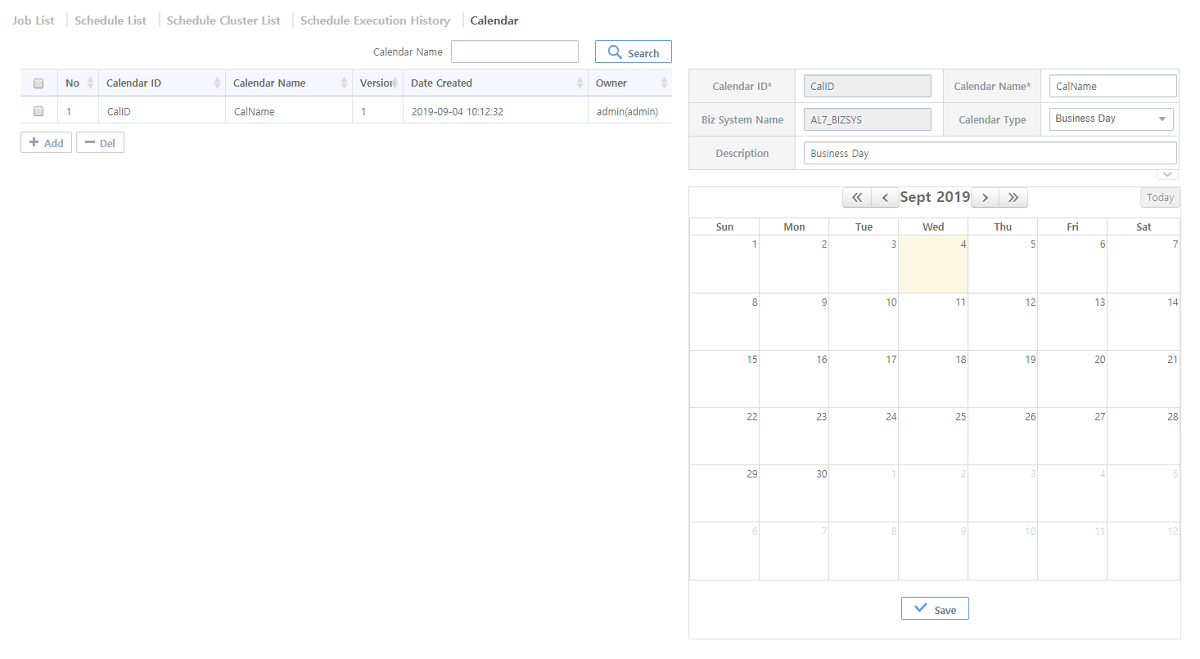
You can add, edit, or delete schedule information for a calendar date.
-
Adding a Schedule
To add a schedule to a calendar date, click the date in the calendar.
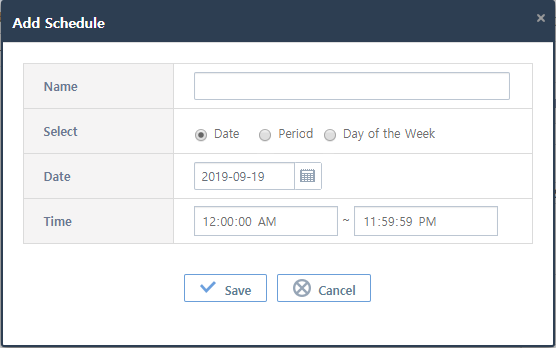 [Configuration] - [Job Schedule] - [Calendar] - Add Schedule
Item Description Name
Unique schedule name of the schedule.
Select
Type of schedule.
-
Date: Add a schedule for a specific date.
-
Period: Add a schedule for a specific period.
-
Day of the Week: Add a schedule for a day of the week to be repeated for a specific period.
Date
Date to add the schedule. If the type of schedule is 'Period', or 'Day of Week', then users will be able to select the start date and end date of the schedule.
Day of the Week
Enabled if the type of schedule is 'Day of Week'. Multiple days of the week can be selected. If the selected day of week is not included in the period entered in the 'Date' option, a warning pop-up will appear.
Time
Time of the schedule. It is expressed in the hh:mm:ss AM/PM format.
-
-
Editing a Schedule
Select a schedule, and then edit or delete the schedule in the Update Schedule window. As well, you can add another schedule on the same date by selecting a margin outside the existing schedule.
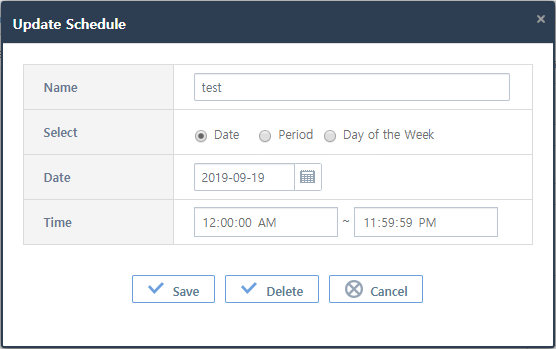 [Configuration] - [Job Schedule] - [Calendar] - Update Schedule
Adding a Calendar
Clicking [Add] below the Calendar List ([Configuration] - [Job Schedule] - [Calendar]) displays the Add Calendar window. Add the calendar information and click [Save].
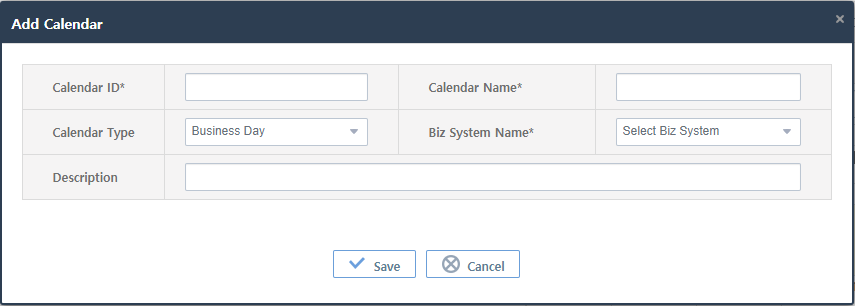
-
Basic Settings (*: required items)
Item Description Calendar ID*
Calendar ID.
Only allows alphanumeric, hyphen, and underscore characters with a length of 3-30.
Calendar Name*
Calendar name.
Only allows alphanumeric, hyphen, and underscore characters with a length of 3-30.
Calendar Type
Calendar type. A calendar for "Business Day" or "Holidays".
-
'Business Day' calendar: Configure a calendar for the Biz System specified when setting a job schedule. The schedules of the 'Business Day' calendar will be run.
-
'Holidays' calendar: Job schedule does not execute on days specified as holidays.
Biz System Name*
Biz System where the calendar will be added to.
Description
Information about the calendar.
-
8. Masking Configuration
Before masking configuration, message masking must have been configured in AnyLink Studio. The settings then can be either enabled or disabled in WebAdmin. For more information about how to configure message masking, refer to AnyLink Studio Guide.
To go to the Masking Configuration screen, click the [Configuration] > [Masking Configuration] and then click a masking configuration in the navigation pane. A white icon ( ) means that masking is not configured yet. After configured, the icon will be changed to blue (
 ). If you select a Biz System or BizTx for which masking is not configured, a dialog box asking appears if you want to configure masking. To go to the Masking Configuration screen, Click the [OK] button. Configure masking settings and click
 ![]() (save).
(save).
To delete a masking configuration, select a Biz System or BizTx with the blue icon (![]() ) from the tree and then click [Delete] from the drop-down menu of
) from the tree and then click [Delete] from the drop-down menu of ![]() (menu) on the top right hand corner. In the confirmation dialog box that opens, click [OK].
(menu) on the top right hand corner. In the confirmation dialog box that opens, click [OK].
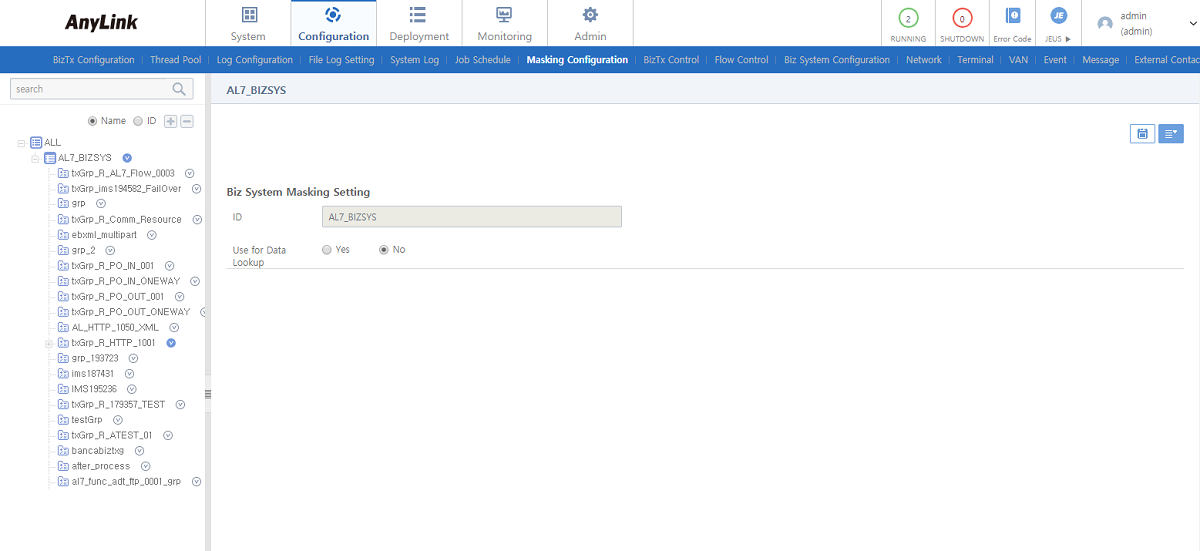
-
Biz System Masking Setting
Item Description ID
Biz System ID. This item is automatically entered when a Biz System is selected from the tree.
Use for Data Lookup
Option to use masking when looking up messages.
9. BizTx Control
To go to the BizTx Control screen, click [Configuration]> [BizTx Control] and then select a Biz System or BizTx in the navigation pane. A white icon (![]() ) means that BizTx control is not configured yet. After configured, the icon will be changed to blue (
) means that BizTx control is not configured yet. After configured, the icon will be changed to blue (![]() ).
).
If you select a Biz System or BizTx that for which BizTx Control is not configured, a dialog box appears asking if you want to set BizTx Control. To go to the BizTx Control screen, Click [OK]. Specify the BizTx control settings and click ![]() (save). To delete a BizTx control setting, select a Biz System or BizTx with the blue icon (
(save). To delete a BizTx control setting, select a Biz System or BizTx with the blue icon (![]() ) from the tree and then click [Delete] from the drop-down menu of
) from the tree and then click [Delete] from the drop-down menu of ![]() (menu) on the top right hand corner. In the confirmation dialog box that opens, click [OK].
(menu) on the top right hand corner. In the confirmation dialog box that opens, click [OK].
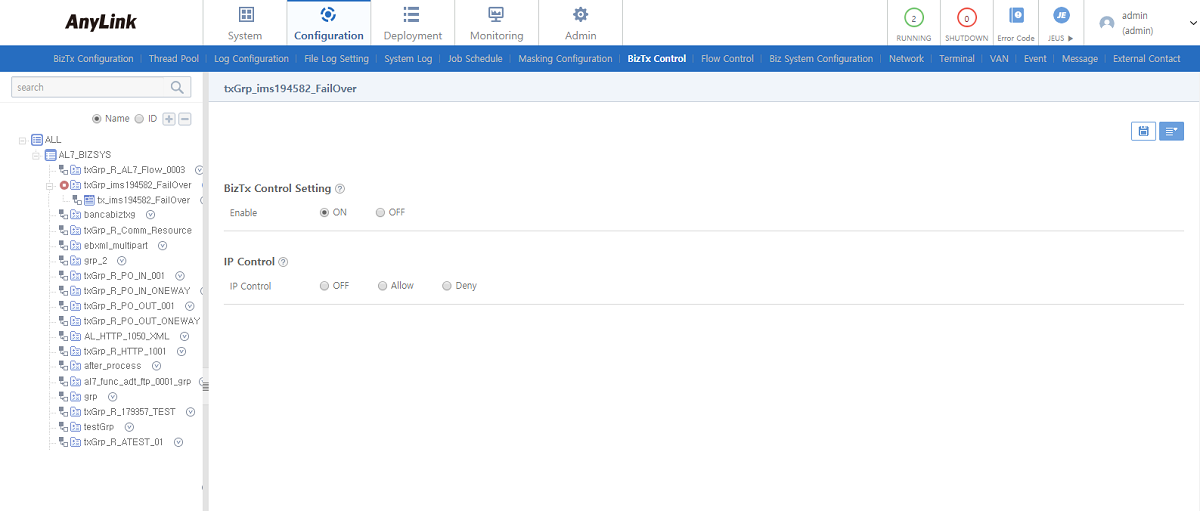
-
BizTx Control Setting
Item Description Enable
Option to use the Biz Control settings.
IP Control
Option to process client requests.
-
OFF: All client requests are processed. (Default value)
-
Allow: Only requests from clients with the matching IP rule are processed.
-
Deny: Requests from clients with the matching IP rule are restricted.
-
10. Flow Control
To go to the Flow Control Setting screen, click [Configuration] > [Flow Control] and then select a Biz System or BizTx in the navigation pane. If the incoming transactions exceed the specified flow limit, AnyLink issues an error.
A white icon (![]() ) means that flow control is not configured yet. After configured, the icon will be changed to blue (
) means that flow control is not configured yet. After configured, the icon will be changed to blue (![]() ).
).
If you select a Biz System or BizTx for which flow control is not configured, a dialog box appears asking if you want to set flow control. To go to the Flow Control Setting screen, click [OK]. Specify the Flow Control settings and click ![]() (save). To delete a flow control setting, select a Biz System or BizTx with the blue icon (
(save). To delete a flow control setting, select a Biz System or BizTx with the blue icon (![]() ) from the tree and then click [Delete] from the drop-down menu of
) from the tree and then click [Delete] from the drop-down menu of ![]() (menu) on the top right hand corner. In the confirmation dialog box that opens, click [OK].
(menu) on the top right hand corner. In the confirmation dialog box that opens, click [OK].
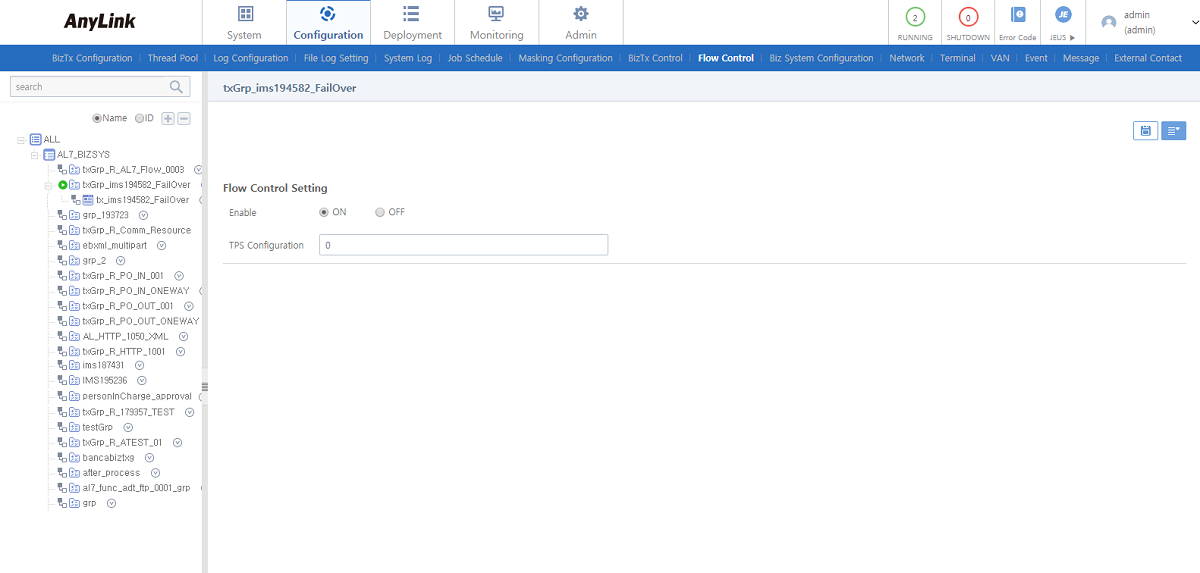
-
Flow Control Setting
Item Description Enable
Option to use flow control.
TPS Configuration
Maximum number of packets transmitted per BizTx or BizTx Group in TPS.
11. Biz System Configuration
To configure Biz System settings, click [Configuration] > [Biz System Configuration] and then select a Biz System in the navigation pane. Configure the items and then click ![]() (save).
(save).
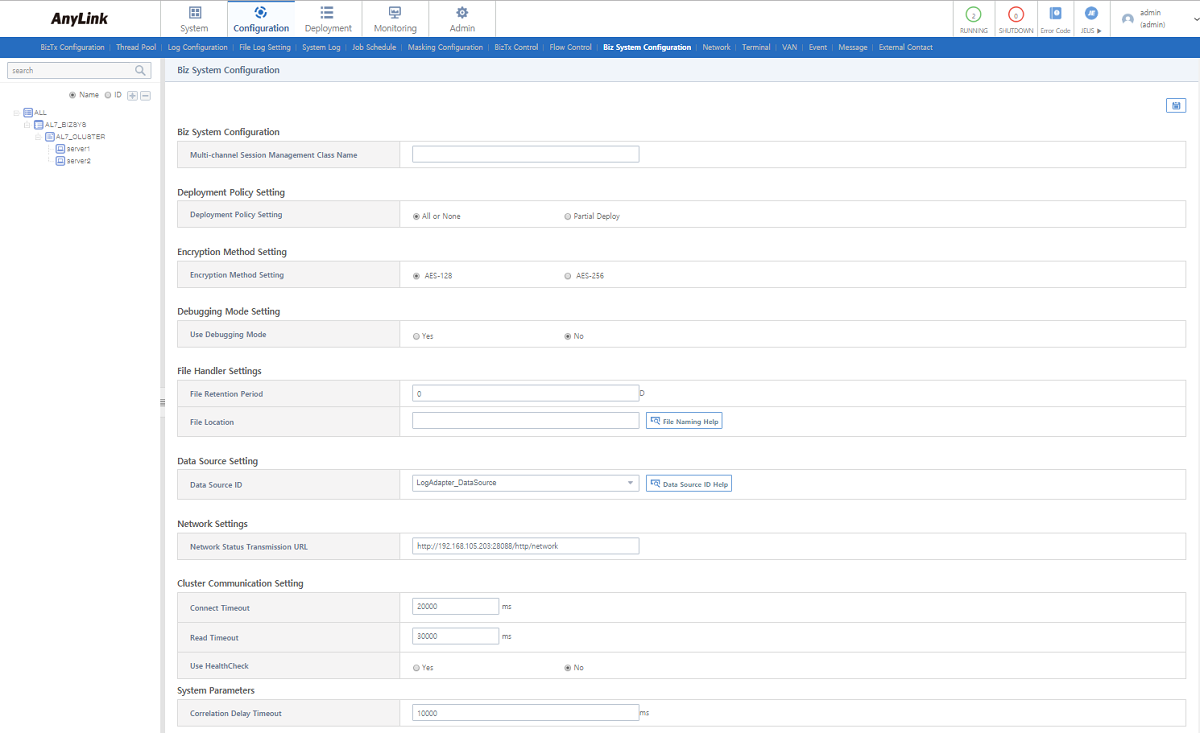
-
Basic Settings
Item Description Multi-channel Session Management Class Name
Name of user class that manages multi-channel sessions in the Biz System.
Deployment Policy Setting
Policy for deploying the Biz System.
-
All or None: Deploys either all Biz System settings or no Biz System settings
-
Partial Deploy: Deploys part of the Biz System settings..
Encryption Method Setting
Encryption method of a Biz System.
This encryption method is applied to the resources to be encrypted in the Biz System. For example, if the password of FTP endpoint or system variable value is set to be encrypted, the encryption method specified in this item will be used.
-
AES-128
-
AES-256
Debugging Mode Setting
Option to enable the remote debugging mode of AnyLink Studio.
File Retention Period
Length of time to keep log files.
The unit is set in days. If set to '1', system logs are updated daily, and the files of the previous day will be deleted.
File Location
Location to save file logs.
To view a guideline for configuring a file name, click [File Naming Help].
Data Source ID
Data source provided by JEUS and used by Biz System to access DB.
This specified data source is used for network management, manager approval, dash board, adapter/endpoint monitoring, events management, batch process, and meta management. If not selected, all of the functions are disabled and the Adapter Monitoring screen cannot be accessed.
To view a guideline for configuring a file name, click [Data Source Usage Notice].
Network Status Transmission URL
URL to send network status.
Connect Timeout
Connection timeouts between servers in a cluster. Only applicable when the Biz System is configured as a cluster. The unit is in milliseconds.
Read Timeout
Read timeouts between servers in a cluster. Only applicable when the Biz System is configured as a cluster. The unit is in milliseconds.
Use HealthCheck
Option to use health check for the servers in a cluster. Only applicable when the Biz System is configured as a cluster.
Correlation Delay Timeout
Timeouts for flow correlation. Only applicable to flow correlation.
The default value is 1000 ms. This is an interval to check after 10 seconds has elapsed. The unit is in milliseconds.
-
12. Network
To enable network management, click [Configuration] > [Network].
This function receives error messages from organizations and sends them to internal systems, allowing users to configure the status of organizations. For more information, refer to AnyLink Studio Guide.
| Tab | Description |
|---|---|
Adds or edits networks (Bizs, organizations), or views added networks. |
|
Views the status of newtworks before and after updates. |
12.1. Networks
To add or edit networks (Biz, organizations) or view the list of added newtorks, click the [Configuration] > [Network] > [Networks].
The tree is organized in the order Networks> Bizs> Organizations. Clicking each resource opens the Networks Screen ([Configuration] - [Network] - [Networks]), Bizs Screen ([Configuration] - [Network] - [Bizs]), Organizations Screen ([Configuration] - [Network] - [Organizations]) respectively.
-
Networks
To go to the Networks screen, click a Biz System in the navigation pane. Clicking a network from the networks list opens the Network Information window, where you can edit the network settings. For more information about configuring Network Information, refer to "Adding a Network".
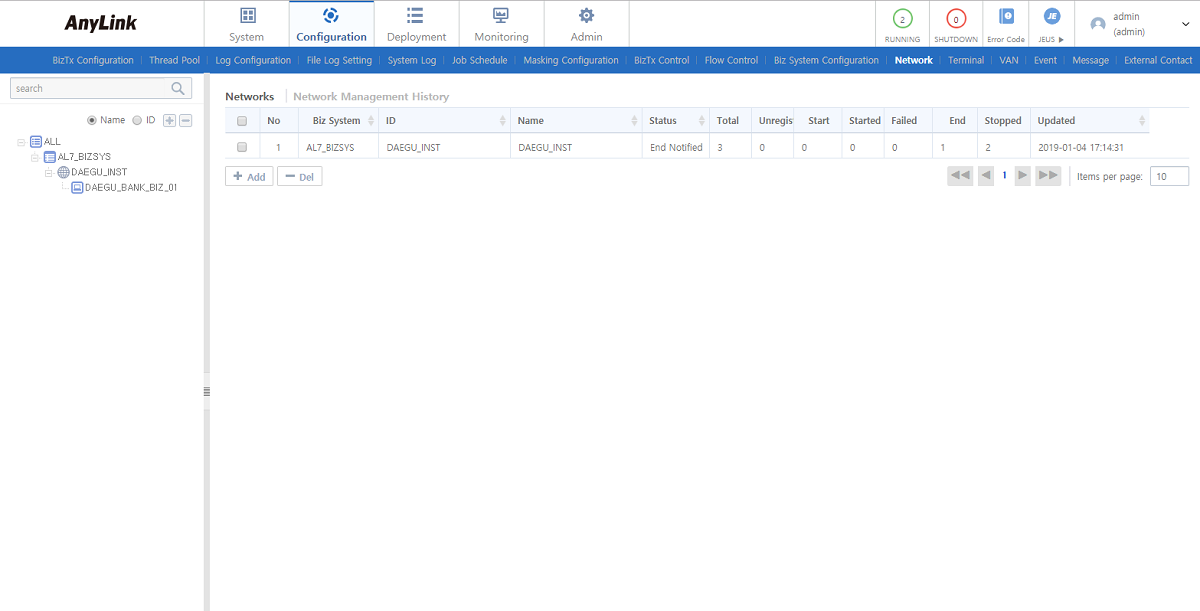 [Configuration] - [Network] - [Networks]
-
Network List
Item Description ID
Network ID.
Name
Network name.
Status
Current status of the network.
Total
Total number of organizations belonging to the network.
Unregistered
Total number of organizations for the Biz belonging to the network which status is not registered.
Start
Total number of organizations for the Biz belonging to the network which is ready to start.
Started
Total number of organizations for the Biz belonging to the network that has been started.
Failed
Total number of organizations for the Biz belonging to the network that has been failed.
End
Total number of organizations for the Biz belonging to the network which is ready to end.
Stopped
Total number of organizations for the Biz belonging to the network that has been stopped.
Updated
Date when the network information was updated.
-
Button
Button Description [Add]
Adds a network. For more information, refer to "Adding a Network".
[Del]
Deletes a network.
To delete a network, select the network from the list and click [Del]. In the confirmation dialog box that opens, click [OK].
[Send]
Sends the status of a network. Check the checkbox for the network and then click [Send] to send the network status to the Network Status Transmission URL set in [Configuration] > [Biz System Configuration].
-
-
Bizs
To go to the Bizs screen, click a network node under the Biz System in the navigation pane on the left. Clicking a Biz from the Biz list opens the BizTx Info window, where a user can edit the details of the selected Biz. For more information about configuring Biz Information, refer to "Adding a Biz".
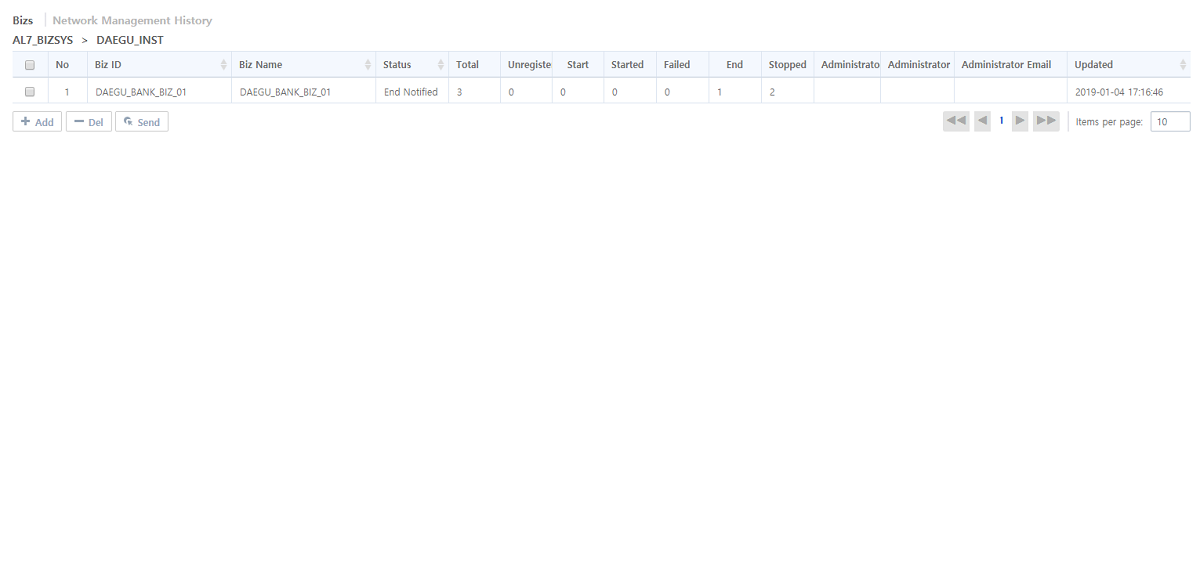 [Configuration] - [Network] - [Bizs]
-
Biz List
Item Description ID
Biz ID.
Name
Biz name.
Status
Current status of the Biz.
Total
Total number of organizations belonging to the Biz.
Unregistered
Total number of organizations for the Biz belonging to the network which status is not registered.
Start
Total number of organizations for the Biz belonging to the network which is ready to start.
Started
Total number of organizations for the Biz belonging to the network that has been started.
Failed
Total number of organizations for the Biz belonging to the network that has been failed.
End
Total number of organizations for the Biz belonging to the network which is ready to end.
Stopped
Total number of organizations for the Biz belonging to the network that has been stopped.
Administrator Name
Administrator name.
Administrator Contact
Administrator contact.
Administrator Email
Administrator email.
Updated
Date when the Biz information is updated.
-
Button
Button Description [Add]
Add a Biz. For more information, refer to "Adding a Biz".
[Del]
Delete a Biz.
To delete a Biz, select the Biz from the list and click [Del]. In the confirmation dialog box that opens, click [OK].
[Send]
Send the status of the network. Check the checkbox for the network and then click [Send] to send the network status to the Network Status Transmission URL set in [Configuration] > [Biz System Configuration].
The Network Status Transmission URL setting is required in Biz System configuration, and Json message must be set in AnyLink Studio. The physical name must be the same as the name specified in AnyLink, and the array size must be unbounded.
-
-
Organizations
To go to the Organizations screen, click an organization under the Biz System in the navigation pane. Clicking an Organization from the organization list opens the Organization Info window, where you can edit the details of the selected organization. For more information about configuring Organization Info, refer to "Adding an Organization".
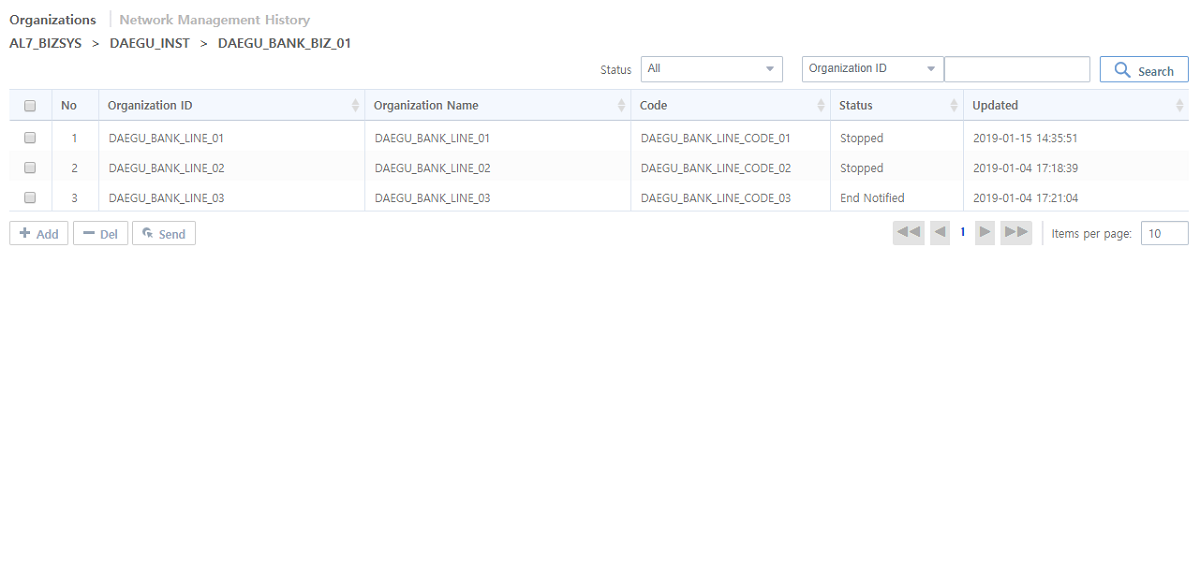 [Configuration] - [Network] - [Organizations]
-
Organization List
Item Description ID
Organization ID.
Name
Organization name.
Code
Organization code.
Status
Current status of the organization.
Updated
Date when the organization information is updated.
-
Button
Button Description [Add]
Adds an organization. For more information, refer to "Adding an Organization".
[Del]
Deletes an organization.
To delete an organization, select the organization from the list and click [Del]. In the confirmation dialog box that opens, click [OK].
[Send]
Send the status of the network. Check the checkbox for the network and then click [Send] to send the network status to the Network Status Transmission URL set in [Configuration] > [Biz System Configuration].
The Network Status Transmission URL setting is required in Biz System configuration, and Json message must be set in AnyLink Studio. The physical name must be the same as the name specified in AnyLink, and the array size must be unbounded.
-
Adding a Network
To go to the Add Network window, click [Add] below the Networks List ([Configuration] - [Network] - [Networks]).

-
Basic Settings (*: required items)
Item Description ID*
Network ID.
Only allows alphanumeric, hyphen, and underscore characters with a length of 3-30.
Enter a network ID and then click [Check] to check if the network ID already exists.
Name*
Network name.
Only allows alphanumeric, hyphen, and underscore characters with a length of 3-30.
Description
View a guideline for adding a network.
Adding a Biz
To go to the Add Biz window, click [Add] below the Biz List ([Configuration] - [Network] - [Bizs]).
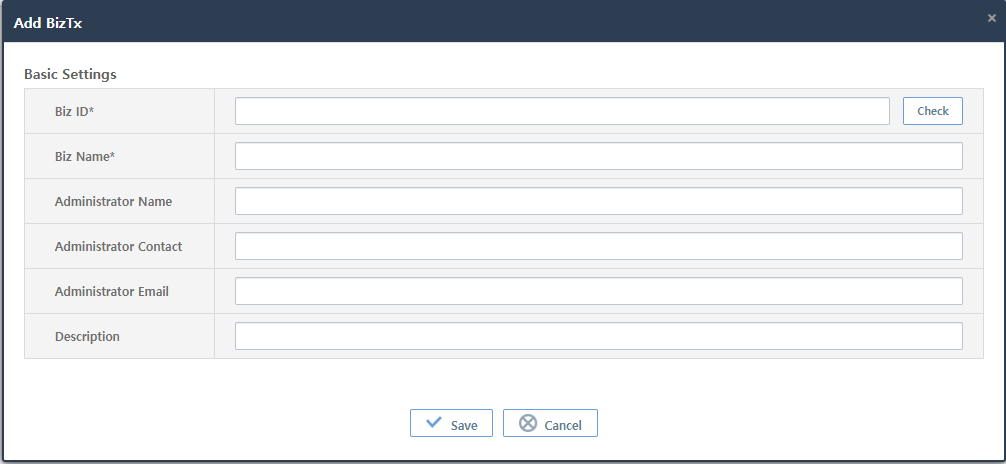
-
Basic Settings (*: required items)
Item Description Biz ID*
Biz ID.
Only allows alphanumeric, hyphen, and underscore characters with a length of 3-30.
Enter a Biz ID and then click [Check] to check if the Biz ID already exists.
Biz Name*
Biz name.
Only allows alphanumeric, hyphen, and underscore characters with a length of 3-30.
Administrator Name
Administrator name.
Administrator Contact
Administrator contact.
Administrator Email
Administrator email.
Description
Information about the Biz.
Adding an Organization
To go to the Add Organization window, click [Add] below the Organization List ([Configuration] - [Network] - [Organizations]).
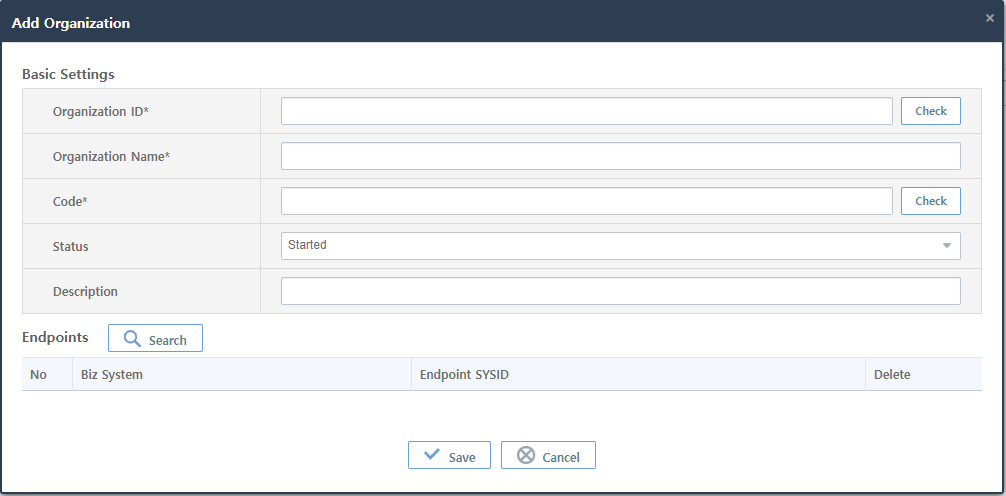
-
Basic Settings (*: required items)
Item Description Organization ID*
Organization ID.
Only allows alphanumeric, hyphen, and underscore characters with a length of 3-30.
Enter an organization ID and then click [Check] to check if the organization ID exists.
Organization Name*
Organization name.
Only allows alphanumeric, hyphen, and underscore characters with a length of 3-30.
Code*
Organization code.
Enter a code and then click [Check] to check if the code exists.
Status
Organization status.
-
Started
-
Stopped
-
Failed
-
Start Notified
-
End Notified
-
Unregistered
Description
Information about the organization.
-
12.2. Network Management History
Clicking [Configuration] > [Network] > [Network Management History] opens the Network Management History screen, where you can view the network management records that the organization has updated.
To view the detailed information about network management, click the Network Management History tab.
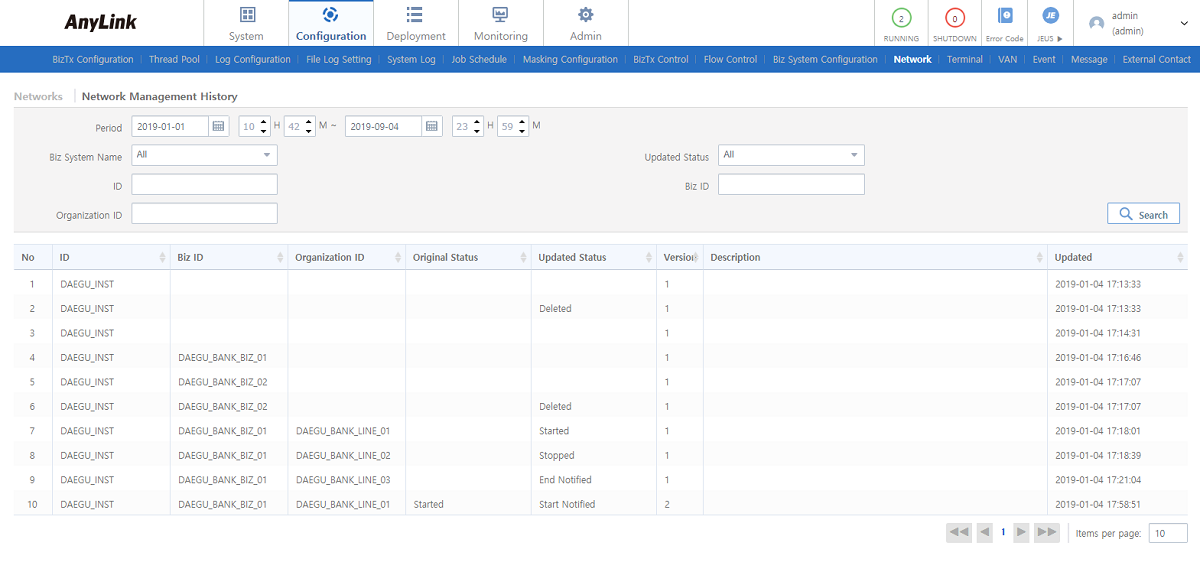
-
Search Conditions
Enter the following search conditions and then click [Search].
Item Description Period
Specific period when the network was updated. Enter the period, or select it by clicking the Calendar icon.
Biz System Name
Name of the Biz System to view.
Updated Status
Status of the network after the update.
ID
Network ID.
Biz ID
Biz ID.
Organization ID
Organization ID.
-
Network Management History
Item Description ID
Network ID.
Biz ID
Biz ID.
Organization ID
Organization ID.
Original Status
Original status of the network.
Updated Status
Status of the network after the update.
Version
Each update increases the version number.
Description
Information about the network.
Updated
Date when the network information was updated.
13. Terminal
The Terminal menu is used to access terminal management. To use the menu, click [Configuration] > [Terminal].
To enable terminal management, the 'Manager Approval Activity' Utility of AnyLink Studio is required. For more information, refer to AnyLink Studio Guide.
Terminal information is used in MCI to configure and view terminals, users, and connections. Terminal consists of the following submenus. For more information about each menu, refer to the relevant section.
| Tab | Description |
|---|---|
Manages terminal information. |
|
Manages user information. |
|
Views the current connection to the terminal. |
|
Views the connection history of the terminal. |
13.1. Terminals
The Terminals tab is used to add, edit, and view Branch IDs and Terminal IDs. To go to the tab, click [Configuration] > [Terminal] > [Terminals]. Enter the search conditions and [Search] to view the results of your search.
To edit terminal information, click the terminal from the terminal list. The Terminal Info window will be displayed where you can edit the terminal information. For more information, refer to "Adding a Terminal".
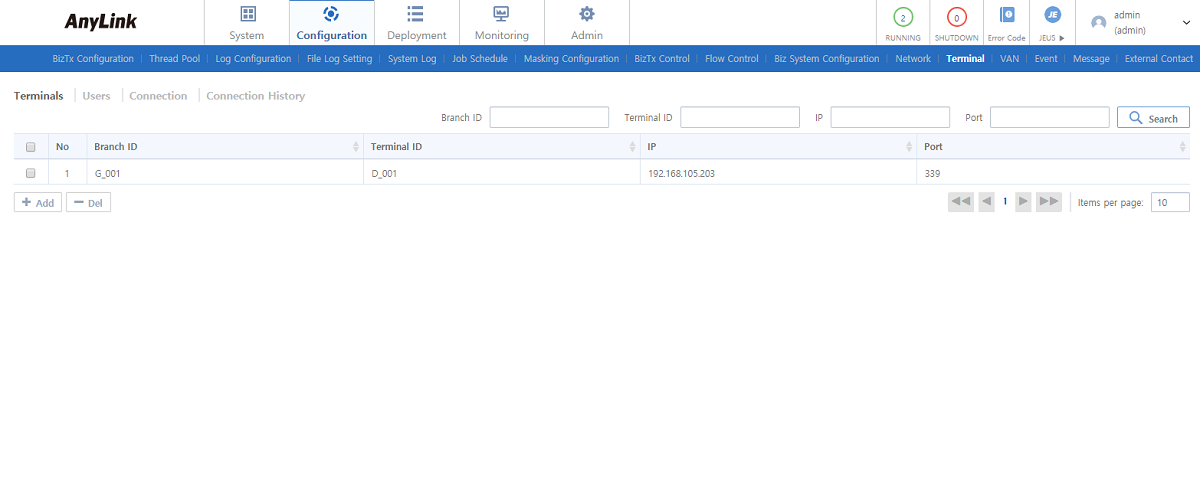
-
Terminal List
Item Description Branch ID
Branch ID.
Terminal ID
Terminal ID.
IP
Terminal IP.
Port
Terminal port.
-
Button
Button Description [Add]
Adds a terminal. For more information, refer to "Adding a Terminal".
[Del]
Deletes a terminal.
To delete a terminal, select the terminal from the list and click [Del]. In the confirmation dialog box that opens, click [OK].
Adding a Terminal
To go to the Add Terminal window, click [Add] below the Terminal List ([Configuration] - [Terminal] - [Terminals]).
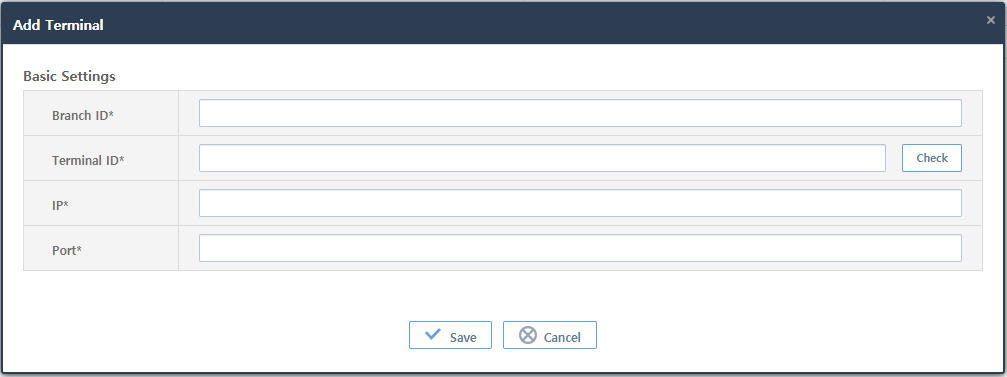
-
Basic Settings (*: required items)
Item Description Branch ID*
Branch ID.
Only allows alphanumeric, hyphen, and underscore characters with a length of 3-30.
Terminal ID*
Terminal ID.
Only allows alphanumeric, hyphen, and underscore characters with a length of 3-30.
Enter a terminal ID and then click [Check] to check if the terminal ID exists.
IP*
Terminal IP.
Port*
Terminal port number.
13.2. Users
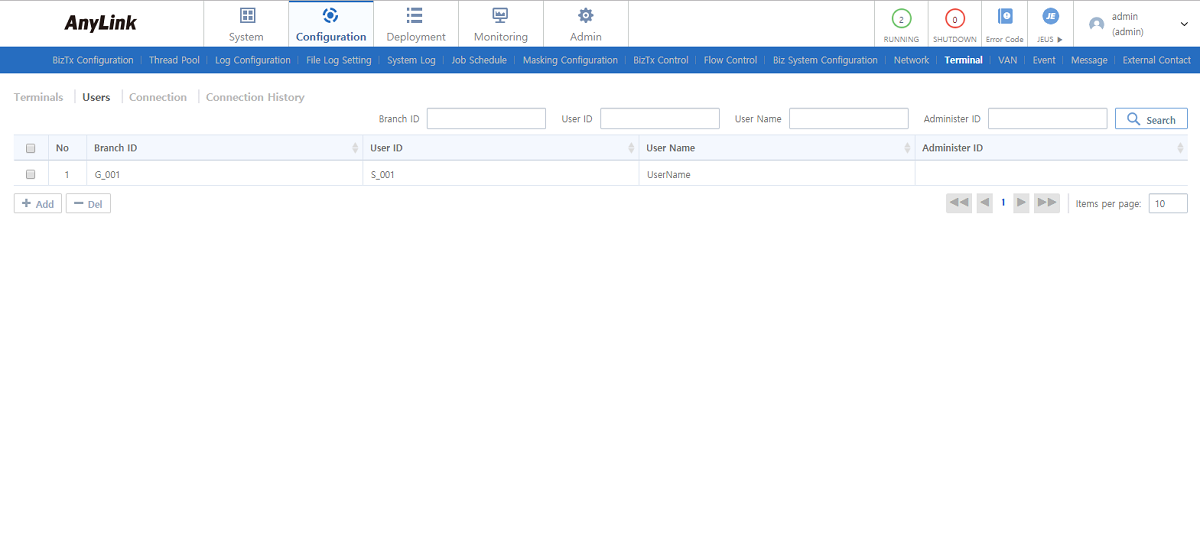
The Users tab is used to manage the information of users connected to the terminal. To go to the tab, click [Configuration] > [Terminal]> [Users]. Enter the search conditions and [Search] to view the results of your search.
To edit user information, click the user from the user list. The User Information window will be displayed where you can edit the user information. For more information, refer to "Adding a User".
-
User List
Item Description Branch ID
Branch ID.
User ID
User ID.
User Name
User name.
Administrator ID
Administrator ID.
-
Button
Button Description [Add]
Adds a user connected to the terminal. For more information, refer to "Adding a User".
[Del]
Delete a user.
To delete a user, select the user from the list and click [Del]. In the confirmation dialog box that opens, click [OK].
Adding a User
To go to the Add User window, click [Add] below the User List ([Configuration] - [Terminal] - [Users]).
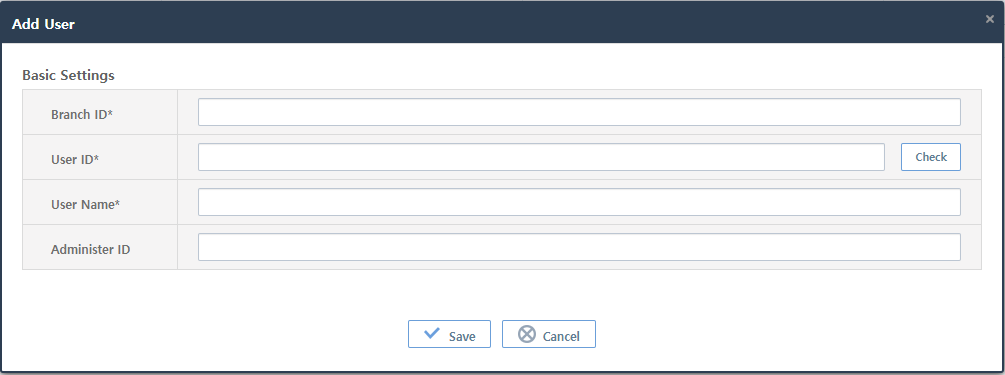
-
Basic Settings (*: required items)
Item Description Branch ID*
Branch ID.
Only allows alphanumeric, hyphen, and underscore characters with a length of 3-30.
User ID*
User ID.
Only allows alphanumeric, hyphen, and underscore characters with a length of 3-30.
Enter a user ID and then click [Check] to check if the user ID exists.
User Name*
User name.
Administrator ID
Administrator ID.
13.3. Connection
The Connection tab is used to view the current connections to the terminal. To go to the tab, click [Configuration] > [Terminal]> [Connection]. Each row of the table indicates a single terminal. Clicking on a specific row in the table opens the Detailed Terminal Connection History window.
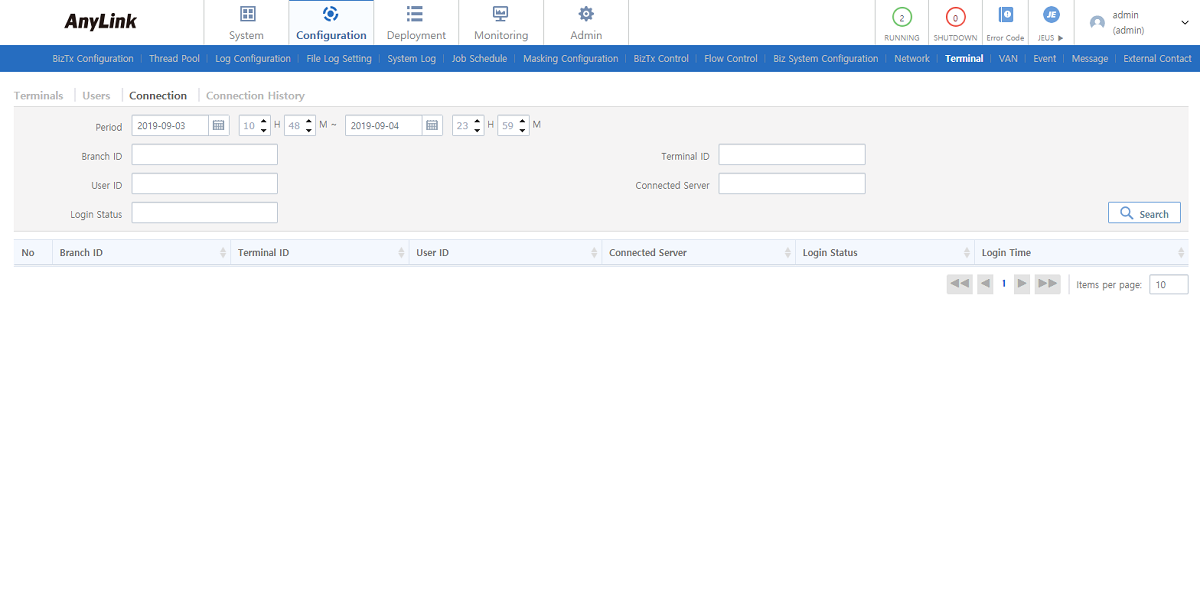
-
Search Conditions
Enter the following search conditions and then click [Search].
Item Description Period
Enter the period, or select it by clicking the Calendar icon.
Branch ID
Branch ID.
Terminal ID
Terminal ID.
User ID
User ID.
Connected Server
Server connected to the terminal.
Login Status
Enter either "Y" or "N".
-
Terminal Connection List
Item Description Branch ID
Branch ID.
Terminal ID
Terminal ID.
User ID
User ID.
Connected Server
Server connected to the terminal.
Login Status
Terminal login information.
Login Time
Terminal login time.
13.4. Connection History
The Connection History screen is used to view the connection history to the terminal. To go to the screen, click [Configuration] > [Terminal] > [Connection History]. For information about Search Conditions and Terminal Connection List, refer to Connection.
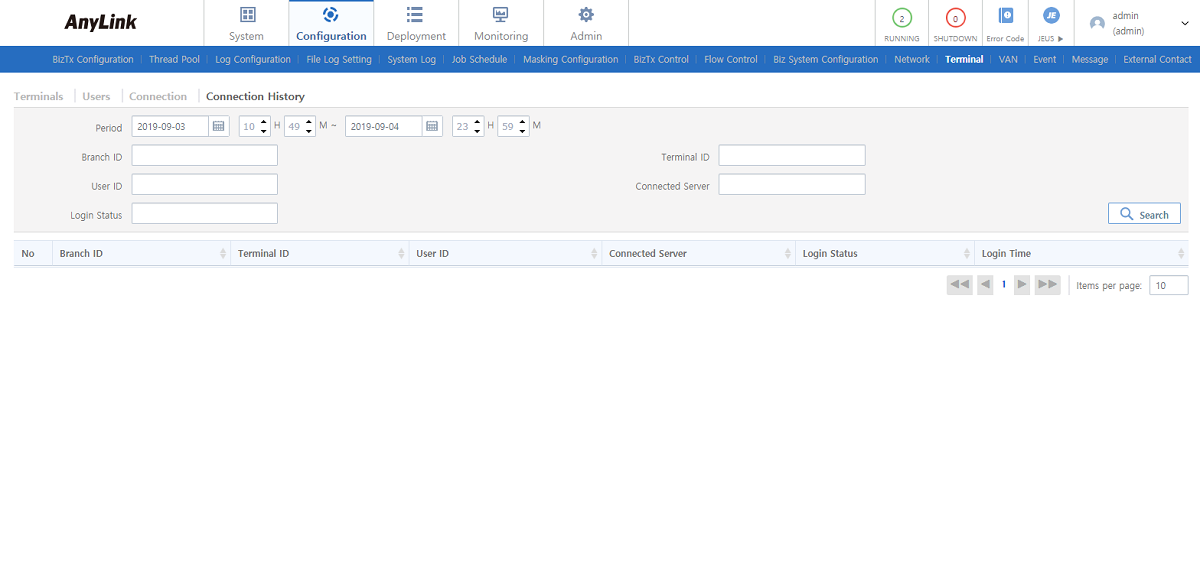
14. VAN
The VANs menu is used to view the list of added VANs. To go to the screen, click [Configuration] > [VAN]. Enter the search conditions and then click [Search] to view the results of your search.
VAN information can ben updated in the VAN Information screen, which is displayed by clicking a VAN in the VAN List. Update 'System Name' and 'Message Name' and then click [Save]. For more information about configuration items, refer to "Adding a VAN".
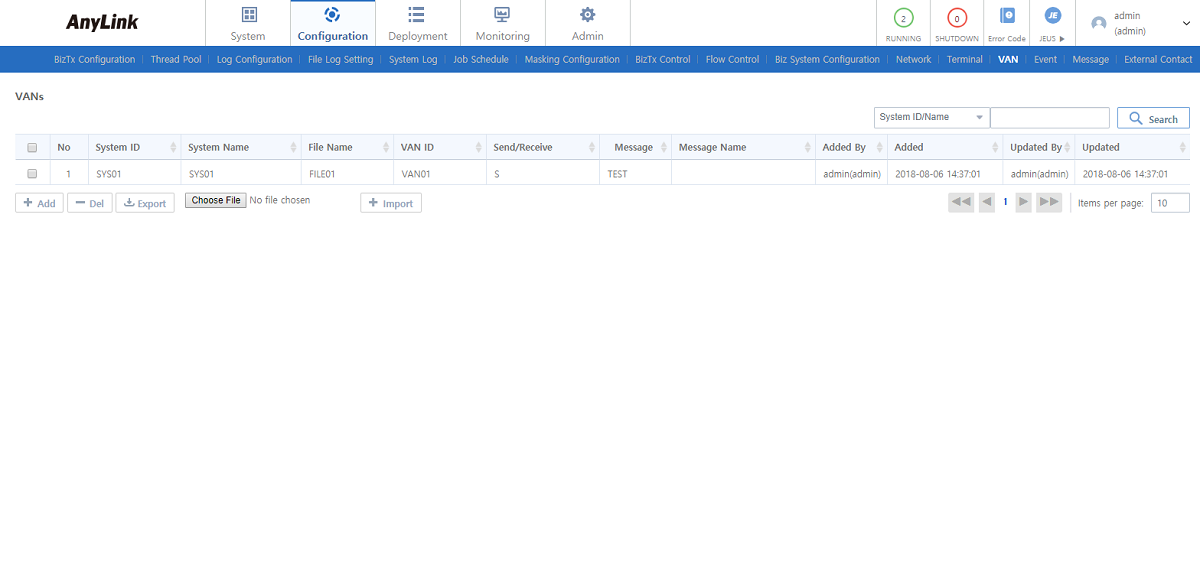
-
VAN List
Item Description System ID
System ID.
System Name
System name.
File Name
File name.
VAN ID
VAN ID.
Send/Receive
Option to select whether the message is sent or received.
Message Code
Message code.
Message Name
Message name.
Added By
User ID who added the VAN information.
Added
Date when the user first added the VAN information.
Updated By
User ID who updated the VAN information.
Updated
Date when the user last updated the VAN information.
-
Button
Button Description [Add]
Adds a VAN. For more information, refer to "Adding a VAN".
[Del]
Deletes a VAN.
To delete a VAN, select the VAN from the list and click [Del]. In the confirmation dialog box that opens, click [OK].
[Export]
Downloads the VAN list as a .csv file.
[Import]
Imports the list of VANs in .csv file to WebAdmin. Click [Choose File] to select a csv file and then click [import].
Adding a VAN
Clicking [Add] below the VAN List ([Configuration] - [VAN] - VAN List) displays the VAN Information window. Enter the VAN information and then click [Save].
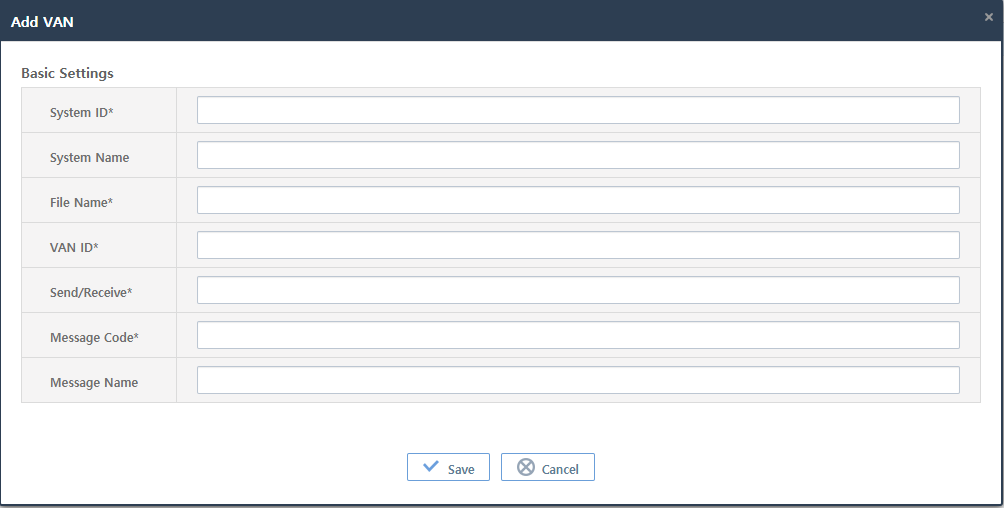
-
Basic Settings (*: required items)
Item Description System ID*
Batch system ID.
Only allows alphanumeric, hyphen, and underscore characters with a length of 3-30.
System Name
Batch system name.
File Name*
Name of the file to be sent to the VAN.
Only allows alphanumeric, hyphen, and underscore characters with a length of 3-30.
VAN ID*
VAN ID.
Only allows alphanumeric, hyphen, and underscore characters with a length of 3-30.
Send/Receive*
Option to select whether the message is sent or received.
Only allows alphanumeric, hyphen, and underscore characters with a length of 3-30.
Message Code*
Message code.
To use a message code, it must be set in Batch Outbound Rule of AnyLink Studio.
For more information about message code settings, refer to AnyLink Studio Guide.
Only allows alphanumeric, hyphen, and underscore characters with a length of 3-30.
Message Name
Message name.
15. Events
The Events menu is used to manage a variety of monitoring resources including BizTx status, network status, and server status by calling handlers. To go to the screen, click [Configuration] > [Events].
Events have the following submenus. For more information about each screen, refer to the relevant section.
| Tab | Description |
|---|---|
Manages the information of events. |
|
Views the history of events. |
|
Manages BizTx events. |
15.1. Events
The Events tab is used to add, edit, and view the events of each Biz System. To go to the screen, click [Configuration] > [Event]> [Events].
Select a Biz System in the navigation pane. Enter the search conditions and then click [Search] to view the results of your search.
Clicking an event in the Event List displays the Update Events window. Update the event information and then click [Save]. For more information about each item, refer to "Adding an Event".
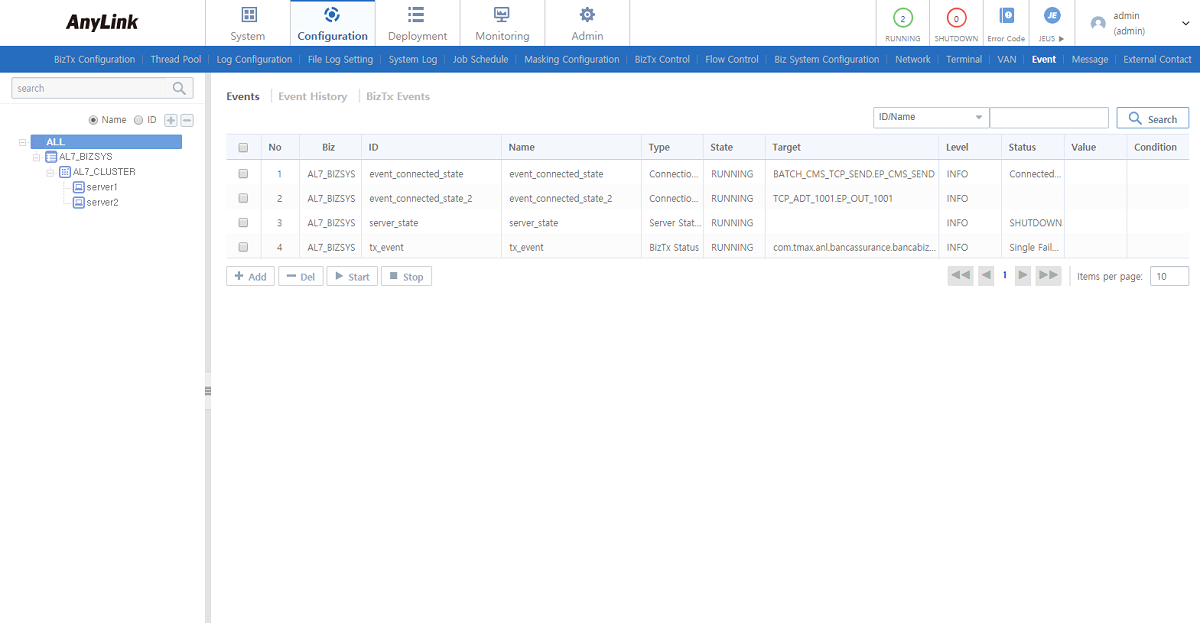
-
Event List
Item Description ID
Event ID.
Name
Event name.
Type
Event type.
-
BizTx Status: Generates an event based on the status of a running BizTx.
-
Network Status: Generates an event based on the status of a network.
-
Server Status: Generates an event based on the status of a server.
-
Connection Status: Only applicable to TCP. Generates an event based on the status of connection to the endpoint.
State
Event status.
-
RUNNING: Enables the event if the condition is met.
-
STOPPED: Disables the event even if the condition is met.
Target
Event target.
Level
Event level.
-
INFO
-
WARNING
-
ERROR
-
CRITICAL
Status
Conditions to generate each event.
Value
Event value.
Condition
Event condition.
-
-
Button
Button Description [Add]
Adds an event. For more information, refer to "Adding an Event".
[Del]
Deletes the selected event.
To delete an event, select the event from the list and click [Del]. In the confirmation dialog box that opens, click [OK].
[Start]
Starts an event. The event status becomes RUNNING.
Multiple events can be started at once by checking the events in the list.
[Stop]
Stopped an event. The event status becomes STOPPED.
Multiple events can be stopped at once by checking the events in the list.
Adding an Event
Clicking [Add] below the Event List ([Configuration] - [Events] - [Events]) displays the Add Event window.
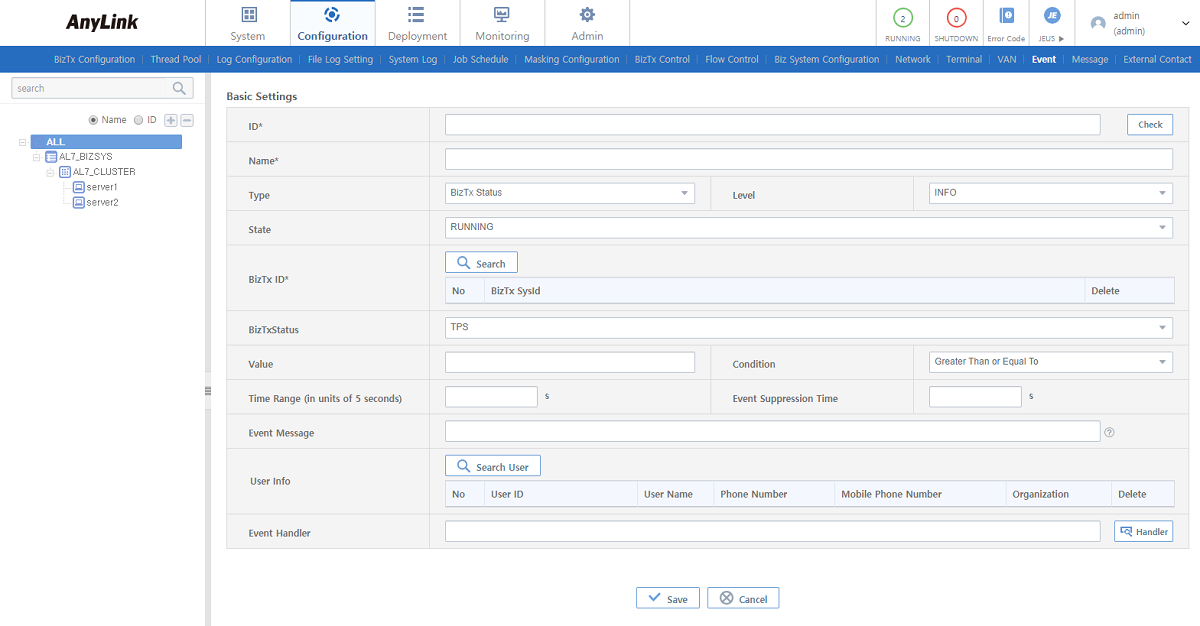
-
Basic Settings (*: required items)
Specifies the basic event information, the conditions to generate an event, user information to send, and an event handler to call. The conditions to generate an event varies depending on the type of the event.
Item Description ID*
Unique event ID.
Only allows alphanumeric, hyphen, and underscore characters with a length of 3-30.
Enter an event ID and then click [Check] to check if the event ID exists.
Name*
Event name.
Only allows alphanumeric, hyphen, and underscore characters with a length of 3-30.
Type
Event type.
-
BizTx Status: Generates an event based on the status of a running BizTx (refer to [Configuration] - [Event] - [Events] - Add Event (2)).
-
Network Status: Generates an event based on the status of a network (refer to [Configuration] - [Event] - [Events] - Add Event (3) ).
-
Server Status: Generates an event based on the status of a server (refer to [Configuration] - [Event] - [Events] - Add Event (4)).
-
Connection Status: Only applicable to TCP. Generates an event based on the status of connection to the endpoint (refer to [Configuration] - [Event] - [Events] - Add Event (5)).
For more information about configuring an event, refer to the relevant section.
Level
Event level.
-
INFO
-
WARNING
-
ERROR
-
CRITICAL
State
Event state.
-
RUNNING: Enables the event if the condition is met.
-
STOPPED: Disables the event even if the condition is met.
Event Suppression Time
Limits the frequency of how often an event runs. If the event occurs again after the has occurred, the event handler will not run until the suppression time expires.
Event Message
Event message format.
If a message format is created using event message variables, the event message variables are converted into the corresponding values and passed to the event handler.
To view the list of available event message variables, click [?] at the right of the event message item.
User Info
User information to be sent to the event handler.
Click [Search User] to display the Select User window where the users added in WebAdmin are shown. Select a user from the list.
Event Handler
Monitoring event handler to be called when the event occurs. The handler receives the event information and the users that were added to the event.
Click [Handler] to display the Select Message Handler window. Select an event from the list.
Monitoring event handler must be created in AnyLink Studio. For more information about how to create a monitoring event handler, refer to AnyLink Studio Guide.
'Event Type' requires different settings according to each type.
-
Event Type: BizTx Status
Event occurs based on the status of a running BizTx.
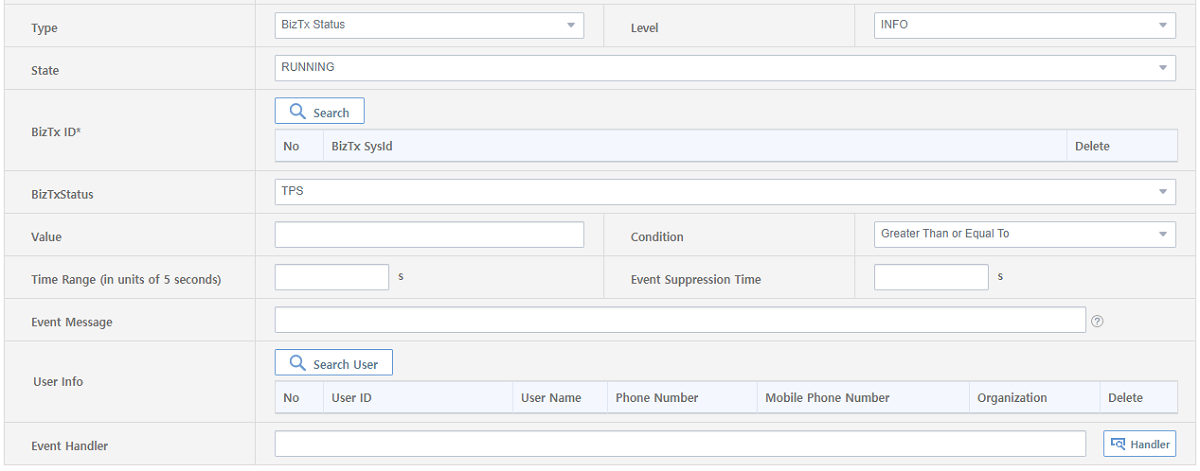 [Configuration] - [Event] - [Events] - Add Event (2)
Item Description BizTx ID*
BizTx ID. Click [Search] to display the Select BizTx window. Select a BizTx in the tree.
BizTx Status
BizTx status.
-
TPS
-
Failure Count
-
Average Response Time
-
Single Failure
Value
BizTx value.
Condition
Event condition.
-
Greater Than or Equal To: Event occurs when the BizTx value is greater than or equal to the specified condition.
-
Greater Than: Event occurs when the BizTx value is greater than the specified condition.
-
Less Than or Equal To: Event occurs when the BizTx value is less than or equal to the specified condition.
-
Less Than: Event occurs when the BizTx value is less than the specified condition.
-
Equal To: Event occurs when the BizTx value is equal to the specified condition.
-
Not Equal To: Event occurs when the BizTx value is not equal to the specified condition.
Time Range (in units of 5 seconds)
Event monitoring period. Only applicable to BizTx Status. (e.g. Assume that failure count is more than 5 in 1 hour, set the time range to 1 hour. In this case, if Event Suppression Time is not set, the event continues to occur every 5 seconds for 1 hour.)
-
-
Event Type: Network Status
Event occurs based on the network status.
 [Configuration] - [Event] - [Events] - Add Event (3)
Item Description ID*
Network ID. Click [Search] to display the Select Network window. Select a network in the tree.
Status
Network status.
-
Started: Event occurs when the network is started.
-
Stopped: Event occurs when the network is stopped.
-
Failed: Event occurs when the network is failed.
-
Start Notified: Event occurs when the network is notified to start.
-
End Notified: Event occurs when the network is notified to end.
-
Unregistered : Event occurs when the network is not registered.
-
-
Event Type: Server Status
Event occurs based on the server status.
 [Configuration] - [Event] - [Events] - Add Event (4)
Item Description Server Status
Server status.
-
RUNNING
-
SHUTDOWN
-
-
Event Type: Connection Status
Event occurs based on the connection status.
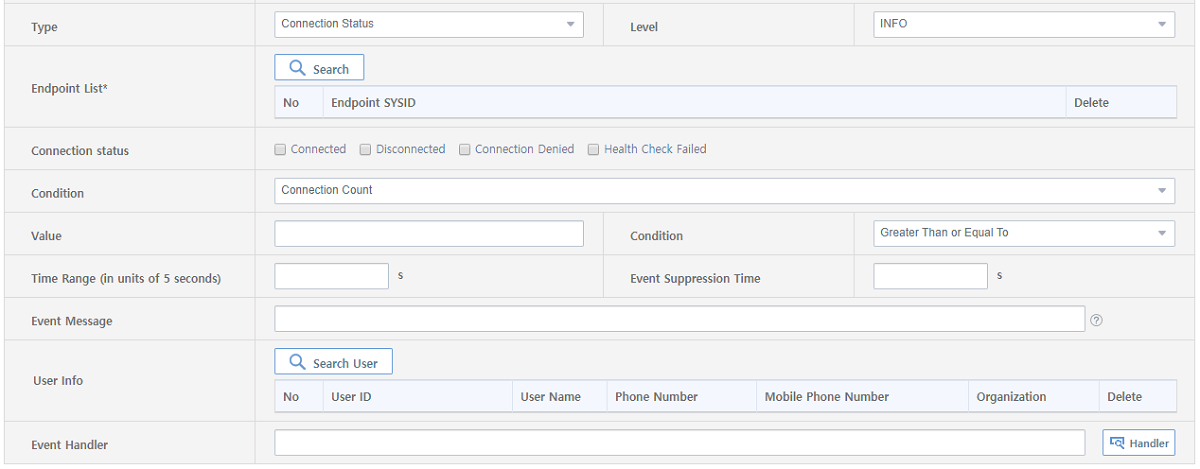 [Configuration] - [Event] - [Events] - Add Event (5)
Item Description Endpoint List*
Endpoint. Click [Search] to display the Select Endpoint window. Select an endpoint in the tree.
Connection Status
Connection status.
-
Connected: Event occurs when the connection is made.
-
Disconnected: Event occurs when the connection is lost.
-
Denied: Event occurs when the connection is denied.
-
Health Check Failed: Event occurs when health check failed.
Condition
Option to select whether the event is single or multiple.
-
-
15.2. Event History
The Event History tab is used to view the history of the event. To go to the screen, click [Configuration] > [Events] > [Event History].
To view a specific event history, click the event history from the Events History List. This opens Event Details where you can view the information.
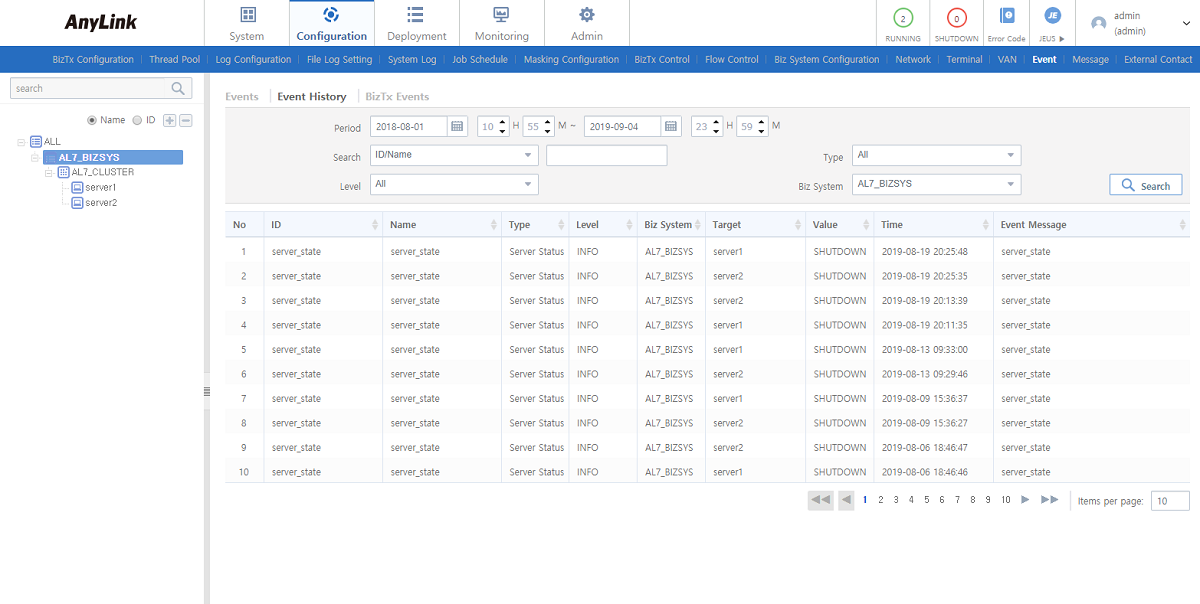
-
Search Condition
Enter the following search conditions and then click [Search].
Item Description Period
Period to view event history. Enter the period, or select it by clicking the Calendar icon.
Search
Search condition. Select a search condition from the drop-down list.
Type
Event type. Select an event type from the drop-down list.
Level
Event level. Select an event level from the drop-down list.
Biz System
Biz system. Select a Biz System from the dropdown list.
-
Events History List
Item Description ID
Event ID.
Name
Event name.
Type
Event type.
-
BizTx Status: Event occurs based on the status of a running BizTx.
-
Network Status: Event occurs based on the status of a network.
-
Server Status: Event occurs based on the status of the server.
-
Connection Status: Only applicable to TCP. Event occurs based on the status of connection to the endpoint.
Level
Event level.
-
INFO
-
WARNING
-
ERROR
-
CRITICAL
Target
Event target.
Value
Event threshold.
Time
Event occurrence time.
Event Message
Event message.
-
15.3. BizTx Events
The BizTx Events tab is used to view and manage BizTx events. To go to the screen, click [Configuration] > [Events] > [BizTx Events]. This screen is similar to the Events screen, but makes it easier for users to manage BizTx events.
To perform a search, enter the search conditions and click [Search]. The items of the BizTx Events table are the same as those of the Events table. For more information, refer to Events.
To view a specific BizTx event, click the BizTx event from the list. For more information about configuration items, refer to "Adding an Event".
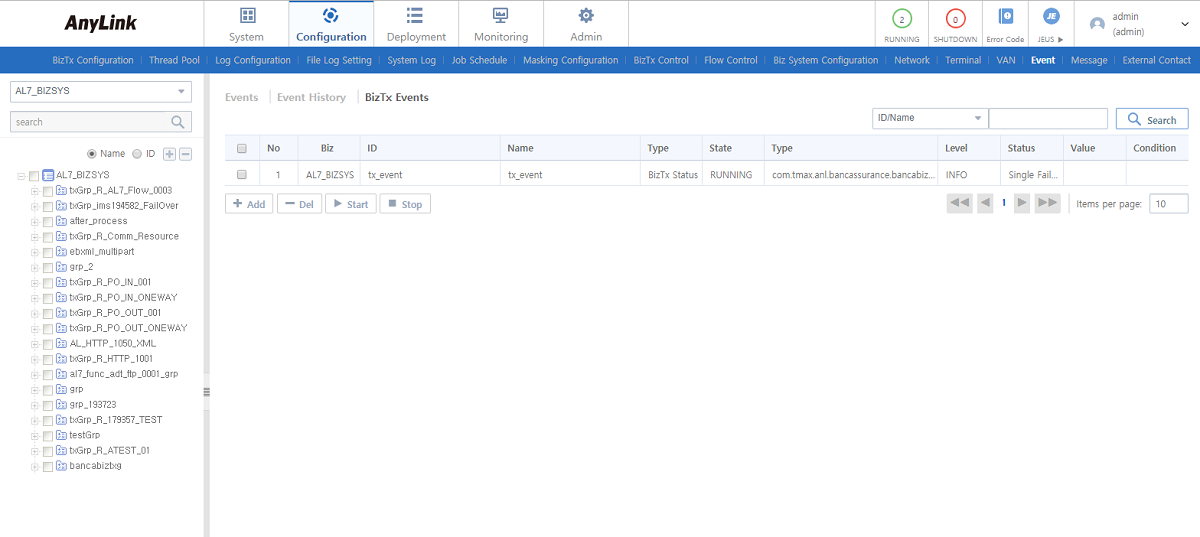
Adding a BizTx Event
To add a BizTx event, click [Add] below the BizTx Events List ([Configuration] - [Event] - [BizTx Events]). This opens the Add BizTx Event window.
When a BizTx is selected in the navigation pane, it is automatically set in 'BizTx ID'. This screen is similar to the Add Event screen ([Configuration] - [Events] - [Events] - Add Event (1)), but makes it easier for users to add BizTx events. For more information about adding events, refer to "Adding an Event".
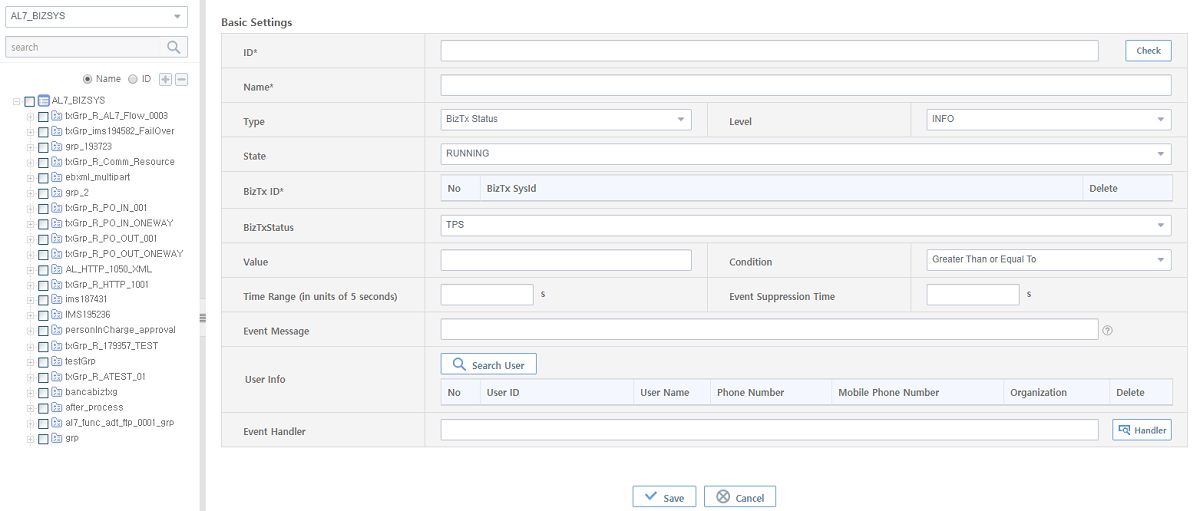
16. Messages
The Messages screen is used to share the messages developed with AnyLink to other solutions. The screen includes the list of messages deployed in AnyLink. Select a message to share and then click [Send] to share it with other systems.
To go to the Messages screen, click [Configuration] > [Message]. The list of added messages are displayed in this screen. Enter search conditions and then click [Search] to view the results of your search.
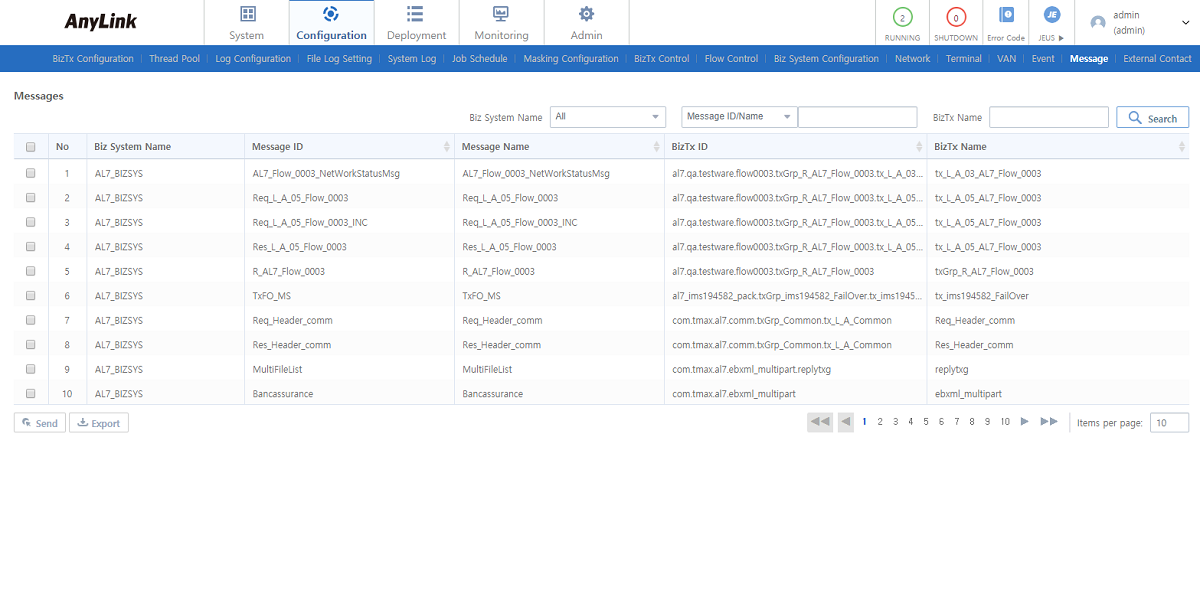
-
Messages List
Item Description Biz System Name
Biz System name.
Message ID
Messages ID.
Message Name
Message name.
BizTx ID
BizTx ID.
BizTx name
BizTx name.
-
Button
Button Description [Send]
Calls a message handler.
Handler can be set by going to [Admin] > [DIS Configuration] > [Message Handler].
Click a message to send in the Messages screen, and then click [Send] to call the specified handler.
[Export]
Downloads the message list as a .csv file.
17. External Contact
The External Contact screen is used to manage administrators of each BizTx Group/BizTx. To go to the screen, click [Configuration] > [External Contact].
External Contact has the following submenus. For more information about each submenu, refer to the relevant section.
| Tab | Description |
|---|---|
Manages administrator’s information and maps the administrator to a BizTx management group. |
|
Manages BizTxs as a group. |
|
Views the information about the administrator mapped to the BizTx. |
17.1. Administrators
The Administrators tab is used to add, delete, or edit an administrator. To go to the screen, click [Configuration] > [External Contact]> [Administrators]. Enter the search conditions and then click [Search] to view the results of your search.
To edit Administrator Information, click the administrator from the Administrator List. This opens the Administrator Info window where you can edit the administrator. For more information about configuration items, refer to "Adding an Administrator".
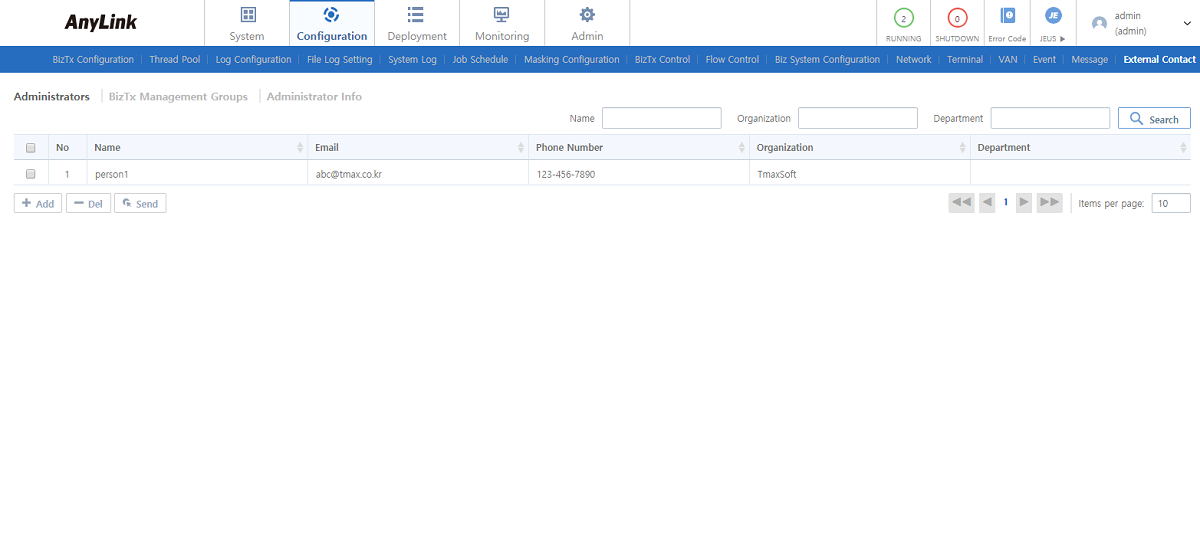
-
Administrator List
Item Description Name
Administrator name.
Email
Administrator’s email.
Phone Number
Administrator’s phone number.
Organization
Administrator’s organization.
Department
Administrator’s department.
-
Button
Button Description [Add]
Adds an administrator. For more information, refer to "Adding an Administrator".
[Del]
Deletes the selected administrator.
To delete an administrator, select the administrator from the list and click [Del]. In the confirmation dialog box that opens, click [OK].
[Send]
Calls the Administrator Handler.
Adding an Administrator
Clicking [Add] below the External Contact List ([Configuration] - [External Contact] - [Administrators]) displays the Add Administrator window.
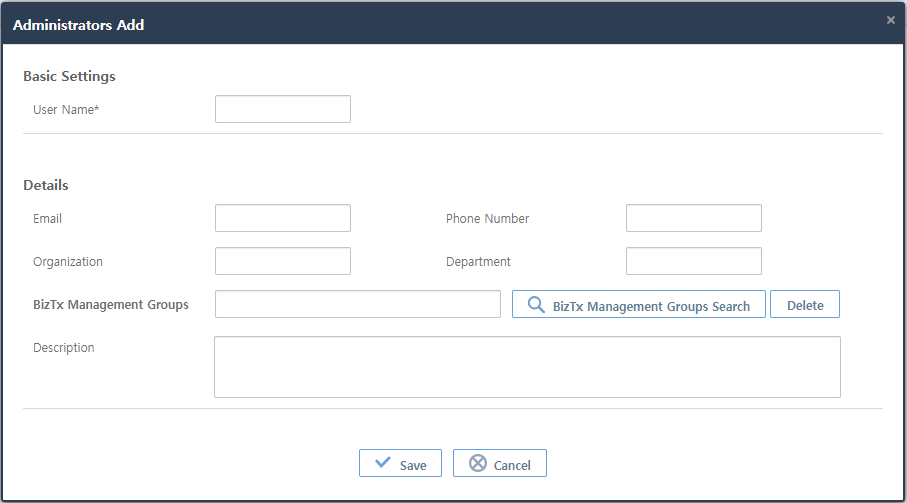
-
Basic Settings (*: required items)
Item Description User Name*
Administrator name.
-
Details
Item Description Email
Administrator’s email.
Phone Number
Administrator’s phone number.
Organization
Administrator’s organization.
Department
Administrator’s department.
BizTx Management Groups
Click [BizTx Management Groups Search] to display the BizTx Management Groups Search screen where you can manage BizTx Groups. The BizTx Group is mapped to the administrator. To delete the BizTx management group, Click [Del].
Description
Information about the administrator.
17.2. BizTx Management Groups
The BizTx Management Groups tab is used to manage the group of BizTxs. To go to the screen, click [Configuration] > [External Contact] > [BizTx Management Groups]. Enter search conditions and click [Search] to view the results of your search.
To edit a BizTx management group, click the BizTx management group from the BizTx Management Groups List. This opens the Add BizTx Management Groups where you can edit the BizTx management group information.
For more information, refer to "Adding BizTx Management Group".
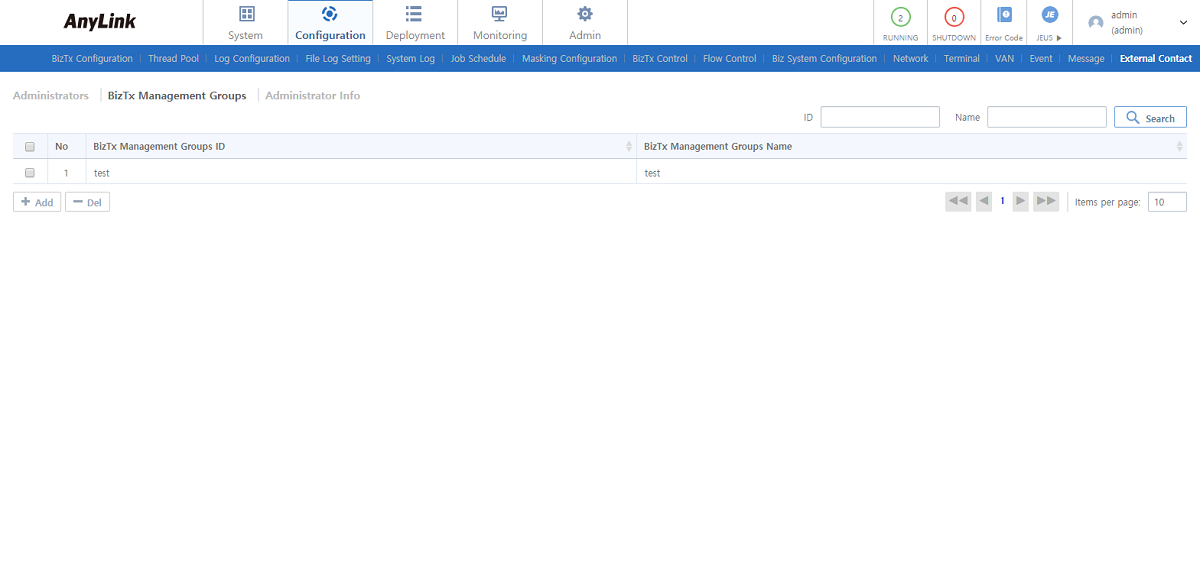
-
BizTx Management Groups List
Item Description BizTx Management Groups ID
BizTx management group ID.
BizTx Management Groups Name
BizTx management group name.
-
Button
Button Description [Add]
Adds a BizTx management group. For more information, refer to "Adding a BizTx Management Group".
[Del]
Deletes a BizTx management group.
To delete a BizTx management group, select the BizTx management group from the list and click [Del]. In the confirmation dialog box that opens, click [OK].
Adding a BizTx Management Group
Clicking [Add] below the BizTx Management Groups List ([Configuration] - [External Contact] - [BizTx Management Groups]) displays the Add BizTx Management Groups window.
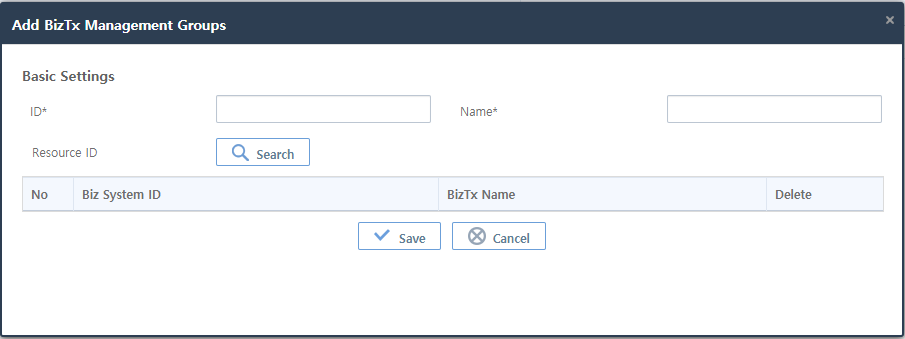
-
Basic Settings
Item Description ID*
BizTx management group ID.
Only allows alphanumeric, hyphen, and underscore characters with a length of 3-30.
Name*
BizTx management group name.
Resource ID
Click [Search] to display the Search Resource window.
Select more than one BizTxs and then click [OK]. The list of BizTxs will be displayed in the Add BizTx Management Groups window.
17.3. Administrator Info
The Administrator Info tab is used to view administrator’s information by BizTx. To go to the screen, click [Configuration] > [External Contact] > [Administrator Info].
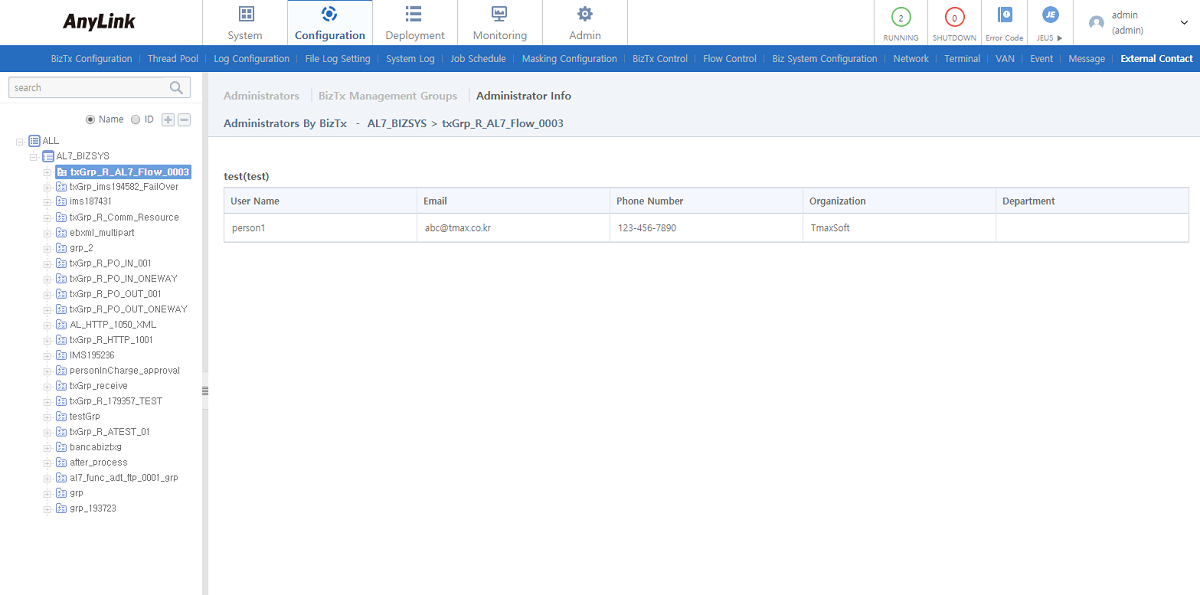
-
Administrators Info
Item Description Administrator Name
Name of the administrator responsible for the BizTx.
Email
Email of the administrator responsible for the BizTx.
Phone Number
Phone number of the administrator responsible for the BizTx.
Organization
Organization of the administrator responsible for the BizTx.
Department
Department of the administrator responsible for the BizTx.