Environment Configuration
This chapter describes how to configure AnyLink Web Service adapter and outbound rule.
1. Adapter Configuration
Configure a Web Service adapter in WebAdmin.
|
For information about accessing and using AnyLink WebAdmin, refer to AnyLink WebAdmin Guide. |
Log in to AnyLink WebAdmin through a web browser, and go to [System] > [Adapter] to view the adapter list.
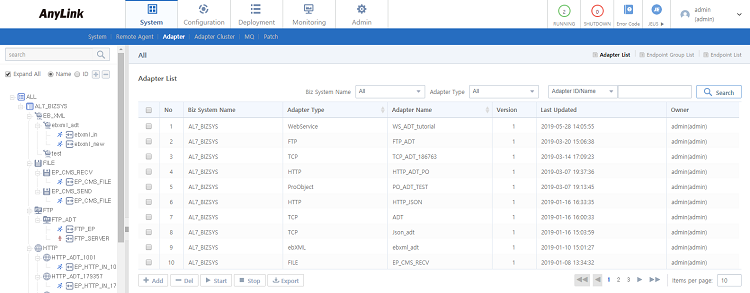
Click [Add] from the Adapter List screen to add an adapter. Enter the required information in the Add Adapter screen, and then click [Save]. If successful, the message "Created successfully." is displayed.

-
Basic Settings
Item Description Adapter ID
Adapter ID. Only alphanumeric and special (-, _) characters are allowed, and the length must be between 3 and 30 characters. Must be unique within the same business system.
Adapter Name
Adapter name. Only Korean, alphanumeric, and special (-, _) characters are allowed, and the length must be between 3 and 30 characters.
Adapter Type
Select 'WebService' from the list.
Description
Adapter description (optional).
Biz System Name
Business system to deploy adapter to.
-
[Advanced Settings] Tab
Item Description Outbound Thread Pool ID
Thread pool ID to be used during an outbound service call. If an ID different from the thread pool executed in the engine is specified, then the thread is changed to this thread pool during an outbound service call.
Use this option when the user wants to separate thread pools by each adapter so that there is no effect between different adapters.
2. Endpoint Configuration
Select the [System] > [Adapter] menu of WebAdmin to display the adapter tree on the left. Click the [Endpoint List] tab in the Adapter Details screen to display the endpoint list of the adapter.
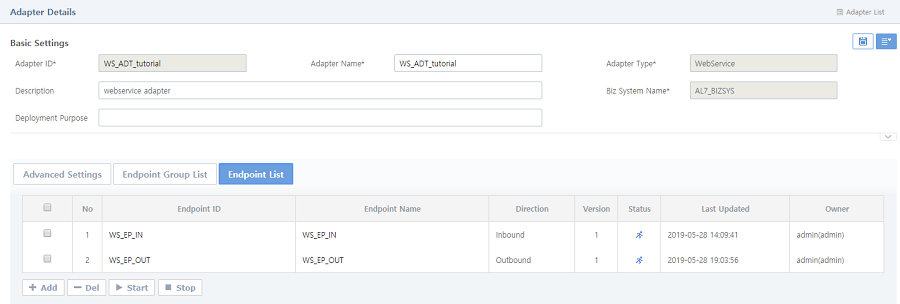
Click [Add] below the [Endpoint List] tab to go to the Add Endpoint screen. Enter the required items, and then click [Save] to add the endpoint. Check the result from the tree on the left.
-
Basic Settings
The following shows the Basic Settings section of the Add Endpoint screen.
 Add Endpoint Screen - Basic Settings
Item Description Endpoint ID
Adapter ID. Only alphanumeric and special (-, _) characters are allowed, and the length must be between 3 and 30 characters. Must be unique within the same adapter or endpoint group.
Endpoint Name
Endpoint name. Only Korean, alphanumeric, and special (-, _) characters are allowed, and the length must be between 3 and 30 characters.
Endpoint Status
Initial endpoint status.
-
Running: endpoint is running.
-
Stopped: endpoint is stopped.
Initial State at Boot
Initial endpoint state at boot time.
-
Running: endpoint is in Running state at boot time.
-
Stopped: endpoint is in Stopped state at boot time.
If the 'Endpoint Status' and 'Initial State at Boot' are different, a warning message ('Initial State at Boot' and 'Endpoint Status' Mismatch Message) is displayed when stopping or restarting an endpoint.
Direction
Endpoint’s communication direction.
-
Inbound: endpoint for inbound messages.
-
Outbound: endpoint for outbound messages.
Description
Endpoint description. Optional.
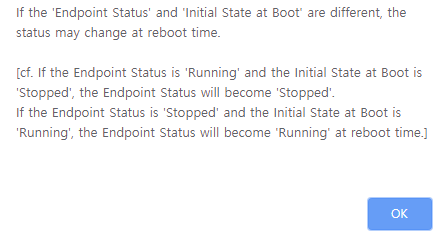 'Initial State at Boot' and 'Endpoint Status' Mismatch Message
 -
2.1. Inbound Endpoint
A Web Service inbound endpoint can process external incoming web service requests.
-
[Connection Info] Tab
The following shows the [Connection Info] tab of the Add Endpoint screen.
 Add Endpoint Screen - [Connection Info] - Inbound
Item Description WSDL
Name of the WSDL exported from Studio, including the extension. For more information, refer to Importing & Exporting WSDL.
context-path
Endpoint context path.
URL
Endpoint URL.
Binding Type
Communication protocol.
Default Encoding
Default encoding to be used in an endpoint. The encoding set in the message is given priority over the default encoding. If no encoding is set in the message and the endpoint, then the system’s default encoding is used.
Select Inbound Port
The endpoint port. If not specified, then all ports will be listened.
-
[Advanced Settings] Tab
The following shows the [Advanced Settings] tab of the Add Endpoint screen.
 Add Endpoint Screen - [Advanced Settings] - Inbound
Item Description Message Handler
User message handler for the request message.
BizTx Group/BizTx
BizTx Group/BizTx to be executed by the request received by the endpoint.
2.2. Outbound Endpoint
Web Service outbound endpoint can request external web service processing.
-
[Connection Info] Tab
The following shows the [Connection Info] tab of the Add Endpoint screen.
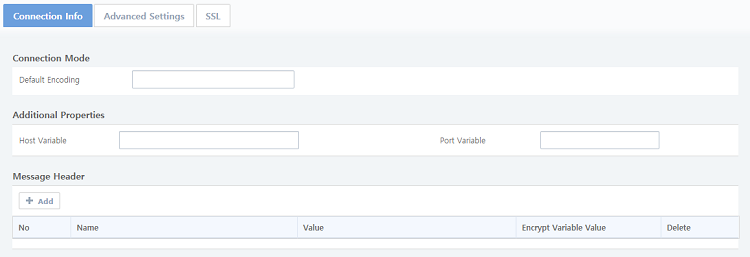 Add Endpoint Screen - [Connection Info] - Outbound
Item Description Default Encoding
Default encoding to be used in an endpoint. The encoding set in the message is given priority over the default encoding. If no encoding is set in the message and the endpoint, then the system’s default encoding is used.
Host Variable
Entered when using the endpoint address as a variable in the outbound rule. The variable entered as '${host}' in the outbound rule’s endpoint address is replaced with the value entered in this item. If the function is not used, then no value needs to be entered.
Port Variable
Entered when using the endpoint address as a variable in the outbound rule. The variable entered as '${port} in the outbound rule’s endpoint address is replaced with the value entered in this item. If the function is not used, then no value needs to be entered.
Message Header
Web service header as a pair of key and value. If variable value encryption is checked, the variable value is encrypted with an encryption algorithm set in a business system.
-
[Advanced Settings] Tab
The following shows the [Advanced Settings] tab of the Add Endpoint screen.
 Add Endpoint Screen - [Advanced Settings] - Outbound
Item Description Message Handler
User message handler for the response message.
-
[SSL] Tab
The following shows the [SSL] tab of the Add Endpoint screen.
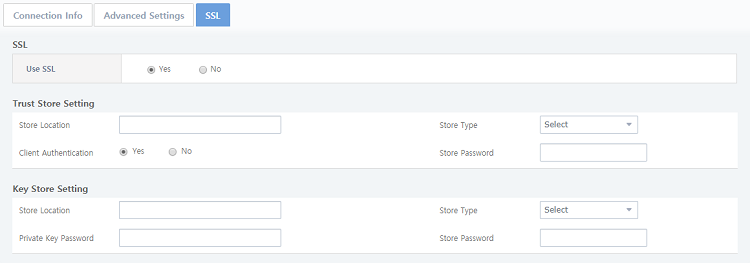 Add Endpoint Screen - [SSL] - Outbound
-
SSL
Item Description Use SSL
Option to use SSL authentication.
-
Trust Store Setting
Set the SSL related Trust Store information. This section is related to the Trust Store (public key, certificate) file settings to be used for SSL authentication.
Item Description Store Location
Storage location of the Trust Store.
Store Type
Storage type of the Trust Store.
Client Authentication
Option to use the Key Store.
Store Password
Password for accessing the Trust Store.
-
Key Store Setting
Set the SSL related Key Store information. This section is related to the private key file settings to be used for SSL authentication.
Item Description Store Location
Storage location of the Key Store.
Store Type
Storage type of the Key Store.
Private Key Password
Password for accessing the private key.
Store Password
Password for accessing the Key Store.
-
3. Configuring an Outbound Rule
This section describes how to configure a Web Service outbound rule in AnyLink Studio.
|
For more information about AnyLink Studio, refer to AnyLink Studio Guide. |
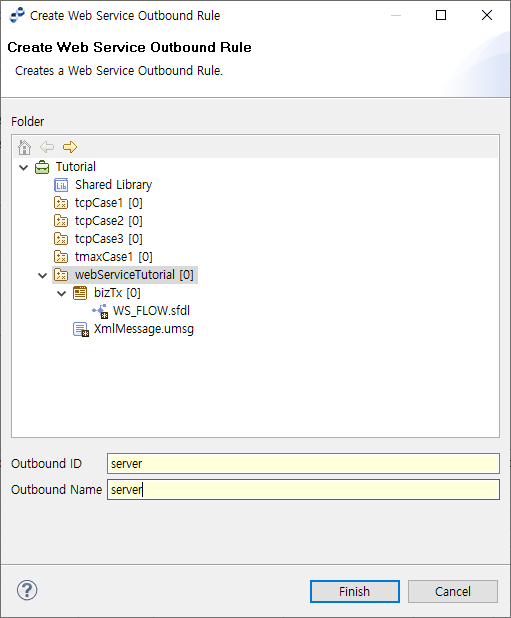
In the Studio BizTx Group navigator, right click on a BizTx/BizTx Group and go to [New] > [Outbound Rule] > [Web Service Outbound Rule] to open the following Create Web Service Outbound Rule screen. Enter the required items, and then click [Finish].
| Item | Description |
|---|---|
Outbound ID |
Outbound rule ID. Only alphanumeric and special (_) characters are allowed, and the first character must be an alphabet character. Must be unique in the same BizTx node. |
Outbound Name |
Outbound rule name. Only Korean, alphanumeric, and special (-, _) characters are allowed. Must follow the XML naming conversion. |
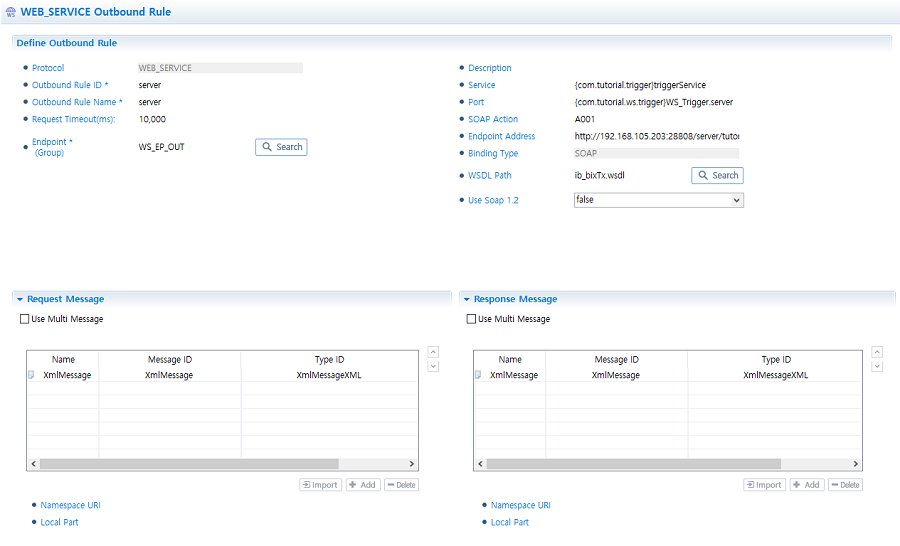
After an outbound rule is created, detailed settings are displayed in the following tabs.
-
Define Outbound Rule
Item Description Outbound Rule ID
Outbound rule ID. Only alphanumeric and special (_) characters are allowed. Must be unique within the same BizTx node.
Outbound Rule Name
Outbound rule name. Only Korean, alphanumeric, and special (-, _) characters are allowed.
Request Timeout (ms)
Request processing timeout (positive integer). Timeout occurs if no connection or an outbound request response is received during the timeout period starting from the time when the outbound rule is called.
Endpoint (Group)
Endpoint or endpoint group in which the outbound rule will be added. Must be connected to the server.
Description
Outbound rule description. Optional.
Service
Service name of the target Web Service.
Port
Port name of the target Web Service.
SOAP Action
SOAPAction of the operation requested to the target Web Service.
Endpoint Address
Target Web Service address.
Binding Type
Method for calling the Web Service system’s remote procedure. Only the SOAP method is supported.
WSDL Path
WSDL file path.
Use Soap 1.2
Option to use SOAP 1.2. The default value is 'false' and SOAP 1.1 is used.
-
Define Outbound Rule Message
Request message and normal response message can be defined for an outbound rule.
Item Description Request Message
Request message for the outbound rule.
Normal Response Message
Response message for the outbound rule.