Dialog Boxes
This appendix describes how to use various dialog boxes in Studio that are shared by multiple pages. For information about each dialog box, refer to the relevant description in this chapter.
1. Message Dialog Boxes
1.1. Select Message
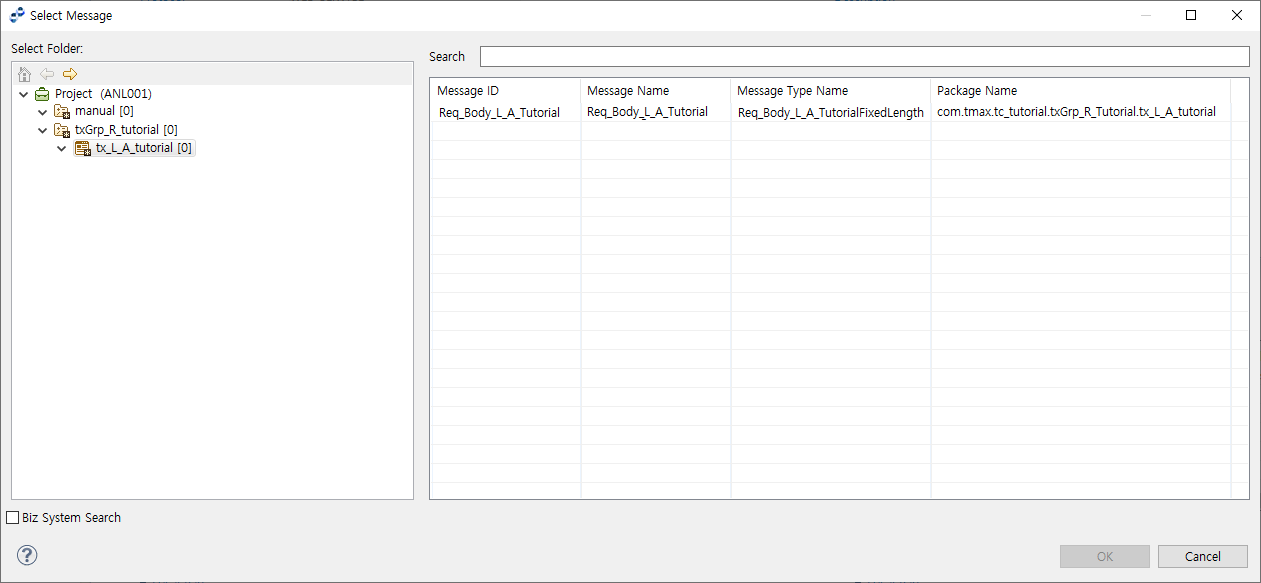
The Select Message dialog box is used to select a message. Select a BizTx/BizTx List from the Project Navigator on the left to view all the messages that belong to it in the Message List on the right. Select a message from the list, and then click [OK].
Enter a message name in the Search textbox to search for a specific message.
1.2. Select Message Field
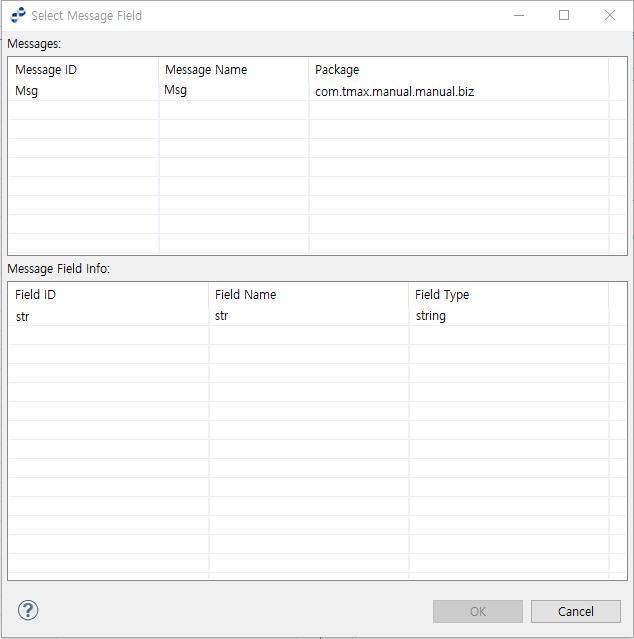
The Select Message Field dialog box is used to select a field of the selected message.
All messages in the current project are listed in the Messages list box. Select a message to display its fields in the Message Field Info list. Select a field, and then click [OK].
2. Mapping Dialog Boxes
A mapping defines a source-to-target relationship used to transform messages. Mapping is frequently used in AnyLink, and it is usually created through a wizard.
AnyLink provides various adapters to establish and navigate links between resources. An adapter transforms the resource format to a message format that can be used in AnyLink by using a mapping that is defined through the Mapping Wizard. The same Mapping Wizard is used for all resource types and in all sections, such as adapter or flow, where mapping is used.
2.1. Mapping Wizard
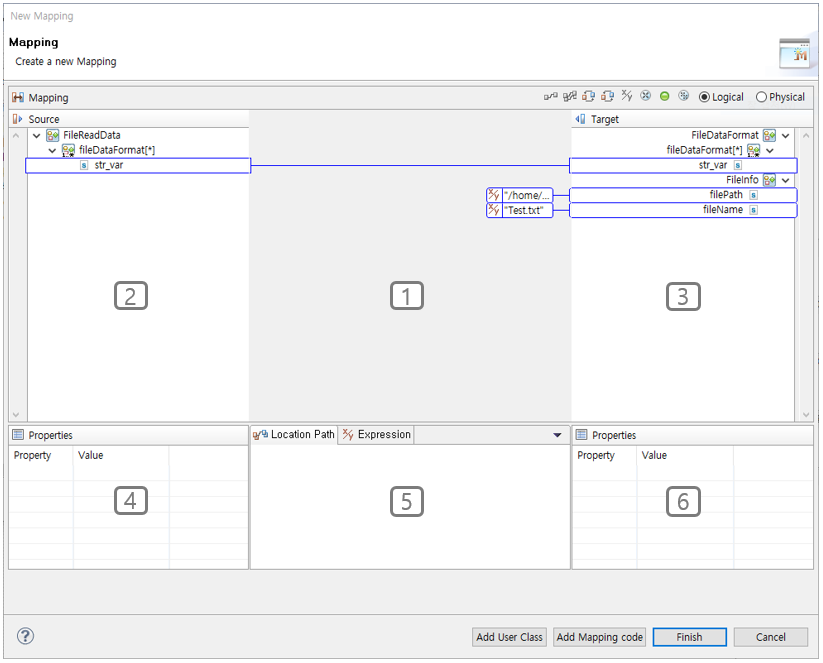
The following describes the New Mapping dialog box of the Mapping Wizard. The wizard is divided into the mapping area (1, 2, 3) and properties and editing area (4, 5, 6).
Mapping Area
The mapping area is divided into the source tree (2), mapping line (1), and target tree (3) areas.
The following describes the toolbar icons and buttons on the top of the mapping area.
Item |
Description |
|
Create a new mapping. |
|
Automatically maps nodes with same names. If there are multiples nodes with the same name in the source or target tree, the first node that appear in the tree is mapped. Hence, the user must check auto-generated mappings to ensure that they are mapped correctly. [Auto-Generate Mappings with Physical Name] automatically maps using physical names instead of the logical names that are shown in the tree. |
|
Create new function or arithmetic expression for the selected node in the tree. If a mapping already exists for the selected target, the [Create New Expression] menu is disabled. The target elements that are involved in a function mapping is shown inside a rounded rectangle. A function is shown on the mapping line with a rounded rectangle function icon. When a function mapping is created, it is automatically shown as selected. |
|
Delete mapping and expression. |
|
Highlight the mapped fields in purple. |
|
Delete all mappings. |
Logical |
Display data as logical names in the source and target areas. |
Physical |
Display data as physical names in the source and target areas. |
Add User Class |
Open the dialog box to search for a user class that defines the mapping logic. |
Add Mapping Code |
Open the dialog box to edit the Java mapping code. |
Mapping lines, which represent mapping relationships, are shown in blue and currently selected line is shown in red. If the mapped nodes are visible in the source and target trees, they are connected with a solid line. If they are hidden (collapsed), they are connected with a dotted line.
Configuration Area
The configuration area is divided into the source properties pane (4), editing pane (5), and target properties pane (6).
-
[Location Path]
Tab with a list of mapping paths. This tab is read-only.
-
[Expression]
Tab with function mapping. Constant values can be edited.
-
[Add User Class]
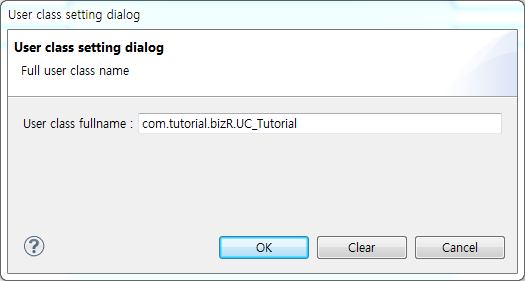
Click [Add User Class] to open the following dialog box to add a user class. A user class is used to implement more complex logic that cannot be created in the editing area with [Add New Function].
 User Class Properties Dialog Box
Enter the full user class name including the package name in the 'Full User Class Name' textbox. If the user class does not exist on the server, use [Upload] to upload a new library to the server. Otherwise, click [OK] to add the selected user class or [Clear] to clear the entry. To add a simple function to the mapping, additional code can be added to the mapping.
-
[Add Mapping Code]
Click [Add Mapping Code] to open the following dialog box to add Java code to the mapping.
The Java code is executed after executing the mapping. Drag and drop the variable values from the source and target trees. The code should be written with care since the compilation result is not shown immediately. Various functions are provided in the context menu of the source and target trees.
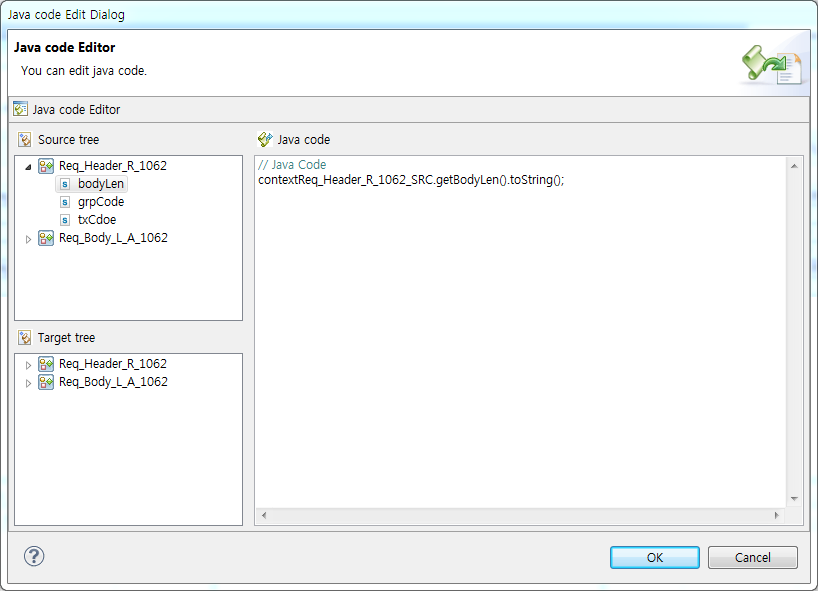 Java Code Editor Dialog Box
The size of each pane can be adjusted by placing the cursor on the border and dragging it. Double click on the tab of each pane to maximize or reset it.
The following describes each pane.
Pane Description Source Tree (Target Tree)
Same as a general tree control.
Use the mouse to select a node. Use <+> and <-> keys to collapse and expand the tree. Each item in the source or target tree is shown with an icon that represents the item and the object count limit.
Java Code
Source/target properties. Properties vary according to the resource type of each node.
2.2. Using Mapping Wizard
The Mapping Wizard can be used to map one or more sources to one or more targets. The source and target trees show only the basic mapping items and not all possible items. The user can add or delete mapping items as needed.
Source Tree
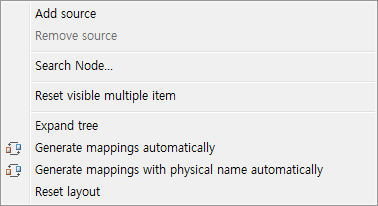
The context menu of the source tree provides various functions.
A source item can have child items in the tree. To hide a source tree, click [Remove Source] from the context menu or click [Delete]. If a source tree is hidden from the list, mappings defined for the deleted source item or its child items are automatically deleted.
| Menu | Description |
|---|---|
[Add Source] |
Open the Source Selection dialog box for selecting source items that are not shown in the source tree. The Source Selection dialog box displays all items that can be added to the source tree. To select an item, click on the item or enter the item name. Use the <Shift> key to select multiple items. Double click on the selected item(s) or click [OK] to add them to the source tree. |
[Remove Source] |
Remove an item. Only enabled for removable items. |
[Search Node] |
Open the Search Node dialog box to find a node by name. Enter the search keyword in the textbox to find all node names that contain the keyword. Select the 'Regular Expression' checkbox to use regular expression search. The search results are displayed and the nodes that are in the results are selected in the source tree. |
[Reset Array Range] |
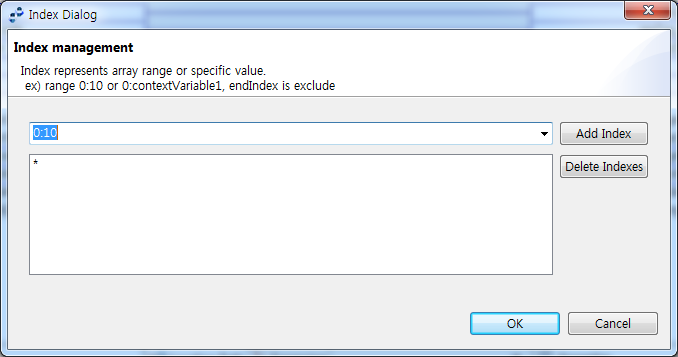
Enabled for array type item. Opens the Manage Indexes dialog box to adjust the array range for mapping. |
[Expand Tree] |
Expand the tree to show all child items. |
[ Auto-Generate Mapping] |
|
[Auto-Generate Mappings with Physical Name] |
|
[Reset Layout] |
Reset the layout to its original size. To adjust the pane size, place the cursor on the border which changes the cursor to a pointer, and then drag the pointer. |
Target Tree
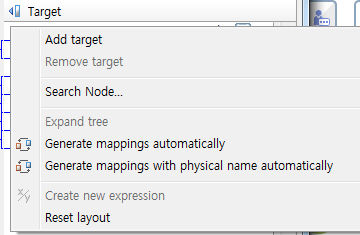
The context menu of the target tree provides various functions.
| Menu | Description |
|---|---|
[Create New Expression] |
Create a new function or arithmetic expression for the selected node in the tree. |
|
For information about other context menu items, refer to the source tree context menu description. |
Edit
After creating a function mapping, the function must be edited in the editing pane.
The following is the context menu of the editing pane.
-
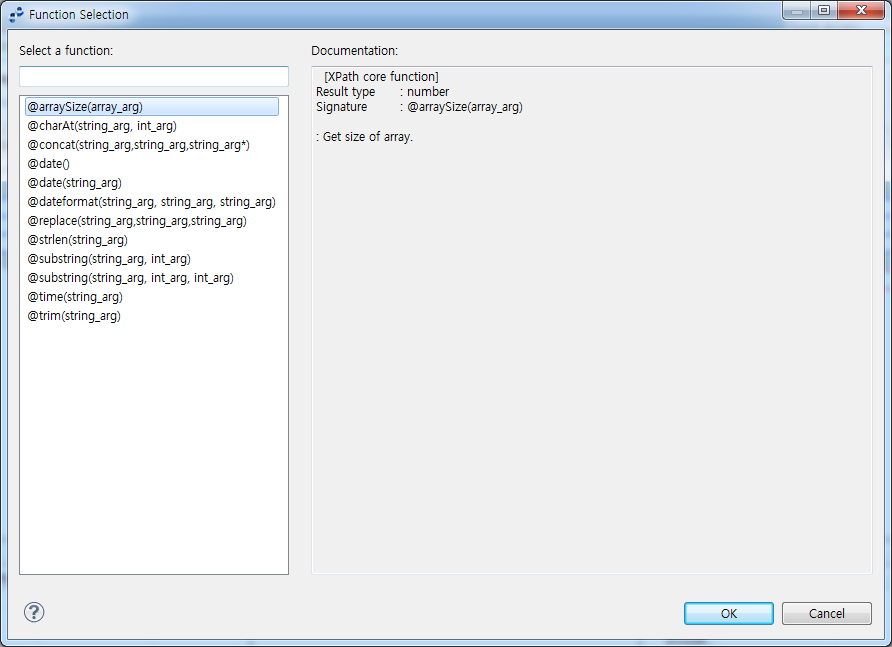
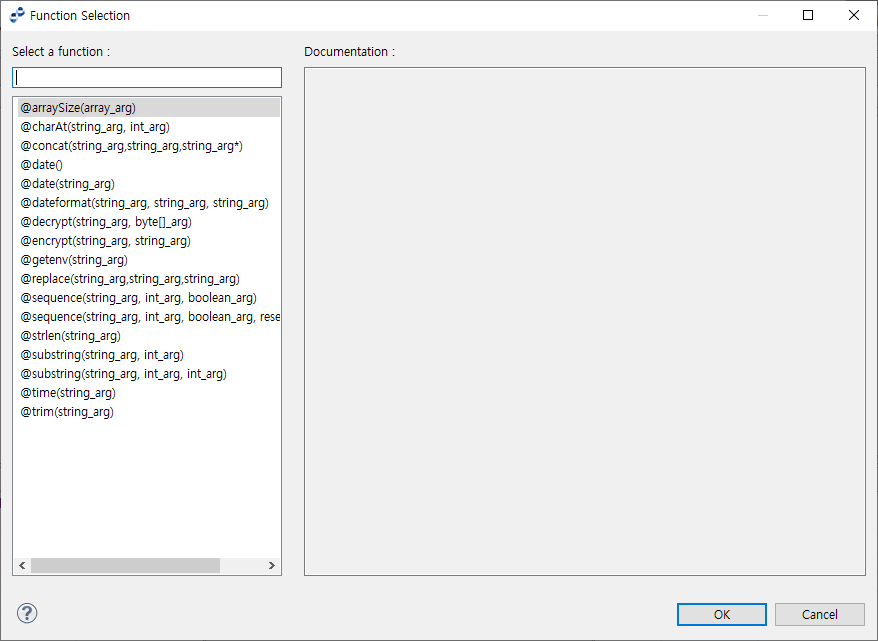
[Add New Function]
To add a new function in the [Expression] tab, click [Add New Function].
Drag and drop a node object from the source tree to the function editing pane. Use this method to easily enter function parameters.
-
Returns ArrayField size
@arraySize(arrayField)
-
Returns String.charAt(i)
@charAt(String, index)
-
Returns the result of concatenating specified strings
@concat(stringField1, stringField2, .....)
-
Returns current date (String)
@date()
-
Returns current date in the given format
@date("yyyyMMdd"); -
Returns the given date in the given format
dateformat(stringField, "yyyyMMdd", "yyyy-MM-dd")
dateformat(stringField, "HHmmss", "HH:mm:ss")
-
Decrypts and returns a string (String)
@decrypt(stringField, stringValue);
-
Encrypts and returns a string (byte[])
@encrypt(stringField, byteArray);
-
Returns AnyLink system variable or BizTx information (String)
@getEnv(stringKey);
-
Returns the result of replacing the given string with the given pattern
@replace(stringField, "target", "replacement")
-
Saves the sequence value to the system and increase the value by 1.
@sequence(stringField, int length, boolean padding)
-
Saves the sequence value to the system and increase the value by 1. resetType determines whether to reset the value.
@sequence(stringField, int length, boolean padding, ResetType resetType)
-
Returns the length of a given string
@strlen(stringField)
-
Returns substring starting from the given index
@substring(stringField, int beginIndex)
-
Returns substring in the range of the given indexes
@substring(stringField, int beginIndex, int endIndex)
-
Returns current time in the given format
@time("HHmmdd") -
Returns the result of trimming the given string
@trim(stringField)
For a more complex logic, click [Add User Class] to add a user class that implements the desired logic.
-
-
[Add Variable Data]
To add a variable value in the source code to the [Expression] tab, drag the variable from the source code to the [Expression] tab or click [Add Variable Data] from the context menu.
Mapping Lines
To create a mapping in general, either select a source item and a target item and then click [Create New Mapping] from the toolbar or drag and drop the source item on top of the target item.
The source and target items must be compatible types, and the target must not be defined in another mapping. Otherwise, [Create New Mapping] and drag and drop functionality are disabled.
Click on a mapping line to select the mapping. For a function or constant mapping, click the inside of the rectangle that represent the mapping type to select the mapping. Hold down the <Ctrl> or <Shift> key to select multiple mappings.
If a single constant mapping is selected, the constant mapping tab is enabled. If a single function mapping is selected, the function mapping tab is enabled. Otherwise, the Location Path tab that shows the mapping paths is enabled.
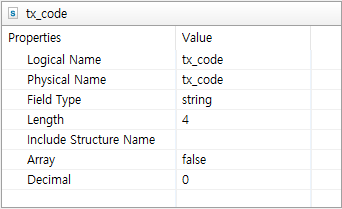
Tree Properties
The source and target properties panes display the properties of the selected items in the source and target tree, respectively. The following is an example of the properties pane.
3. Resource Dialog Boxes
This section describes resource related dialog boxes.
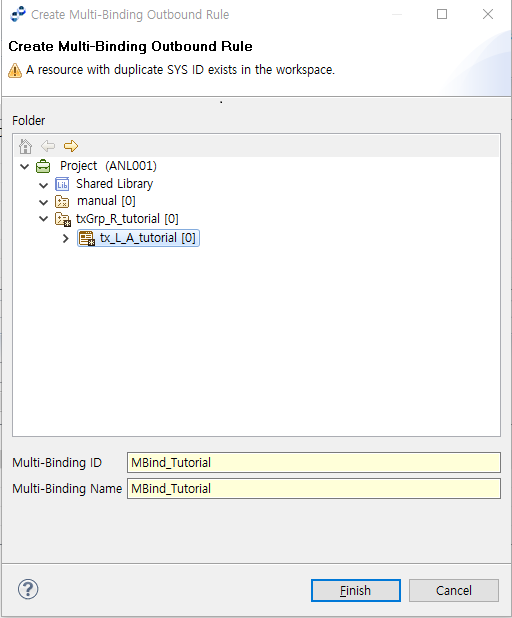
3.1. Create Resource
The Create Resource dialog box is used to create a resource in a Studio project.
Select a BizTx/BizTx Group, enter the [Resource Name] and [Resource ID], and then click [Finish] to add the resource to the current node. The configuration options and allowed ID and name are different for each resource type.
3.2. Search Resource
The Search Resource dialog box is used to select a resource for a field. To get a resource created in WebAdmin, the user must log in as the owner of the resource in WebAdmin. Select the desired resource and click [OK] to enter the resource in the field.
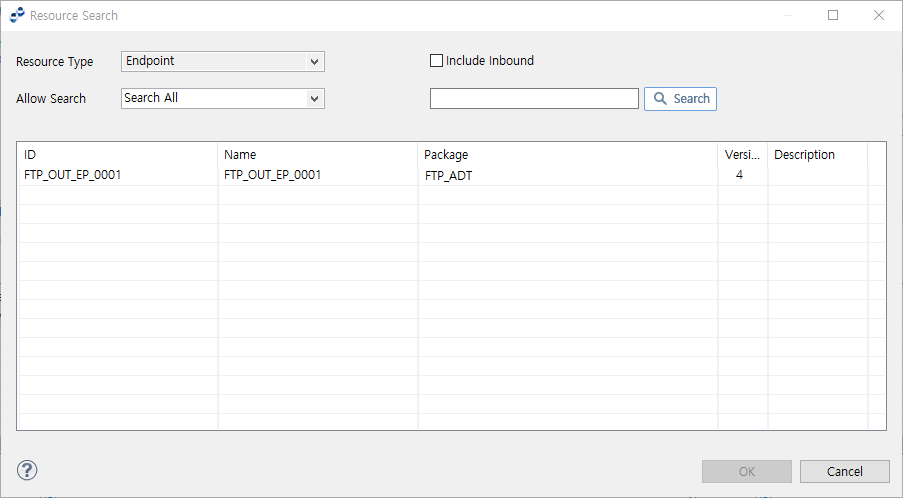
| Item | Description |
|---|---|
Resource Type |
Resource type to search. Any AnyLink resource type, such as endpoint, message, or flow, can be selected. |
Allow Search |
Search keyword type (Name, ID, or Package). Enter the keyword in the textbox, and then click [Search] to execute the search. |
Resource List |
List of resources retrieved by the search. |


