Introduction
This chapter describes the screen layout and basic functions.
1. Starting Studio
AnyLink Studio, a product line of AnyLink, can be used to easily create and deploy service flows and various adapter rules. Users can easily edit and manage flows and rules using the Studio GUI. Refer to the relevant guides for information about flow services and various types of adapters.
The following are the steps for starting AnyLink Studio.
-
Click the Desktop Shortcut (
 ).
). -
While Studio is loading, the AnyLink logo, copyright information, and progress are displayed.
 Studio Loading Window
 -
The Workspace Launcher for configuring a workspace starts. To execute AnyLink Studio, click [OK].
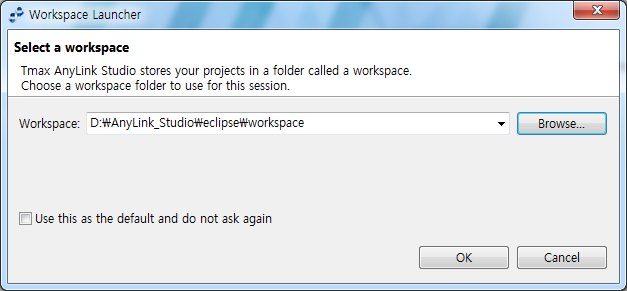 Workspace Launcher
 -
Click
 at the top to open the Login page. Studio requires a login for user history management. Any user changes saved to the server are managed as user change logs and are used to detect any data conflicts between users.
Enter the Server Name, User ID, Password, and Server IP Address and Port Number, and then click [Log In] to connect to the AnyLink server.
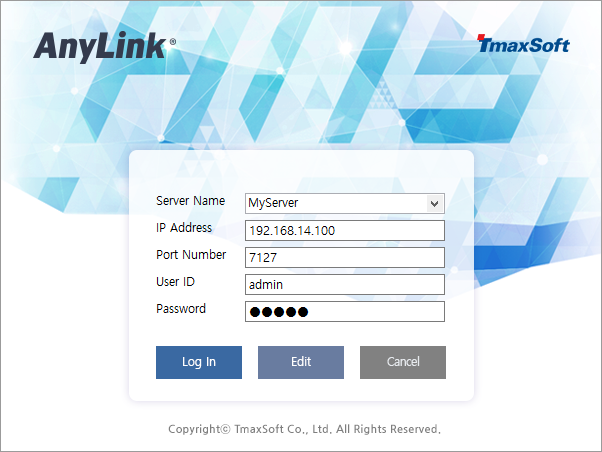 Login Window
Item Description Server Name
Login info (address, port, and user ID).
If server connection is not established using the login icon, Studio can be used in the local mode.
IP Address
DIS IP address.
Port Number
Port number (default value: 7127).
User ID
User ID created in WebAdmin.
Password
Password created in WebAdmin.
Click [Edit] from the Login Window (Login Window) to open the window for adding, editing, or deleting the login information.
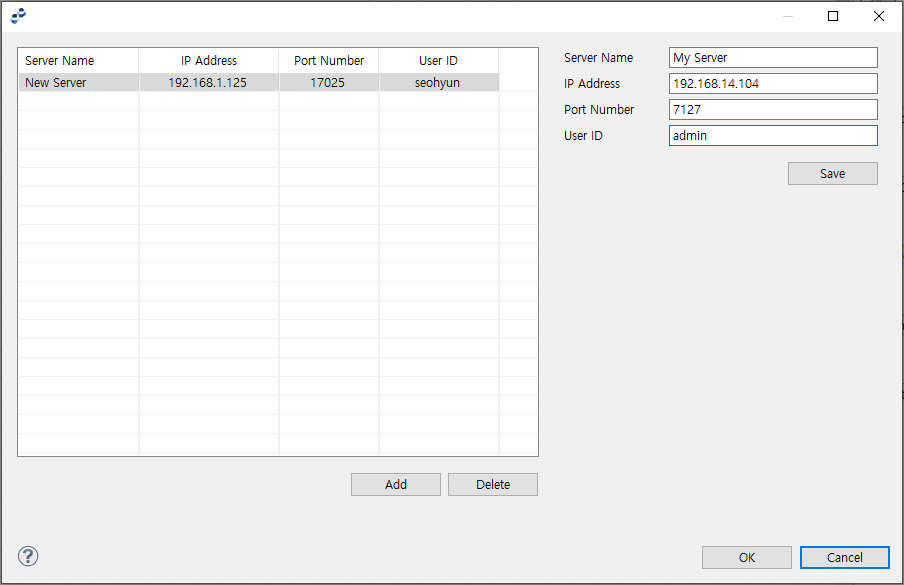 Edit Login Dialog Box
 -
Once logged in successfully, the main screen is displayed.
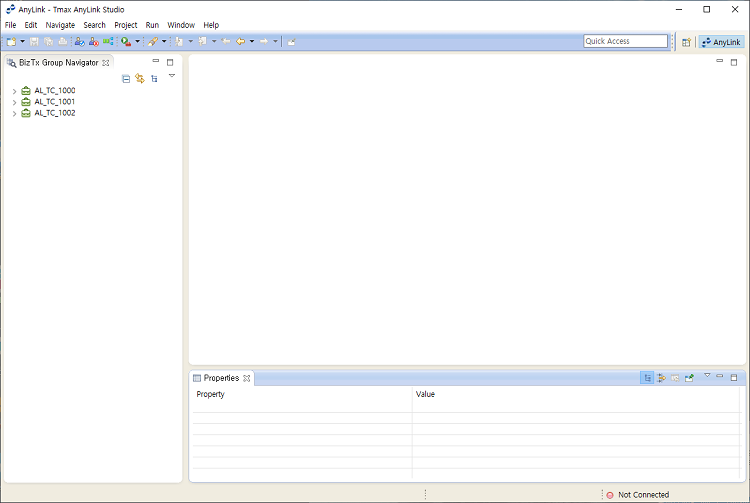 Studio Main Screen
The login information is displayed at the bottom.
 Studio Main Screen - Login Information
2. Screen Layout
Studio consists of a main page called the Workbench and multiple Perspectives (layout).
The following is the initial screen of AnyLink Studio.
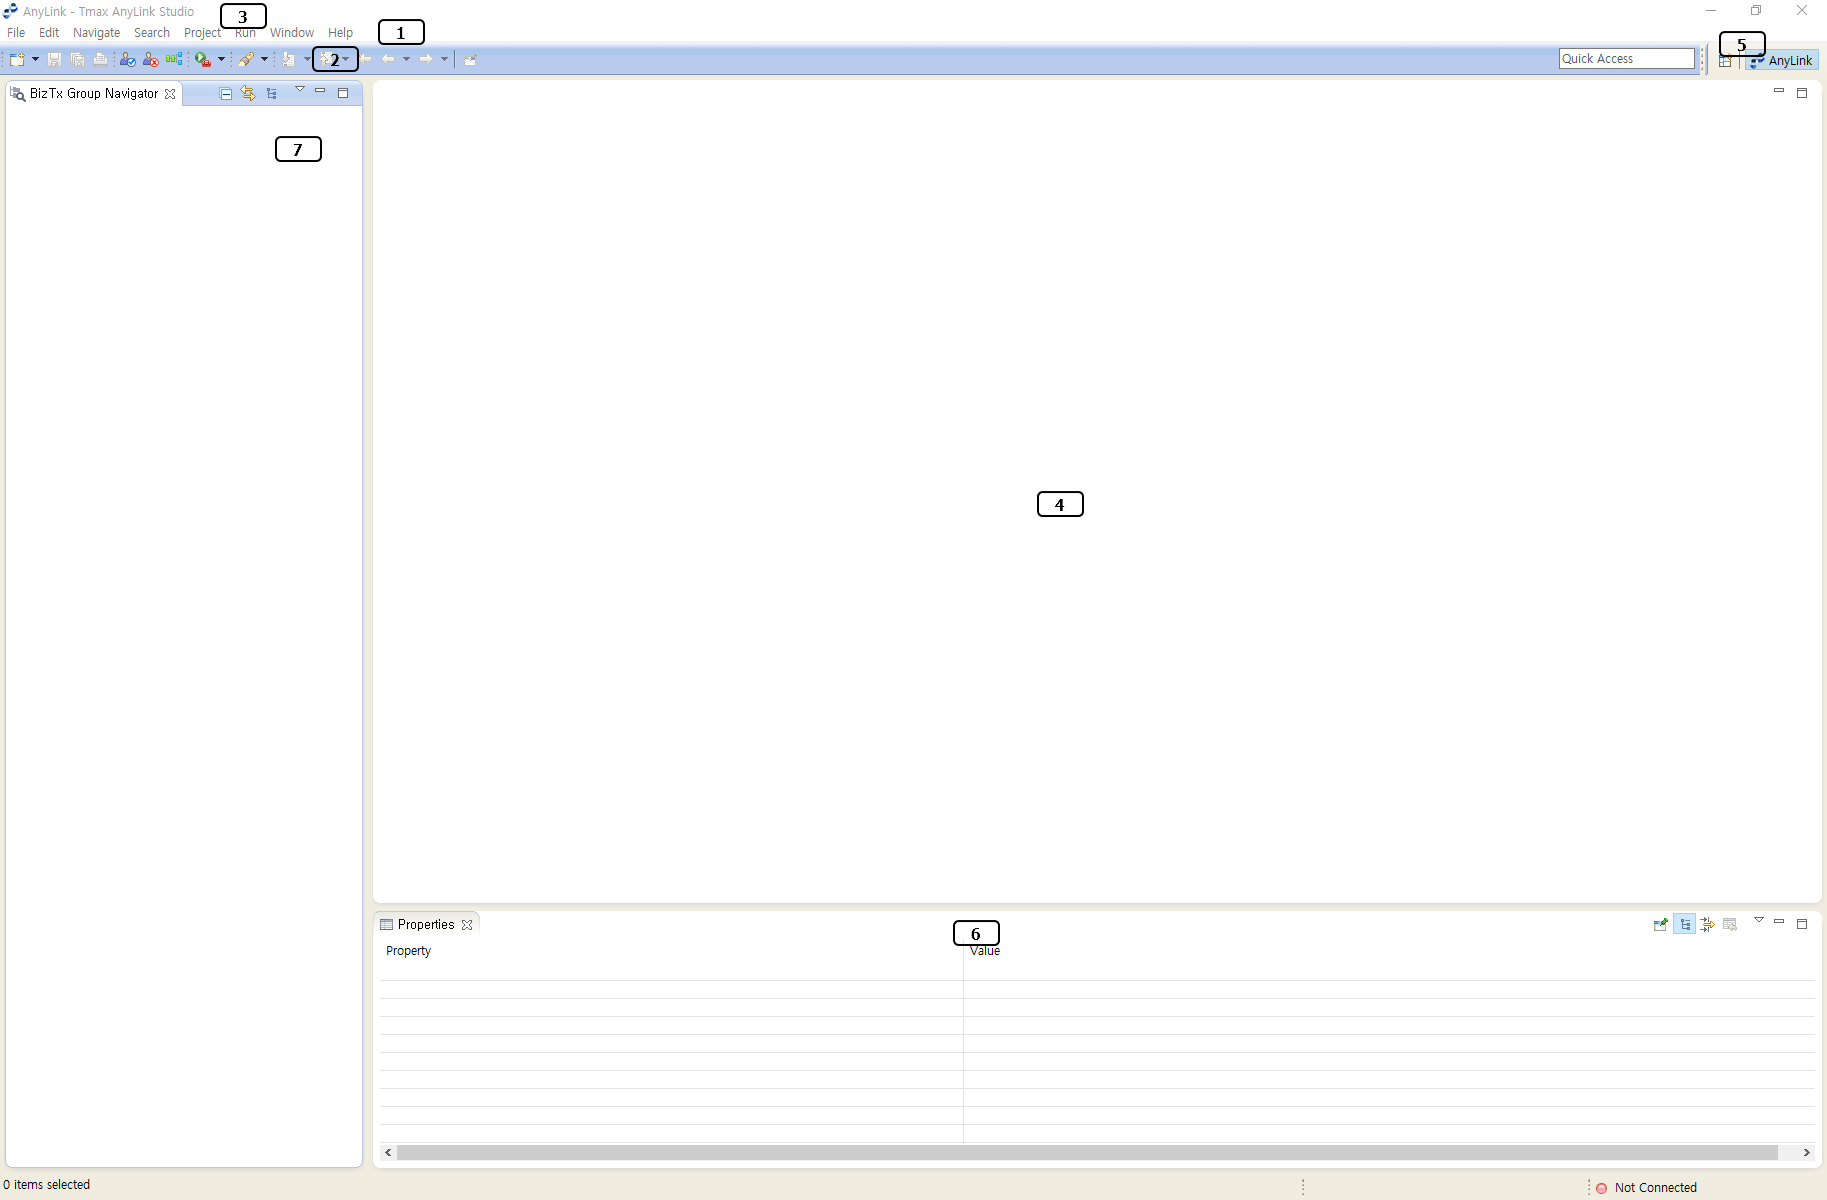
-
(1) Menu
Displays Workbench menu items. For detailed description of each menu item, refer to Menus.
-
(2) Tool bar
Displays menu items for quick menu access. Toolbar can be configured from [Window] > [Customize Perspective].
The following are the toolbar items available in AnyLink.
Icon Description  (Login)
Connect to DIS.
 (Logout)
Disconnect from DIS.
 (Outline)
Resource relationship view.
-
(3) Title bar
The Workbench title is displayed in the following format.
{Current Perspective Name} – {Current Working File Name} – Tmax AnyLink Studio -
(4) Editor Panel
Displays various editors including the Service Flow Diagram editor.
-
(5) Perspective
Displays Perspective shortcut buttons, and the active Perspective is highlighted. Right-click to display the context menu to customize the toolbar.
-
(6) View
Allows the user to search for resources and edit their properties. For detailed description of each menu item, refer to Views.
-
(7)Navigator
Provides editor support and is used mostly for searching for Presentation or Workbench data. For detailed information, refer to Navigator.
2.1. Menus
Workbench consists of the following menu items.
-
[File] menu
Create and save a project or file.
Menu Description [New]
Create a new project or file.
[Open File]
To open an editor in Eclipse, double-click on a file in the Workspace from the Service Explorer, or select a file in the Service Explorer and then click [Open File] from the context menu.
Use command to open a file that is not in the Workspace.
[Close]
Close the active editor.
[Close All]
Close all open editors.
[Save]
Save the active editor file.
[Save As]
Save the active editor file under another name.
[Save All]
Save the files in all open editors.
[Revert]
Revert the file in the active editor to the last saved version. Any changes made after the last save is lost.
[Move]
Drag and drop the selected file or folder to another location in the Service Explorer.
[Rename]
Rename the selected file in the Service Explorer.
[Refresh]
Refresh the Workspace data in the Service Explorer to sync with the file system.
Projects in the Workspace reflect the current file system state.
Since files in the Workbench can be modified externally, use the Refresh command to sync the files with those in the file system.
[Convert Line Delimiters To]
Convert the line delimiter of the active editor to that of Windows, Unix, or Mac OS 9. Windows is the default value.
[Print]
Print the contents from the active editor.
[Switch Workspace]
Switch to a new or an existing Workspace.
[Restart]
Restart Studio.
[Import]
Use the Wizard to import a project or file into the Workspace.
[Export]
Use the Wizard to export a project or file from the Workspace. Wizard supports various export formats.
[Properties]
Display the properties dialog box for the selected resource in the Service Explorer.
[Recent Files]
Display a list of recently used files in the Workbench.
Set the maximum number of files to displays under [Recent Files] in the 'Size of recently opened files list' from the [Window] > [Preferences] > [General] > [Editors] menu.
[Exit]
Close the Workbench. All open files and Perspective states are automatically saved when the Workbench closes so that it can be reopened preserving the previous state.
-
[Edit] menu
Edit a file in the editor.
Menu Description [Undo]
Undo the last change.
[Redo]
Redo the last undo.
[Cut]
Copy the selected content to the clipboard and delete the original.
[Copy]
Copy the selected content to the clipboard.
[Paste]
Paste the text or object from the clipboard to the cursor location in the active editor or view.
[Delete]
Delete selected content.
[Select All]
Select all text or objects in the active editor.
[Find/Replace]
Find and replace an expression with another expression in the active editor.
[Add Bookmark]
Add a bookmark for the row at the cursor location.
To see the bookmark list, go to [Window] > [Show View] > [Other] to open the Show View dialog box and then select [General] > [Bookmarks].
[Add Task]
Add a task to the row at the cursor location of the active editor.
To see the bookmark list, go to [Window] > [Show View] > [Other] to open the Show View dialog box and then select [General] > [Tasks].
-
[Navigate] menu
Search and find resources and items in the Workbench.
Menu Description [Go Into]
If the Tree View is active, the selected item becomes the root node.
The root node is an Invisible Root that is not displayed.
[Go To]
-
Back: Similar to HTML browser’s [Back] button. Returns the active view to the state before executing the Go Into command.
-
Forward: Similar to HTML browser’s [Forward] button. Returns the active view to the state before executing Go To > Back command.
-
Up One Level: Makes the current node’s root as the parent root to navigate to a higher level in the tree view.
[Open from Clipboard]
Open an item from the clipboard.
[Show In]
Allow the contents in the active view to be seen from another view.
[Next]
Navigate to the next item of a view or list from the active view.
For example, in a Search view, navigate to the next search item.
[Previous]
Navigate to the previous item of a view or list from the active view.
For example, in a Search view, navigate to the previous search item.
[Last Edit Location]
Navigate to the location of the last change.
[Back]
Move to the previous position in the editor.
[Forward]
Cancel the Back command.
Move to the last position before executing the Back command.
-
-
[Search] menu
Search for a file or text in the Workbench.
Menu Description [Search]
Search within files and Java sources.
[File]
Search within files and Java sources.
[Text]
Search for the selected text within the Workspace.
-
[Project] menu
Project related functions in the Workspace.
Menu Description [Open Project]
Open the selected project.
To execute this command, the target project must be closed.
[Close Project]
Close the selected project.
To execute this command, the target project must be open.
[Build All]
Execute incremental build on all projects in the Workbench. This will build all resources changed since the last incremental build.
This command can only be used if [Project] > [Build Automatically] is not checked.
[Build Project]
Execute incremental build on the selected project. This will build all resources changed since the last incremental build.
This command can only be used if [Project] > [Build Automatically] is not checked.
[Build Working Set]
Execute incremental build on the user specified working set. This will build all resources that are affected by the changes made since the last build.
This command can only be used if [Project] > [Build Automatically] is not checked.
[Clean]
Delete all previous build results.
If [Project] > [Build Automatically] is checked, this will rebuild the current project.
[Build Automatically]
If this menu is checked, changed resources in the Workbench that need to be saved will be automatically built (incremental).
[Properties]
Open the Properties dialog box for the selected project or resource.
-
[Run] menu
Set tools for compilation.
Menu Description [Run As]
Compile using the selected tool.
[External Tools Configurations]
Set external tools for compilation.
[Organize Favorites]
Add a configured external tool as a favorite and access it from the [Run As] menu.
-
[Window] menu
Open, close, or configure a perspective, view, or other items in the Workbench page.
Menu Description [New Window]
Open a duplicate Perspective in a new Workbench page.
[New Editor]
Open the selected file in a new editor.
[Hide Toolbar]
Hide the toolbar.
[Open Perspective]
Select and open a Perspective.
[Show View]
Select and display a view.
Only essential views can be accessed from the submenu in Studio. To display other views, click [Other] and select a view.
[Customize Perspective]
Set items, such as menu or toolbar, for the current Perspective.
[Save Perspective As]
Reconfigure a Perspective, or save the current Perspective under another name.
[Reset Perspective]
Reset the layout of the current Perspective.
[Close Perspective]
Close the active Perspective.
[Close All Perspectives]
Close all open Perspectives in the Workbench.
[Navigation]
Navigate through views, editors, and Perspectives in the Workbench.
Use the shortcuts for this menu to navigate using the keyboard.
The following are the submenu items:
-
[Show System Menu]: Show menu to adjust or close the current view or editor.
-
[Show View Menu]: Show list menu for the active view.
-
[Quick Access]: Search for a resource quickly by entering a string.
-
[Maximize / Minimize Active View or Editor]: Maximize or minimize the current view or editor.
-
[Activate Editor]: Activate the current editor.
-
[Next Editor]: Move to the next editor in the list of recently used editors.
-
[Previous Editor]: Move to the previous editor in the list of recently used editors.
-
[Switch to Editor]: Show a list of currently open editors. Select an editor to activate it.
-
[Next View]: Move to the next view in the list of recently used views.
-
[Previous View]: Move to the previous view in the list of recently used views.
-
[Next Perspective]: Move to the next perspective in the list of recently used perspectives.
-
[Previous Perspective]: Move to the previous perspective in the list of recently used perspectives.
[Preferences]
Show the preferences window for configuring the Workbench or installed plugins.
Since Studio resources are created in XML format, set [General] > [Workspace] > [Text file encoding] to UTF-8.
-
-
[Help] menu
Display help and product information.
Menu Description [Help Contents]
Display help TOC and contents.
[Search]
Search help contents.
[Dynamic Help]
Search help topics.
[Key Assist]
Display shortcut keys for each menu item.
[Cheat Sheets]
Select cheat sheets for installed software.
[Check for Updates]
Display a list of installed software and updates.
[Install New Software]
Search for available software and install desired software.
[About Tmax AnyLink Studio]
Display AnyLink Studio product information.
2.2. Views
A view provides editor support by displaying Presentation or Workbench data. A view can be displayed in a separate window or in a tabbed notebook. Workbench allows tabs to be configured at the top or bottom of the page.
Click on a tab to activate the tabbed notebook.
The following describes each tab.
-
[Project Explorer]
Display a list of resources in the Workspace. Select a resource to open it in the editor.
-
[Console]
Search for various information, such as deploy process and error messages, for using Studio.
-
[Error Log]
Display error logs that occurred while using the Workbench.
-
[Outline]
Display outline of the contents of the active editor.
-
[Properties]
Display and edit the properties of the selected object in the Workbench.
-
[Debug]
Display Flow Debugger results.
 [Debug] Tab
 -
[Relationships]
Display resource relationships.
 [Relationships] Tab
2.3. Navigator
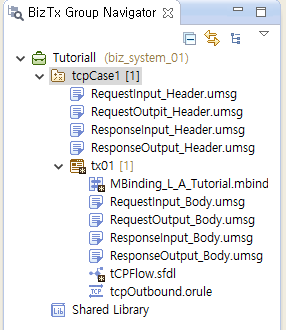
Navigator can be shown in a separate window or in a tab with other Navigator tabs. Click on a Navigator’s tab to activate it. Workbench allows the tabs to be configured at the top or bottom of the page.
The following is the initial AnyLink Navigator window.
The following describes the Navigator context menu items.
| Menu | Description |
|---|---|
[New] |
Create a new service (BizTx, Flow, Outbound Rule, etc.). |
[Download] |
Download resources from DIS. Requires connection to the server. |
[Template] |
Create a template or upload it to DIS. A template can be used to quickly create multiple resources that have common settings. |
[Assign Biz System] |
Deploy active project’s resources to RTE (Runtime Engine Server) when deploying the project. In the local mode, the Log In window is displayed. |
[Unassign Biz System] |
Undeploy resources from RTE. In the local mode, the Log In window is displayed. |
[Import Configuration] |
Import a configuration file registered in DIS and register configuration data in Studio. (Example: BizTx type) |
[Refresh] |
Refresh the Workspace in the Service Explorer to sync with the file system. A project in the Workspace reflects the current file system state. Since files in the Workbench can be modified externally, use the Refresh command to sync the files with those in the file system. |
[Paste] |
Paste a project or file. |
[Delete] |
Delete local project or file. |
[Import] |
Import a project or file into the Navigator. |
[Export] |
Export a project or file from the Navigator. |
[Validate] |
Validate source. |
[Team] |
Manage team sources by integrating with a version control system such as SVN. |
[Compare With] |
Compare resources. |
[Replace With] |
Replace a resource by using history. |
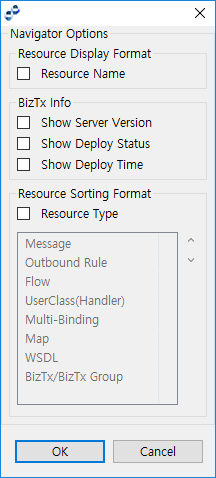
Click ![]() to open the Navigator Options dialog box.
to open the Navigator Options dialog box.
The following describes how to modify resource display format in the Navigator.
| Option | Description |
|---|---|
Resource Name |
Option to show the resource name. If not set, the Resource ID is displayed. |
Show Server Version |
Option to show the BizTx (Group) resource version currently deployed on DIS while logged in. |
Show Deploy Status |
Option to show the deploy/undeploy status of the BizTx (Group) resource while logged in. |
Show Deploy Time |
Option to show the last deployed time of the BizTx (Group) resource while logged in. |
Resource Sorting Format |
Option to sort resources by type. Select the 'Resource Type' check box to sort resources by type. Otherwise, resources are sorted by name regardless of their type. |
3. Resources
Click [New] from the Navigator's context menu to create a new resource. For detailed information, refer to each resource guide.
The following describes each resource supported in AnyLink.
| Project | Description |
|---|---|
Project |
To create a service flow diagram, first create a project in the workspace. AnyLink project is created for managing AnyLink resources. The resources in the project can reference one another and form relationships, and are grouped into a package. |
BizTx/BizTx Group |
BizTx is a business service provided by AnyLink. It includes a series of tasks that involve receiving a client request, forwarding it to a backend service, and returning the result in a response message. A BizTx/BizTx Group resource can be used to create or edit items like a BizTx Group, tree, and message. |
Multi-Binding |
Multi-Binding router rule is an AnyLink service that calls a multi-binding rule through the adapter’s parsing rule. Multiple services are combined into a single group when different routing method is used for each internal service type in AnyLink. |
Outbound Rule |
AnyLink calls an external system through an internal service, and receives the result. If an outbound rule service is called from an external component, a message is sent to the external system by using the adapter and endpoint configured in the rule. |
WSDL |
Web Services Description Language (hereafter WSDL) is an XML-based interface definition language that is used to define network service interface using endpoints for exchanging messages. An operation and message are defined abstractly, and an endpoint interface is described by binding a network protocol with message format. WSDL is not restricted to a specific message format and network protocol. It can be used to describe various types of network interfaces. |
External Mapping |
Defines data object mapping between messages. |
Flow |
Service flow expresses process flow through a diagram that is derived from the standard BPMN (Business Process Modeling Notation). A diagram consists of activities and events, and is defined with process flows, variables, expressions, mappings, etc. A service flow shows the service execution process in a graphical form. |
User Class/Handler |
Flow defines a condition to implement a control flow. A condition is defined as a single conditional expression using process variables. Define a user class activity or handler for a more complex logic that cannot be defined with a simple expression. |
Message |
Message is a basic abstract data unit that is exchanged between services. |
Common BizTx/BizTx Group Project |
A set of resources that can be used in projects assigned to the same business system. |
4. Creating a Project
Create a project before creating resources in AnyLink.
Click [New] > [Project] from the context menu in the Navigator. Enter the project name in the Create Project page, and then click [Finish].
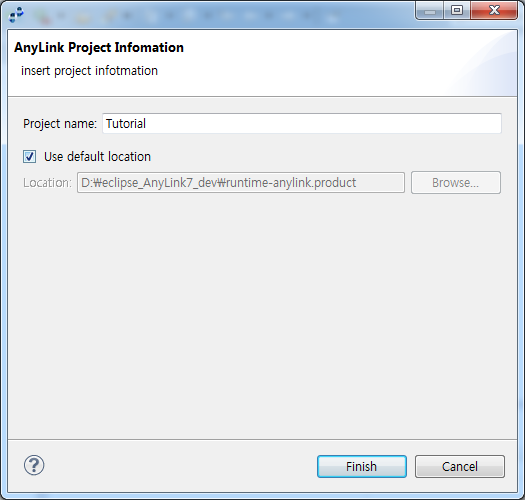
| Item | Description |
|---|---|
Project name |
Project name. Special characters (?, <, >, ", *, |) are not allowed. |
