Outbound Rule Editor
This chapter describes the functions and uses of the Outbound Rule editor.
1. Overview
An Outbound Rule is a service that sends data from RTE to Outbound Adapter. An Outbound Rule stores the message format that was received from the Inbound Adapter, and it can be used to define the format or content of the message for a successful or failed transfer.
The default Outbound Rule is created if the user does not create one. If an Outbound Rule is created, it automatically processes any messages with an input data format that matches the format defined in the rule.
An Outbound Rule can be added to the BizTx, but this may require data mapping between the Outbound Rule message and input message.
|
2. Custom Log Outbound Rule
A Custom Log Outbound Rule can be configured through Service Flow Rule Activity, Response Message Activity’s Request, Response part and Start Message event mappings. This section describes how to create and configure a Custom Log Outbound Rule.
2.1. Creating a Custom Log Outbound Rule
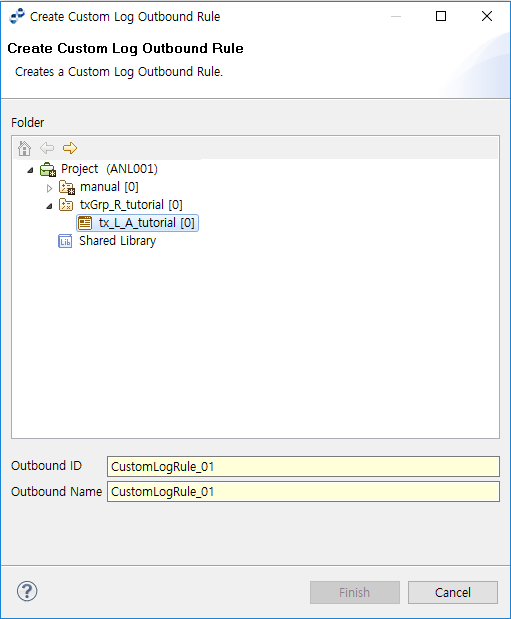
To create an Outbound Rule, select [New] > [Outbound Rule] > [Custom Log Outbound Rule] from the context menu of the Project Navigator. Enter the required items in the Create Outbound Rule window, and then click [Finish].
| Item | Description |
|---|---|
Outbound ID |
Outbound Rule ID. Only alphanumeric and special (_) characters are allowed, and the first character must be capitalized. |
Outbound Name |
Outbound Rule name. Only Korean, alphanumeric, and special (_) characters are allowed. Must follow the XML Naming Convention. |
2.2. Configuring a Custom Log Outbound Rule
The following describes the configuration items for a Custom Log Outbound Rule.
-
Define Outbound Rule
 Define Outbound Rule
Item Description Protocol
Protocol of the Outbound Rule. The protocol is selected when an Outbound Rule is initially created.
Outbound Rule ID
Outbound Rule ID.
Duplicate value is not allowed. (Required)
Outbound Rule Name
Outbound Rule name. (Required)
Request Processing Timeout (ms)
Timeout for processing outbound data transfer.
Endpoint (Group)
Endpoint or endpoint group connected to the external system to send data to. Click [Search] to open the Resource Search window to select an endpoint or endpoint group. (Required)
Description
Description about the Outbound Rule for easy identification.
Use Encryption/Decryption
Option to encrypt/decrypt log data.
Select User Class
Encryption user class. Click [Search] to open the Resource Search window to select a user class.
Clone Message
Option to clone a variable to be able to log its value regardless of BizTx execution time (using this option may reduce memory efficiency).
Use View
Option to use database view. If the view is used, request messages, log table mapping, and Insert SQL statements are not editable.
-
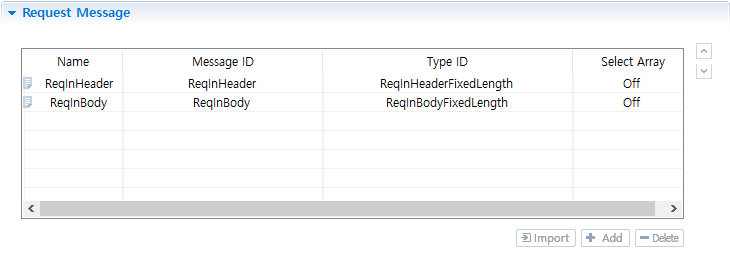
Request Message
Input message type that is used to match the format of the input received from the Outbound endpoint.
 Request Message
 -
Log Table
-
Log Table Name
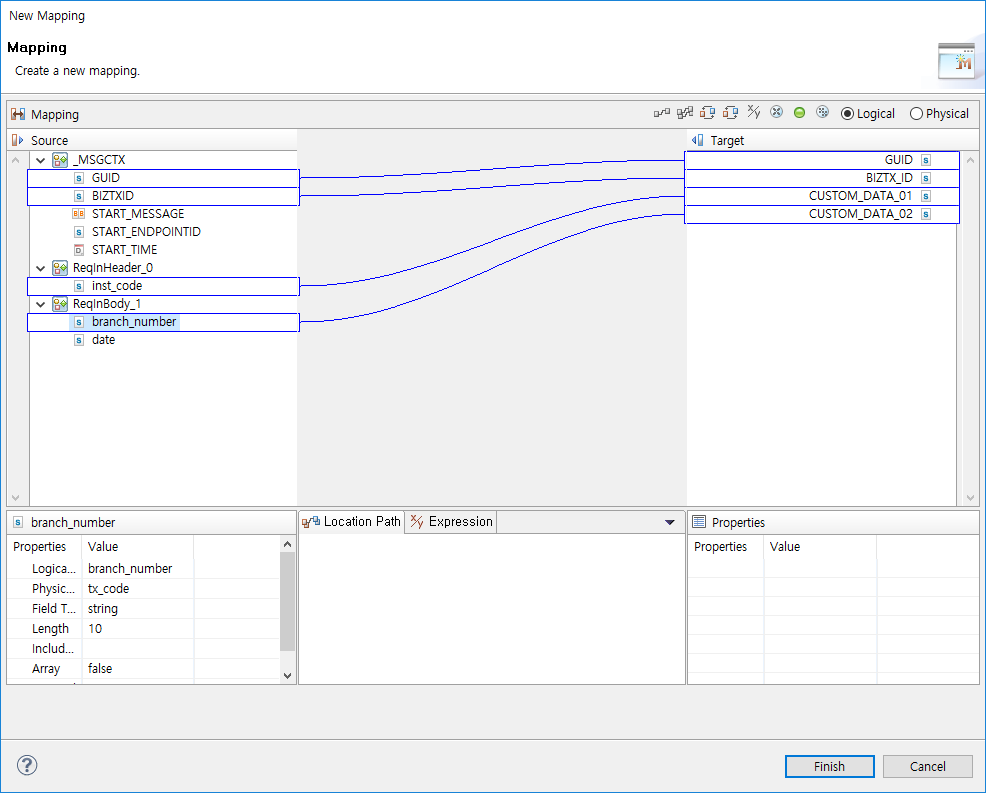
Select a log table included in the endpoint. To set a log table name, Endpoint (Group) must be set. Click [Mapping] to open the Mapping dialog box ([Log Table] - [Custom Log Table Info] - Mapping Dialog Box) to map the request message to a log table column.
 [Log Table] - Log Table Name
If the database account of the database set in Endpoint (Group) only has DML privilege, the table list cannot be retrieved. To retrieve the list, set the following jvm option of JEUS Domain Admin Server (DAS).
-Danylink.dis.db.noperm=true
-
Mapping Dialog Box
AnyLink BizTx’s transaction or trace information or messages set as request messages are mapped to custom log table columns. The mapped information is saved in a database table at logging.
The Source section displays _MSGCTX messages that can be mapped to AnyLink transaction or trace information and request messages set in the custom log rule. The Target section displays columns of the database table set in Log Table Name.
 [Log Table] - [Custom Log Table Info] - Mapping Dialog Box
 -
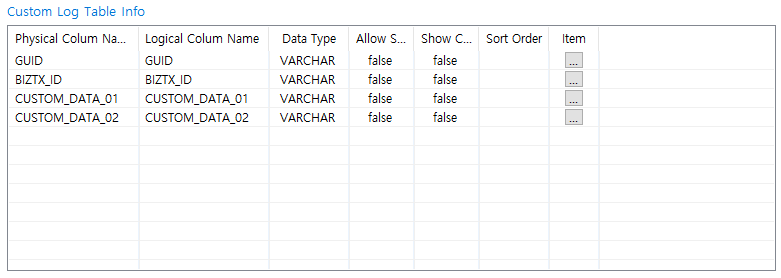
Custom Log Table Info
Displays information about the selected Custom Log Table. Use [Add] or [Delete] to modify the table.
 [Log Table] - Custom Log Table Info
Item Description Physical Colum Name
Physical column name.
Logical Colum Name
Logical column name.
Data Type
Data type of the column (editable).
If set to BLOB or CLOB type, Allow Search and Show Column are both set to false and cannot be edited.
Allow Search
Option to enable the column to be searchable in WebAdmin.
Unless it is set to true, the column is not displayed as a custom log search condition.
Show Column
Option to show the column in WebAdmin.
Sort Order
Sort order for search results in WebAdmin.
-
Ascending
-
Descending
Item
Item that can also be configured from a combo box in WebAdmin.
Clicking the button opens the Custom Log Items ([Log Table] - Custom Log Items Dialog Box) dialog box where items can be configured.
Configure an item in the following dialog box and then click [OK].
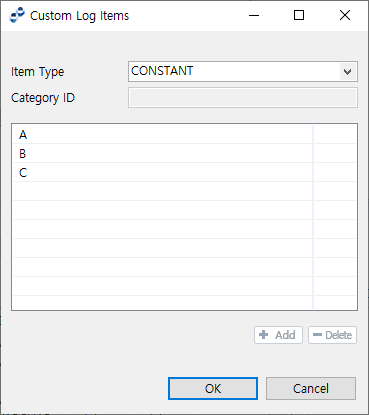 [Log Table] - Custom Log Items Dialog Box
Item Description Item Type
-
CONSTANT: Enter a fixed value to the table below.
-
USER_META: Use meta information of WebAdmin.
Category ID
Category ID of meta information to use for the item list. Enabled when Item Type is set to USER_META.
CONSTANT Item Table
Enabled when Item Type is set to CONSTANT. To add an item, click [+ Add]. To delete an item, click [- Delete].
-
-
INSERT SQL Statement
SQL created by mapping a Request Message to a log table column name.
Click [Edit] to edit the SQL, and [Reset] to undo changes and display the original SQL.
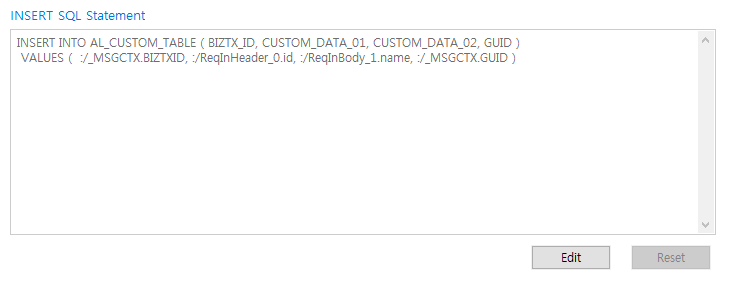 [Log Table] - INSERT SQL Statement
-
2.3. Custom Log Example
This section describes an example of performing custom logging while executing BizTx.
|
For information about creating and deploying resources and executing BizTx, refer to AnyLink TCP Adapter User Guide. |
Creating a Custom Log Outbound Rule
Select [New] > [Outbound Rule] > [Custom Log Outbound Rule] from the context menu of the Project Navigator.

| Item | Description |
|---|---|
Outbound ID |
CustomLogRule_01 |
Outbound Name |
CustomLogRule_01 |
Configuring a Custom Log Outbound Rule
-
Outbound Rule Definition
 Outbound Rule Definition
Item Description Protocol
LOG
Outbound Rule ID
CustomLogRule_01
Outbound Rule Name
CustomLogRule_01
Request Processing Timeout (ms)
10,000
Endpoint (Group)
default-log-endpoint
-
Request Message
 Request Message
Item Description Request Message
Request input header (ReqInHeader)
Request input body (ReqInBody)
-
Log Table
 Log Table
Item Description Log Table Name
AL_CUSTOM_TABLE
Custom Log Table Info
Allow Search: true
Show Column: true
 Log Table Mapping
Configuring a Flow
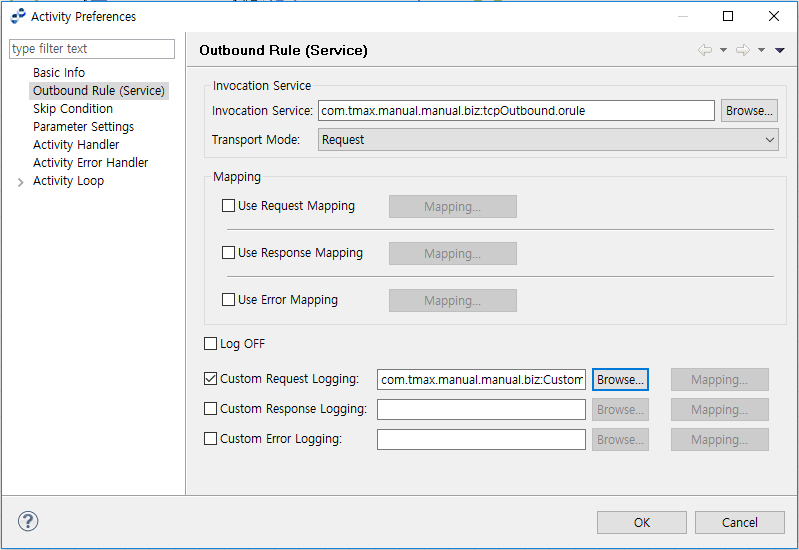
This example shows how to configure a Request Custom Logging for the input messages of TCP Outbound Rule.
The following figure is the Outbound Rule (Service) configuration section in the TCP Activity Preferences window. Click [Browse…] next to the Request Custom Logging, and select a Custom Log Outbound Rule file (CustomLogRule_01.orule).
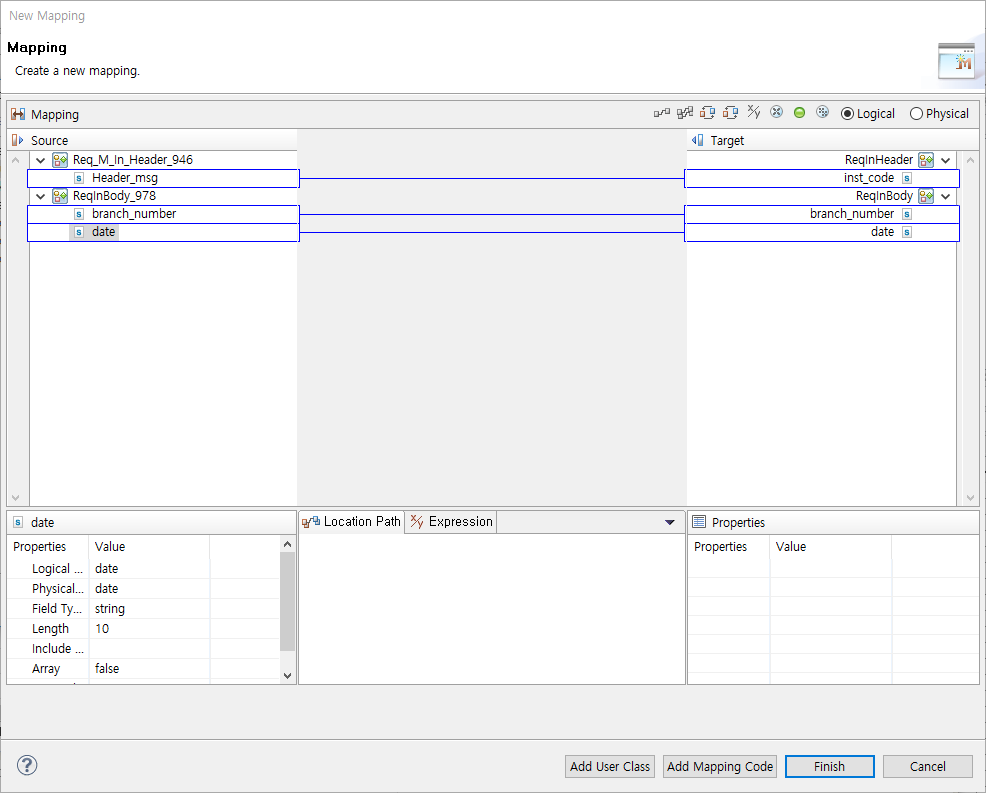
The following is the Request Custom Log Mapping window. Add the Activity’s input parameters in the Source side, and Custom Log Outbound Rule’s request messages in the Target side.
BizTx Test Run Result
The custom logging result can be check by selecting [Monitoring] > [Custom Log] in WebAdmin.

| Item | Description |
|---|---|
GUID |
BizTx GUID. |
BIZTX_ID |
BizTx Code field value of the ReqInHeader (TCP Activity’s Input Parameter) message. |
CUSTOM_DATA_01 |
ID field value of the ReqInHeader (TCP Activity’s Input Parameter) message. |
CUSTOM_DATA_02 |
Name field value of the ReqInHeader (TCP Activity’s Input Parameter) message. |
3. Batch Outbound Rule
This section describes how to create and configure a Batch Outbound Rule. Configuration items vary depending on the batch style.
3.1. Creating a Batch Outbound Rule
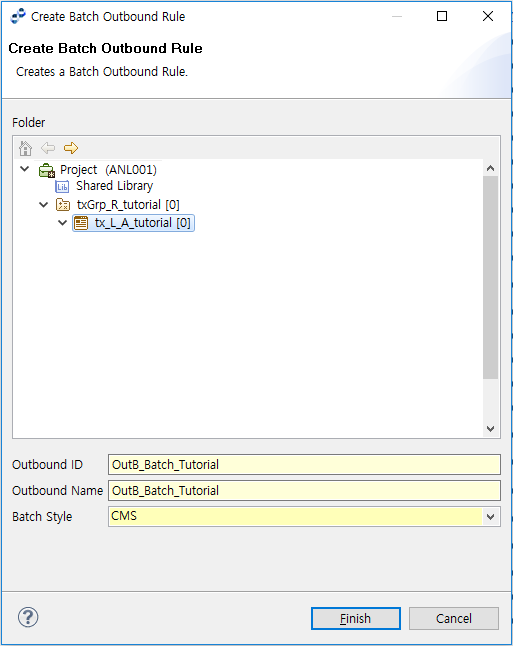
To create a Batch Outbound Rule, select [New] > [Outbound Rule] > [Batch Outbound Rule] from the context menu of the Project Navigator. Enter the required items in the Create Outbound Rule window, and then click [Finish].
| Item | Description |
|---|---|
Outbound Rule ID |
Outbound Rule ID. Only alphanumeric and special (_) characters are allowed, and the first character must be capitalized. |
Outbound Rule Name |
Outbound Rule name. Only Korean, alphanumeric, and special (_) characters are allowed. Must follow the XML Naming Convention. |
Batch Style |
Batch style. Select one of:
|
|
0600 line is used for business transactions related to KFTC batch transfer, Federation of Banks, CMS, bank sheet, KIS rating style, etc. In this batch style, the start message is always 0600/001 and missing message processing is identical. If a 0600/001 message comes in as the start message, the message header or transfer instruction message is exchanged and data is sent as a 0320 message. If 100 messages (0320) are sent and then a 0620 message is sent for a missing message, a 0300 is received as the response and 0310 is used to transfer missing data. It there are no missing messages, 0320 messages are continuously sent. |
3.2. Configuring a Batch Outbound Rule
The following describes the configuration items for a Batch Outbound Rule.
-
Outbound Rule Definition
 Outbound Rule Definition
Item Description Protocol
Protocol of the Outbound Rule. The protocol is selected when an Outbound Rule is initially created.
Outbound Rule ID
Outbound Rule ID.
Duplicate value is not allowed. (Required)
Outbound Rule Name
Outbound Rule name. (Required)
Description
Description about the Outbound Rule for identification.
Show Batch Progress
Option to use the menu for showing batch progress in WebAdmin. (Default value: false)
Send/Receive
Sets whether the batch is sending or receiving. Only available when Show Batch Progress is set to true.
-
Request Message
Input message type. Messages including data (such as file code, txDate, and filler) that can be used to search for batch style are configured.
 Request Message
 -
Response Message
Message to map batch style search result. Click [Add] to set the response message.
 Response Message
 -
File List
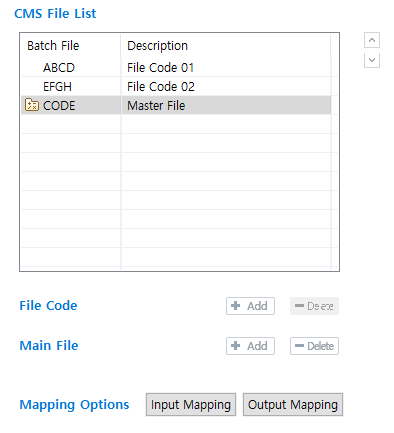
Click [Input Mapping] to map a file code to the request message, and click [Output Mapping] to map the response message to the Batch Style setting.
 File List
-
File Code
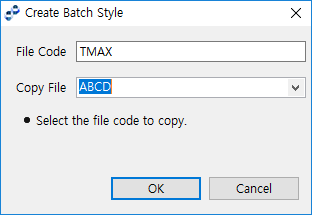
Click [Add] to open the Create Batch Style dialog box to add a file code and set a batch style for it. If a file with an existing file code is selected in Copy File, a batch style of the selected file code is created. Click [Delete] to delete the file code.
 Create Batch Style Dialog Box
 -
Main File
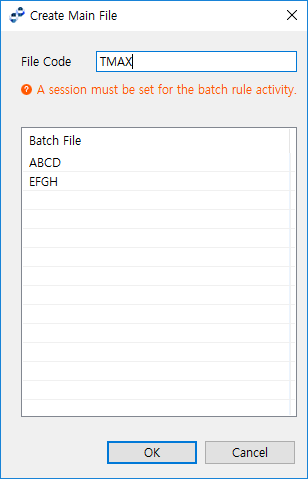
Main file represents a group of file codes. Click [Add] to open the Create Main File dialog box to add a main file and select file codes to include. Click [Delete] to delete the main file.
 Create Main File Dialog Box
 -
Input Mapping
Map data such as file code, txDate, and filler to get information set in the batch style.
The Source section displays request messages set in the batch rule. The Target section displays FILE_CODE, TX_DATE, and FILLER.
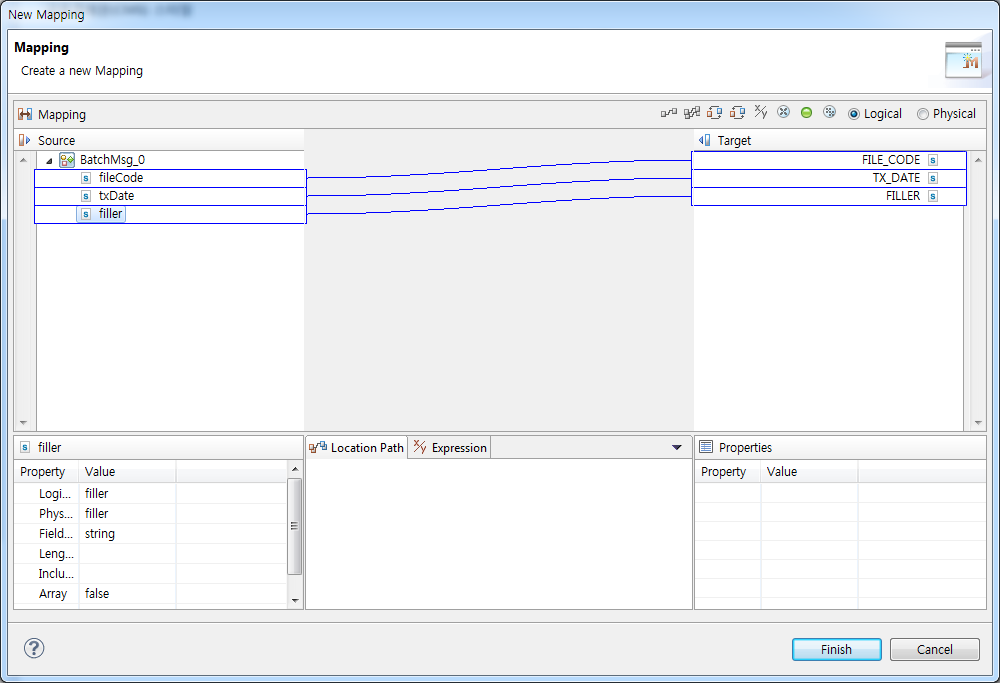 Input Mapping Dialog Box
 -
Output Mapping
Map batch style information to a response message. Style information about the batch requested through Input Mapping can be mapped.
The Source section displays values configured for the style, AFTER_ACTION_ID, and FILE_COUNT.
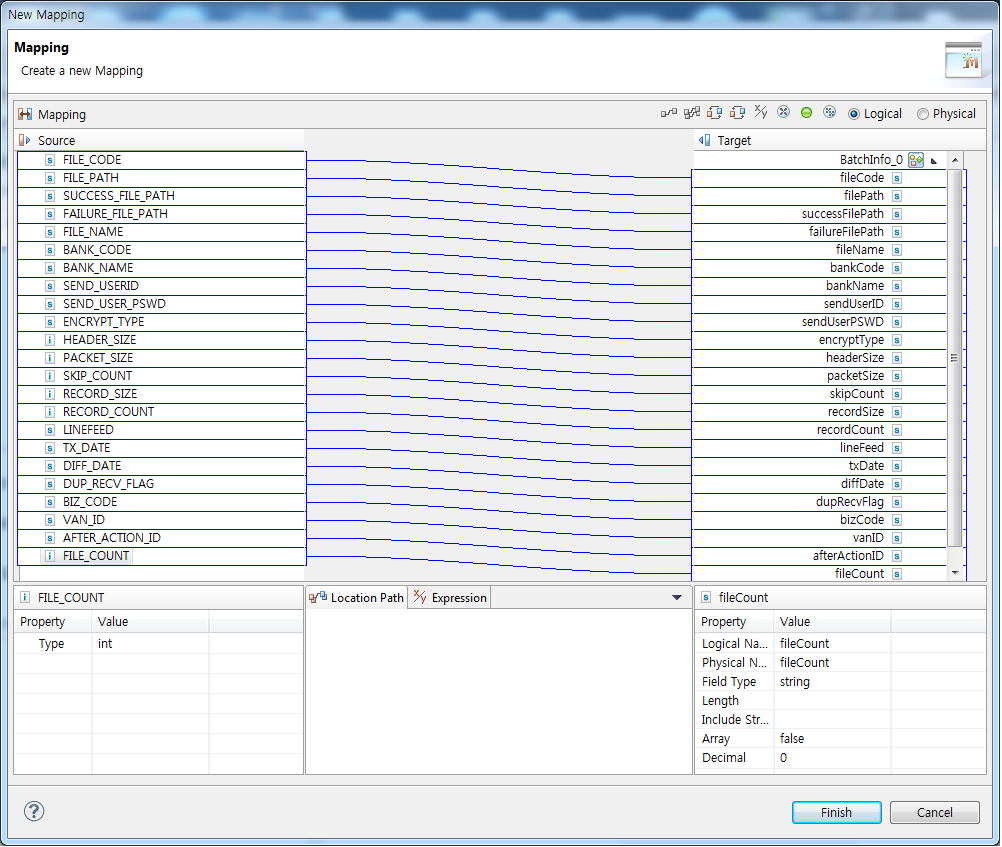 Output Mapping Dialog Box
 -
Batch Style Specifications
Batch style specifications.
 Batch Style Specifications
-
-
Style Options
For easy creation of a batch job, each batch style has common items used in flows for each file code. They may not be the same as actual specifications.
-
CMS
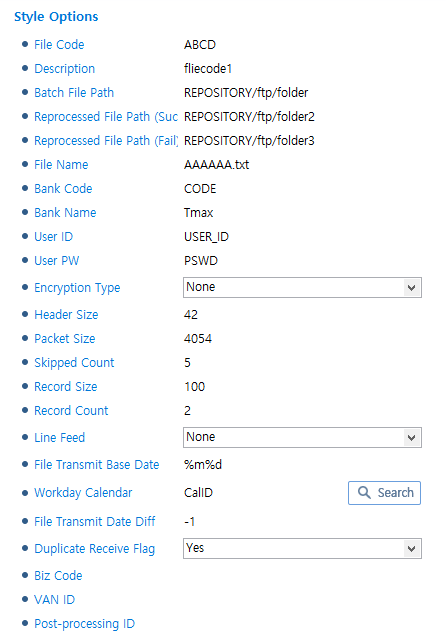 CMS Style
Item Description File Code
File code. (Required)
Description
File code description.
Batch File Path
Batch file path in the node.
Reprocessed File Path (Success)
Reprocessed file path in the node for success.
Reprocessed File Path (Fail)
Reprocessed file path in the node for failure.
File Name
File name.
Bank Code
Bank code.
Bank Name
Bank name.
User ID
User ID.
User PW
User password.
Encryption Type
Encryption type. Select one of:
-
None
-
KFTC CMS Algorithm
-
KFTC CMS Algorithm (2009)
-
KFTC CMS Algorithm (2015)
Header Size
Header size. Set to the Byte item when sending a file info message.
Packet Size
Max message size without the common 'Header Size'.
Skipped Count
Skipped count.
Record Size
Data record size defined in the file.
Record Count
Number of records to include in a sequence.
Line Feed
Line feed character.
File Transmit Base Date
Base date used to set the file transmit date in the scheduler.
Workday Calendar
Workday calendar created in WebAdmin. The calendar is used to calculate File Transmit Date Diff by excluding holidays.
File Transmit Date Diff
Days to add or subtract from the base date to set the transfer date when scheduling a file transfer.
-
Negative (-): Before the base date.
-
Positive (+): After the base date.
-
Default value: File Transmit Base Date.
Duplicate Receive Flag
Option to indicate a duplicate receive.
Biz Code
Biz Code.
VAN ID
VAN ID.
Post-processing ID
Post-processing ID.
-
-
DACOM_EDI
For information about items that are not described in the following, refer to CMS (CMS Style).
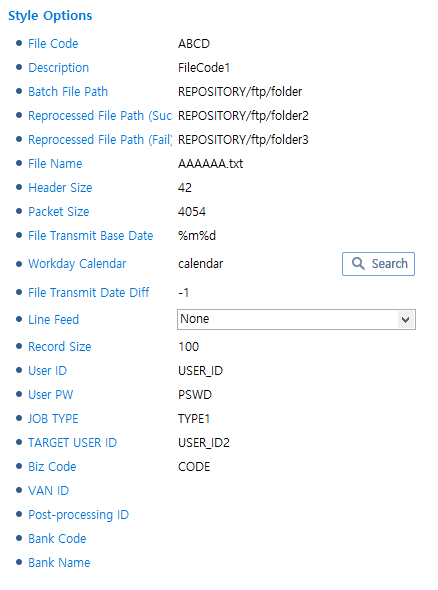 DACOM_EDI Style
Item Description JOB TYPE
Job type.
TRGET USER ID
Target user ID.
-
KIDI
For information about items that are not described in the following, refer to CMS (CMS Style).
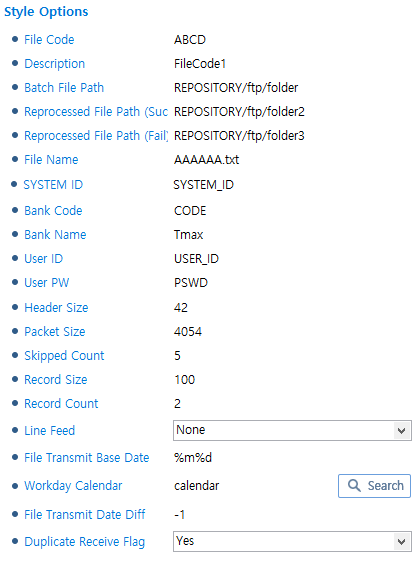 KIDI Style
Item Description SYSTEM ID
System ID.
-
SSNW
For information about items that are not described in the following, refer to CMS (CMS Style).
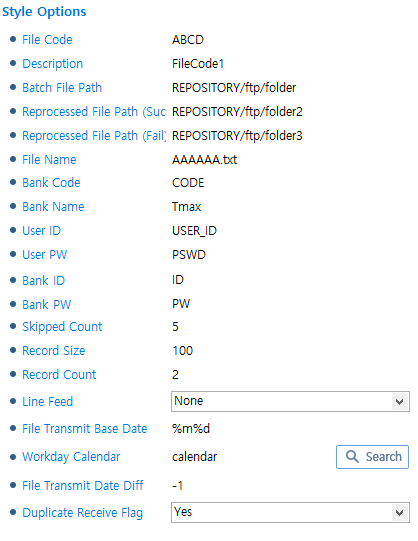 SSNW Style
Item Description Bank ID
Organization ID.
Bank PW
Password for the organization ID.
-
KLIA
For information about items that are not described in the following, refer to CMS (CMS Style).
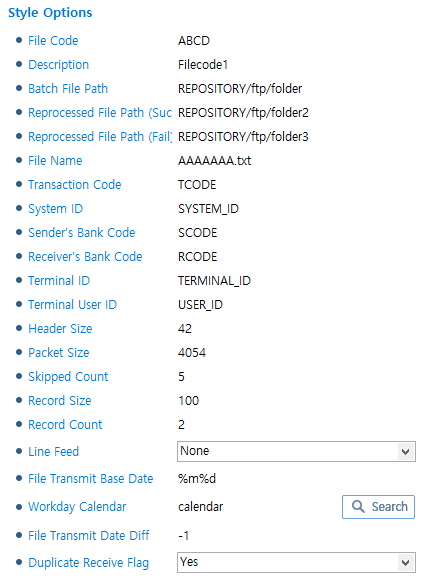 KLIA Style
Item Description Transaction Code
Transaction code.
System ID
System ID.
Sender’s Bank Code
Sender’s organization code.
Receiver’s Bank Code
Receiver’s organization code.
Terminal ID
Terminal ID.
Terminal User ID
Terminal user ID.
-
SONBO
For information about items, refer to CMS (CMS Style).
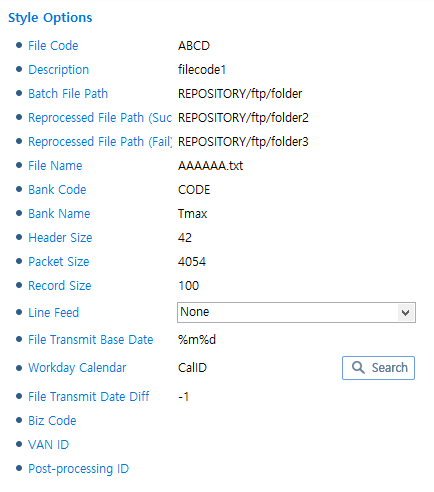 SONBO Style
 -
KNIA
For information about items that are not described in the following, refer to CMS (CMS Style).
Since this style does not know the full length of a data message to send or receive, select Use Length Info Key and enter the length information by using an expression in the Message/Error Handling tab of the TCP Endpoint Details page in WebAdmin. You can go to the page by selecting [System] > [Adapter], clicking Endpoint List, and then clicking the endpoint.
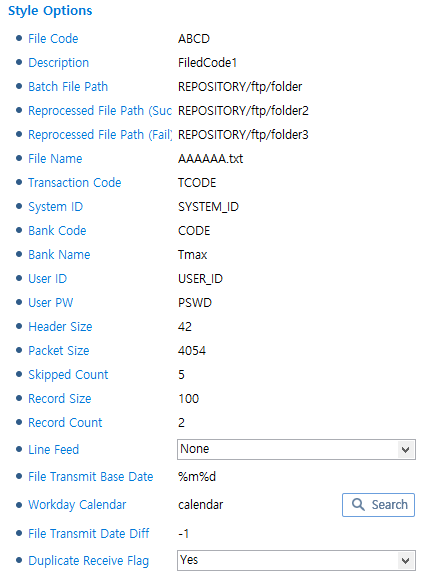 KNIA Style
Item Description Transaction Code
Transaction code.
System ID
System ID.
-
KFB
For information about items, refer to CMS (CMS Style).
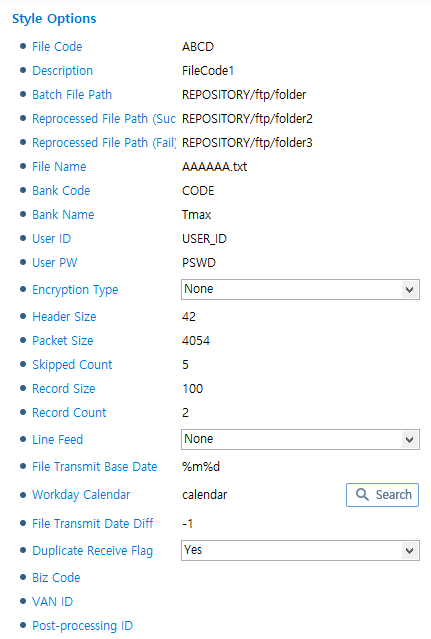 KFB Style
 -
FTP
For information about items that are not described in the following, refer to CMS (CMS Style).
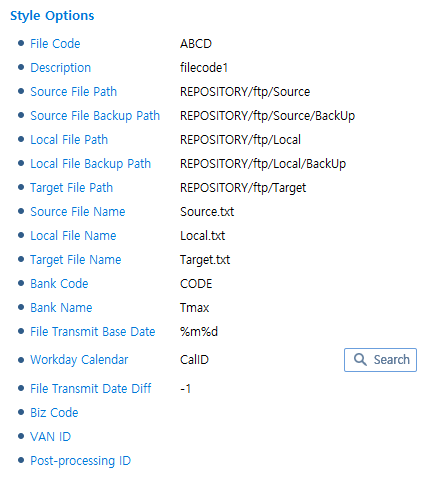 FTP Style
Item Description Source File Path
Source file path.
Source File Backup Path
Source file backup path.
Local File Path
Local file path.
Local File Backup Path
Local file backup path.
Target File Path
Target file path.
Source File Name
Source file name.
Local File Name
Local file name.
Target File Name
Target file name.
-
KCREDIT
For information about items, refer to CMS (CMS Style).
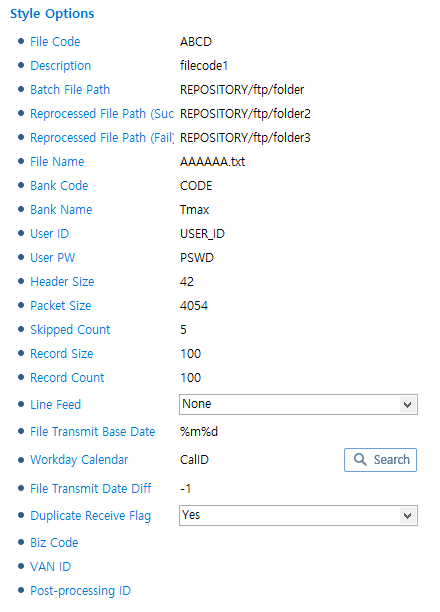 KCREDIT Style
 -
KSD
For information about items, refer to CMS (CMS Style).
This style receives data by splitting it. For more information, refer to "TCP MESSAGE SPLIT ACTIVITY".
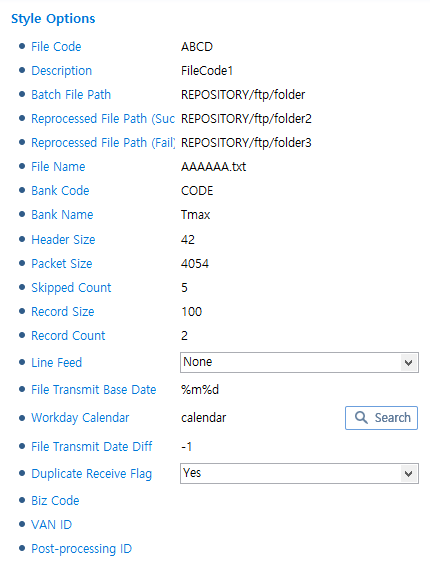 KSD Style
 -
KOTA
For information about items that are not described in the following, refer to CMS (CMS Style).
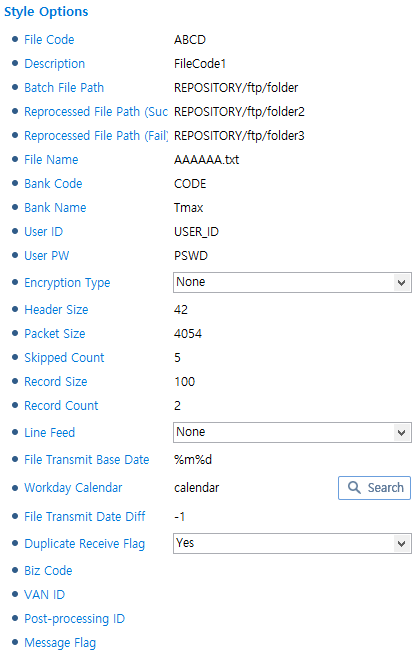 KOTA Style
Item Description Message Flag
Message flag.
-
Code Information Configuration
-
Code Information
By entering codes of batch flows, you can map the codes to response messages and use them.
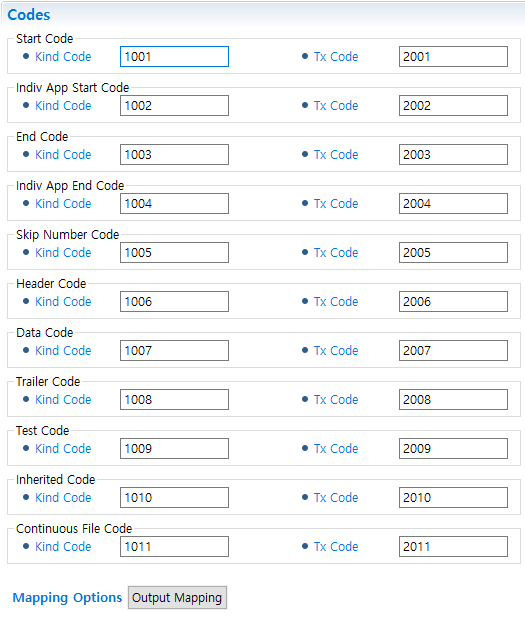 Code Information
Item Description Kind Code
Kind code.
Tx Code
Tx code.
Output Mapping
Maps each code to a response message set in the rule.
-
Output Mapping
Maps each code to a response message.
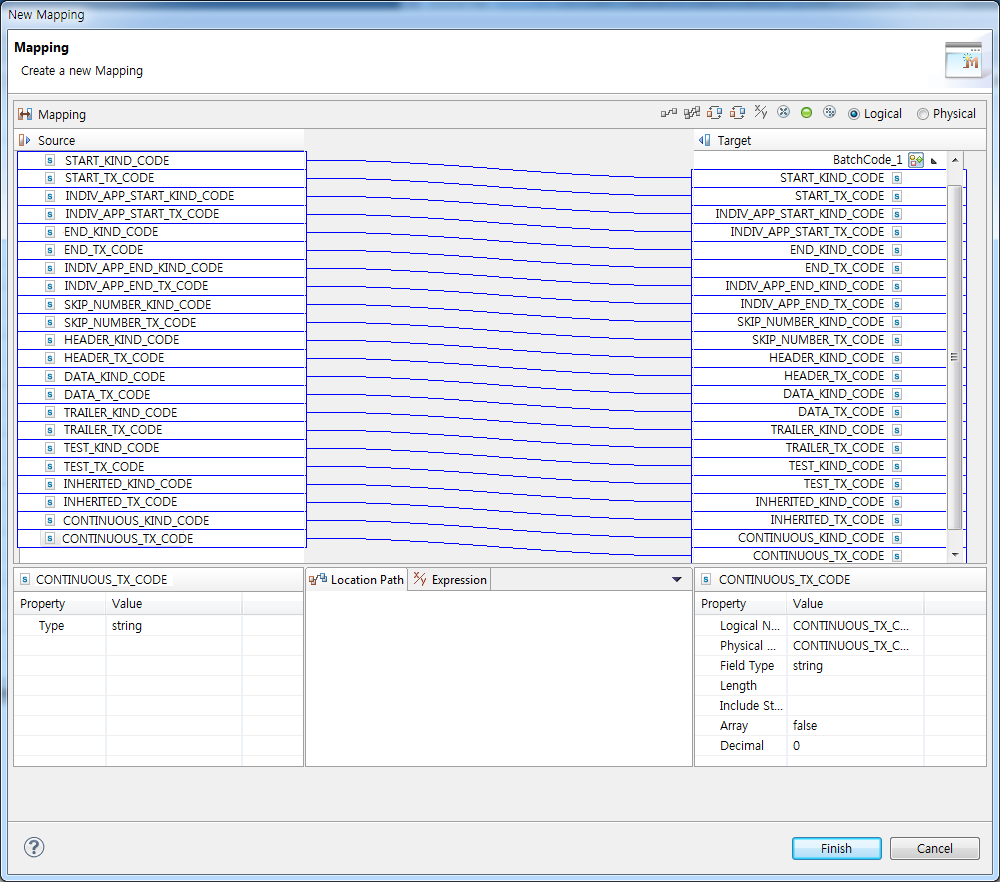 Output Mapping
Section Description Source
Displays code information fields.
Target
Displays response messages.