Examples
This chapter describes examples of using AnyLink Tmax adapter.
1. Overview
All used messages use the WebtStringBuffer method. For more information about Tmax and WebT, refer to the relevant Tmax guide.
The following shows the basic Tmax BizTx process.
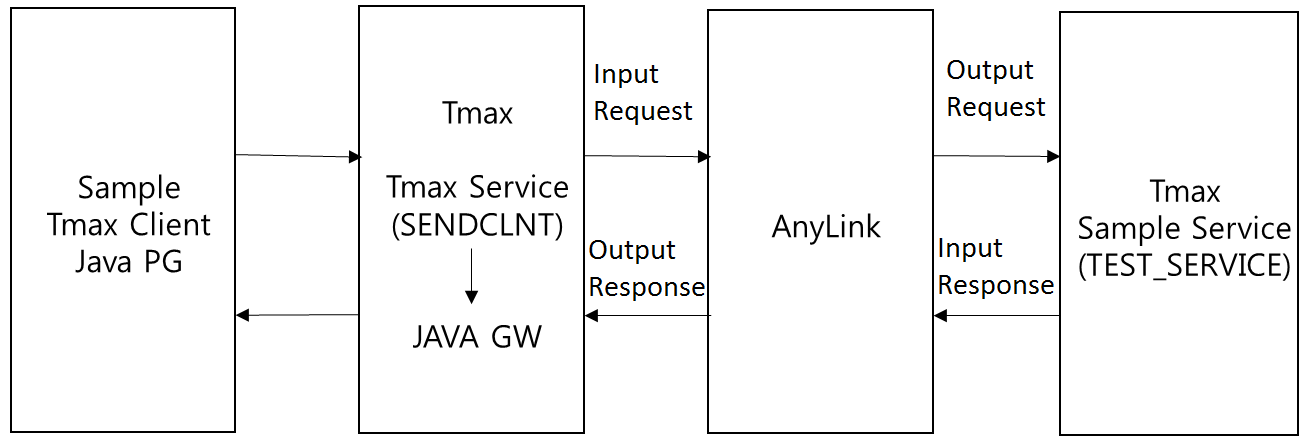
A BizTx is processed as follows:
-
A request message is sent to the Tmax SENDCLNT service via a sample Tmax Client Java program.
-
Tmax receives the message, and then sends it to AnyLink via a Tmax Java gateway.
-
AnyLink receives the message via an inbound adapter and then executes a service flow.
-
The service flow maps the request input message to the request output message.
-
The request output message is sent to the Tmax Server’s TEST_SERVICE service via an outbound adapter.
-
The Tmax Server sends the response input message via the outbound adapter.
-
The service flow maps the response input message to the response output message.
-
The response output message is sent to the Java gateway via the inbound adapter.
-
The Java gateway sends the response output message to the sample Tmax client.
Message Components
The following are the components of the message used in the examples of this chapter.
-
Request Input
-
Header messages
Field Name Description Type Size kind_code
Type code
Char
4
tx_code
BizTx code
Char
4
date
Date
Char
8
id
ID
Char
10
-
Body messages
Field Name Description Type Size branch_number
Branch number
Number
3
teller_number
Teller number
Char
5
name
Name
Char
10
account
Account
Char
12
data
Data
Char
50
-
-
Request Output
-
Header messages
Field Name Description Type Size tx_code
BizTx code
Char
4
id
ID
Char
10
-
Body messages
Field Name Description Type Size name
Name
Char
10
account
Account
Char
12
data
Data
Char
50
-
-
Response Input
-
Header messages
Field Name Description Type Size return_code
Response code
Char
4
id
ID
Char
10
-
Body messages
Field Name Description Type Size transactionDate
Response date
Char
8
transferType
Management information
Char
4
-
-
Response Output
-
Header messages
Field Name Description Type Size kind_code
Type code
Char
4
tx_code
BizTx code
Char
4
date
Date
Char
8
id
ID
Char
10
-
Body messages
Field Name Description Type Size return_code
Response code
Char
4
transferType
Management information
Char
4
-
2. Creating an Adapter
Log in to AnyLink WebAdmin through a web browser, go to [System] > [Adapter], and click [Add] below the Adapter List to go to the Add Adapter screen. For information about creating an adapter, refer to Adapter Configuration. For information about accessing and creating business systems in AnyLink WebAdmin, refer to AnyLink WebAdmin Guide.
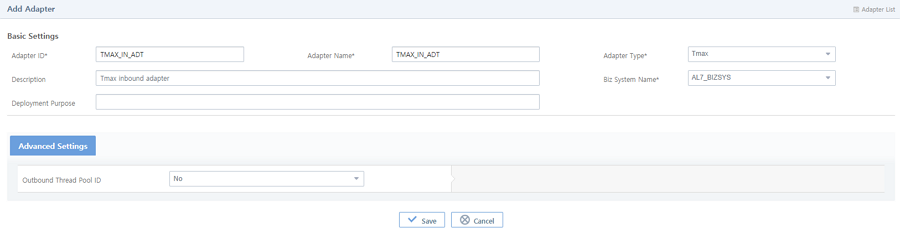
2.1. Creating an Inbound Adapter
The following is an example of creating a Tmax inbound adapter.
-
Basic Settings
Item Value Adapter ID
TMAX_IN_ADT
Adapter Name
TMAX_IN_ADT
Adapter Type
Tmax
Description
TMAX inbound adapter
Biz System Name
AL7_BIZSYS
-
[Advanced Settings] Tab
Item Value Outbound Thread Pool ID
No
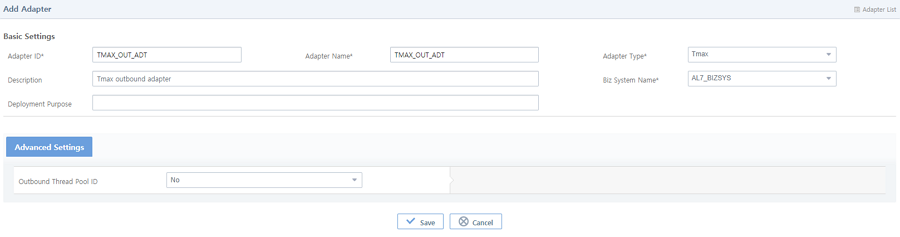
2.2. Creating an Outbound Adapter
The following is an example of creating a Tmax outbound adapter.
-
Basic Settings
Item Value Adapter ID
TMAX_OUT_ADT
Adapter Name
TMAX_OUT_ADT
Adapter Type
Tmax
Description
TMAX outbound adapter
Biz System Name
AL7_BIZSYS
-
[Advanced Settings] Tab
Item Value Outbound Thread Pool ID
No
3. Creating an Endpoint
From the [Adapter] screen, click on an adapter and go to the Adapter Details screen. Click [Add] from the [Endpoint List] tab to go to the Add Tmax Endpoint screen. For more information about creating an endpoint, refer to Endpoint Configuration.
3.1. Creating an Inbound Endpoint
The following is an example of creating a Tmax inbound endpoint.
-
Basic Settings
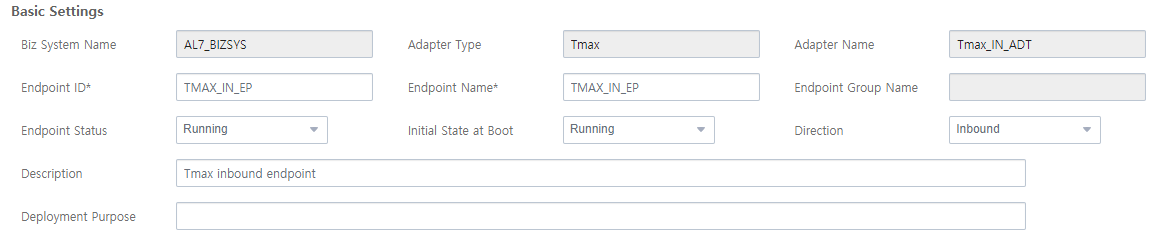 Adding an Inbound Endpoint - Basic Settings
Item Value Endpoint ID
TMAX_IN_EP
Endpoint Name
TMAX_IN_EP
Endpoint Status
Running
Initial State at Boot
Running
Direction
Inbound
Description
Tmax inbound endpoint
-
[Connection Info] Tab
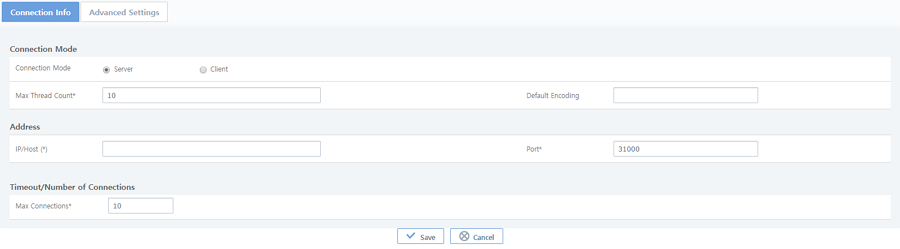 Adding an Inbound Endpoint - [Connection Info]
Item Value Connection Mode
Server
Max Thread Count
10
Port
31000
Max Connections
10
-
[Advanced Settings] Tab
 Adding an Inbound Endpoint - [Advanced Settings]
Item Description BizTx Group/BizTx
manual.tmax.tmaxCase1.tx01 (This item can be entered manually or can be selected after creating BizTx Group/BizTx.)
3.2. Creating an Outbound Endpoint
The following is an example of adding a Tmax outbound endpoint. The [Advanced Settings] tab is not configured in this example.
-
Basic Settings
 Adding an Outbound Endpoint - Basic Settings
Item Value Endpoint ID
TMAX_OUT_EP
Endpoint Name
TMAX_OUT_EP
Endpoint Status
Running
Initial State at Boot
Running
Direction
Outbound
Description
Tmax outbound endpoint
-
[Connection Info] Tab
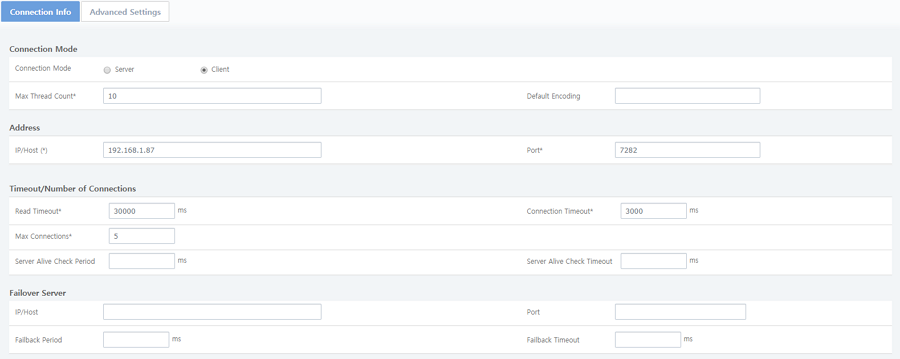 Adding an Outbound Endpoint - [Connection Info]
Item Value Connection Mode
Client
Max Thread Count
10
IP/Host
192.168.1.87 (Specify the IP of the machine the sample Tmax server is running on.)
Port
7282
Read Timeout
30000
Connection Timeout
3000
Max Connections
5
4. Creating a Studio Resource
This section describes how to create a resource in Studio. For information about AnyLink Studio, refer to AnyLink Studio Guide.
4.1. Creating a BizTx Group
In the BizTx Group navigator, right click on a Project and go to [New] > [BizTx/BizTx Group].
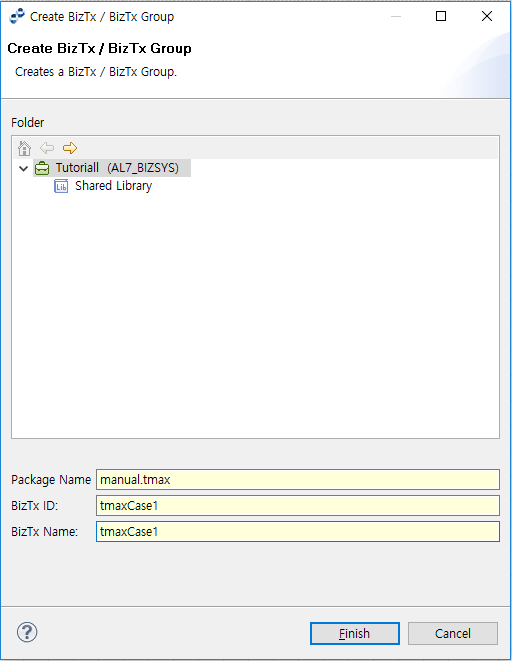
| Item | Value |
|---|---|
Package Name |
manual.tmax |
BizTx ID |
tmaxCase1 |
BizTx Name |
tmaxCase1 |
4.2. Creating a BizTx
In the BizTx Group navigator, right click on a BizTx Group and go to [New] > [BizTx/BizTx Group].
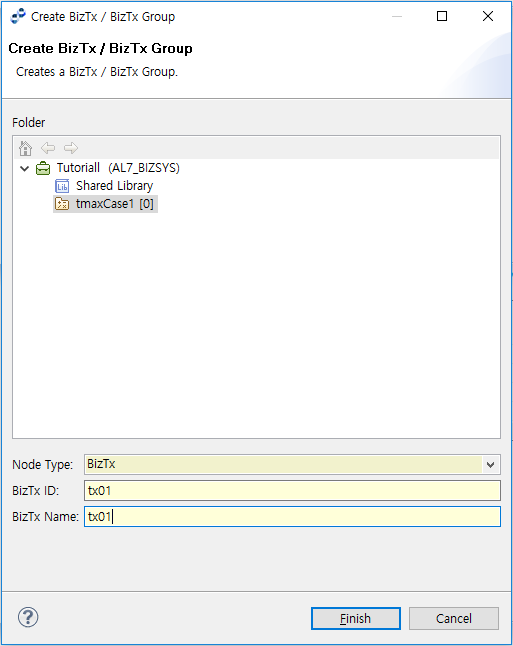
| Item | Value |
|---|---|
Node Type |
BizTx |
BizTx ID |
tx01 |
BizTx Name |
tx01 |
4.3. Creating a Message
Messages that can be created in Studio are request input header/body, request output header/body, response input header/body, and response output header/body. For information about creating a message, refer to AnyLink Studio Guide.
5. Configuring a Studio Resource
This section describes how to configure a resource. For information about AnyLink Studio, refer to AnyLink Studio Guide.
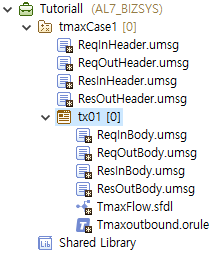
The following shows resources created in the BizTx Group navigator.
5.1. Configuring a BizTx Group
The following is an example of configuring a BizTx Group. The [Parsing Options] tab is not configured in this example.
-
[BizTx Group Info] Tab
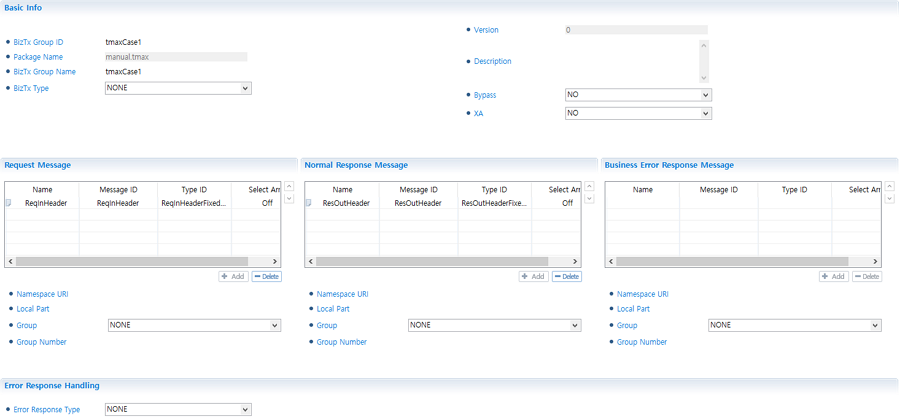 Configuring a BizTx Group - [BizTx Group Info]
Item Value Request Message
ReqInHeader
Normal Response Message
ResOutHeader
Bypass
NO
XA
NO
Error Response Type
NONE
-
[BizTx Group Options] Tab
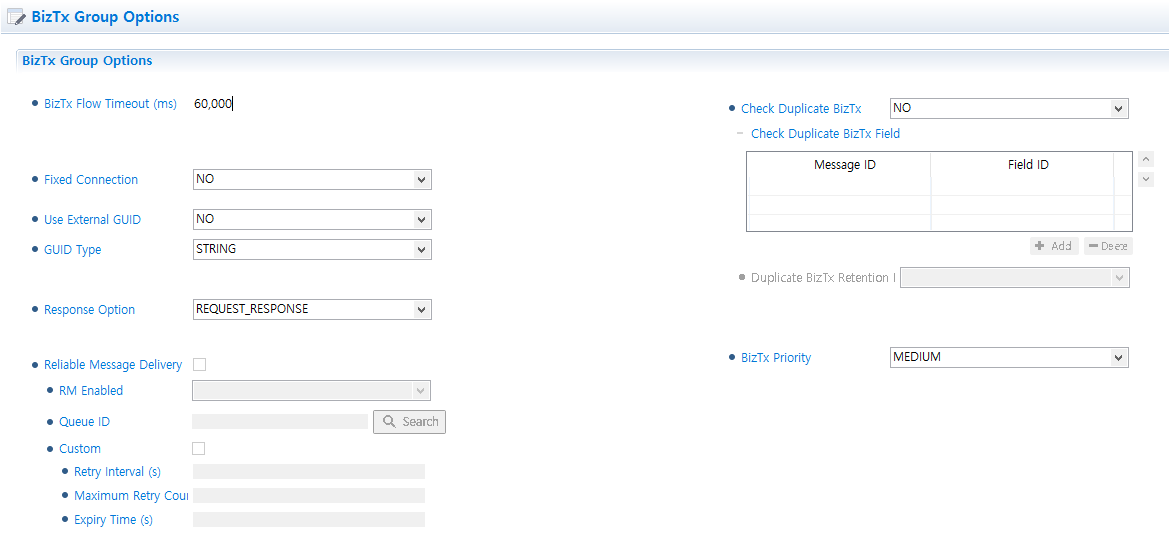 Configuring a BizTx Group - [BizTx Group Options]
Item Value BizTx Flow Timeout (ms)
60000
Response Option
REQUEST_RESPONSE
BizTx Priority
MEDIUM
-
[Parsing Definition] Tab
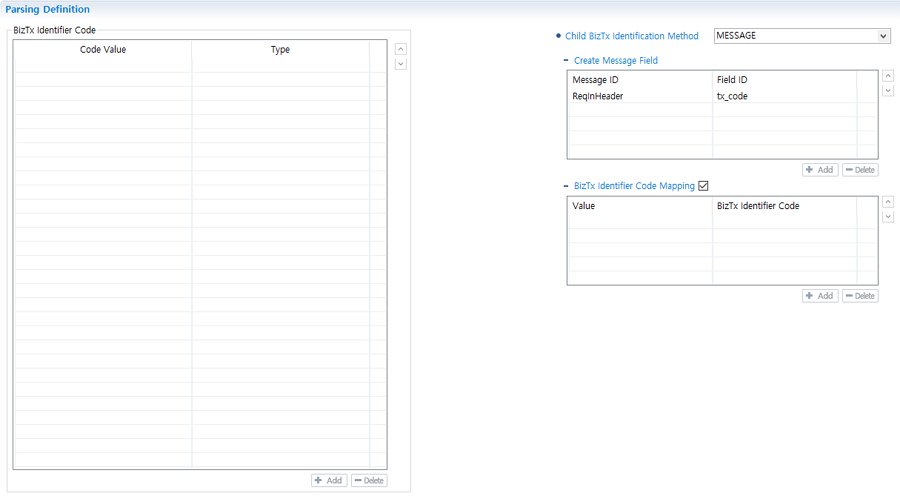 Configuring a BizTx Group - [Parsing Definition]
Item Value Child BizTx Identification Method
MESSAGE
Message ID
ReqInHeader
Field ID
tx_code
5.2. Configuring a Transaction
The following is an example of configuring a transaction. The [Parsing Options] tab is not configured in this example.
-
[BizTx Info] Tab
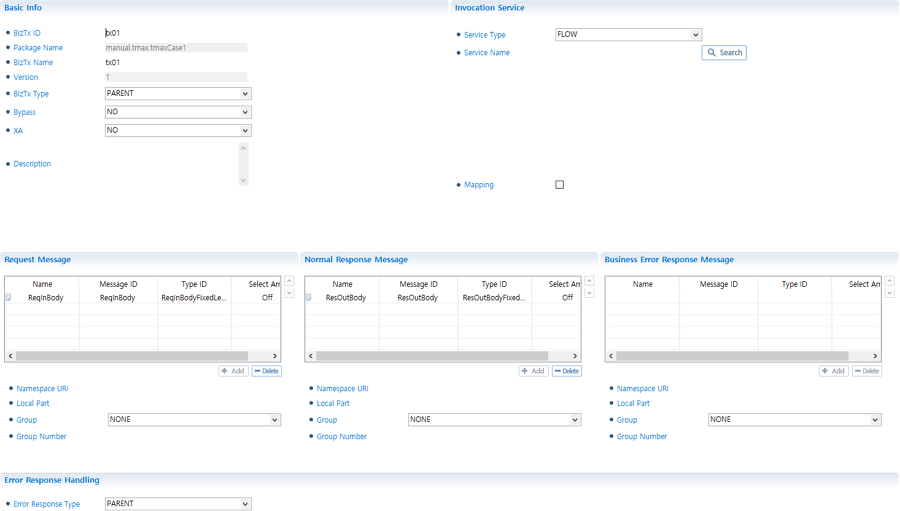 Configuring a BizTx - [BizTx Info]
 Configuring a BizTx - [BizTx Info] - Invocation Service
Item Value Request Message
ReqInBody
Normal Response Message
ResOutBody
Bypass
NO
XA
NO
Error Response Type
PARENT
Service Type
FLOW
Service Name
TmaxFlow (TmaxFlow_Message_STRT_Event_697118) (randomly generated)
-
[BizTx Options] Tab
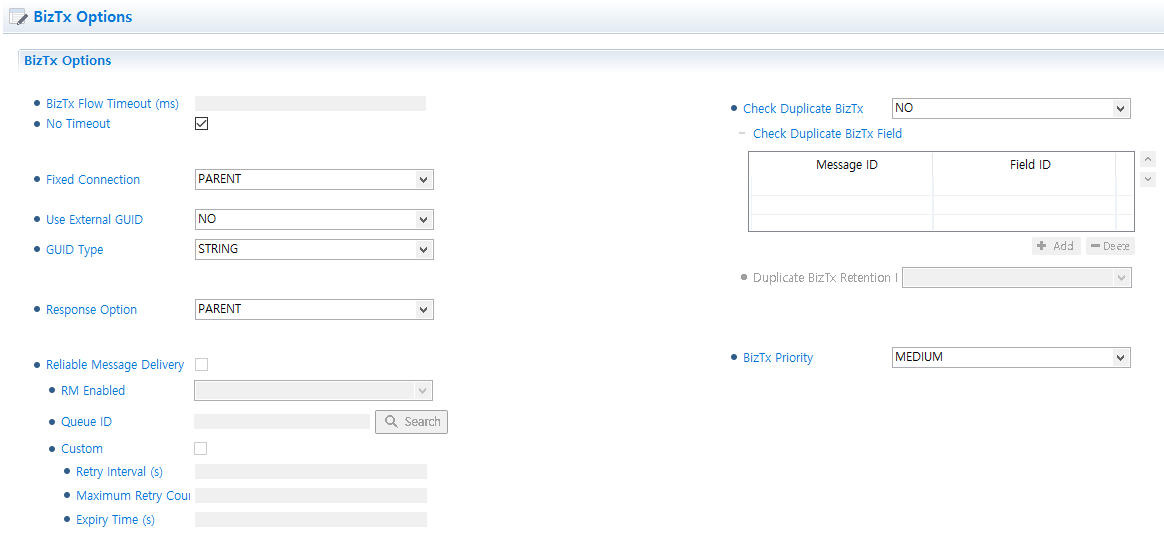 Configuring a BizTx - [BizTx Options]
Item Value BizTx Flow Timeout (ms)
None
No Timeout
Yes
Response Option
PARENT
BizTx Priority
MEDIUM
-
[Parsing Info] Tab
 Configuring a BizTx - [Parsing Definition]
-
BizTx Identification Code
Item Value Code Value
A001
Type
REQUEST
-
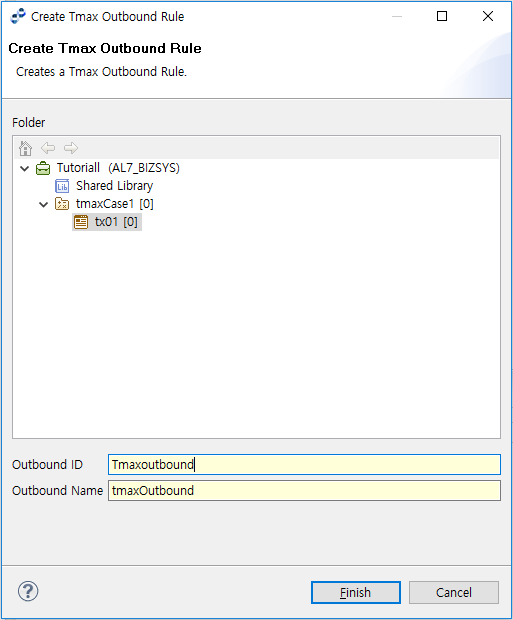
5.3. Configuring an Outbound Rule
The following is an example of configuring an outbound rule.
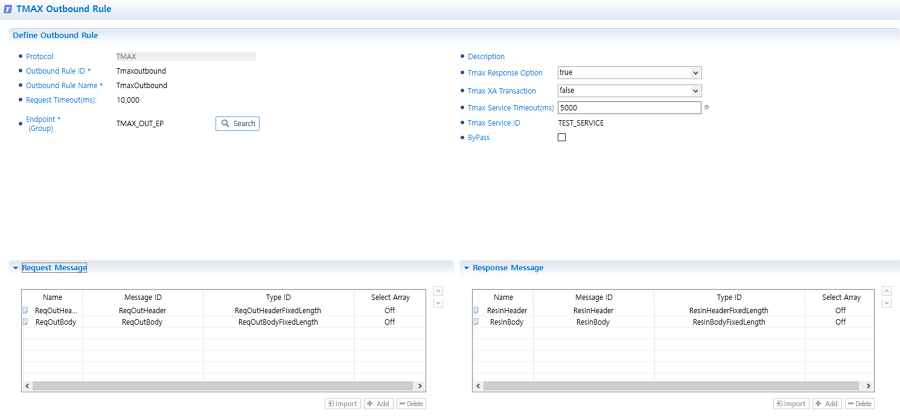
| Item | Value |
|---|---|
Request Timeout (ms) |
10000 |
Endpoint (Group) |
TMAX_OUT_EP |
Tmax Response Option |
true |
Tmax XA Transaction |
false |
Tmax Service Timeout (ms) |
5000 |
Tmax Service ID |
TEST_SERVICE |
Request Message |
ReqOutHeader ReqOutBody |
Normal Response Message |
ResInHeader ResInBody |
5.4. Configuring a Flow
Configure a flow as follows:
-
Create a flow diagram
-
Configure variables
-
Configure message events
-
Configure outbound service call
-
Configure response service call
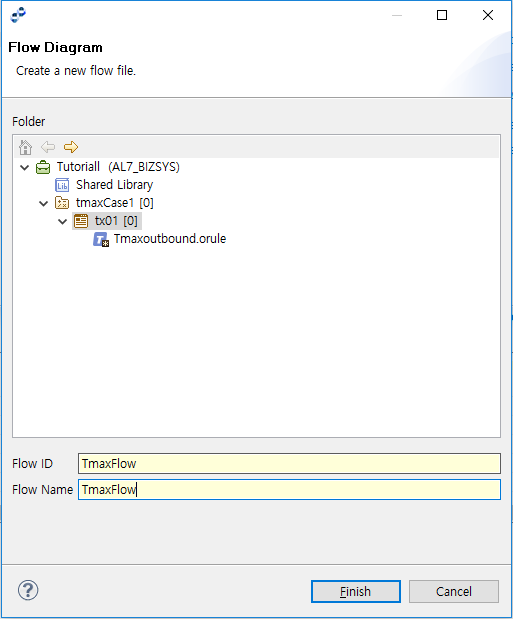
Flow Diagram
The following is an example of creating a service flow diagram.

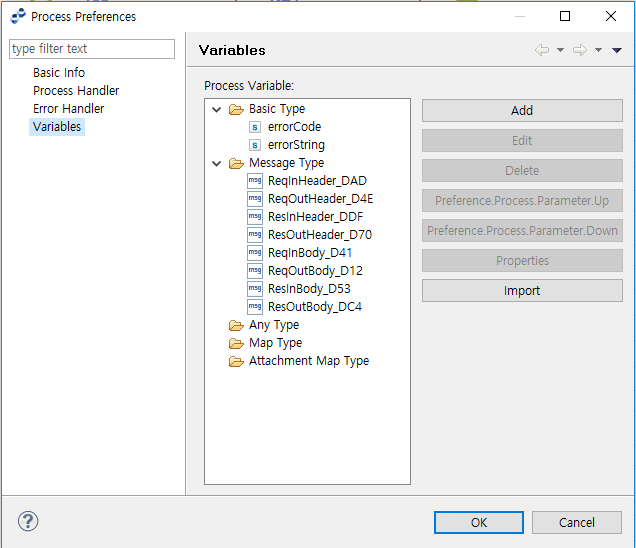
Variables
To set variables, click [Properties] from the context menu of the Flow editor.
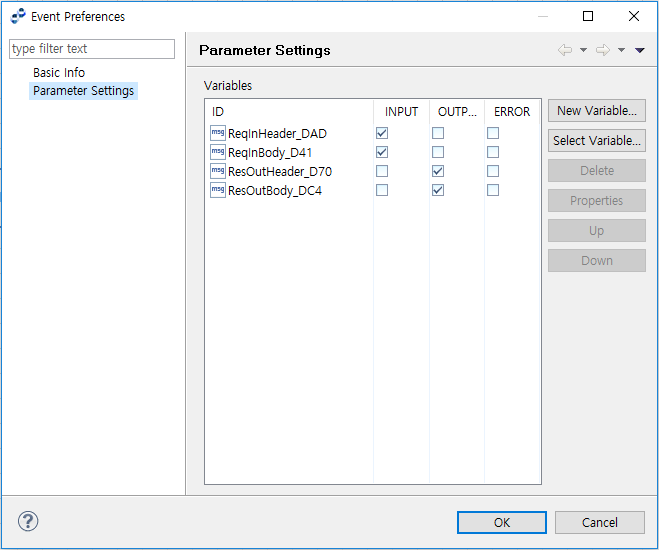
Message Event
Click [Properties] from the context menu of a Message Event in the Flow editor, and then click [Parameter Properties] from the Event Preferences window.
Outbound Call
Configure an outbound call as follows:
-
Select [Properties] from the Tmax Activity (Outbound Call) context menu of the flow editor. Click [Parameter Settings] in the Activity Preferences window.
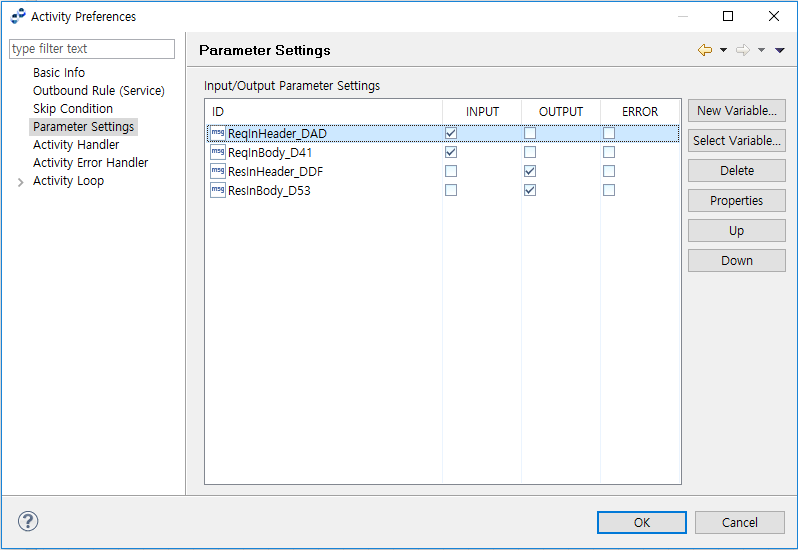 Outbound Call - Parameter Settings
 -
Click [Outbound Rule (Service)] from the Activity Preferences window.
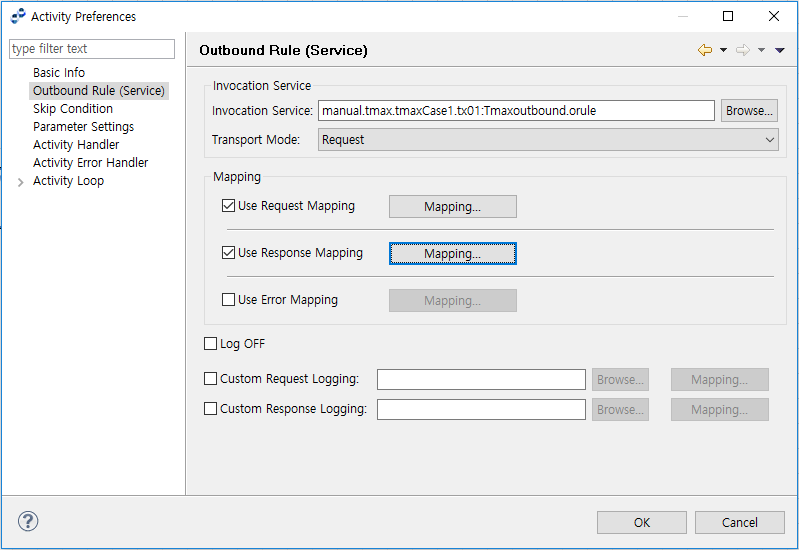 Outbound Call - Outbound Rule (Service)
 -
Select the 'Use Request Mapping' and 'Use Response Mapping' checkboxes, and then click [Mapping] to create mappings.
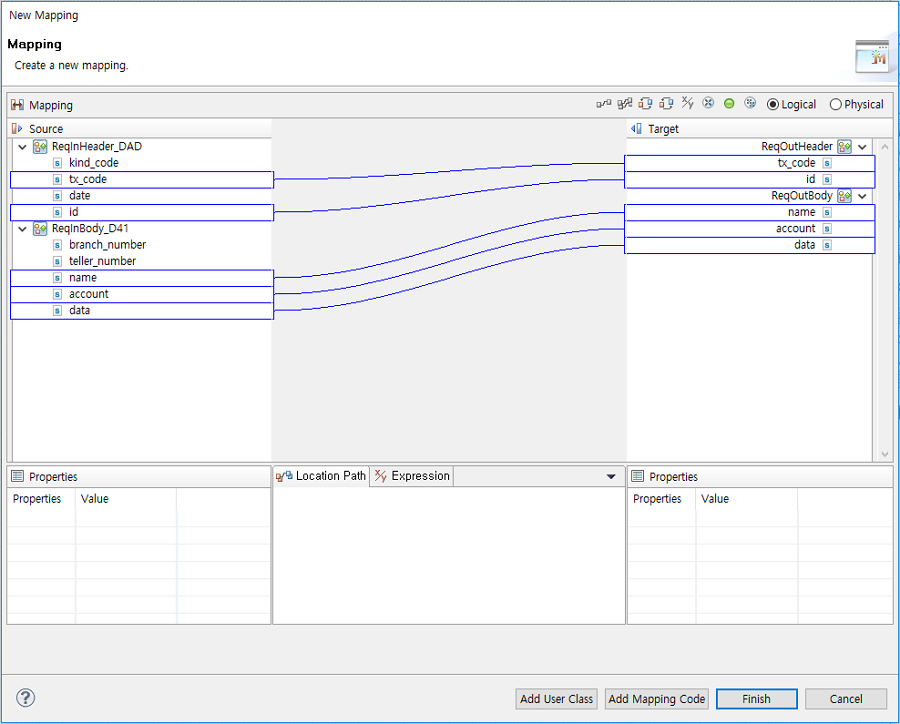 Outbound Call - Outbound Rule (Service) - Request Mapping
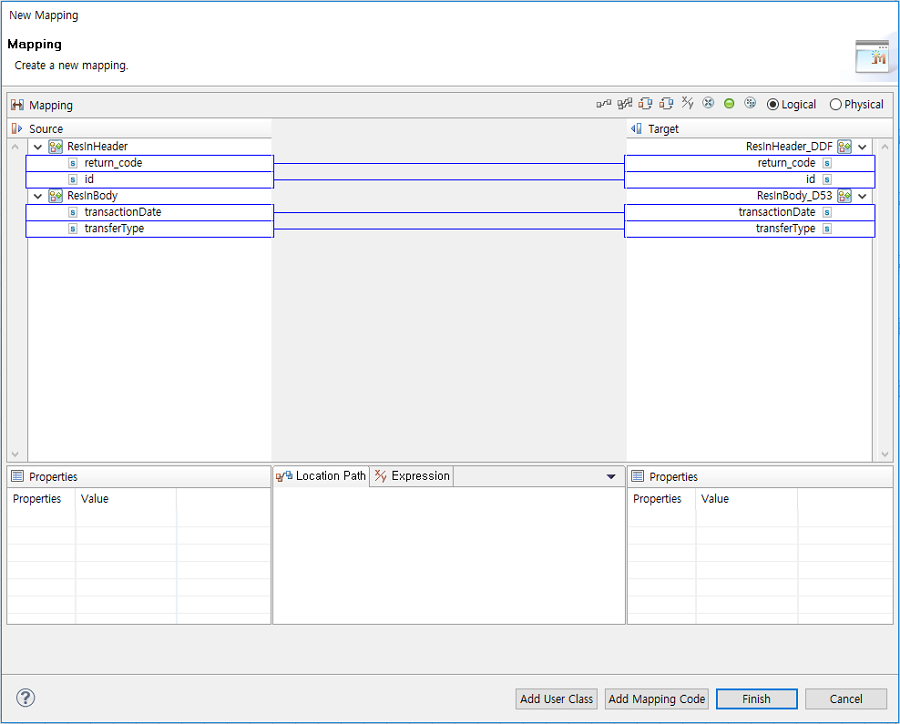 Outbound Call - Outbound Rule (Service) - Response Mapping
Response Call
Configure a response call as follows:
-
Select Properties from the Response Message Activity (Send Message) context menu of the flow editor. Click [Reply Message] in the Activity Preferences window.
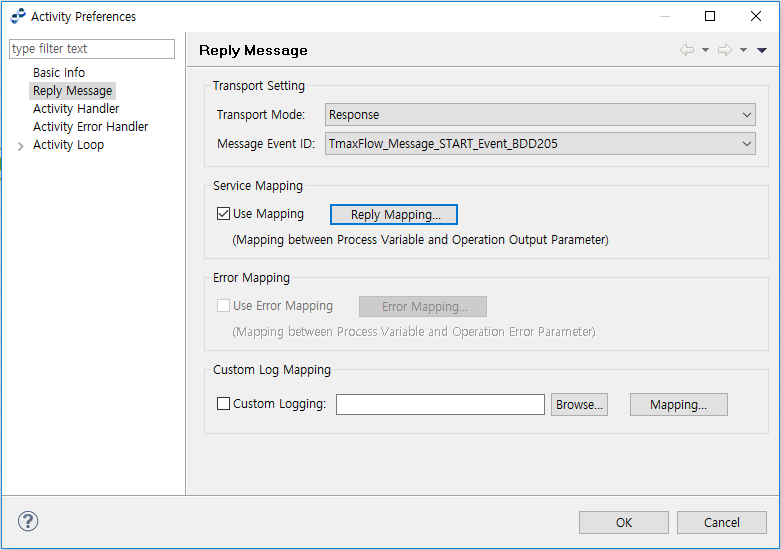 Reply Message
 -
Select the 'Use Mapping' checkbox, and then click [Reply Mapping…] to create mapping.
Click [Add Source] from the context menu of the Source section in the Mapping screen, and then select ReqInHeader, ResInHeader, and ResInBody for the mappings.
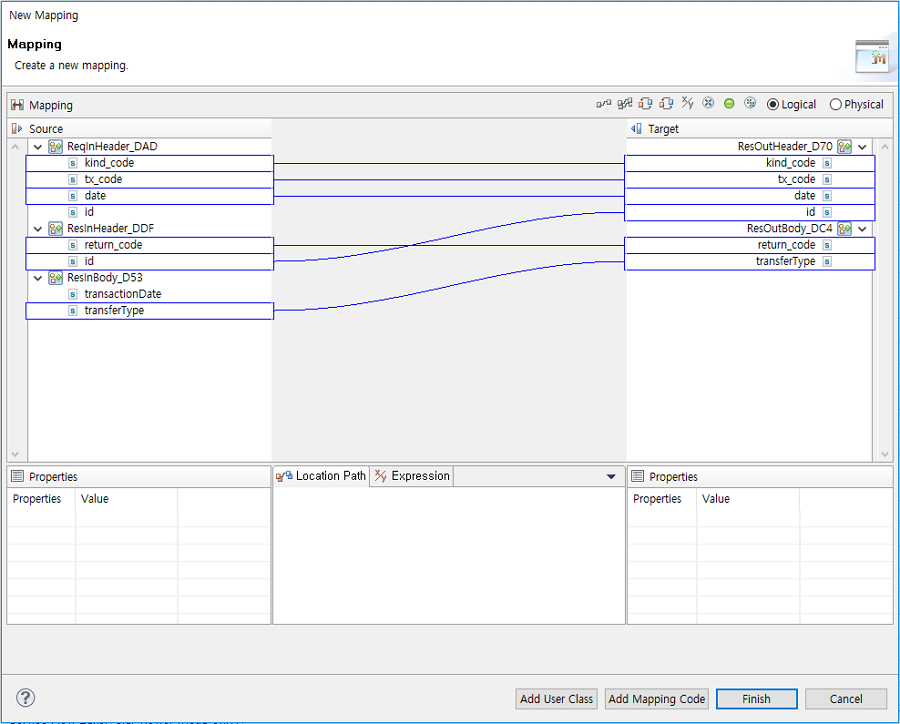 Reply Message - Service Mapping - Reply Mapping
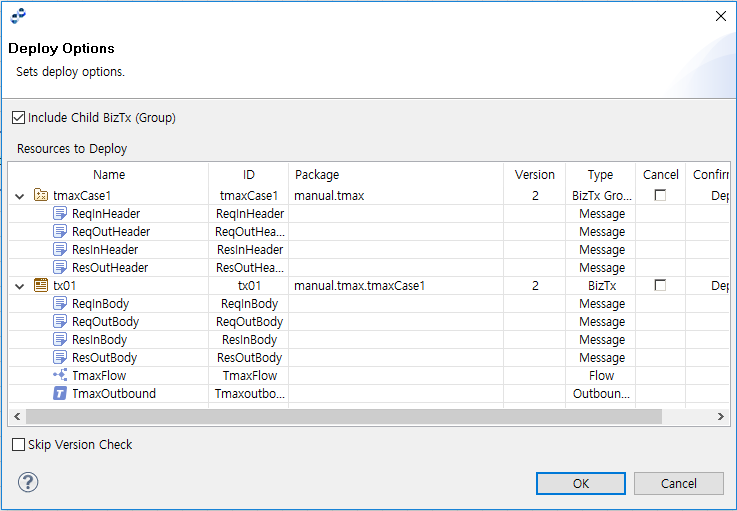
6. Deployment
Use the following Deploy Options window to configure deployment options for a BizTx Group/BizTx. For more information, refer to AnyLink Studio Guide.
7. Testing a BizTx
7.1. Client Program
To use the Tmax client program, the user needs Tmax libraries (webt.jar and jclient.jar).
<TmaxClient.java>
package manual.tmax;

import tmax.webt.WebtAttribute;
import tmax.webt.WebtBuffer;
import tmax.webt.WebtConnection;
import tmax.webt.io.WebtStringBuffer;

public class TmaxClient {
    String host;
    int port;
    String serviceName;

    public TmaxClient(String host, int port, String serviceName) {
        this.host = host;
        this.port = port;
        this.serviceName = serviceName;
    }

    public String call(String inputMessage) {
        WebtBuffer sndBuffer = makeWebtBuffer(inputMessage);
        WebtConnection connection = new WebtConnection(host, port);
        WebtBuffer recvBuffer = connection.tpcall(sndBuffer, serviceName, WebtAttribute.TPNOFLAGS);
        return new String(recvBuffer.getBytes());
    }

    public WebtBuffer makeWebtBuffer(String message) {
        WebtBuffer webtBuffer = new WebtStringBuffer();
        webtBuffer.setString(message);
        return webtBuffer;
    }

    public static void main(String[] args) {
        try {
            TmaxClient client = new TmaxClient("192.168.1.87", 7282, "SENDCLNT");

            String sendMessage = "AAAAA00120160701KIMKILSU  B01P1034MOONYOU   KNIGHT      THISISSAMPLEDATA                                  ";

            System.out.println("SEND:" + sendMessage);
            String recvMessage = client.call(sendMessage);
            System.out.println("RECV:" + recvMessage);
        } catch (Exception e) {
            e.printStackTrace();
        }
    }

}
7.2. Tmax Environment Configuration and Server Program
For information about Tmax environment configuration and program build, refer to the relevant Tmax guide.
-
Configuring a Tmax Java gateway
*SERVICE SENDCLNT SVRNAME = jgw_t1toa1 *GATEWAY jgw_t1toa1 GWTYPE=JEUS_ASYNC, NODENAME="tmaxi7", PORTNO=8801, RGWADDR="192.168.14.106", RGWPORTNO=31000, CLOPT = "-r" -
Configuring a Tmax service
*SERVICE
TEST_SERVICE            SVRNAME = server_test
-
Tmax service program
<server_test.c>
#include <usrinc/atmi.h>
#include <stdio.h>
#include <string.h>

TEST_SERVICE(TPSVCINFO *msg)
{
        char *rcvbuf;
        char *recvData;

        recvData = (char *)tpalloc("STRING", NULL, msg->len + 1);
        memcpy(recvData, msg->data, msg->len);

        printf(" Data recv = %s\n", recvData);
        printf(" Data Length = %d\n", msg->len);

        rcvbuf=(char *)tpalloc("STRING", NULL, 1024);
        if(rcvbuf==NULL) {
                printf("tpalloc failed (rcvbuf) : %s\n", tpstrerror(tperrno));
                tpreturn(TPFAIL, -1, NULL, 0, 0);
        }

        strcpy(rcvbuf, "1000KIMKILSU  20160720SP01");
        printf(" Data send = %s\n", rcvbuf);

        tpfree(recvData);

        tpreturn( TPSUCCESS, 0, rcvbuf, 0 , 0 );
}
7.3. Running a Test
-
Client results
SEND:AAAAA00120160701KIMKILSU  B01P1034MOONYOU   KNIGHT      THISISSAMPLEDATA
[2016.08.03 19:42:46:819] (main)webt.properties file is not found
[2016.08.03 19:42:46:857] (main)[WEBT-1109][000000] start to connect server 192.168.1.87:7282 for 20000 msec
[2016.08.03 19:42:46:877] (main)[WEBT-1102][000000] connection established socket(192.168.1.87:7282)
[2016.08.03 19:42:46:880] (main)[WEBT-1111][000000] socket list add tmax.webt.io.WebtSocket@5901d85a
[2016.08.03 19:42:46:882] (main)[WEBT-1037][000000] buffer transmitted
[_tpstart(0x0):seq(0):msgtype(1):cd(1):errcode(0):rcode(0):asize(76):reserved(0x0):
magic(0x270f)][xid:00 00 00 00 : 00 00 00 00 : 00 00 00 00 : F
[2016.08.03 19:42:46:882] (main)[WEBT-1034][000000] receive start for 60000 msec
[2016.08.03 19:42:46:882] (main)[WEBT-1035][000000] buffer received [---(0x0):seq(0):
msgtype(1001):cd(8):errcode(0):rcode(16):asize(56):reserved(0x0):magic(0x270f)]
[xid:00 00 00 00 : 00 00 00 00 : 00 00 00 1e : F
[2016.08.03 19:42:46:882] (main)[WEBT-1041][000000] matching received.. seqno(0:0), type(1:1001)
[2016.08.03 19:42:46:883] (main)[WEBT-1042][000000] matching result.. seqno match = true, type match = true
[2016.08.03 19:42:46:883] (main)[WEBT-1305][000000] set maximum dialoge session size 8
[2016.08.03 19:42:46:883] (main)[WEBT-1003][000000] tmax session established.. tmax version [5.0.2.1]
[2016.08.03 19:42:46:883] (main)[WEBT-1005][000000] node count [1]
[2016.08.03 19:42:46:883] (main)[WEBT-1006][000000] rq count [0]
[2016.08.03 19:42:46:883] (main)[WEBT-1007][000000] topend product count [0]
[2016.08.03 19:42:46:884] (main)[WEBT-1056][000000] node registered [0:tmaxi7]
[2016.08.03 19:42:46:884] (main)[WEBT-1011][000000] compress threshold -1 byte
[2016.08.03 19:42:46:885] (main)[WEBT-1037][000000] buffer transmitted [SENDCLNT(0x0):
seq(1):msgtype(3):cd(0):errcode(0):rcode(0):asize(107):reserved(0x0):magic(0x270f)]
[xid:00 00 00 00 : 00 00 00 00 : 00 00 00 00 : F
[2016.08.03 19:42:46:885] (main)[WEBT-1034][000000] receive start for 30000 msec
[2016.08.03 19:42:46:935] (main)[WEBT-1035][000000] buffer received [---(0x0):seq(1):
msgtype(1003):cd(0):errcode(0):rcode(0):asize(1024):reserved(0x0):magic(0x270f)]
[xid:00 00 00 00 : 00 00 00 00 : 00 00 00 00 : F
[2016.08.03 19:42:46:935] (main)[WEBT-1041][000000] matching received..
seqno(1:1), type(3:1003)
[2016.08.03 19:42:46:936] (main)[WEBT-1042][000000] matching result..
seqno match = true, type match = true
RECV:AAAAA00120160701KIMKILSU  1000SP01
-
Server results (Tmax ulog)
 Data recv = A001KIMKILSU  MOONYOU   KNIGHT      THISISSAMPLEDATA
 Data Length = 86
 Data send = 1000KIMKILSU  20160720SP01