System
This chapter describes the functions and uses of the [System] menu, which is used to configure basic settings and a variety of resources of AnyLink.
1. Overview
The [System] menu is used to configure basic settings and set up resources.
The following describes each System menu. For more information about the function and usage of each menu, refer to the relevant section.
| Menu | Description |
|---|---|
Adds, updates, and deletes a Biz System or remote agent. |
|
Controls a number of servers in remote to reduce operating costs. |
|
Configures an adapter and adapter endpoints. |
|
Clusters [Adapter], [Endpoint Group], and [Endpoint] when a Biz System is configured with a server cluster. |
|
Configures connection information of message queues. |
|
Deploys AnyLink Studio or agent patch files to the remote agent. |
2. System
The [System] menu is used to manage Biz Systems. A Biz System is the basic logical element in AnyLink WebAdmin and Studio. Thus, it has to be created in WebAdmin before using any AnyLink function or resource.
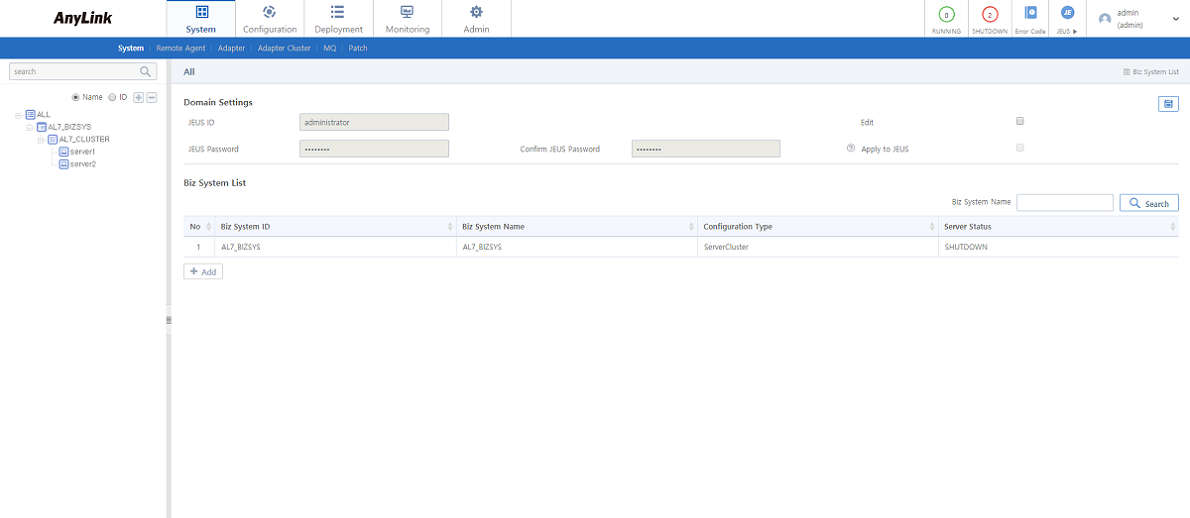
To go to the System screen, click [System] > [System] or click a server or cluster in the navigation pane. This screen consists of Domain Settings and Biz System List.
2.1. Domain Settings
It is necessary to integrate AnyLink with JEUS before use because AnyLink runs based on JEUS. This section describes how to connect to the JEUS server in AnyLink.
Entering a JEUS ID and password will automatically connect AnyLink to the JEUS server. Note that if this function is used incorrectly, the connection to JEUS is ended or the entire system can have an issue.
To change JEUS password, select 'Edit'. AnyLink must be connected to JEUS in advance. enter a new password in 'JEUS Password' and 'Confirm JEUS Password' and then click ![]() (save). To apply the new password to JEUS, select 'Apply to JEUS'.
(save). To apply the new password to JEUS, select 'Apply to JEUS'.

| Item | Description |
|---|---|
Edit |
Enables to change JEUS password. |
JEUS Password |
New JEUS password. |
Confirm JEUS Password |
New JEUS password for confirmation. |
Apply to JEUS |
Option to apply the new password to JEUS.
Since an invalid ID or password is not applied, check JEUS ID and password if there are no data in Domain Settings. |
|
The JEUS password can be changed through AnyLink while it is connected to JEUS. It is not necessary to restart JEUS to log in to the server with the account information updated in AnyLink. In some cases, however, it might cause an error in a system integrated with JEUS. |
2.2. Biz System List
In AnyLink, all resources including BizTxs, adapters, and endpoints are managed through Biz Systems. Therefore, before using AnyLink, a Biz System must be created first. A Biz System processes an incoming request received from an inbound adapter within a service flow and then displays the result using an outbound adapter.
To modify Biz System information, click the Biz System from Biz System List. This opens Biz System Details ([System] - [System] - Biz System Details) where you can modify the information. For detailed information, refer to "Biz System Details".
To add a Biz System, click [Add]. For detailed information, refer to "Adding a Biz System".

-
Biz System List
Item Description Biz System ID
Biz System ID.
Biz System Name
Biz System name.
Configuration Type
Biz System’s configuration type.
-
Server
-
ServerCluster
Server Status
Server Status.
-
FAILED: Failed to run a server.
-
RUNNING: Started a server and the server is currently running.
-
SHUTDOWN: Not started a server yet or stopped the server.
-
STANDBY: Started a server and the server is in standby status.
-
SUSPENED: Stopped all deployed applications on the server so the applications can no longer provide service.
-
UNCERTAIN: Uncertain status because the server booting is not completed.
-
OTHER: Other status.
-
Biz System Details
To go to Biz System Details, click [System] > [System] and then click a Biz System in the navigation pane or Biz System List ([System] - [System] - Biz System List).
To edit a Biz System, modify the information and then click ![]() (save). For detailed information about each item, refer to "Adding a Biz System". To delete a Biz System, click [Delete] from the drop-down menu of
(save). For detailed information about each item, refer to "Adding a Biz System". To delete a Biz System, click [Delete] from the drop-down menu of ![]() (menu). For detailed information, refer to "Deleting a Biz System".
(menu). For detailed information, refer to "Deleting a Biz System".

|
An error may occur if a business system is updated while the system is in use. Therefore, the user must consider how the changes would affect the overall system operation before updating the business system. |
Adding a Biz System
Since the list displayed in Biz System List ([System] - [System] - Biz System List) is about servers or server clusters that are managed in JEUS, they must have been added to JEUS first before using them in AnyLink.
|
It is possible to add and modify servers or server clusters for a Biz System only through JEUS WebAdmin. A Biz System can only have one server or one server cluster. If multiple servers are to process the same job, use a server cluster. |
To add a Biz System, click [Add] below Biz System List ([System] - [System] - Biz System List). This opens the Add Biz System screen. Enter basic information and then click [Save].

-
Basic Settings (*: required items)
Item Description Biz System ID*
Unique Biz System ID.
Only allows alphanumeric, hyphen, and underscore characters with a length of 3-30.
Biz System Name*
Biz System name.
Only allows alphanumeric, hyphen, and underscore characters with a length of 3-30.
Configuration Type*
Option to configure a Biz System.
-
Server
-
Server Cluster
JEUS servers and server clusters are displayed for each configuration type. Each list can be managed in JEUS WebAdmin.
Server/Cluster List*
Either 'Server List' or 'Cluster list' depending on the value set in 'Configuration Type'.
-
Deleting a Biz System
To delete a Biz System, click [Delete] from the drop-down menu of ![]() (menu) in Biz System Details ([System] - [System] - Biz System Details). In the confirmation dialog box that opens, click [OK].
(menu) in Biz System Details ([System] - [System] - Biz System Details). In the confirmation dialog box that opens, click [OK].
|
A Biz System can only be deleted if it has no child node such as a Biz System, adapter, or transaction. |
3. Remote Agent
Remote agents are used to manage multiple servers remotely from a single location to reduce operating costs. For information about how to install a remote agent, refer to AnyLink Installation Guide.
Remote agents provided by protocols such as TCP, HTTP, and FTP are used to send messages from an external network to an internal network. Typically, they send files by using FILE endpoints. A binary patch file can be applied to a remote agent in the [Patch] menu. A remote agent can be added, edited, and deleted while the remote agent is in boot status.
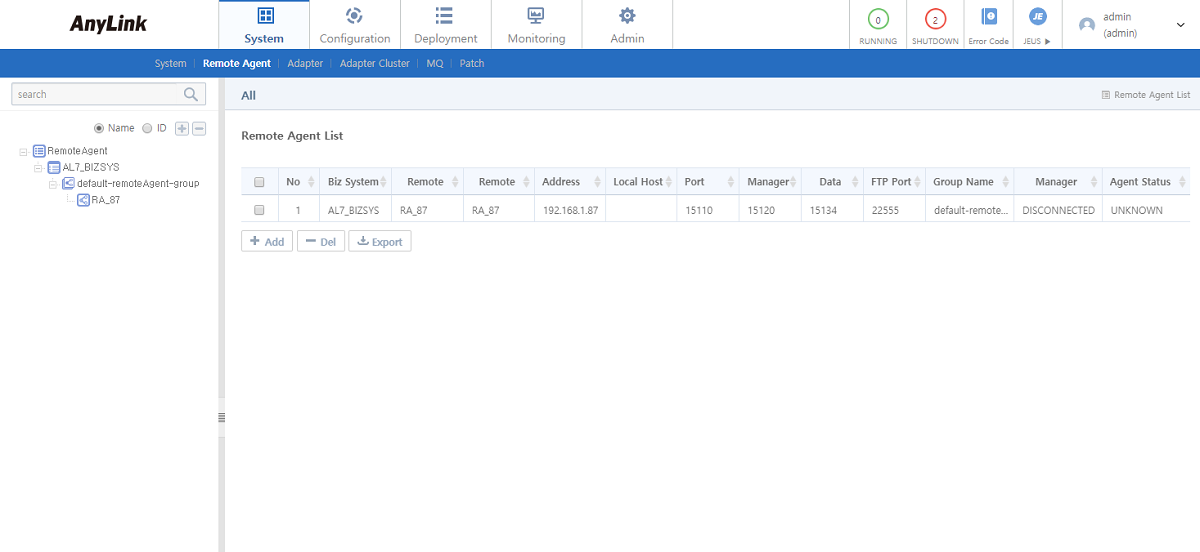
To go to the Remote Agent screen, click [System] > [Remote Agent] or click a group in the navigation pane.
To edit or delete a remote agent, click the remote agent from Remote Agent List. This opens Remote Agent Details ([System] - [Remote Agent] - Remote Agent Details) where you can edit or delete the remote agent. For detailed information, refer to "Remote Agent Details".
-
Remote Agent List
Item Description Biz System Name
Biz System name.
Remote Agent ID
Remote agent ID.
Remote Agent Name
Remote agent name.
Address
Remote agent address.
Local Host
Local host of the remote agent.
Port
Remote agent port.
Manager Port
Manager port used by the manager of the remote agent.
Data Port
File port used for file transmission.
FTP Port
File port used for FTP transmission.
Group Name
Group name of the remote agent.
Manager Status
Current status of the manager.
-
CONNECTED: The manager is normally running.
-
DISCONNECTED: The manager is shut down or cannot be connected due to network error.
Agent Status
Current status of the remote agent.
-
UNKNOWN: Unknown status because the manager is in 'DISCONNECTED' status.
-
RUNNING: The remote agent is running normally.
-
STOP: Ready to shut down the agent process by user’s request.
-
DOWN: The agent process is shut down. If the agent is terminated due to an unexpected error, it will be started automatically.
-
DISCONNECTED: The agent manager is shut down or cannot be connected due to network error.
-
-
Buttons
Button Description [Add]
Adds a remote agent. For more information, refer to "Adding a Remote Agent".
[Del]
Deletes a selected remote agent. For more information, refer to "Deleting a Remote Agent".
[Export]
Exports the remote agent list as a .csv file.
Remote Agent Details
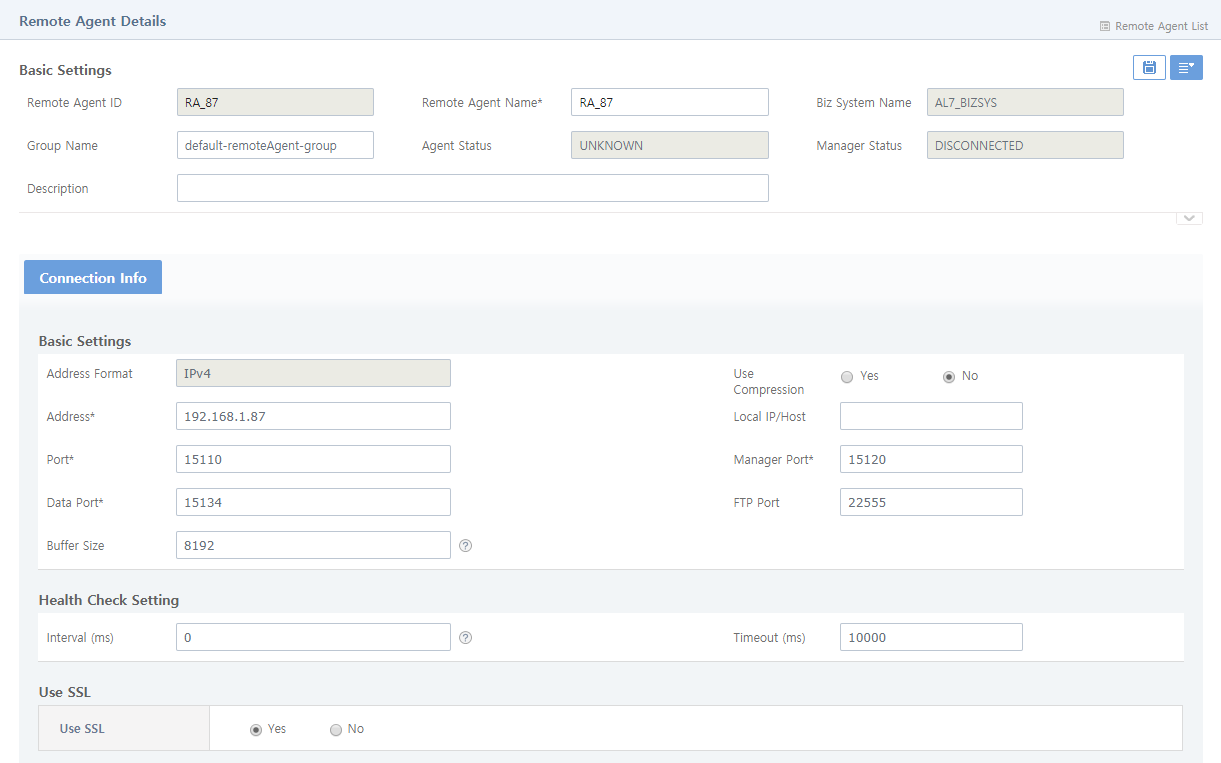
To go to Remote Agent Details, click [System] > [Remote Agent] and then click a remote agent in the navigation pane or Remote Agent List ([System] - Remote Agent List).
To edit a remote agent, modify the information and then click ![]() (save). For detailed information about each item, refer to "Adding a Remote Agent". To delete or control a remote agent, select an appropriate menu from the drop-down menu of
(save). For detailed information about each item, refer to "Adding a Remote Agent". To delete or control a remote agent, select an appropriate menu from the drop-down menu of ![]() (menu). For detailed information, refer to "Deleting a Remote Agent" and "Controlling Remote Agent Status".
(menu). For detailed information, refer to "Deleting a Remote Agent" and "Controlling Remote Agent Status".
Adding a Remote Agent
An agent opens a channel for endpoint management, and an agent manager manages information necessary for agents, agent process booting, and agent endpoints. After a manager starts, the manager starts agents and connects to the agents through the manager port.
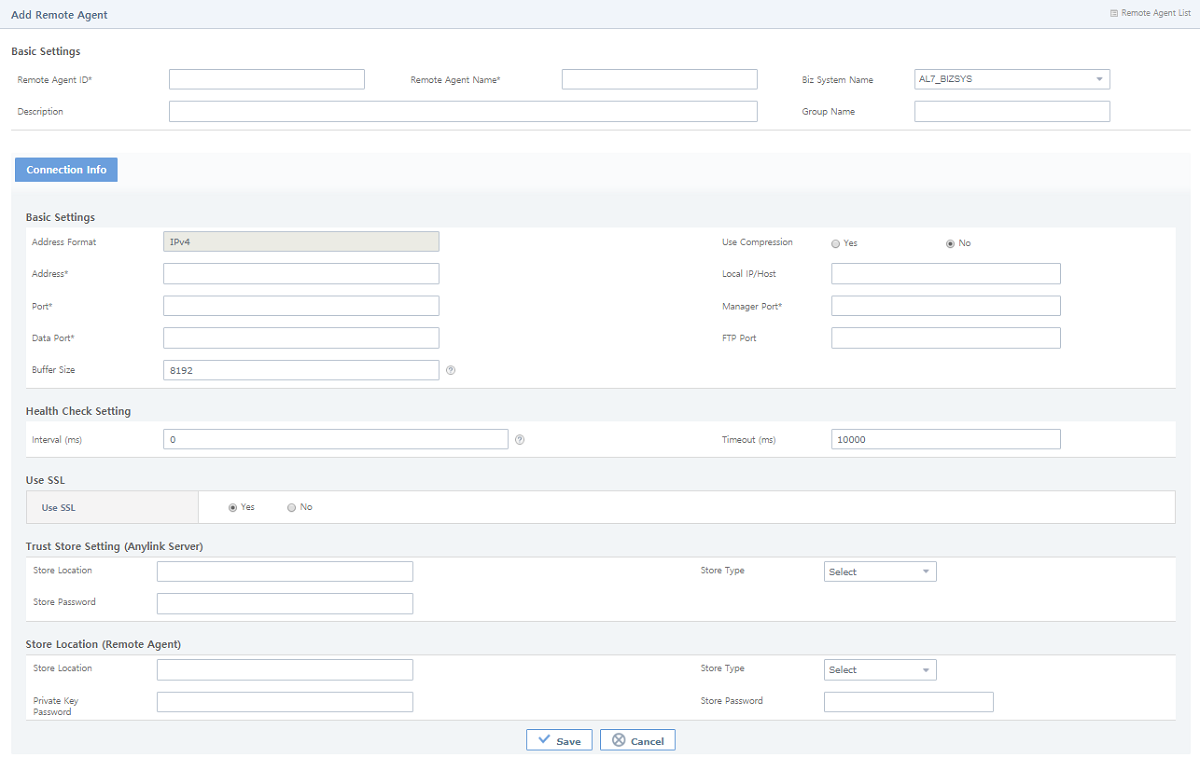
To add a remote agent, click [Add] below Remote Agent List ([System] - Remote Agent List). This opens the Add Remote Agent screen. Enter information to Basic Settings and the [Connection Info] section and then click [Save].
|
The information (Port, Data Port, and Manager Port) set in the [Connection Info] section must be identical to the information set during the remote agent installation. |
The following describes the Add Remote Agent screen.
-
Basic Settings (*: required items)
Item Description Remote Agent ID*
Unique remote agent ID.
Only allows alphanumeric, hyphen, and underscore characters with a length of 3-30.
Remote Agent Name*
Remote agent name.
Only allows alphanumeric, hyphen, and underscore characters with a length of 3-30.
Biz System Name
Name of the Biz System to use the remote agent.
Description
Remote agent information.
Group Name
Group that contains the remote agent.
The default value is 'default-remoteAgent-group'.
-
[Connection Info]
-
Basic Settings (*: required items)
Item Description Address Format
Remote agent address format. IPv4 is supported by default.
Use Compression
Option to compress a packet to send.
Address*
IP address of the remote agent.
The IP address must be entered in the format of 'xxx.xxx.xxx.xxx'. (e.g. 192.168.123.456)
Local IP/Host
Local IP address.
The IP address must be entered in the format of 'xxx.xxx.xxx.xxx'. (e.g. 192.168.123.456)
The default value is the value set in 'Address'.
Port*
Communication port of the remote agent.
Manager Port*
Manager port used by the manager of the remote agent.
Data Port*
File port used by RA TCP, RA HTTP, and RA FILE for file transmission.
FTP Port
File port used for FTP transmission.
Buffer Size
Packet unit when sending files using the remote agent.
(Unit: bytes, default value: 8192, minimum value: 8192)
-
Health Check Setting
Item Description Interval (ms)
Interval for checking the health of the remote agent. The value 0 specifies not to use the health check function.
Timeout (ms)
Time to wait for a response from the remote agent when executing a health check. It is recommended that the value is set lower than the interval value so that no health check will occur during a wait period.
-
Use SSL
Item Description Use SSL
Option to use SSL.
If you select 'Yes', you need to additionally set Trust Store Setting (Anylink Server) and Store Location (Remote Agent).
-
Trust Store Setting (Anylink Server)
Item Description Store Location
Store location.
Store Type
Store type.
-
JKS
-
PKCS12
Store Password
Trust store password.
-
-
Store Location (Remote Agent)
Item Description Store Location
Store location.
Store Type
Store type.
-
JKS
-
PKCS12
Private Key Password
Key store password.
Store Password
Trust store password.
-
-
Deleting a Remote Agent
There are following two methods to delete a remote agent.
-
Method 1
Select a checkbox for a remote agent to delete in Remote Agent List ([System] - Remote Agent List) and then click [Del]. In the confirmation dialog box that opens, click [OK].
-
Method 2
Click [Delete] from the drop-down menu of
 (menu) in Remote Agent Details ([System] - [Remote Agent] - Remote Agent Details). In the confirmation dialog box that opens, click [OK].
Controlling Remote Agent Status
To remotely control status of the remote agent, click [Start] or [Stop] from the drop-down menu of ![]() (menu) in Remote Agent Details ([System] - [Remote Agent] - Remote Agent Details).
(menu) in Remote Agent Details ([System] - [Remote Agent] - Remote Agent Details).
4. Adapter
Adapters enable input and output processing between a business system and other system components using a required protocol. It also allows users to use the library of an application that runs on system components.
After adding a Biz System in Biz System List ([System] - Biz System List), add an adapter, endpoint group, and endpoint by selecting the following submenus of [System] > [Adapter].
4.1. Adapter List
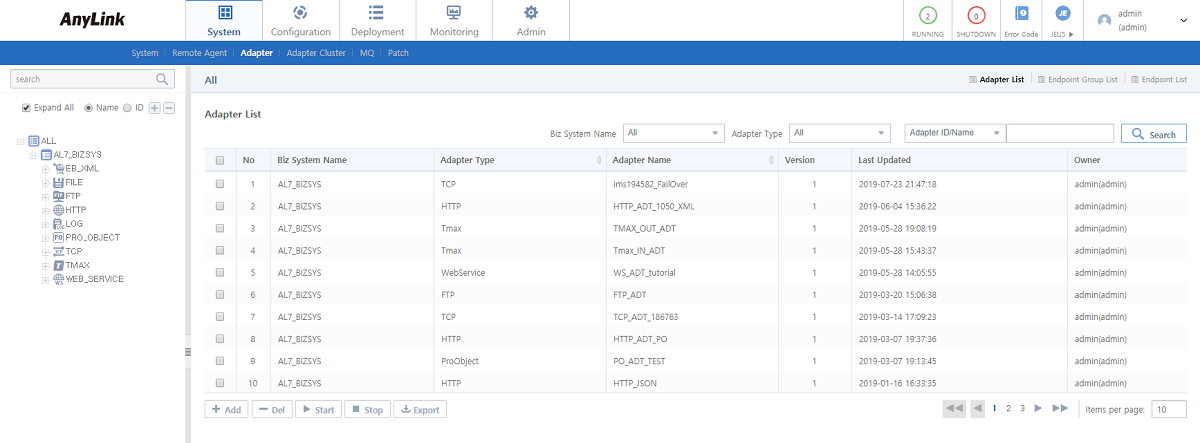
To go to the Adapter List screen, click [System] > [Adapter] or click an adapter in the navigation pane.
To edit or delete an adapter, click the adapter from Adapter List. This opens Adapter Details ([System] - [Adapter] - Adapter Details (1)) where you can edit or delete the adapter. For detailed information, refer to "Adapter Details".
-
Search Conditions
Enter the following search conditions and then click [Search].
Item Description Biz System Name
Biz system name.
Adapter Type
Adapter type.
Adapter ID/Name
Adapter ID or name (case-sensitive). You can search by using part of the name.
-
Adapter ID
-
Adapter Name
-
Adapter ID/Name
-
-
Adapter List
Item Description Biz System Name
Biz System name selected when adding the adapter.
Adapter Type
Adapter type selected when adding the adapter.
-
TCP
-
HTTP
-
Tmax
-
WebService
-
DB
-
FILE
-
Log
-
FTP
-
MQ
-
SAP
-
UDP
-
SMTP
-
WebDAV
-
Tuxedo
-
JMS
-
ebXML
-
ISO8583
-
ProObject
Adapter Name
Adapter name.
Version
Adapter version. Version is incremented by 1 each time deployment is performed.
Last Updated
Date when the adapter was last updated.
Owner
ID of a user who updated the adapter.
-
-
Buttons
Button Description [Add]
Adds an adapter. For more information, refer to "Adding an Adapter".
[Del]
Deletes a selected adapter. For more information, refer to "Deleting an Adapter".
[Start]
Starts a selected adapter’s endpoint.
[Stop]
Stops a selected adapter’s endpoint.
[Export]
Exports a adapter list as a .csv file.
|
This guide contains information on how to manage adapters. The detailed information about adapter types is not covered in this guide. Refer to each adapter guide for more information. |
Adapter Details
To go to Adapter Details, select an adapter in the navigation pane, or click [System] > [Adapter] and then click an adapter from Adapter List ([System] - [Adapter] - Adapter List).
To edit an adapter, modify the information and then click ![]() (save). For detailed information about each item, refer to "Adding an Adapter".
(save). For detailed information about each item, refer to "Adding an Adapter".
|
Editing an adapter in a running system may cause an issue. |
To delete an adapter, click [Delete] from the drop-down menu of ![]() (menu). For detailed information, refer to "Deleting an Adapter".
(menu). For detailed information, refer to "Deleting an Adapter".

To display more detailed adapter information, click [V] (open) at the right bottom of Basic Settings. To retrieve deployment history, click [Change History]. For more information about deployment history, refer to Deployment History.

The following describes each tab in Adapter Details. For information about each item in Basic Settings and the [Advanced Settings] tab, refer to "Adding an Adapter".
-
[Endpoint Group List] Tab
Displays endpoint groups added to the selected adapter. For information about endpoint group management, refer to Endpoint Group List.
 [System] - [Adapter] - Adapter Details - [Endpoint Group List] Tab
 -
[Endpoint List] Tab
Displays endpoints added to the selected adapter. For more information about endpoint management, refer to Endpoint List.
 [System] - [Adapter] - Adapter Details - [Endpoint List] Tab
Adding an Adapter
To add an adapter, click [Add] below Adapter List ([System] - [Adapter] - Adapter List). This opens the Add Adapter screen. Enter information and then click [Save].

-
Basic Settings (*: required items)
Item Description Adapter ID*
Unique adapter ID.
Only allows alphanumeric, hyphen, and underscore characters with a length of 3-30.
Adapter Name*
Adapter name.
Only allows alphanumeric, hyphen, and underscore characters with a length of 3-30.
Adapter Type*
Adapter type.
-
TCP
-
HTTP
-
Tmax
-
WebService
-
DB
-
FILE
-
FTP
-
MQ
-
SAP
-
UDP
-
SMTP
-
WEBDAV
-
Tuxedo
-
JMS
-
ebXML
-
ISO8583
-
ProObject
Description
Information about the adapter.
Biz System Name*
Biz System that the adapter will belong to.
Deployment Purpose
Deployment purpose. The purpose can be retrieved by selecting [Deployment] > [Deployment History] (refer to Deployment).
-
-
[Advanced Settings] Tab
Item Description Outbound Thread Pool ID
Select an outbound thread pool to use from the dropdown list.
-
[Connection Control] Tab
Controls client access to IP adapters. Only available for TCP adapters.
Item Description IP Control
-
OFF: Allow access of all clients. (Default value)
-
Allow: Allow access of clients that match the specified IP rule.
-
Deny: Deny access of clients that match the specified IP rule.
-
Deleting an Adapter
There are following two methods to delete an adapter.
-
Method 1
Select a checkbox for an adapter to delete in Adapter List ([System] - [Adapter] - Adapter List) and then click [Del]. In the confirmation dialog box that opens, click [OK].
-
Method 2
Click [Delete] from the drop-down menu of
 (menu) in Adapter Details ([System] - [Adapter] - Adapter Details (1)). In the confirmation dialog box that opens, click [OK].
|
An adapter can be deleted only if it has no child node such as an endpoint group or endpoint. Therefore, check if an adapter has a child node before deleting it. |
Log Adapter
When adding a Biz System, a Log adapter (default-log-adapter) and its endpoint (default-log-endpoint) are created automatically. The default-log-adapter Log adapter is unique.
To view and edit the Log adapter, select default-log-adapter in the navigation pane. This opens the Adapter Details where you can view the adapter. Edit the adapter in the [Trace Log] and [Transaction Log] tabs, which are available only for Log adapters. Connection Info can be set for the endpoint under the Log adapter. For information about basic information and the other tabs, refer to "Adapter Details".
-
[Trace Log] Tab
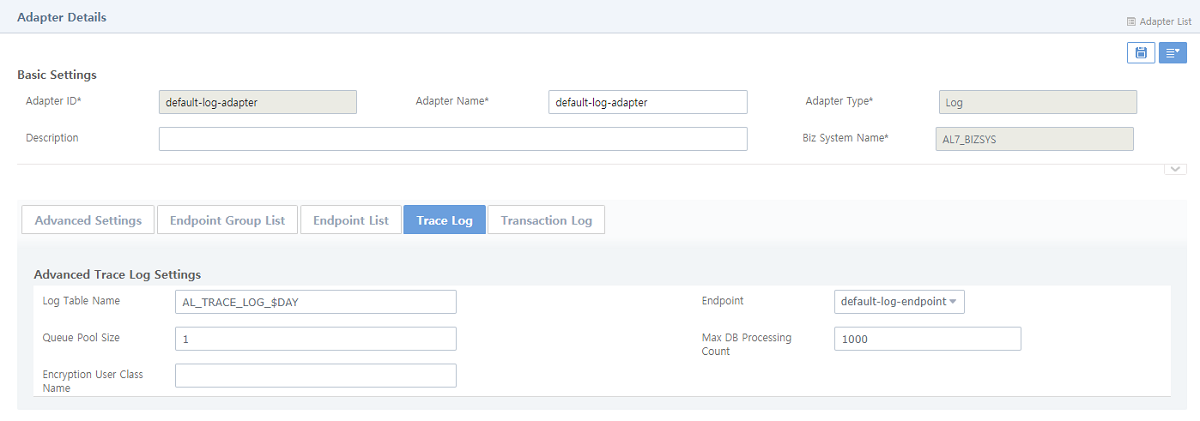 [System] - [Log Adapter] - [Adapter Details] - [Trace Log] Tab
Item Description Log Table Name
Trace log table name. (Default value: AL_TRACE_LOG_$DAY)
Endpoint
Endpoint of the Log adapter. (Default value: default-log-endpoint)
Queue Pool Size
Number of threads that process transaction log.
Max DB Processing Count
Maximum number of transactions processed per unit time. As many transactions as the maximum number are processed as a database batch job.
Encryption User Class Name
Name of the user class created for log encryption.
For information about how to create a user class, refer to AnyLink Studio Guide.
After creating the encryption user class, configure it by selecting [Configuration] > [Log Configuration]. For more information, refer to Log Configuration.
-
[Transaction Log] Tab
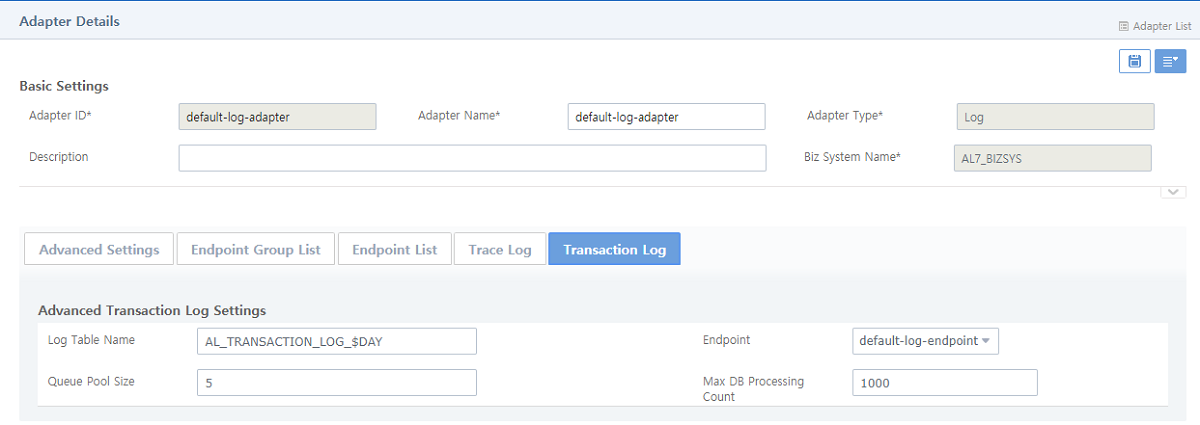 [System] - [Log Adapter] - [Adapter Details] - [Transaction Log] Tab
Item Description Log Table Name
Transaction log table name. (Default value: AL_TRANSACTION_LOG_$DAY)
Endpoint
Endpoint of the Log adapter. (Default value: default-log-endpoint)
Queue Pool Size
Number of threads that process transaction log.
Max DB Processing Count
Maximum number of transactions processed per unit time. As many transactions as the maximum number are processed as a database batch job.
4.2. Endpoint Group List
Endpoint groups are used to manage multiple endpoints together, as a management unit. Unlike an endpoint that cannot have a child element, an endpoint group can have multiple endpoints to manage them as its child element.
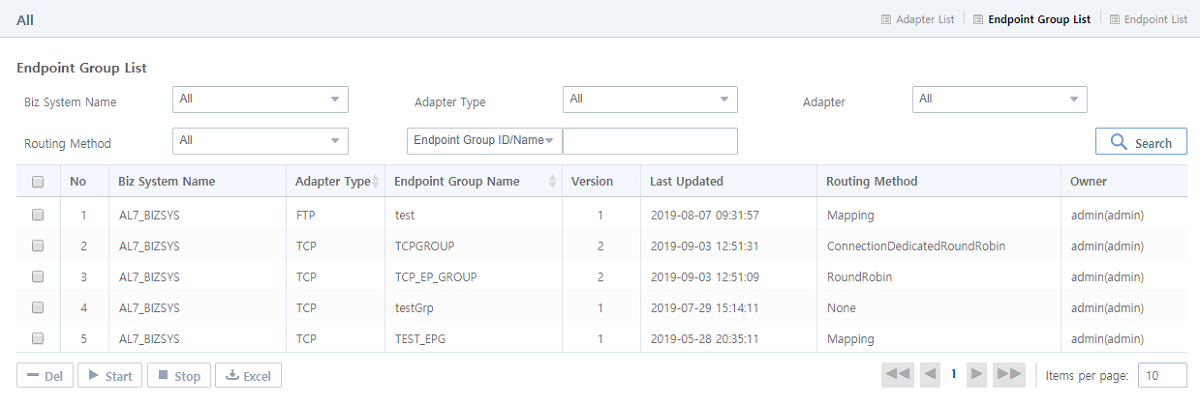
To go to the Endpoint Group List screen, click [System] > [Adapter] > Endpoint Group List.
To edit or delete an endpoint group, click the endpoint group from Endpoint Group List. This opens Endpoint Group Details ([System] - [Adapter] - Endpoint Group Details) where you can edit or delete the endpoint group. For detailed information, refer to "Endpoint Group Details".
-
Search Conditions
Enter the following search conditions and then click [Search].
Item Description Biz System Name
Biz system name.
Adapter Type
Adapter type.
Adapter
Adapter.
Routing Method
Routing method for endpoint allocation.
Endpoint Group ID/Name
Endpoint group ID or name (case-sensitive). You can search by using part of the name.
-
Endpoint Group ID
-
Endpoint Group Name
-
Endpoint Group ID/Name
-
-
Endpoint Group List
Item Description Biz System Name
Biz System where the endpoint group is registered.
Adapter Type
Adapter type of the endpoint group.
-
TCP
-
HTTP
-
Tmax
-
DB
-
FILE
-
Log
-
FTP
-
MQ
-
SAP
-
UDP
-
SMTP
-
WebDAV
-
Tuxedo
-
JMS
-
ebXML
-
ISO8583
-
ProObject
Endpoint Group Name
Endpoint group name.
Version
Endpoint group version.
Last Updated
Date when the endpoint group was last updated.
Routing Method
Methods that selects and allocates an endpoint included in the endpoint group when the group receives a request.
-
None
-
RoundRobin
-
ConnectionDedicatedRoundRobin
-
AvailableConnectionRoundRobin
-
FewerRequest
-
Priority
-
Mapping
-
SessionKey
Owner
ID of a user who added or updated the endpoint group.
-
-
Buttons
Button Description [Del]
Deletes a selected endpoint group. For more information, refer to "Deleting an Endpoint Group".
[Start]
Starts a selected endpoint group’s endpoint.
[Stop]
Stops a selected endpoint group’s endpoint.
[Excel]
Exports the endpoint group list as a .csv file.
|
An endpoint or endpoint group must be added for an endpoint group in the Endpoint Group List tab. An endpoint group cannot be set for an endpoint in the Endpoint List tab. If no endpoint group is set for an endpoint, refer to "Adding an Endpoint". |
Endpoint Group Details
To go to Endpoint Group Details, select an endpoint group in the navigation pane, or click an endpoint group from Endpoint Group List ([System] - [Adapter] - Endpoint Group List).
To edit an endpoint group, modify the information and then click ![]() (save). For detailed information about each item, refer to "Adding an Endpoint Group".
(save). For detailed information about each item, refer to "Adding an Endpoint Group".
|
Editing an endpoint group in a running system may cause an issue. |
To delete an endpoint group, click [Delete] from the drop-down menu of ![]() (menu). For detailed information, refer to "Deleting an Endpoint Group".
(menu). For detailed information, refer to "Deleting an Endpoint Group".
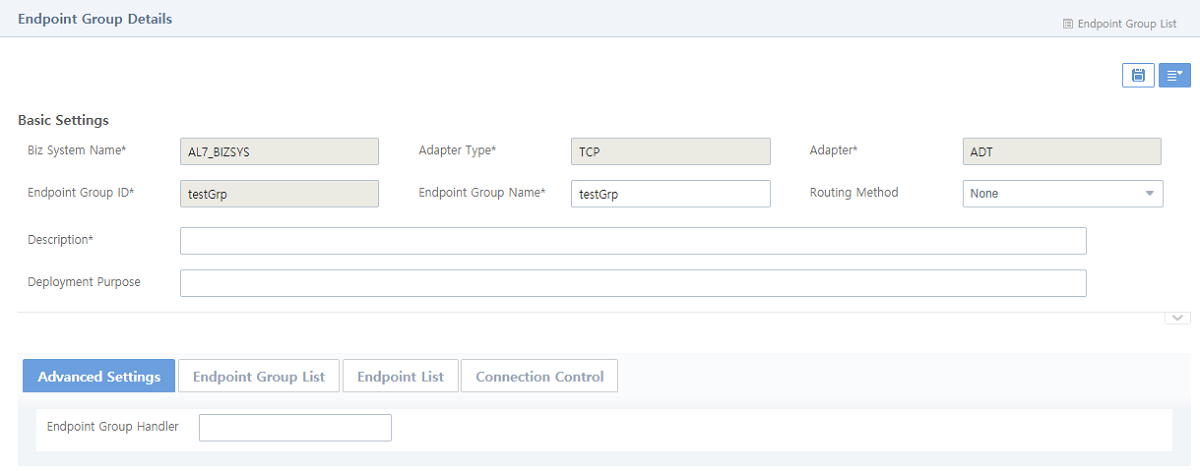
-
[Advanced Settings] Tab
Item Description Failback time (s)
Maximum time to try to connect to an endpoint before trying to route to another endpoint. (Default value: 60 seconds)
Only available when 'Routing Method' is set to 'RoundRobin'.
-
[Endpoint Group List] Tab
Displays and manages endpoint groups.
To add an endpoint group, click [Add]. For more information, refer to "Adding an Endpoint Group". To delete an endpoint group, click [Del]. For more information, refer to "Deleting an Endpoint Group". To start an endpoint in the group, click [Start]. To stop an endpoint in the group, click [Stop].
 [System] - [Adapter] - Endpoint Group Details - [Endpoint Group List] Tab
 -
[Endpoint List] Tab
Displays endpoints in an endpoint group.
To add an endpoint, click [Add]. For more information, refer to "Adding an Endpoint". To delete an endpoint group, click [Del]. For more information, refer to "Deleting an Endpoint". To start an endpoint, click [Start]. To stop an endpoint, click [Stop].
 [System] - [Adapter] - Endpoint Group Details - [Endpoint List] Tab
 -
[Connection Control] Tab
Configures endpoint connection information. Only available for TCP adapters.
 [System] - [Adapter] - Endpoint Group Details - [Connection Control] Tab
Item Description IP Control
Controls client access to endpoints. The setting for an endpoint group applies to the group’s subgroups and endpoints.
-
Parent: Inherit the parent setting. Only available for endpoint subgroups and endpoints.
-
OFF: Allow access of all clients. (Default value)
-
Allow: Allow access of clients that match the specified IP rule.
-
Deny: Deny access of clients that match the specified IP rule.
-
-
[Priority] Tab
Configures priorities of endpoints. Only available when 'Routing Method' in Basic Settings is set to 'Priority'.
 [System] - [Adapter] - Endpoint Group Details - [Priority] Tab
Item Description Failback time (s)
Maximum time to try to connect to an endpoint before trying to route to another endpoint. (Default value: 60 seconds)
If the routing to an endpoint with a highest priority is failed, it is tried to an endpoint with the next priority.
Endpoint List
Sets priorities of endpoints of the endpoint group.
-
Priority: Only allow a number.
-
Use: Option to apply a priority. If selected, the priority can be set.
-
-
[Mapping Setting] Tab
Configures mapping information of endpoints. Only available when 'Routing Method' in Basic Settings is set to 'Mapping'.
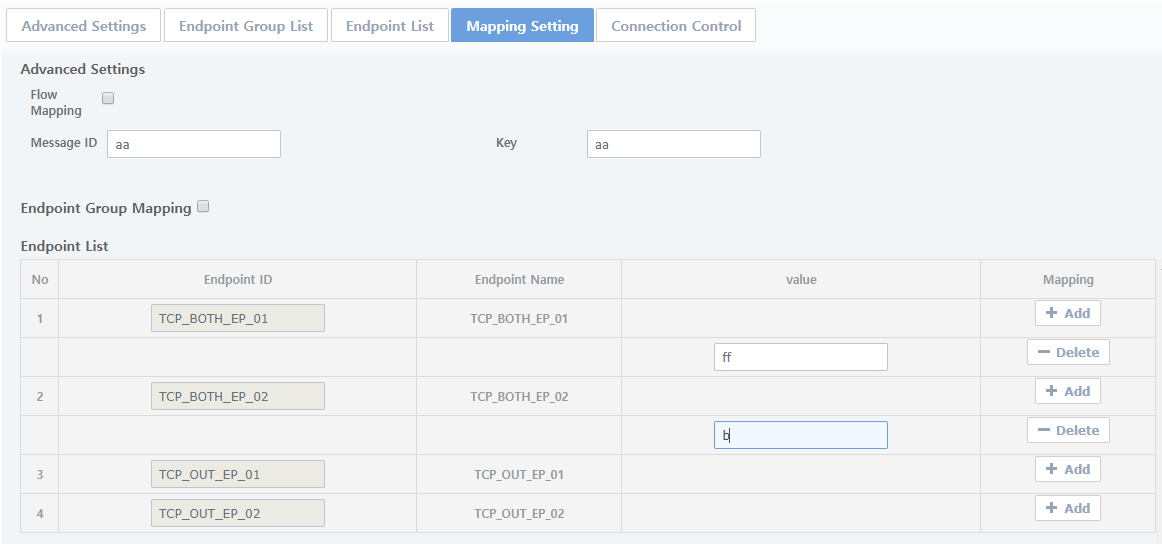 [System] - [Adapter] - Endpoint Group Details - [Mapping Setting] Tab
Item Description Flow Mapping
If selected, an endpoint to map is specified according to VALUE mapped by using 'Endpoint Routing' in Basic Info in the Activity Preference window for an outbound activity in AnyLink Studio. For more information, refer to "Service Flow Editor" in AnyLink Studio Guide.
Supports TCP, ProObject, and HTTP protocols.
Message ID, Key
Endpoint to map according to a field value (key) in the ID of an outbound request flow message that matches.
Endpoint Group Mapping
If selected, mapping information of endpoint groups and endpoints can be configured.
If not selected, mapping value of an endpoint to route to is set among sub-endpoints of the endpoint group. If there is no value to map, the AvailableConnectionRoundRobin routing method is used.
Endpoint List
-
value: Mapping value. If there is no value to map, this value is used. (Default value: an asterisk (*))
-
Mapping: To set a mapping value, click [Add]. Multiple values can be set.
-
Adding an Endpoint Group
To add an endpoint group, click [Add] in the [Endpoint Group List] tab in Adapter Details ([System] - [Adapter] - Adapter Details (1)) or Endpoint Group Details ([System] - [Adapter] - Endpoint Group Details). This opens the Add Endpoint Group screen. Enter information and then click [Save]. This opens the Endpoint Group Details screen where you can set relevant information in each tab. For more information, refer to "Endpoint Group Details".

-
Basic Settings (*: required items)
Item Description Biz System Name
Biz system that an endpoint will be added to. It is set automatically according to the settings of the adapter that contains the endpoint group. Therefore, it cannot be modified.
Adapter Type
Adapter type. This is set automatically according to the settings of the adapter that contains the endpoint group. Therefore, it cannot be changed.
Adapter Name
Adapter name. This is set automatically according to the settings for the adapter that contains the endpoint group. Therefore, it cannot be changed.
Endpoint Group ID*
Unique endpoint group ID.
Only allows alphanumeric, hyphen, and underscore characters with a length of 3-30.
Endpoint Group Name*
Endpoint group name.
Only allows alphanumeric, hyphen, and underscore characters with a length of 3-30.
Description
Description of the endpoint group. It is recommended to describe an endpoint group in detail because this field helps user identify each endpoint group.
Routing Method
Allocates an endpoint that will process a request that was sent to the endpoint group.
-
None: Used only for management. Allocation function is not supported.
-
ConnectionDedicatedRoundRobin: Allocates an endpoint only for a specified request. An endpoint is allocated based on the RoundRobin method only if an endpoint was not allocated for the first request.
-
FewerRequest: Allocates an endpoint that receives the least number of requests.
-
RoundRobin: Allocates an endpoint in a round robin fashion.
-
AvailableConnectionRoundRobin: Enabled only in TCP adapters. This method allocates requests to the endpoint that is set to Yes in Manage Connection. If a session is not valid when session connection is maintained, requests are allocated to another valid session.
-
Priority: Allocates an endpoint with the highest priority. If the routing is failed, it is tried to an endpoint with the next priority. Priorities of endpoints can be set in the [Priority] tab ([System] - [Adapter] - Endpoint Group Details - [Priority] Tab).
-
Mapping: Allocates an endpoint that match the value in a received message. Mapping information can be set in the [Mapping Setting] tab ([System] - [Adapter] - Endpoint Group Details - [Mapping Setting] Tab).
-
SessionKey: Allocates an endpoint that matches the session key.
Deployment Purpose
Deployment purpose. The purpose can be retrieved by selecting [Deployment] > [Deployment History] (refer to Deployment).
-
Deleting an Endpoint Group
There are following two methods to delete an endpoint group.
-
Method 1
Select a checkbox for an endpoint group to delete in Endpoint Group List ([System] - [Adapter] - Endpoint Group List) and then click [Del]. In the confirmation dialog box that opens, click [OK].
-
Method 2
Click [Delete] from the drop-down menu of
 (menu) in Endpoint Group Details ([System] - [Adapter] - Endpoint Group Details). In the confirmation dialog box that opens, click [OK].
|
An endpoint group cannot be deleted if it has a child resource such as an endpoint group or endpoint. |
4.3. Endpoint List
Each endpoint represents direction of data transmission to specific resources including BizTx or BizTx Group through the protocols of the adapter. An adapter can have multiple endpoints.
Endpoints can be grouped together, and an endpoint group can have another endpoint group as its child element. However, an endpoint cannot have another endpoint or endpoint group as its child element. Therefore, it is necessary to determine whether to configure an endpoint or endpoint group for adapters.
|
For more information about endpoint group, refer to Endpoint Group List. This section only describes how to configure an endpoint for adapter. |
To go to the Endpoint List screen, click [System] > [Adapter] > Endpoint List.
To edit or delete an endpoint, click the endpoint from Endpoint. This opens Endpoint Details ([System] - [Adapter] - Endpoint Details) where you can edit or delete the endpoint. For detailed information, refer to "Endpoint Details".
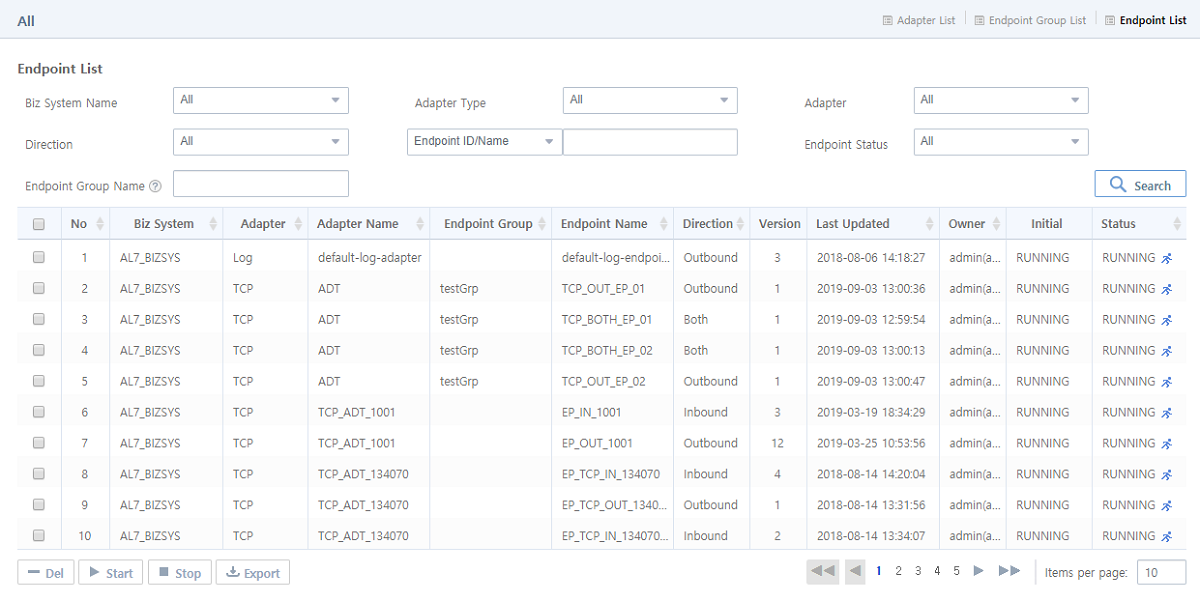
-
Search Conditions
Enter the following search conditions and then click [Search].
Item Description Biz System Name
Biz System that an endpoint belongs to.
Adapter Type
Adapter Type.
Adapter
Adapter that an endpoint belongs to.
Direction
Communication direction.
Endpoint ID/Name
Endpoint ID or name (case-sensitive).
-
Endpoint ID
-
Endpoint Name
-
Endpoint ID/Name
Endpoint Status
Endpoint status.
Endpoint Group Name
Endpoint group name.
When searching for an endpoint group, all parents endpoint groups are searched. All endpoints in the endpoint group are displayed.
-
-
Endpoint Group List
Item Description Biz System Name
Biz system that an endpoint belongs to.
Adapter Type
Adapter type.
-
TCP
-
HTTP
-
Tmax
-
WebService
-
DB
-
FILE
-
Log
-
FTP
-
MQ
-
SAP
-
UDP
-
SMTP
-
WebDAV
-
Tuxedo
-
JMS
-
ebXML
-
ISO8583
-
ProObject
Adapter Name
Adapter name.
Endpoint Group
Endpoint group name.
Endpoint Name
Endpoint name.
Direction
Communication direction.
-
Inbound
-
Outbound
-
Both
Version
Endpoint version.
Last Updated
Date when the endpoint was last updated.
Owner
User who added the endpoint.
Initial State at Boot
Initial boot value.
-
RUNNING: Endpoint is active at booting.
-
STOPPED: Endpoint is inactive at booting.
Status
Endpoint status.
-
RUNNING: Endpoint is active.
-
STOPPED: Endpoint is inactive.
-
-
Buttons
Button Description [Del]
Deletes a selected endpoint. For more information, refer to "Deleting an Endpoint".
[Start]
Starts a selected endpoint. The endpoint status becomes RUNNING. For more information, refer to "Controlling Endpoint Status".
[Stop]
Stops a selected endpoint. The endpoint status becomes STOPPED. For more information, refer to "Controlling Endpoint Status".
[Export]
Exports the endpoint list as a .csv file.
Endpoint Details
To go to Endpoint Details, select an endpoint in the navigation pane, or click an endpoint from Endpoint List ([System] - [Adapter] - Endpoint List).
To edit an endpoint, modify the information and then click ![]() (save). For detailed information about each item, refer to "Adding an Endpoint".
(save). For detailed information about each item, refer to "Adding an Endpoint".
|
Editing an endpoint in a running system may cause an issue. |
To delete or control an endpoint, select an appropriate menu from the drop-down menu of ![]() (menu). For detailed information, refer to "Deleting an Endpoint" and "Controlling Endpoint Status".
(menu). For detailed information, refer to "Deleting an Endpoint" and "Controlling Endpoint Status".
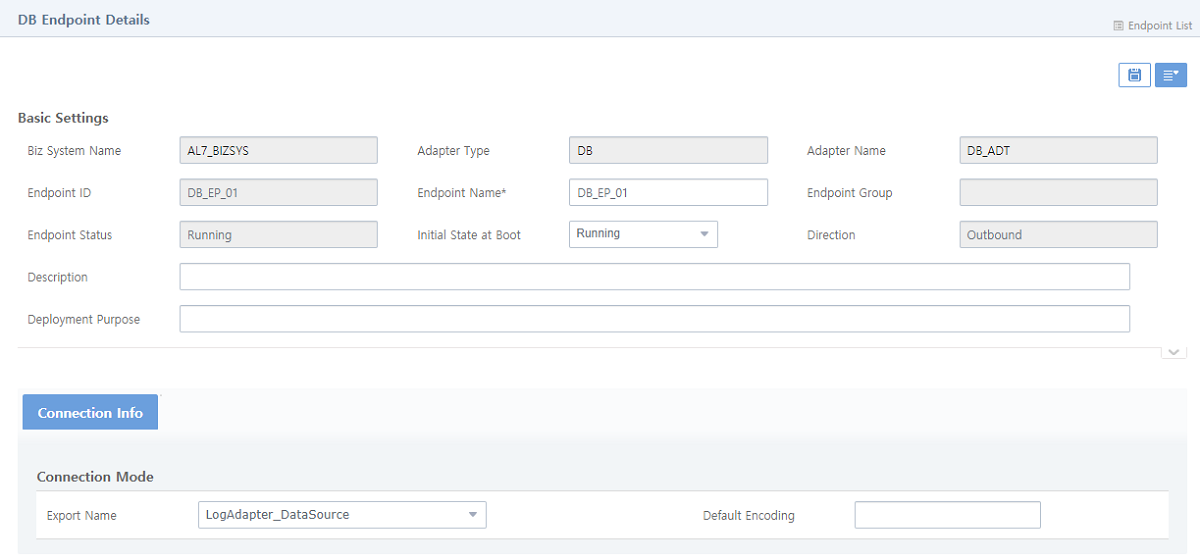
Adding an Endpoint
Endpoint connects an adapter and other components and determines the direction of data transmission. To configure an endpoint, one or more adapters must be added first. For more information about adding an adapter, refer to "Adding an Adapter". After one or more adapters are set up, an endpoint can be added to any of them.
|
It is required that an endpoint is configured with a protocol that the adapter uses. The specific configurations for each adapter type are not covered in this guide, which describes the common configurations required to add an endpoint to an adapter. For more information about adapter settings, refer to the relevant guide for each adapter. |
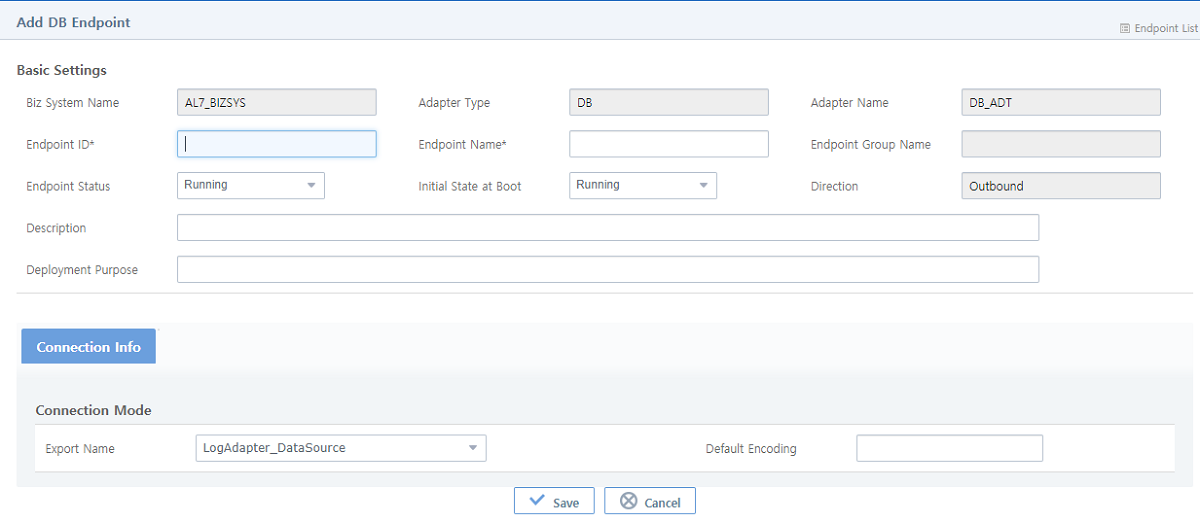
To add an endpoint, click [Add] in the [Endpoint List] tab in Adapter Details ([System] - [Adapter] - Adapter Details (1)) or Endpoint Group Details ([System] - [Adapter] - Endpoint Group Details). This opens the Add Endpoint screen. Enter information and then click [Save].
-
Basic Settings (*: required items)
Item Description Biz System Name
Biz System that an endpoint will be added to. This is set automatically according to the settings for the adapter that contains the endpoint. Therefore, it cannot be changed.
Adapter Type
Adapter type. This is set automatically according to the settings for the adapter that contains the endpoint. Therefore, it cannot be changed.
Adapter Name
Adapter name. This is set automatically according to the settings for the adapter that contains the endpoint. Therefore, it cannot be changed.
Endpoint ID*
Unique endpoint ID.
Only allows alphanumeric, hyphen, and underscore characters with a length of 3-30.
Endpoint Name*
Endpoint name.
Only allows alphanumeric, hyphen, and underscore characters with a length of 3-30.
Endpoint Group Name
Endpoint group that endpoint will belong to.
This is set automatically according to the settings for the adapter that contains the endpoint. Therefore, it cannot be changed. For more information about configuring an endpoint group, refer to Endpoint Group List.
Endpoint Status
Endpoint status.
-
Running: Endpoint is active.
-
Stopped: Endpoint is inactive.
Initial State at Boot
Initial boot value.
-
Running: Endpoint is active at booting.
-
Stopped: Endpoint is inactive at booting.
Direction
Communication direction of endpoint.
One of the following options can be configured according to the adapter setting.
-
Inbound: Receives messages from external.
-
Outbound: Sends messages to external.
-
Both: Exchanges messages with external.
Description
Description of an endpoint. It is recommended to describe an endpoint group in detail because this field helps user identify each endpoint group.
Deployment Purpose
Deployment purpose. The purpose can be retrieved by selecting [Deployment] > [Deployment History] (refer to Deployment).
This guide does not explain the contents of each tab which vary depending on the adapter type. For more information, refer to each adapter guide.
-
Deleting an Endpoint
There are following two methods to delete an endpoint.
-
Method 1
Select a checkbox for an endpoint to delete in Endpoint List ([System] - [Adapter] - Endpoint List) and then click [Del]. In the confirmation dialog box that opens, click [OK].
-
Method 2
Click [Delete] from the drop-down menu of
 (menu) in Endpoint Details ([System] - [Adapter] - Endpoint Details). In the confirmation dialog box that opens, click [OK].
Controlling Endpoint Status
One or more endpoints displayed in the endpoint list can be started and stopped. There are following two methods to control an endpoint.
-
Method 1
Select one or more endpoints to control, click [Start] or [Stop] in Endpoint List ([System] - [Adapter] - Endpoint List). In the confirmation dialog box that opens, click [OK].
-
Method 2
To control an endpoint, click [Start] or [Stop] from the drop-down menu of
 (menu) in Endpoint Details ([System] - [Adapter] - Endpoint Details). In the confirmation dialog box that opens, click [OK].
Copying an Endpoint
To copy an endpoint, click [Copy] from the drop-down menu of ![]() (menu) in Endpoint Details ([System] - [Adapter] - Endpoint Details).
(menu) in Endpoint Details ([System] - [Adapter] - Endpoint Details).
5. Adapter Cluster
When a Biz System is created in a cluster environment, adapter, endpoint group, and endpoint resources can be clustered. Configure a Biz System with a cluster of servers, and add an adapter to the Biz System from [System] > [Adapter] to create an adapter cluster.
Clicking [System] > [Adapter Cluster] initially displays the navigation tree on the left and a Biz System and an adapter.
A white icon ( ) means that an adapter cluster is not configured yet. After it is configured, the icon will be changed to blue (
 ), and child endpoint groups or endpoints will be displayed in the navigation pane.
Selecting an unclustered adapter in the navigation pane opens a dialog box that asks whether you want to create an adapter cluster. To go to the Add Adapter Cluster screen ([System] - [Adapter Cluster] - Add Adapter Cluster), click [OK]. For more information, refer to "Creating an Adapter Cluster".
Selecting a clustered adapter opens the Adapter Cluster Details screen where you can edit or delete the adapter cluster. To edit the adapter cluster, modify the information and then click ![]() (save). For detailed information about each item, refer to "Creating an Adapter Cluster". To delete the adapter cluster, click [Delete] from the drop-down menu of
(save). For detailed information about each item, refer to "Creating an Adapter Cluster". To delete the adapter cluster, click [Delete] from the drop-down menu of ![]() (menu). In the confirmation dialog box that opens, click [OK]. The blue icon (
(menu). In the confirmation dialog box that opens, click [OK]. The blue icon ( ) for the adapter changes to the white icon (
 ).
).
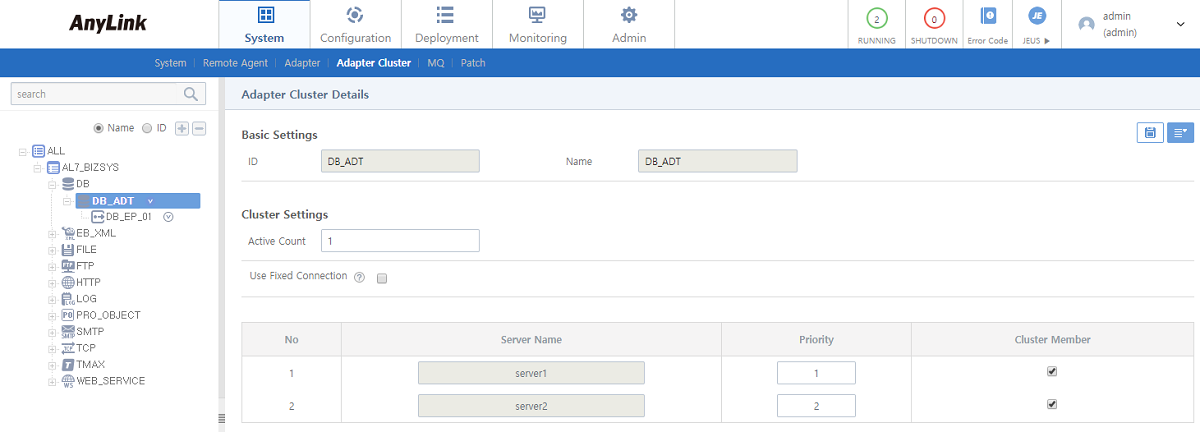
Creating an Adapter Cluster
To create an adapter cluster, click [System] > [Adapter Cluster] and then click an unclustered adapter. This opens a dialog box that asks whether you want to create an adapter cluster. Clicking [OK] opens the Add Adapter Cluster screen.
Enter information and then click [Save]. The adapter cluster is created, and the white icon ( ) for the adapter changes to the blue icon (
 ). The child endpoint group or endpoint is displayed in the navigation pane.
If a Biz System is configured only with servers, there will be no child endpoint groups or endpoints. Display priorities follow parent adapter settings if there are no settings for child endpoint groups or endpoints of the adapter.
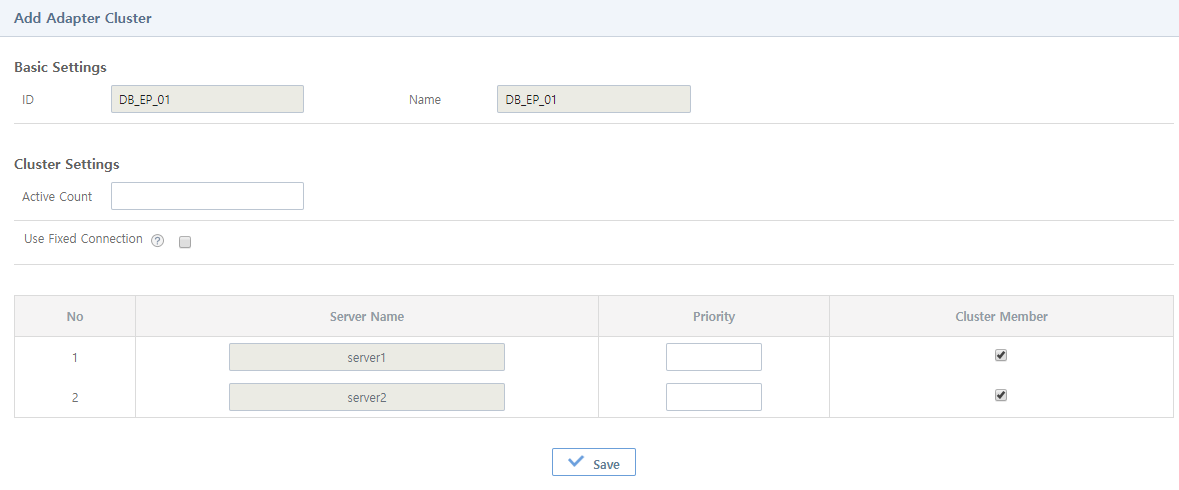
-
Basic Settings
Item Description ID
Resource ID. (Adapter, endpoint group, or endpoint)
Name
Resource name. (Adapter, endpoint group, or endpoint)
-
Cluster Settings
Item Description Active Count
Number of servers to start. If ActiveCount is less or greater than the actual number of servers, a warning message will be displayed.
Use Fixed Connection
If selected, a message is not sent to another Managed Server in the cluster.
Server Name
Name of a server consisting of the cluster.
Priority
Priority of servers consisting of the cluster. Enter a number between 1 and server counts. (can be modified)
Cluster Member
Check the server to use in the cluster.
6. MQ
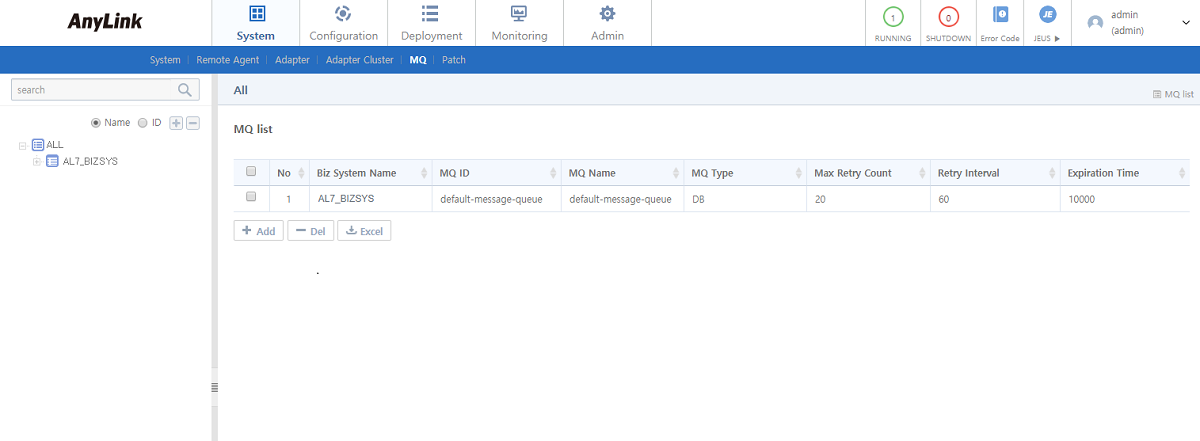
The [MQ] menu is used to save messages of transactions for which message delivery guarantee is set and retry to send queue messages of failed transactions. To go to the MQ List screen, click [System] > [MQ].
To edit or delete a message queue, click the queue from MQ List. This opens MQ Details ([System] - [MQ] - MQ Details) where you can edit or delete the queue. For detailed information, refer to "MQ Details".
-
MQ List
Item Description Biz System Name
Biz system name.
MQ ID
Message queue ID.
MQ Name
Message queue name.
MQ Type
Message queue type.
Max Retry Count
Maximum retry count.
Retry Interval
Retry interval.
Expiration Time
Expiration time of the message queue.
-
Buttons
Button Description [Add]
Adds a message queue. For more information, refer to "Adding a Message Queue".
[Del]
Deletes a selected message queue. For more information, refer to "Deleting a Message Queue".
[Excel]
Exports the message queue list as a .csv file.
|
A message queue is configured in WebAdmin. Message delivery guarantee can be set in AnyLink Studio by using the 'RM Enabled' item. The setting in Studio has priority over that in WebAdmin. For more information, refer to AnyLink Studio Guide. |
MQ Details
To go to MQ Details, select a message queue in the navigation pane, or click a message queue from MQ List.
To edit a message queue, modify the information and then click ![]() (save). For detailed information about each item, refer to "Adding a Message Queue". To delete a message queue, click [Delete] from the drop-down menu of
(save). For detailed information about each item, refer to "Adding a Message Queue". To delete a message queue, click [Delete] from the drop-down menu of ![]() (menu). For detailed information, refer to "Deleting a Message Queue".
(menu). For detailed information, refer to "Deleting a Message Queue".
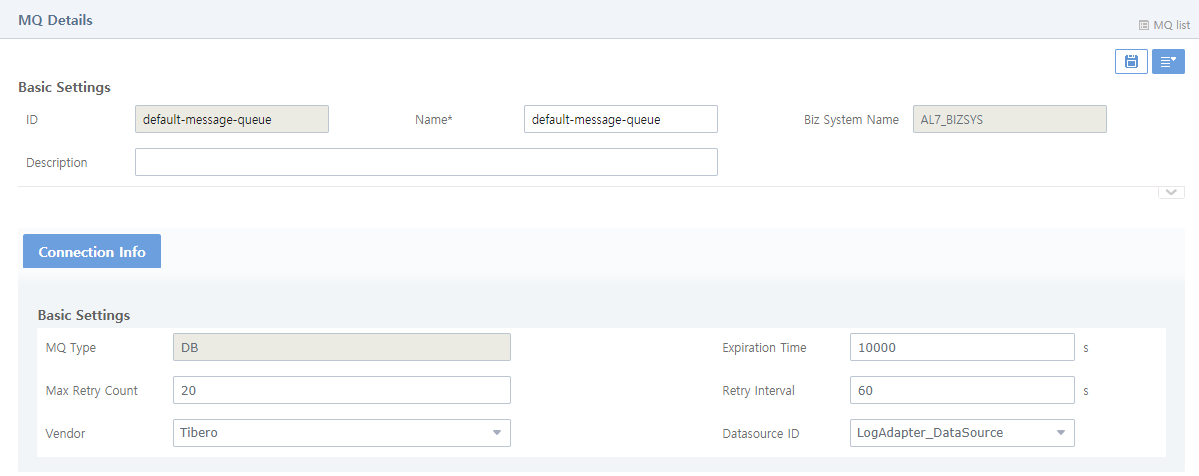
Adding a Message Queue
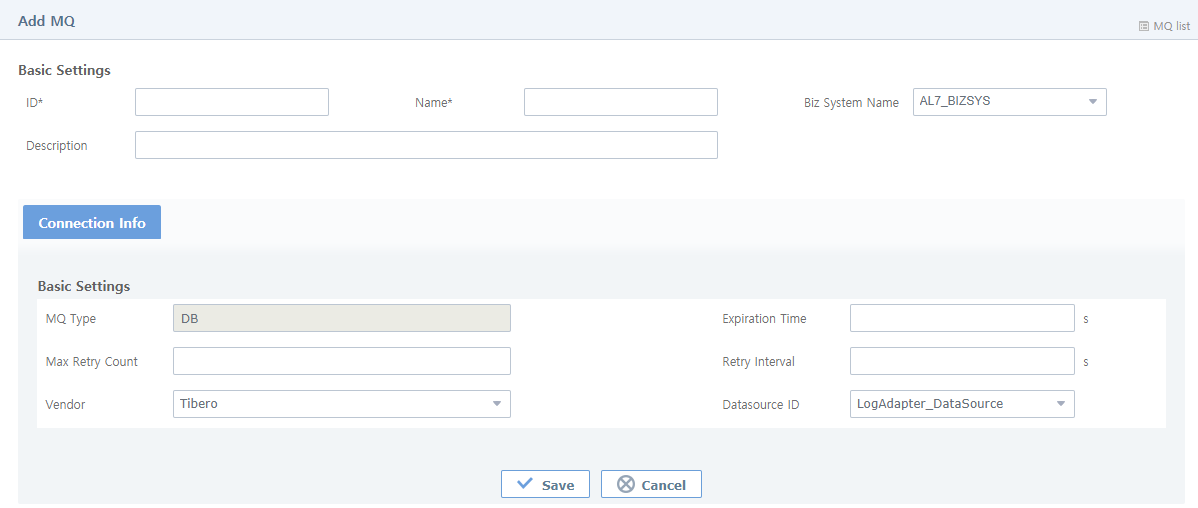
To add a message queue, click [Add] in MQ List ([System] - MQ List). This opens the Add MQ screen. Enter information and then click [Save].
-
Basic Settings (*: required items)
Item Description ID*
Unique queue ID.
Only allows alphanumeric, hyphen, and underscore characters with a length of 3-30.
Name*
Queue name.
Only allows alphanumeric, hyphen, and underscore characters with a length of 3-30.
Biz System Name
Name of a Biz System where the queue is used.
Description
Queue information.
-
[Connection Info] Tab
Item Description MQ Type
DB as a fixed value.
Expiration Time
Expiration time of a message in the message queue. If set to a negative value, the message is not removed from the queue until the message is successful. (Default value: 0, unit: seconds)
Max Retry Count
Maximum retry count. A negative value means infinite. (Default value: 0)
Retry Interval
Retry interval. A negative value means one second. (Default value: 0, unit: seconds)
Vendor
Vendor of the database to connect to.
-
Tibero
-
Oracle
-
Maria
Datasource ID
ID of the datasource set in JEUS.
-
Deleting a Message Queue
There are following two methods to delete a message queue.
-
Method 1
Select a checkbox for a message queue to delete in MQ List ([System] - MQ List) and then click [Del]. In the confirmation dialog box that opens, click [OK].
-
Method 2
Click [Delete] from the drop-down menu of
 (menu) in MQ Details ([System] - [MQ] - MQ Details). In the confirmation dialog box that opens, click [OK].
7. Patch
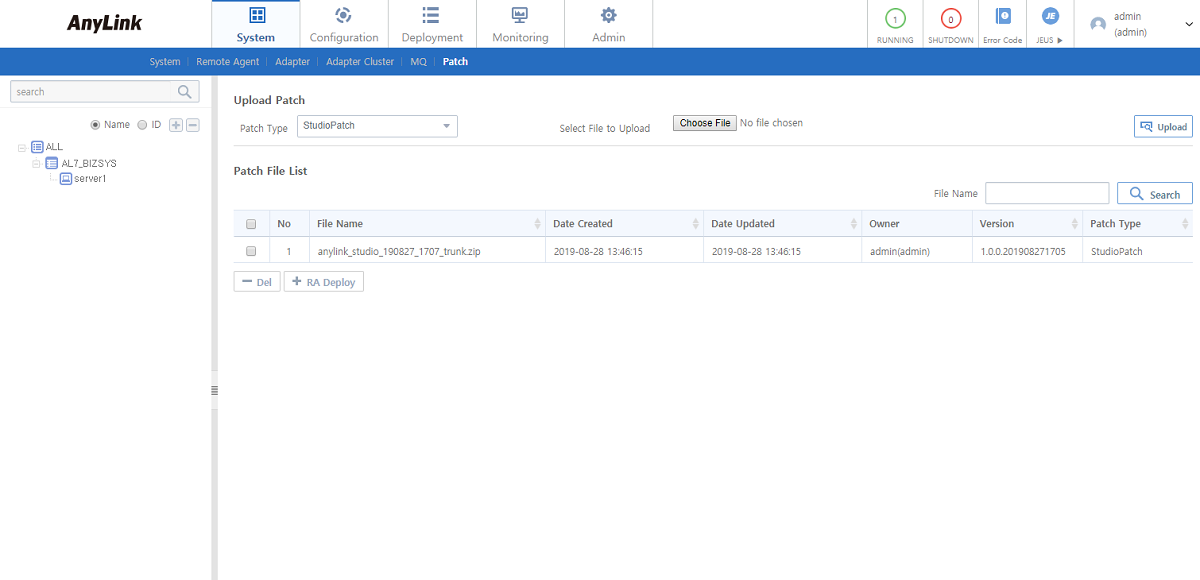
The [Patch] menu is used to manage patch files used when adding an agent engine patch to a remote agent or a new version of engine patch to AnyLink Studio. To go to the Patch screen, click [System] > [Patch].
-
Patch File List
Item Description File Name
Name of the uploaded patch. Case-sensitive. Search term can be part of the file name.
Date Created
Date when the file was uploaded.
Date Updated
Date when the file was updated.
Owner
ID of the owner who uploaded the file.
Version
File version.
Patch Type
Type of the patch file. Type can be selected when uploading the patch.
-
AgentPatch: Agent engine patch for agent engines.
-
StudioPatch: Engine patch for AnyLink Studio.
-
-
Buttons
Button Description [Del]
Deletes a selected patch file.
To delete a patch file, select the file from the list and then click [Del]. In the confirmation dialog box that opens, click [OK].
[RA Deploy]
Selects a remote agent to deploy AgentPatch to.
The following are the steps for patching an agent and AnyLink Studio.
-
Patching an Agent
-
Select 'AgentPatch' in 'Patch Type'.
-
Select a patch file by clicking [Choose File] and then click [Upload] to upload the file.
-
Select the patch file from Patch File List and then click [RA Deploy] below the list.
-
Select a remote agent to deploy an agent file to in the Select Remote Agent dialog box, and then click [Deploy] at the bottom.
-
-
Patching AnlyLink Studio
-
Select 'StudioPatch' in 'Patch Type'.
-
Select a patch file by clicking [Choose File] and then click [Upload] to upload the file.
-
Confirm that the patch file is added in Patch File List.
-
When AnyLink Studio accesses the server where the patch file is added, it automatically detects and downloads the patch file.
-