Starting DBIO
This chapter describes how to create DBIO queries for each SQL usage type in the DBIO editor.
|
This guide assumes that DBIO queries are created in Studio. |
1. Overview
This chapter describes the following for DBIO query creation.
-
Adding DBIO basic information
The first step of creating DBIO. Add basic information that is necessary for DBIO query creation. For detailed information, refer to Adding DBIO Basic Information.
-
Using the DBIO editor
DBIO editor’s screen layout and details. For detailed information, refer to Using DBIO Editor. PERSIST DBIO queries are used as an example.
-
Creating DBIO queries for each SQL usage type
How to create PERSIST, VIEW, EXECSQL, or DYNAMICSQL DBIO queries. For detailed information, refer to Creating DBIO Queries.
-
Compiling DBIO queries
A created DBIO query is compiled in 4 steps: saving the query, creating source, compilation and Dlupdate. After the compilation, a DBIO module is created. For detailed information, refer to Compiling DBIO Queries.
2. Adding DBIO Basic Information
The following are the steps for adding basic information.
-
Select [New] > [DBIO Query] from the context menu of Workspace Navigator.
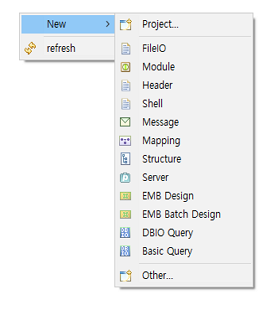 DBIO Query Menu
 -
The following New Query Wizard opens. In this wizard, basic information required to create DBIO can be added.
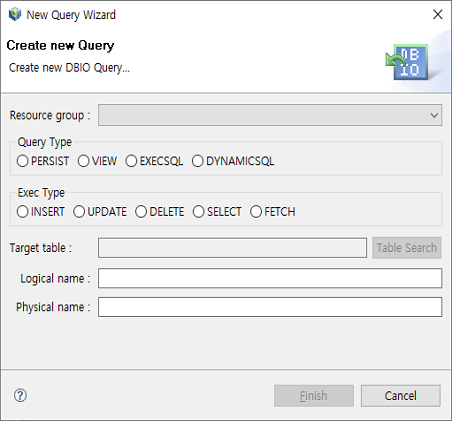 New Query Wizard
The following describes each item.
-
Resource Group
Resource group registered in WebAdmin. (Required)
If a desired resource group does not exist, add the resource group in WebAdmin. To add a resource group, log in to WebAdmin and select [META SYSTEM] from the main screen and then select [META SYSTEM] > [ResourceGroupMgmt]. In the ResourceGroupMgmt screen, check currently set resource groups and then register the resource group to add.
-
Query Type
DBIO query type for each SQL usage type. (Required)
There are following query types: PERSIST, VIEW, EXECSQL, and DYNAMICSQL.
-
Exec Type
According to a selected query type, the radio button next to each Exec type is enabled or disabled. (Required)
The following are Exec types available according to each selected query type.
Query Type Exec Type PERSIST
INSERT, UPDATE, DELETE, ELECT, FETCH
VIEW
SELECT, FETCH
EXECSQL
INSERT, UPDATE, DELETE
DYNAMICSQL
INSERT, UPDATE, DELETE, SELECT, FETCH
-
Target table
Target table that is necessary for DBIO query creation. [Table Search] is enabled only for required target tables or optional target tables of the PERSIST query type. However, the button is enabled for optional target tables of the VIEW, EXECSQL, or DYNAMICSQL query type if 'NON_PERSIST_MAIN_TABLE' is set to 'Y'.
To select a target table, click [Table Search]. This opens the following Select table – DBIO Studio window.
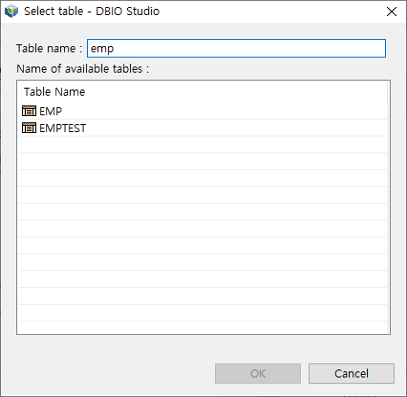 Select table – DBIO Studio
Enter at least 3 characters of a table name in 'Table name'. If the Turn off the "auto-search" check box in DBIO Configuration, press <Enter> to search tables. Select a table to use from the results and then click [OK].
You can select a target table with two methods. One method is selecting a target table from tables in a currently connected database schema as in Select table – DBIO Studio. The other method is selecting it from all tables in all schemas of a current database. To use the second method, the 'TABLES_BEYOND_SCHEMA' configuration item must be set to 'Y' in WebAdmin.
-
Logical name, Physical name
Logical and physical names of DBIO to create (Required).
The names can be automatically set according to the values set in the 'NAMING_RULE', 'NAMING_RULE_APPLIED', and 'NAMING_RULE_FOR_LOGICAL' configuration items of WebAdmin.
-
-
Set each item and click [Finish] to go to the screen where you can edit DBIO. For information about the DBIO editor, refer to Using DBIO Editor.
3. Using DBIO Editor
DBIO editor is a GUI tool embedded in Studio. It helps developers to easily create DBIO queries.
DBIO editor consists of the following 4 sections.
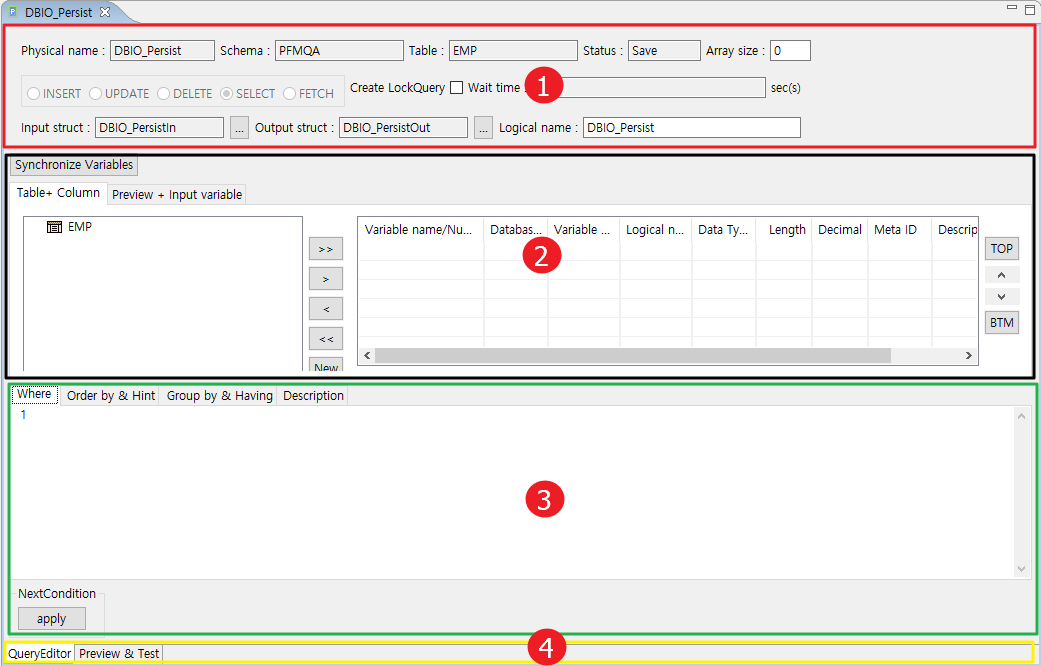
The following describes each section.
① DBIO basic information
② Table information
③ Query input
④ Tabs
DBIO basic information
Display DBIO basic information added as in Adding DBIO Basic Information. The information is used to create DBIO.

The following describes each item.
| Item | Description |
|---|---|
Physical name |
Physical name of DBIO. |
Schema |
Name of a schema that includes a target table. |
Table |
Target table name. |
Status |
Added DBIO status.
|
Array size |
Size of the array used to process multiple DBIOs. (Editable) |
Query type |
Added query type. |
Create LockQuery |
Select for integrity. (Editable) |
Wait time |
Wait time. Available only when 'Create LockQuery' is selected. (Editable) |
Input Struct |
Automatically created input structure. |
Output Struct |
Automatically created output structure. |
Logical name |
Logical name of DBIO. (Editable) |
Table information
Display information about tables on which DBIO queries are executed.
-
[Table+ Column]
Display columns of a target table on which INSERT, UPDATE, SELECT, or FETCH is executed. For DELETE execution, columns are not displayed.
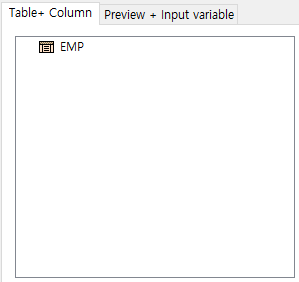 DBIO Editor – [Table+ Column] Tab
 -
[Preview + Input variable]
In SQL Preview, you can check that added DBIO’s SQL query is written correctly.
In Input, you can check defined input variables. For SELECT and FETCH Exec types, you can set defined input variables' date type, length, etc.
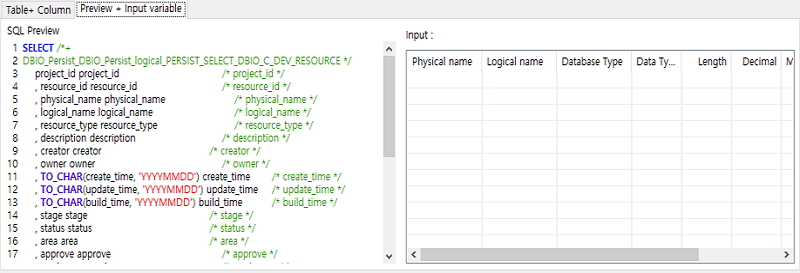 DBIO Editor – [Preview + Input variable] Tab
 -
Column grid
 DBIO Editor – Column Grid
The following describes each column.
Column Description Variable name/Numerical expression
Column name or numerical expression.
Database Type
General database type. There are the following types: char, varchar, number, clob, blob, etc.
Variable name
Variable name of the column.
Logical name
Logical name of the column.
Data Type
One of the following ProFrame data types.
-
string
-
long
-
number (does not match Oracle’s number type. Data of the ProFrame’s number type is an integer with 19 or more digits or a real number with a decimal point.)
-
double
-
CLocator
-
BLocator
Length
Length of the column.
Decimal
Decimal point of the column.
Meta ID
Displayed when the column matches metadata saved in WebAdmin.
Description
Additional description about the column.
The following describes some columns in detail.
-
Meta ID
The following describes each icon that can be displayed in the Meta ID column.
Icon Description 
Warning icon. It is displayed when there is no metadata saved in WebAdmin.

Check icon. It is displayed when there is metadata saved in WebAdmin, but the metadata needs to be checked.
The following is an example.
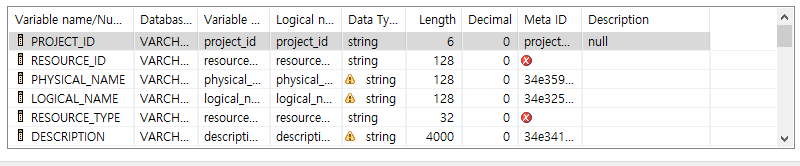
The check icon is displayed when the column no longer exists or does not match metadata due to a table schema change. If the metadata does not match, it needs to check whether the data type, length, and logical name in the column grid match the table column information.
-
Table’s common column
Table’s common column is used to unconditionally record some properties (last modified date, last modifier’s ID, etc.) when executing INSERT and UPDATE. When creating a DBIO query in the DBIO editor, it is supported to automatically create common columns.
Since PERSIST DBIO queries cannot remove a common column from a variable list or edit the column, a target table must include the column. If the table does not include the column, an error can occur when creating a DBIO.
-
-
Buttons
The following describes each button.
Button Description >>
Moves all columns of a target table to the column grid.
>
Moves one or more selected columns to the column grid.
<
Removes one or more selected columns from the column grid.
<<
Opens the window that says "You are about to remove all columns. Would you like to continue?". Clicking [OK] removes all columns from the column grid.
New
Used to edit a specific column and use it as a new output variable.
TOP
Moves the selected column to the top of the column grid.
∧
Moves up the selected column.
∨
Moves down the selected column.
BTM
Moves the selected column to the bottom of the column grid.
Synchronize Variables
Synchronizes with metadata defined in WebAdmin.
Query input
Where, Order by & Hints, and Group by & Having can be entered.
You can enter the following in each tab.
| Tab | Description |
|---|---|
Where |
Expressions and input variables except for a Where clause. |
Order by & Hint |
Expressions in the Order by area except for an Order by clause, and a Hint clause in the Hint area except for /*+ */. |
Group by & Having |
Expressions in the Group By area except for a Group By clause, and expressions in the Having area except for a Having clause. |
Description |
Additional descriptions about queries. The descriptions do not affect the actual queries. |
Tabs
You can go to the QueryEditor or Preview & Test tab.
| Tab | Description |
|---|---|
QueryEditor |
You can edit created DBIO queries. |
Preview & Test |
You can verify, check, and test created DBIO queries. |
4. Creating DBIO Queries
The following describes how to create each type of DBIO queries by using scenarios from adding DBIO’s basic information to testing created DBIO queries.
4.1. PERSIST
The following is a scenario of creating a PERSIST DBIO query.
-
Enter basic DBIO information.
Item Example Resource Group
DBIO_C
Query Type
PERSIST
Exec Type
SELECT
Target table
DEV_RESOURCE
Logical name
DBIO_Persist_logical
Physical name
DBIO_Persist
-
Select all columns of the target table and create the 'descnm' output variable.
-
Add the 'input_txt' input variable in the Where clause. Enter 'ename' for the variable value in the testing step.
-
Check and test the created DBIO query.
-
SQL preview
-
Test and execution plan check
-
ResultSet view
-
DBIO saving
-
The following performs the previous scenario.
-
Select [New] > [DBIO Query] from the context menu of Workspace Navigator.
-
The following New Query Wizard opens. Enter basic DBIO information and then click [Finish].
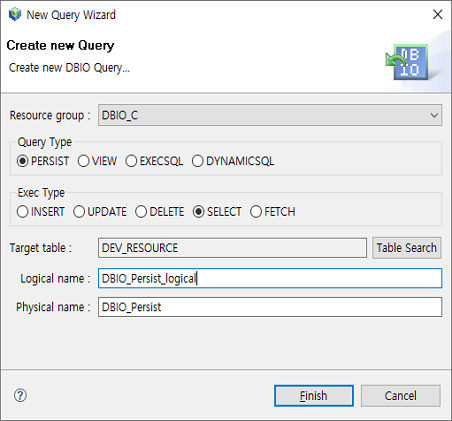 PERSIST - New Query Wizard
 -
The DBIO editor for PERSIST queries is displayed.
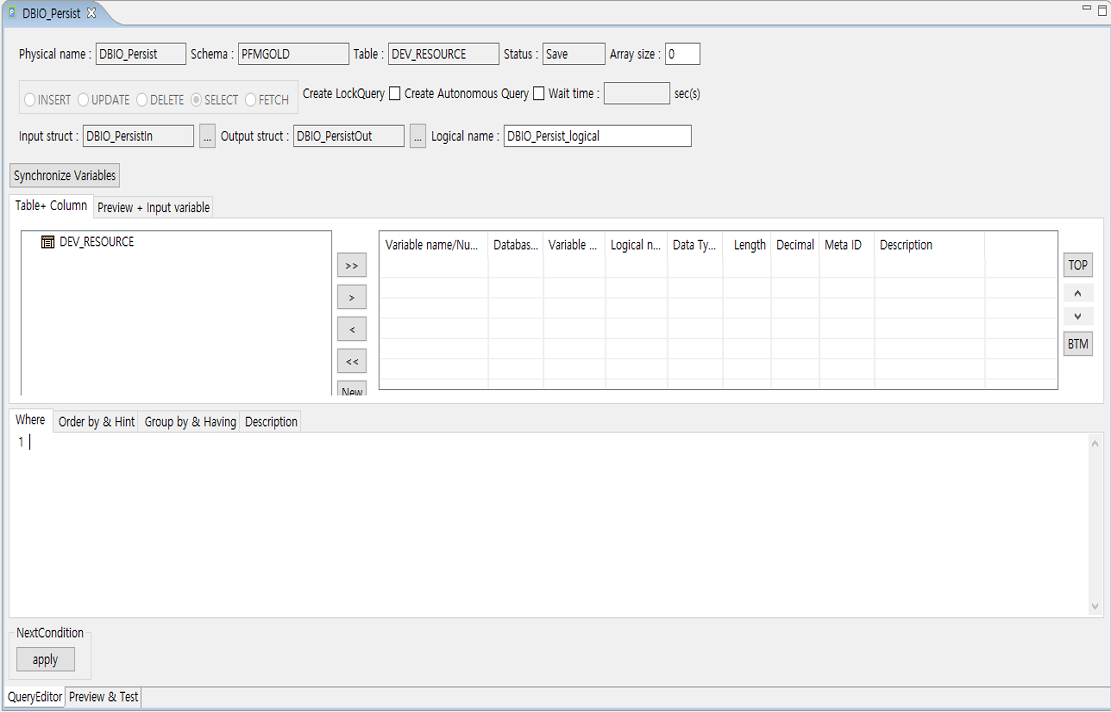 PERSIST - DBIO Editor
For information about common items in the DBIO editor, refer to Using DBIO Editor.
This example only checks registered DBIO basic information and does not edit it. Note that editable items are 'Array size', 'Create LockQuery', 'Wait time', and 'Logical name'.
-
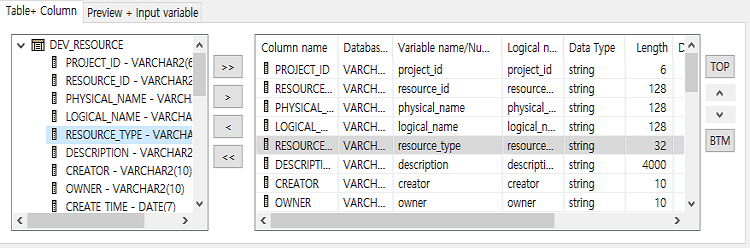
Select all columns of the DEV_RESOURCE table.
Click the [+] icon next to DEV_RESOURCE. Target columns to execute INSERT, UPDATE, SELECT, and FETCH on are displayed. DELETE Exec columns are excluded. For DBIO of the DELETE Exec type, the columns are disabled and displayed.
Click [>>] to move all columns of DEV_RESOURCE to the column grid.
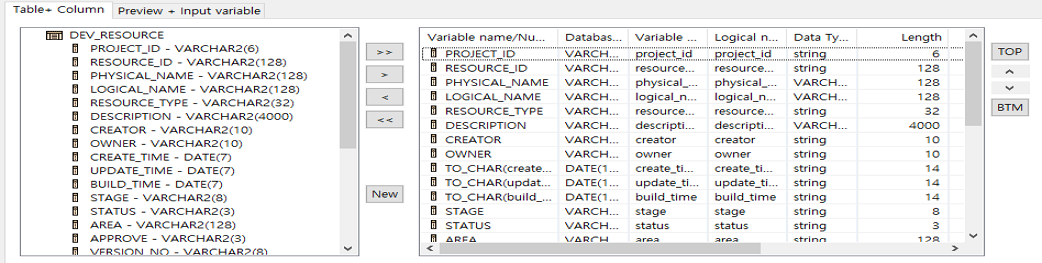 PERSIST – [Table+ Column] Tab
 -
Create the 'descnm' output variable by editing the DESCRIPTION column.
The way to create an output variable differs depending on the Exec type.
-
For SELECT and FETCH Exec types
You can edit numerical expressions. To create a new output variable, click [New] in PERSIST – [Table+ Column] Tab.
The following creates the 'descnm' output variable that checks whether the DESCRIPTION column data exists.
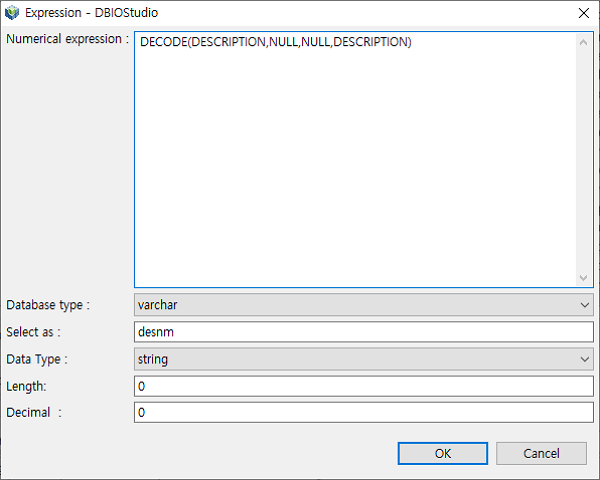 Expression – DBIOStudio
Item Description Numerical expression
Numerical expression for manipulating column data.
Database type
A numeric database type is generally set to long.
When using a numerical expression of the number type, set to number. If not, a DBIO compilation error occurs.
Select as
Variable name used by an actual database program.
Data Type
Data type used by a database program.
For the long type, Length and Decimal do not need to be set. For the number type, they must be set.
The long type is for up to 2 GB binary data.
Length
Data length.
Decimal
Decimal place.
-
For INSERT and UPDATE Exec types
When manipulating and outputting a column, select an output variable name displayed in the column grid. Selecting the name shows the […] button.
This example registers DBIO of the INSERT query type and then manipulates the RESOURCE_TYPE column in the DEV_RESOURCE table so that the column’s data is converted to uppercase.
First, select the RESOURCE_TYPE column.
 Expression – RESOURCE_TYPE Column
This opens the following Expression - DBIOStudio dialog box where you can manipulate the RESOURCE_TYPE column.
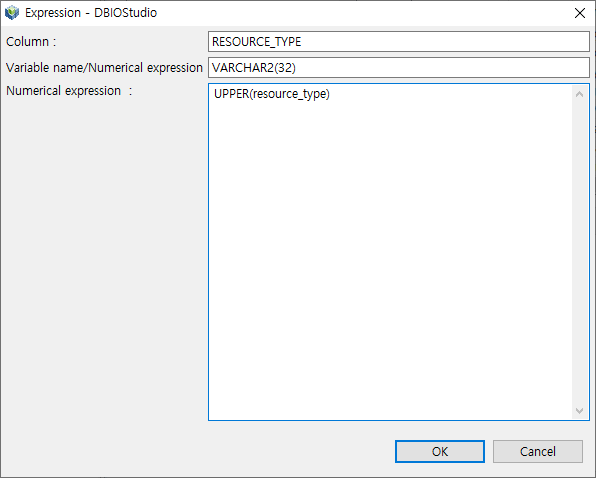 Expression – DBIOStudio Dialog Box
In the Expression - DBIOStudio dialog box, you can create an SQL query for a single table or a frequently used statement such as DECODE as well as directly enter a numerical expression.
-
-
In the Expression - DBIOStudio dialog box, enter a numerical expression for the DESCRIPTION column and then click [OK]. The descnm output variable is displayed in the column grid.
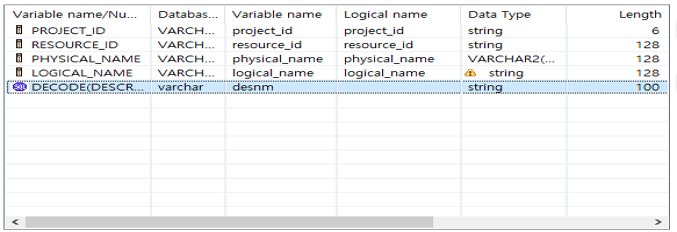 PERSIST – Output Variable Creation Result
 -
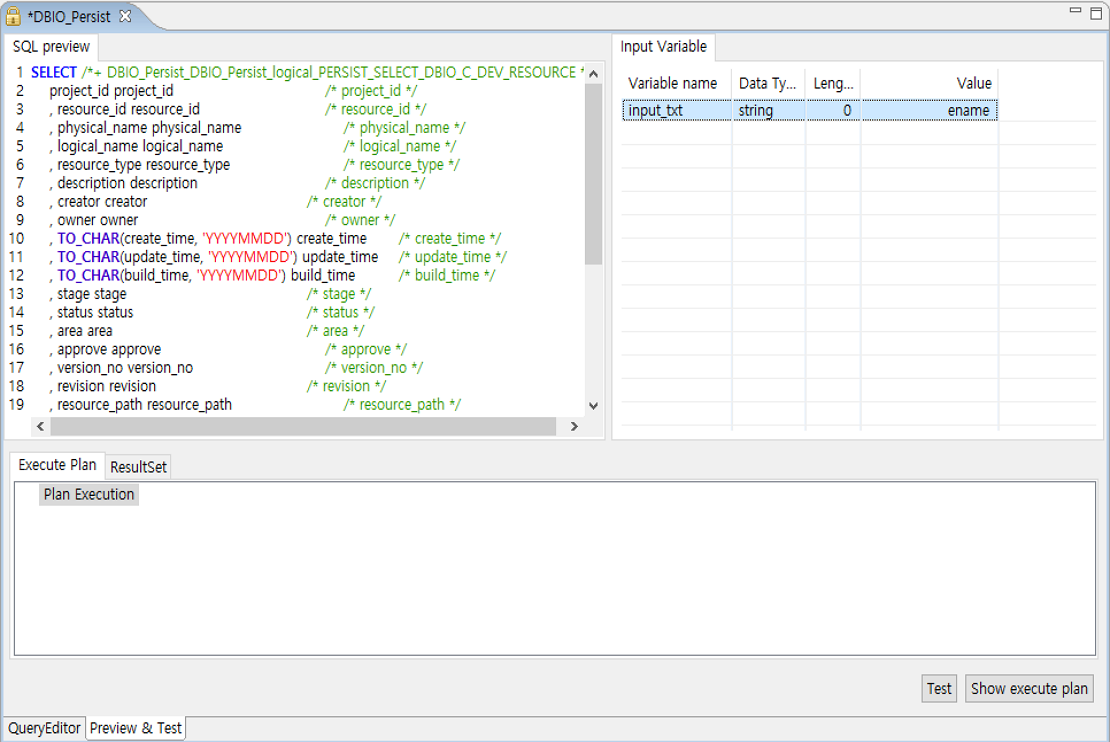
In the [Where] tab, enter the following expression that creates an input_txt input variable for the PHYSICAL_NAME column.
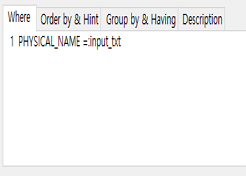 PERSIST – Input Variable Addition
In the [Where] tab, you can enter expressions except for a Where clause for general SQL statements.
When adding the Input_txt input variable to a Where clause, enter the variable name after a colon (:) without a blank space. If not, it cannot be recognized as an input variable.
-
To test the created DBIO query, select the [Preview & Test] tab at the bottom of the DBIO editor. The QueryEditor screen is switched to the Preview & Test screen.
 PERSIST – Preview & Test Screen
 -
Define the created input_txt input variable as 'ename'. Click [Test] to check whether the DBIO query is crated correctly. If the query is created correctly, the following message window is displayed.
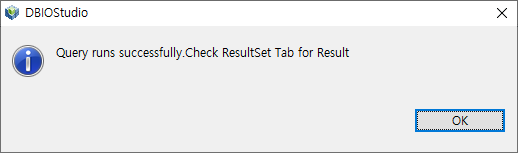 PERSIST – Test Result Window
 -
To check the execution plan of the DBIO query, click [Show execute plan]. Check whether there is no issue.
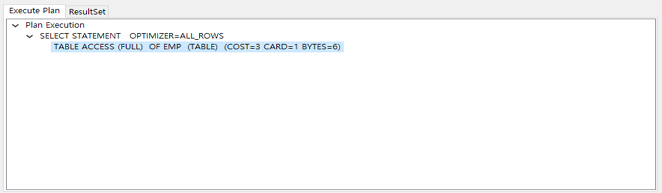 PERSIST – Execution Plan Check
 -
Click the [ResultSet] tab. The following is displayed according to the 'ename' value for the input_txt input variable.
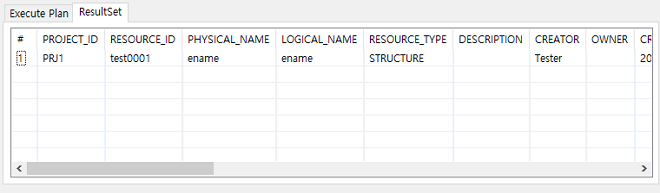 PERSIST – ResultSet Result
4.2. VIEW
The following is a scenario of creating a VIEW DBIO query.
-
Add basic information about DBIO.
Item Example Resource Group
DBIO_C
Query Type
VIEW
Exec Type
SELECT
Target table
DEV_RESOURCE
Logical name
DBIO_View _logical
Physical name
DBIO_View
-
Write a query to create in the [SQL].
-
Create an output variable based on the created query.
-
Check and test the created DBIO query.
-
SQL preview
-
Test and execution plan check
-
ResultSet view
-
DBIO saving
-
The following performs the previous scenario.
-
Select [New] > [DBIO Query] from the context menu of Workspace Navigator.
-
The following New Query Wizard opens. Enter basic DBIO information and then click [Finish].
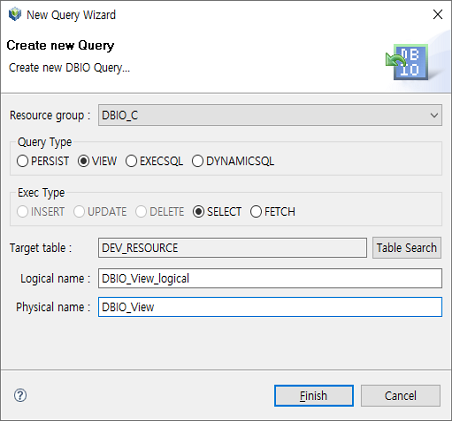 VIEW - New Query Wizard
 -
The DBIO editor for VIEW queries is displayed.
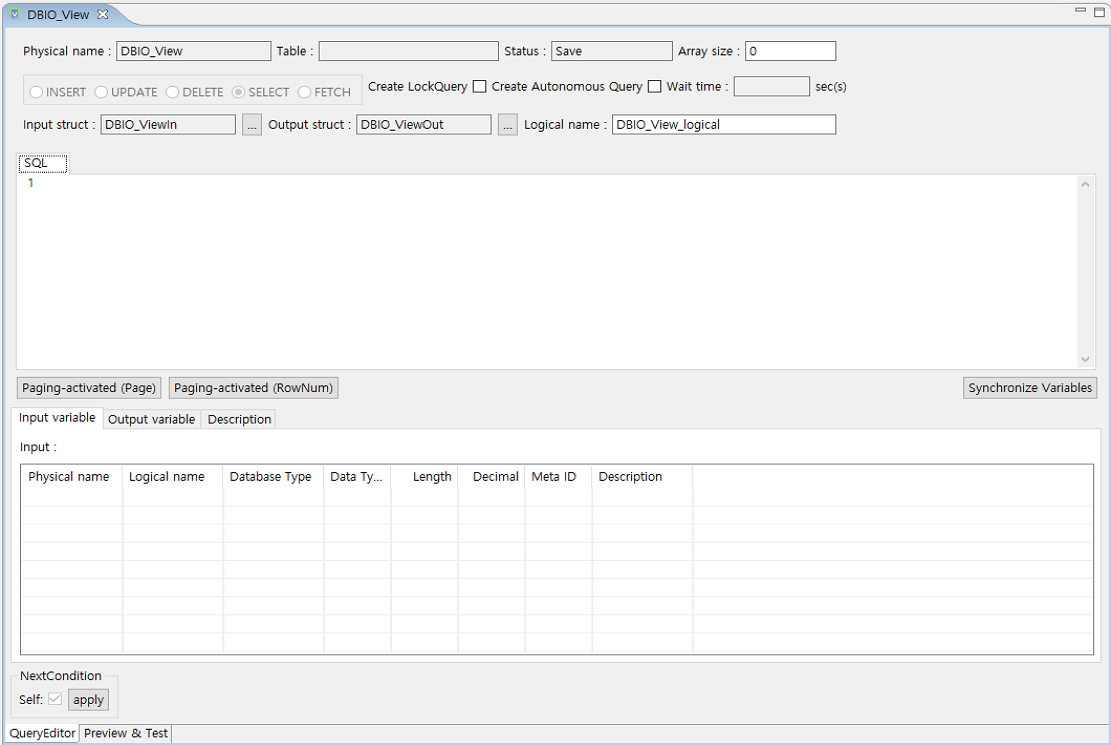 VIEW - DBIO Editor
A developer manually creates a VIEW DBIO query. For information about common items in the DBIO editor, refer to Using DBIO Editor.
-
Enter the following query in the [SQL] tab.
SELECT
  RESOURCE_ID
 ,PHYSICAL_NAME
 ,LOGICAL_NAME
 ,RESOURCE_TYPE
 ,DESCRIPTION
FROM DEV_RESOURCE
WHERE PHYSICAL_NAME = :input_txt
In the [SQL] tab, you can create a general SQL query.
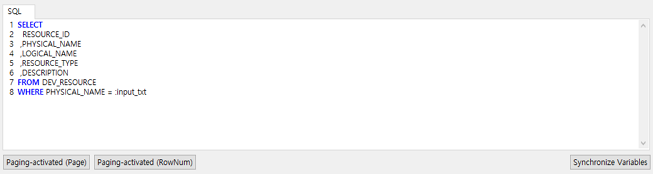 VIEW – [SQL] Tab
The following describes each button.
Button Description [Paging-activated (Page)]
Gets query execution result data by page when the data is large. This inserts an additional query to a written query.
[Paging-activated (Rownum)]
Gets a specific part of rows of query execution result data by setting start and end rows when the data is large.
[Synchronize Variables]
Synchronizes with metadata defined in WebAdmin.
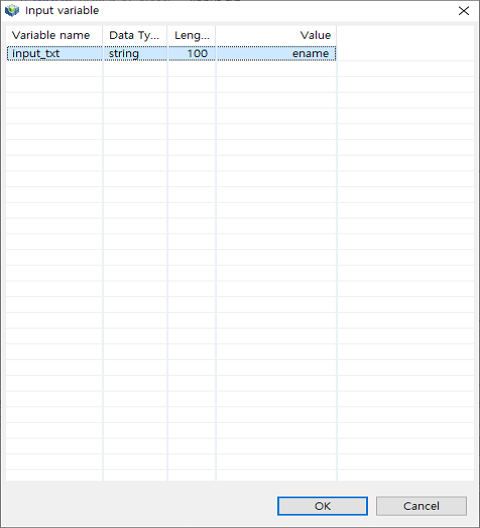
Writing a query automatically creates an input variable. The variable is displayed in the [Input variable] tab.
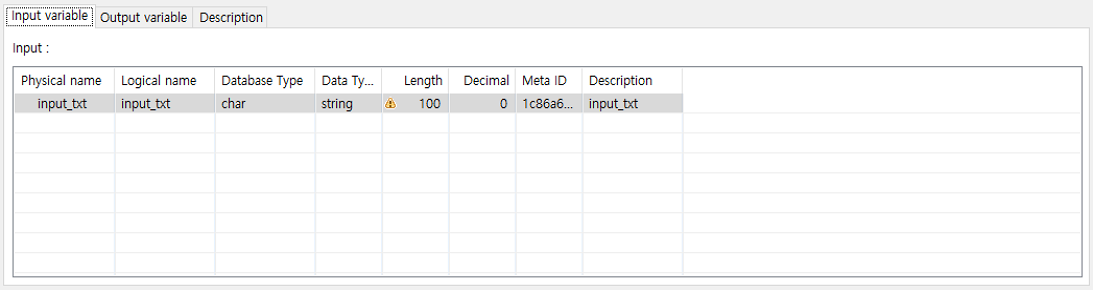 VIEW – [Input variable] Tab
 -
Create an output variable based on the query created in the step 4 (VIEW – [SQL] Tab).
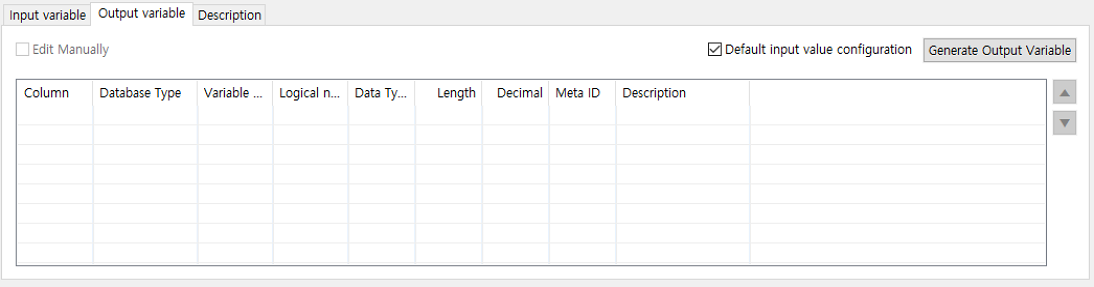 VIEW – Before Creating Output Variable
The following describes each item in the [Output variable] tab.
Item Description Column grid
Refer to Using DBIO Editor.
Default input value configuration
Uses an arbitrary input value when [Generate Output Variable] is clicked.
This check box is selected by default.
Generate Output Variable
Automatically creates an output variable based on the query written in the [SQL] tab.
An output variable is the column as the result of executing a query of the SELECT and FETCH Exec types.
The following describes additional information.
-
Default input value
Clearing the 'Default input value' check box and clicking [Generate Output Variable] opens the following dialog box where you can set a value for a specified input variable.
 VIEW – Input Variable
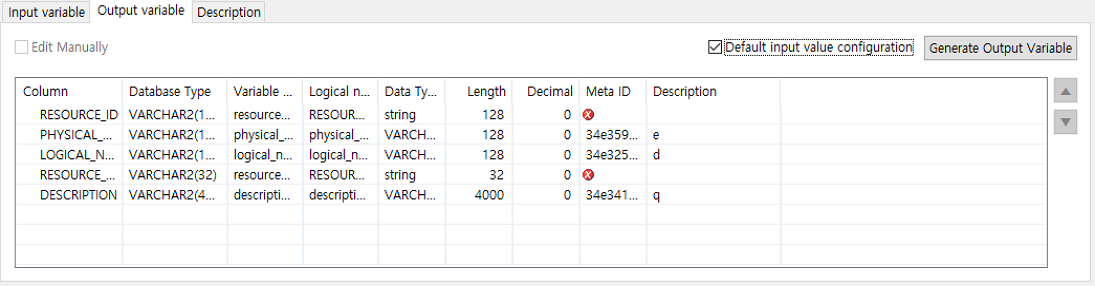 VIEW – After Creating Output Variable
If you do not create an output variable, a compilation error occurs.
If there is no meta ID for a created output variable, you can create its meta ID by selecting the Meta ID column.
The following creates a meta ID by selecting the Meta ID column and clicking [..].
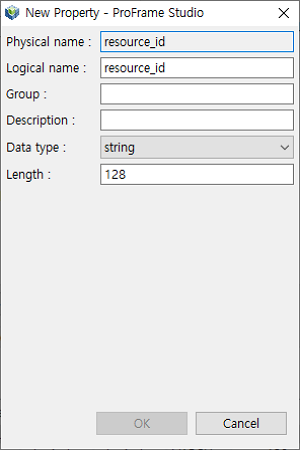 Meta ID Registration
The following describes each item.
Item Description Physical name
Physical name of the meta ID.
Logical name
Logical name of the meta ID.
Group
Name of a resource group that contains the meta ID.
Description
Description about the meta ID.
Data type
Data type of the meta ID.
Length
Length of the meta ID.
-
-
Check and test the created DBIO query.
The process for checking and testing the query is the same as described in PERSIST.
4.3. EXECSQL
The following is a scenario of creating a EXECSQL DBIO query.
-
Add basic information about DBIO.
Item Example Resource Group
DBIO_C
Query Type
EXECSQL
Exec Type
INSERT
Target table
DEV_RESOURCE
Logical name
DBIO_Execsql _logical
Physical name
DBIO_Execsql
-
Write a query to create.
Writing a query automatically creates an input variable.
-
Check and test the created DBIO query.
-
SQL preview
-
Test and execution plan check
-
ResultSet view
-
DBIO saving
DBIO of the EXECSQL query type allows DML queries that cannot be created for PERSIST. Data Manipulation Language (DML is a language used to search, insert, update, delete, and reconfigure database data.
-
The following are DML query examples.
-
Inserting a subquery to another table
INSERT INTO TABLE1 SELECT * FROM TABLE2 WHERE ID=:id
-
Updating Inline VIEW
UPDATE (SELECT COL1, COL2 FROM TABLE3) SET COL2=COL2+1
The following performs the previous scenario.
-
Select [New] > [DBIO Query] from the context menu of Workspace Navigator.
-
The following New Query Wizard opens. Enter basic DBIO information and then click [Finish].
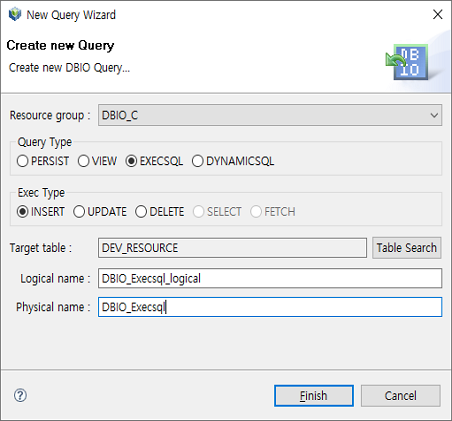 EXECSQL - New Query Wizard
 -
The DBIO editor for EXECSQL queries is displayed.
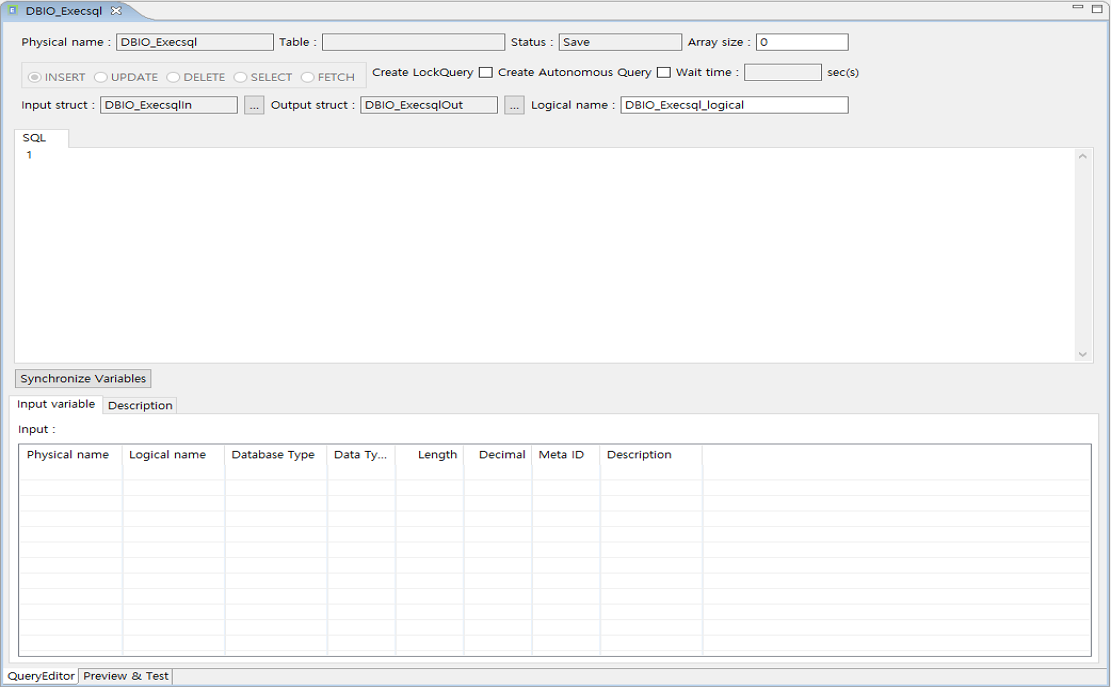 EXECSQL - DBIO Editor
 -
Enter the following query in the [SQL] tab.
INSERT INTO DEV_RESOURCE
SELECT * FROM DEV_RESOURCE_BAK WHERE RESOURCE_ID = :input_txt
 EXECSQL – [SQL] Tab
Writing a query automatically creates an input variable. The variable is displayed in the [Input variable] tab.
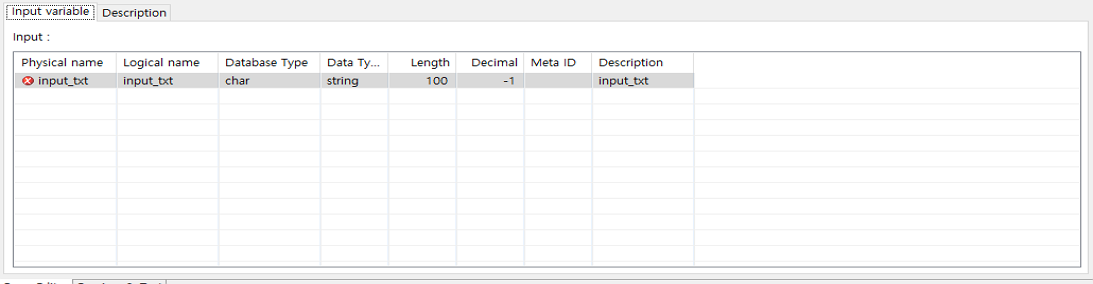 EXECSQL – [Input variable] Tab
 -
Check and test the created DBIO query.
The process for checking and testing the query is the same as described in PERSIST.
4.4. DYNAMICSQL
The following is a scenario of creating a DYNAMICSQL DBIO query.
-
Add basic information about DBIO.
Item Example Resource Group
DBIO_C
Query Type
DYNAMICSQL
Exec Type
SELECT
Target table
DEV_RESOURCE
Logical name
DBIO_Dynamicsql _logical
Physical name
DBIO_Dynamicsql
-
Write a query to create.
Writing a query automatically creates an input variable and a dynamic variable.
-
Create an output variable based on the created query.
-
Check and test the created DBIO query.
-
SQL preview
-
Test and execution plan check
-
ResultSet view
-
DBIO saving
-
|
DBIO of the DYNAMICSQL query type allows dynamic query changes during runtime and queries that cannot be handled in embedded SQL. By specifying dynamic variables in a query, you can change specified dynamic variable values at each runtime to create an actual query. The format of dynamic variables is similar to that of input variables. However, use a percent sign (%) that means a dynamic variable instead of a colon (:) that means an input variable. Note that a percent sign enclosed in single quotation marks (' ') means an SQL regular expression. |
Dynamic Variable Constraints
Dynamic variables have the following constraints.
-
A dynamic variable value cannot be an input variable.
INSERT INTO TABLE1 (col1, col2) VALUES (:col1, %var1)
In the previous example, 'var1' and 'col2' cannot have the same value.
-
You can change an item to retrieve with a SELECT clause at each runtime by setting the item as a dynamic variable. Since the name of a variable used to receive the retrieved value must be fixed, set an alias to the variable when an output item is set as a dynamic variable.
The following is a correct query.
SELECT %var1 AS id FROM TABLE1
The following is an incorrect query.
SELECT %var1 FROM TABLE1
var1="col1, col2"
-
Even when output items are set as dynamic variables, the number of variables used to receive retrieved values is fixed. The number of output items and that of aliases must be the same.
-
When a query is as follows: SELECT %var1 AS id FROM TABLE1
var1="col1" or var1="col2"
-
The following performs the previous scenario.
-
Select [New] > [DBIO Query] from the context menu of Workspace Navigator.
-
The following New Query Wizard opens. Enter basic DBIO information and then click [Finish].
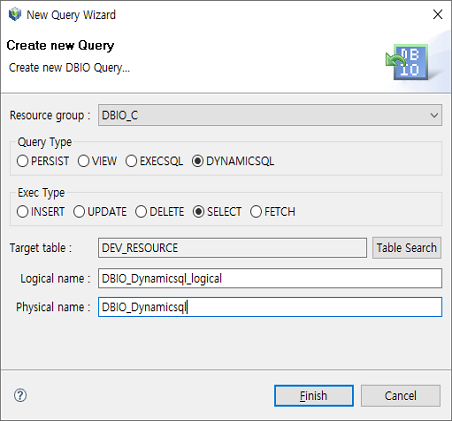 DYNAMICSQL – New Query Wizard
 -
The DBIO editor for DYNAMICSQL queries is displayed.
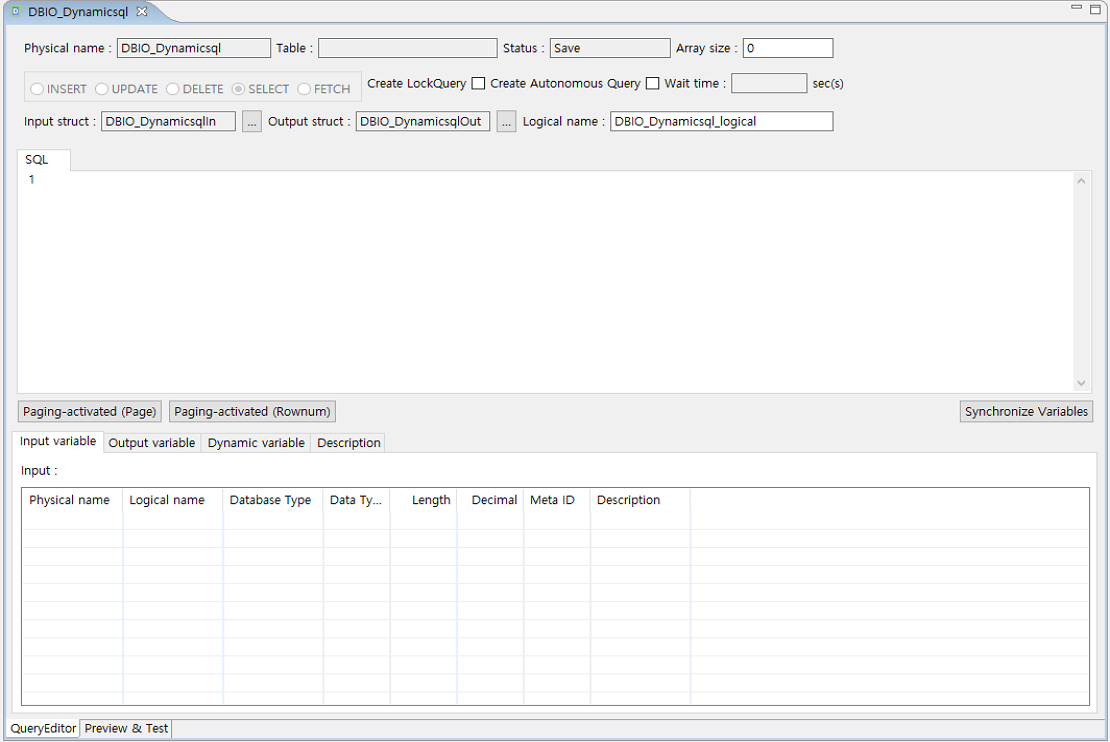 DYNAMICSQL – DBIO Editor
 -
Enter the following query in the [SQL] tab.
SELECT
 RESOURCE_ID
,PHYSICAL_NAME
,LOGICAL_NAME
,RESOURCE_TYPE
,DESCRIPTION
,%var1 AS CDATE
FROM DEV_RESOURCE
WHERE PHYSICAL_NAME = :input_txt
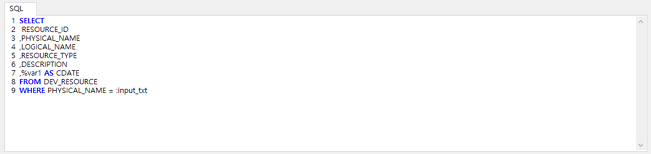 DYNAMICSQL – [SQL] Tab
Writing a query automatically creates an input variable. The variable is displayed in the [Input variable] tab.
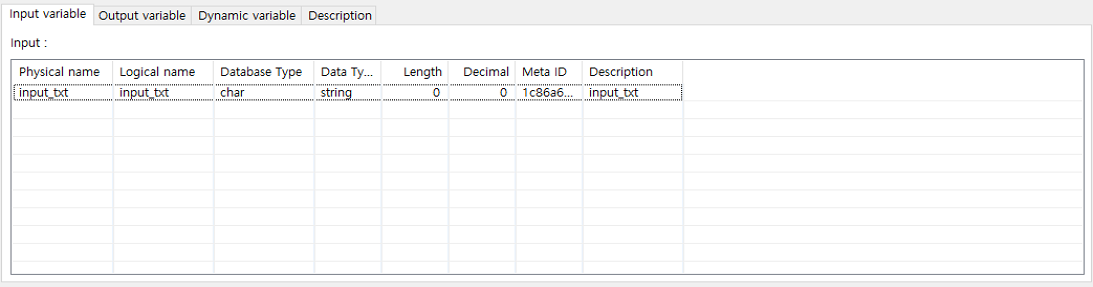 DYNAMICSQL – [Input variable] Tab
 -
Create an output variable based on the query created in the step 4 (DYNAMICSQL – [SQL] Tab).
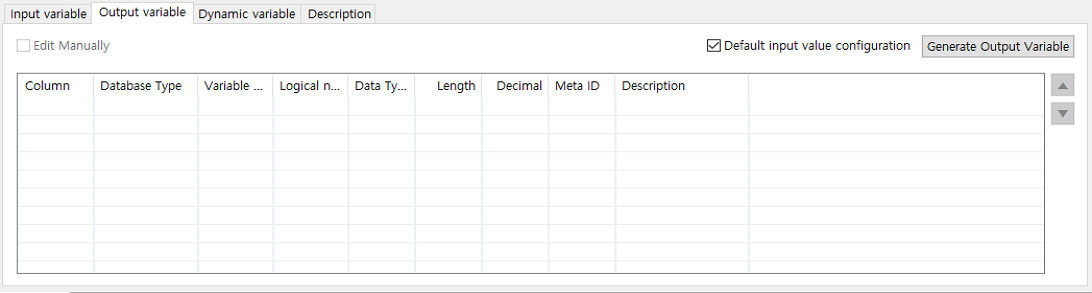 DYNAMICSQL – Before Creating Output Variable
The following describes each item in the [Output variable] tab.
Item Description Column grid
Refer to Using DBIO Editor.
Default input value configuration
Uses an arbitrary input value when [Generate Output Variable] is clicked.
This check box is selected by default.
Generate Output Variable
Automatically creates an output variable based on the query written in the [SQL] tab.
An output variable is the column as the result of executing a query of the SELECT and FETCH Exec types.
The following describes additional information.
-
Generate Output Variable
Clicking [Generate Output Variable] opens the following Input Dynamic Element variable dialog box where you can set values of specified dynamic variables.
To create an output variable, the value must be defined in a dynamic variable.
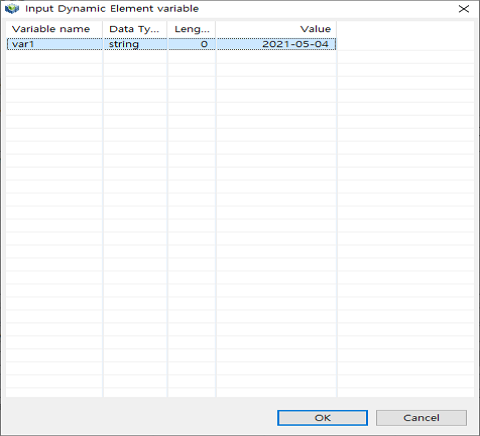 DYNAMICSQL – Input Dynamic Element Variable
Like VIEW, if there is no meta ID for a dynamic variable, you can create its meta ID in the [Dynamic variable] tab. For information about how to create a meta ID, refer to Meta ID Registration.
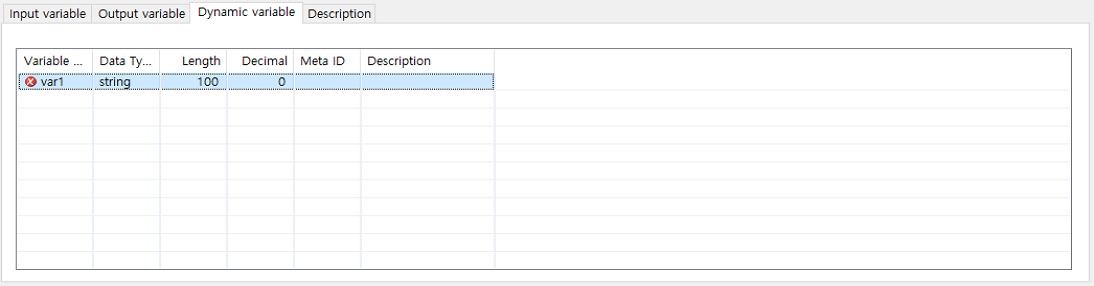 DYNAMIC – [Dynamic Variable] Tab
When creating a query including a dynamic variable, the variable is automatically created as shown in the previous figure. 'Length', 'Decimal', 'Meta ID', and 'Description' are editable.
 DYNAMIC – After Creating Output Variable
-
-
Check and test the created DBIO query.
The process for checking and testing the query is the same as described in PERSIST.
5. Compiling DBIO Queries
A created DBIO query is compiled in the following 4 steps.
-
Saving a DBIO query
Save DBIO query and input/output structure information. If items of the input/output structure (such as name, type, size, order, etc.) change because of query changes, the following window that says input/output information changes is displayed.
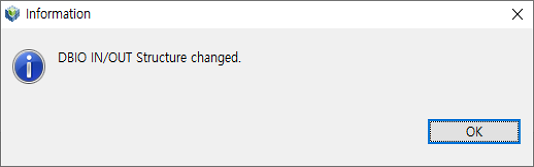 Information Window for Input/Output Structure Changes
 -
Creating source
A .pc file is created. The extension can vary depending on the DB product.
-
Compilation
-
Precompile the .pc file to create a .c file.
-
Compile the .c file to create an .o file.
-
Add the .o file to a .so file to combine them to one file.
-
-
Dlupdate
Execute Dlupdate on the .so file. Prepare the DBIO module to operate.
The following compiles a created DBIO query.
-
Right-click a created DBIO resource from ProFrameResource Navigator. From the context menu, select the [Compile Resource] menu to compile the resource.
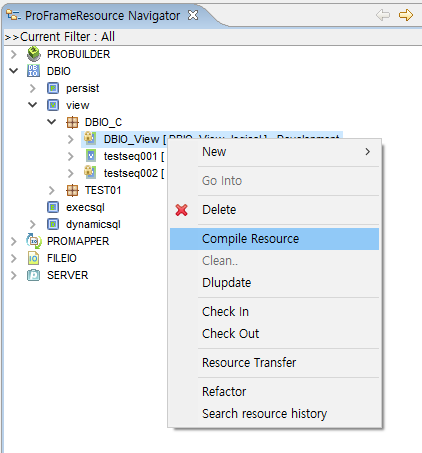 [Compile Resource] Menu
 -
Clicking [Compile Resource] not only compiles the selected DBIO resource but also execute Dlupdate on it. Selecting a DBIO resource and then pressing <ALT> + C or clicking the compilation icon has the same result.
During the compilation, you can check the progress in the Compile Resource window.
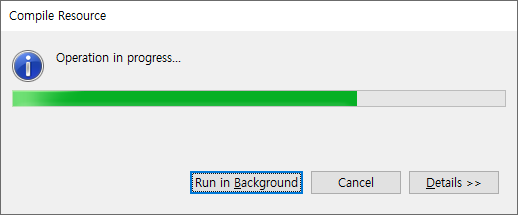 Compile Resource Window
 -
If the 'CHECK_DBIO_LINKING_LIST' option in WebAdmin is set to 'TRUE', the list of DBIOs created as SO along with DBIOs to compile can be checked as shown in the following figure. If the option is set to 'FALSE' or not set, the list cannot be checked.
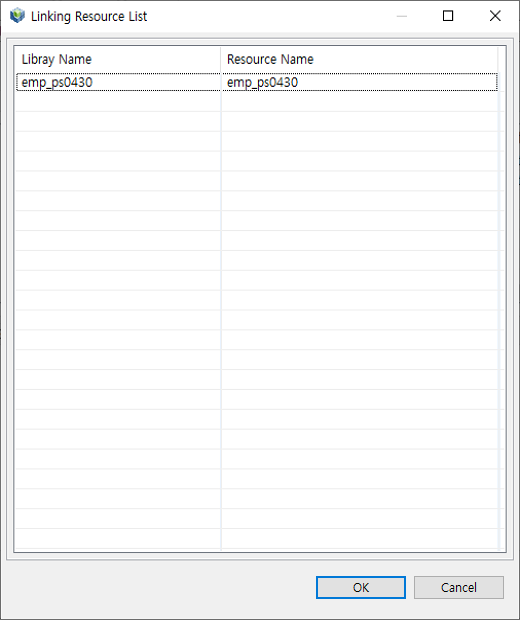 Linking Resource List Window
 -
If the compilation completes successfully, the following compilation log is displayed in the Console tab.
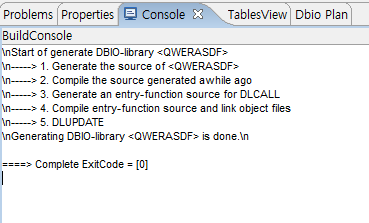 Compile Resource – Console
In the previous figure, ExitCode must be 0. Non-zero ExitCode means an error. If an error occurred in 1, 2, or 3, this means that the DBIO itself has an error. Check each item, or copy the created query and execute it in another database-related tool. If an error occurred in 4 or 5, this means that the DBIO is created successfully, but another DBIO combined with the DBIO in the same library has an error or the compilation was not successful. That is, an error occurred while combining DBIOs to a library (the DBIOs are displayed). To resolve this error, recreate DBIO with an error or compile each DBIO.