Introduction
This chapter introduces Studio and describes its features, components, and support functions.
1. Overview
Studio is a developing tool for service or business system based on ProFrame, providing system service design, data design, and coding for business development with convenience. This tool is able to minimize mistakes caused by arbitrarily coding by developers for using stable and advanced performance components.
Studio includes the following features:
-
Multi-project management
Povides an environment where more than one project is developed using the same studio and integrated server.
-
ReleaseImage/WorkSpace (hereinafter RI/WS)
In order to minimize the impact of the developer’s resource modification on other developers, it is divided into the RI area, which maintains and manages the same source as possible as the library in operation, and the WS area, where resources are developed through new creation and modification. It provides a flexible development environment by minimizing the impact of module modification on other developers.
-
Application program development based on integrated GUI
Integrates Eclipse-based tools and provides various types of application program development environments such as input/output information, service flow information, business rules, and data access information through interworking between tools.
-
Source Generation method
Minimizes the developer’s hard coding based on ProFrame and developer errors by generating verified sources.
-
Strict development control
Imposes the prohibited development standards such as prohibited functions or prohibited SQL and controls the permissions to prevent access or changes to specific resources.
Following is a description for all components of Studio.
| Component | Description |
|---|---|
EMB Designer |
Designs a service or business flow and writes source code. |
DBIO Editor |
Manages database table structures and database access modules. |
ProMapper Editor |
Registers input/output structure and structure conversion rules. |
FileIO Editor |
Registers information about input/output data. However, it is not included in the standard version, and users need to install a separately provided plug-in. |
Server |
Registers for online or batch service. However, it is not included in the standard version, and users need to install a separately provided plug-in. |
2. Start Program
Studio runs by selecting one of the following two methods.
-
Running TmaxSoft menu
Runs [Start] > [Program] > [TmaxSoft] > [ProFrameC5.0] > [Studio] > [ProFrame5C] menu. Depending on the installation path, the location of the corresponding menu can be changed.
-
Running shortcut icon
Select the ProFrame5C Shortcut icon on the desktop and double-click it to run.
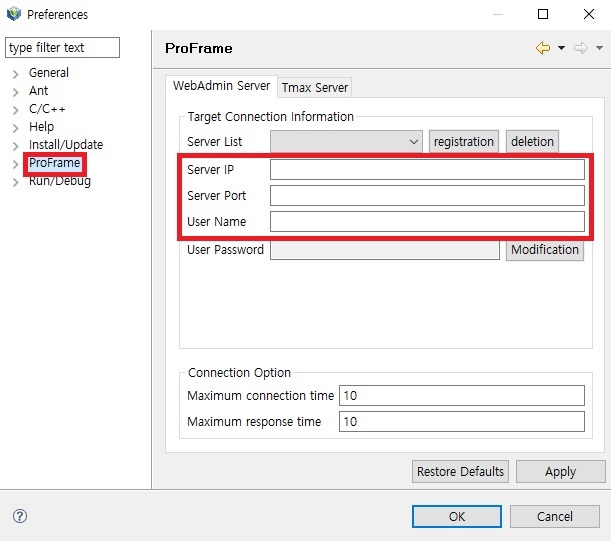
2.1. Login Configuration
The following are the steps for setting up the integrated server to log in.
Click [Window] > [Preferences] and select [Pro Frame] from the left menu of the dialog box. Enter the information to access in the configuration dialog box and click the [OK].
2.2. Login
When the login settings for communication between the studio and the integration server are completed, click the [Login] located at the top of the studio menu.
Enter the project ID, ID and password to access the login screen and click the [Login].
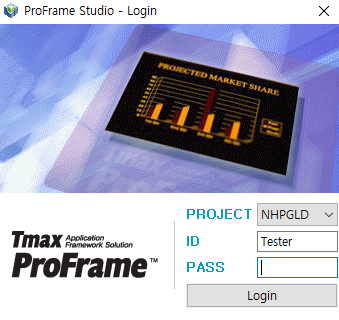
|
The integration server must be running to log into the studio. |
3. Screen Configuration
The studio screen that appears after logging in consists of six areas.
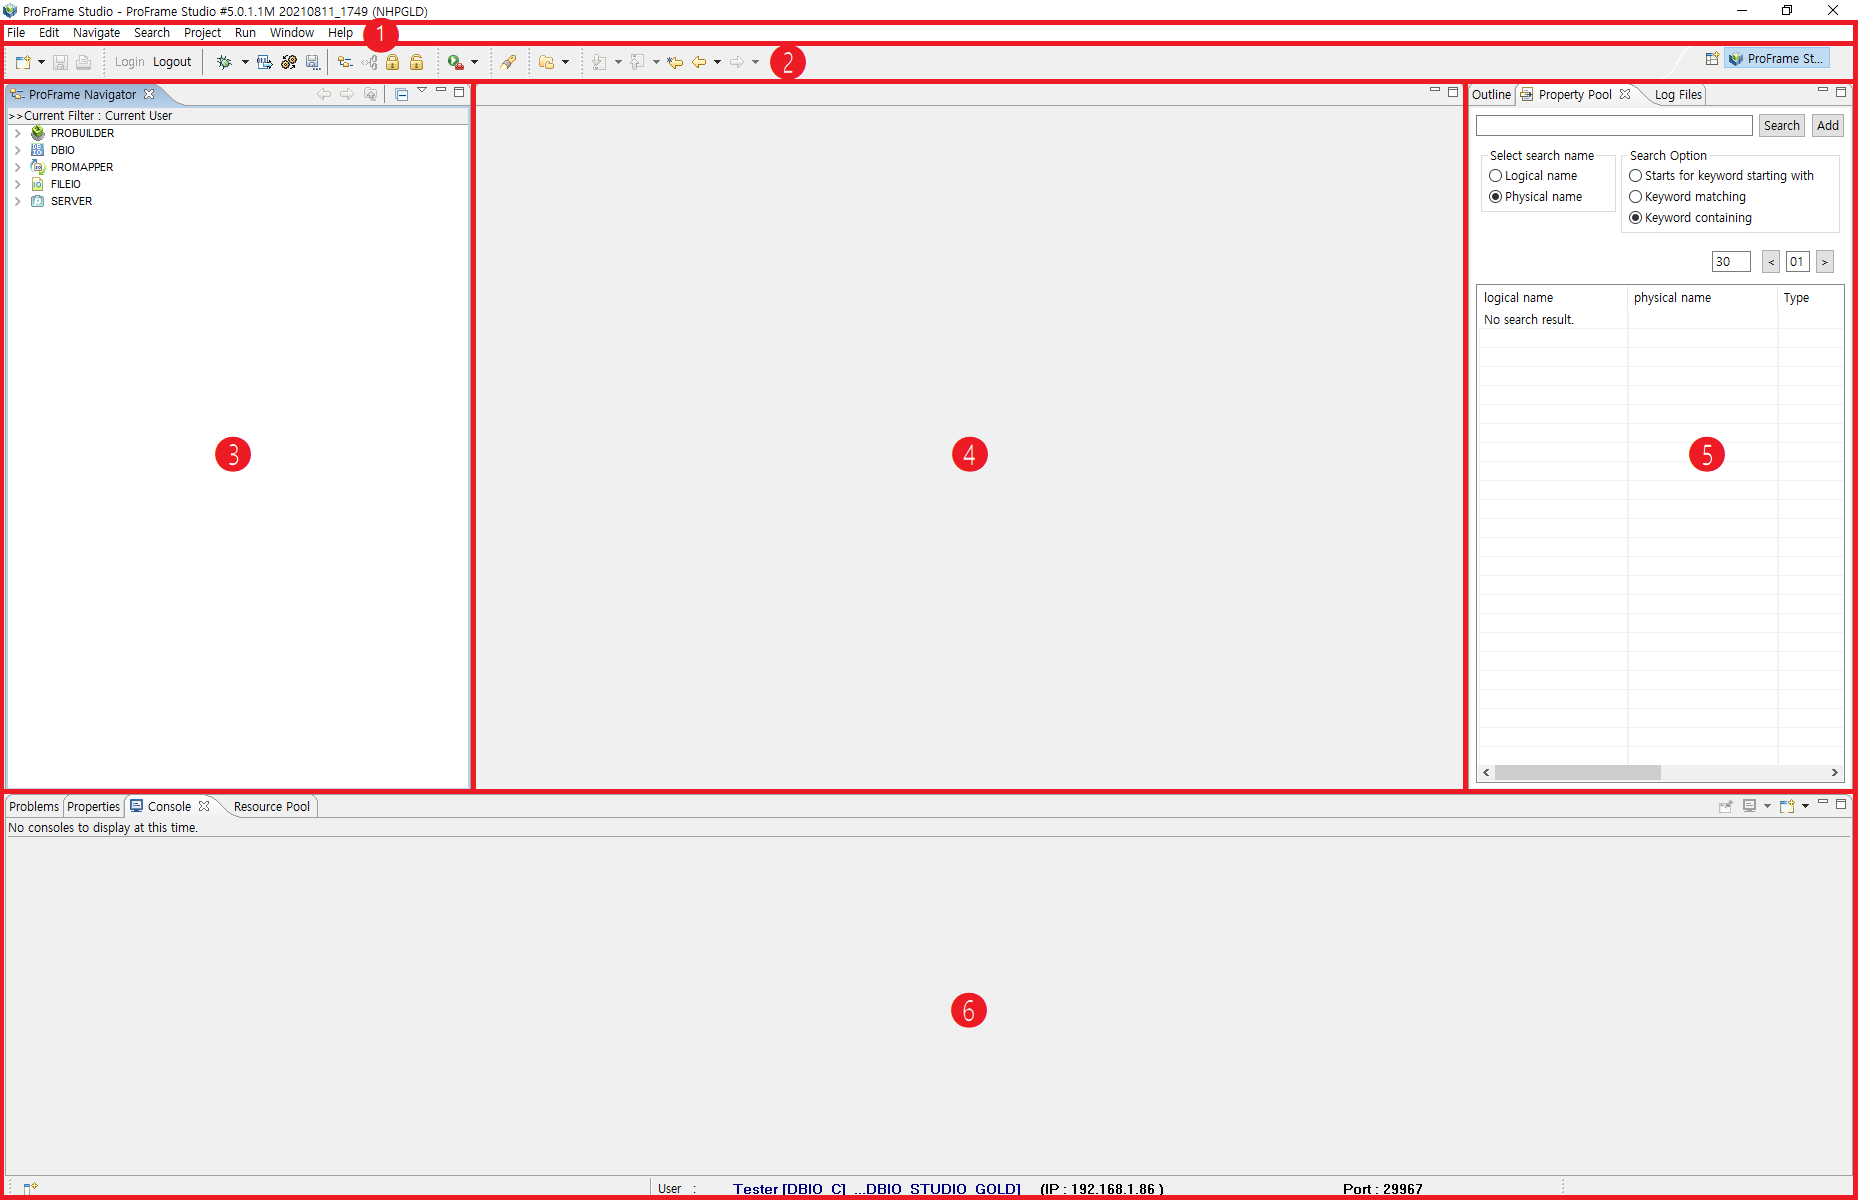
① Main menu
② Tool bar
③ Navigator
④ Editor
⑤ Outline
⑥ Support functions
3.1. Main Menu
The main menu is the area corresponding to No.1 in the previous figure and consists of File, Edit, Refactor, Inquiry, Search, Project, Run, Window, and Help.
Among them, menus excluding [Window] > [Show View], [Window] > [Preferences], [Help] > [ProFrame Studio Information] are Eclipse menus, so only the menus not in Eclipse are described in this guide.
-
Window
A menu related to tab management shown in the support function area.
Menu Description Show View
Basically provides Resource Dependency, Resource History, Resource Pool, Problems, Outline, Console, Attribute and ProFrame Navigator. To check other tabs, select [Others] and select the desired tab.
Refer to Functionality for more information on each tab.
Preferences
Allows the developer to change the studio environment.
Refer to Studio Preferences for more information on preferences.
-
Help
A menu that provides the studio help.
-
About ProFrame Studio
 About ProFrame Studio
The following is a description of the buttons in the dialog box.
Button Description [Plug-in Details]
Displays information of the plug-in in use (including provider, name, version and ID of the plug-in).
[Configuration Details]
Displays all information from the OS where Eclipse runs to plug-ins.
-
3.2. Toolbar
Displays some of the key menus in the main menu for quick execution of specific functions.
3.3. Navigator
Navigator consists of ProFrame (RI) navigator, Workspace (WS) navigator and WebAdmin navigator.
Following are details of each navigator.
-
ProFrame Navigator
It is a basic navigator for checking resources created by each provider or to add, delete, or modify new resources. However, when using the RIWS function, users can only check the resources in the RI area, and cannot add or modify resources.
-
Workspace Navigator
It is available only when using the RIWS function, and is used to check WS resources created for each provider or to add, delete, or modify new resources.
-
WebAdmin Navigator
It can be used only by users with the ADMIN role that can be granted through WebAdmin, it provides a read-only function to check the resources of each provider of all projects.
Top side of each navigator has a toolbar that provides functions for controlling the navigator tree.
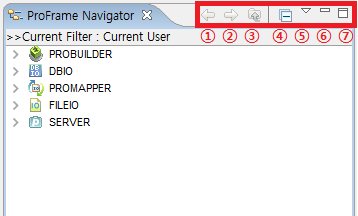
| Icon | Description |
|---|---|
|
Moves forward, backward, and up in the tree of the navigator. (Currently, this function is not used in the studio.) |
|
Collects only the top node to be displayed when the navigator tree is expanded. |
|
Sets the filters for filtering and displaying the resources in the navigator. |
|
Minimizes the navigator area. |
|
Maximizes the navigator area. |


The following is a description of  icon on the toolbar.
| Category | Items | Description |
|---|---|---|
Resource Filter |
All |
Displays all the resources developed with the menu set as the default value. |
Current Users |
Displays only the resources of the currently logged in user. |
|
Custom |
Displays a dialog box where the user can define filter conditions. Refer to "Resource Filter – Custom" for more information. |
|
Resource Name |
Physical Name |
Displays the resources in navigator only as physical name. Default value. |
Logical Name |
Displays the resources in navigator only as logical name. |
|
Physical Name + Logical Name |
Displays the resources in navigator with the format of 'physical [logical] name'. |
|
Group Name |
English |
Displays group name only in English. Default value. |
Korean |
Displays group name only in Korean. |
|
English + Korean |
Displays group name with the format of 'English [Korean]'. |
|
Navigator Route |
Provider-based View |
Displays the tree structure by setting the available resources as the route. Default value. Refer to "Navigator Route Configuration" for more information. |
Group-based View |
Displays the tree structure by setting the developer resource group as the route. Refer to "Navigator Route Configuration" for more information. |
|
Team-based View |
Displays the tree structure by setting the team to which the developer belongs to as the route. Refer to "Navigator Route Configuration" for more information. |
The following is a description of the detailed items of the toolbar.
-
To enter the filter conditions, click [Resource Filter] > [Custom].
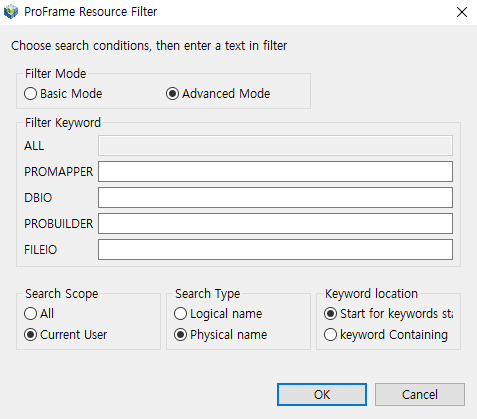 Resource Filter – Custom Dialog Box
Item Description Filter Mode, Filter Keyword
-
When you click Basic Mode, ALL in Filter Keyword is activated.
-
When you click Advanced Mode, other items excluding ALL in Filter Keyword are activated.
Enter the filter keywords in the active field.
Search Scope
Select the desired scope among all resources or the developer’s resources.
Search Type
Set whether to filter by logical name or physical name.
Keyword Location
Set whether the registered keyword is the beginning words or included words of the resource name.
-
-
Click [Navigator Route Configuration] to select which item to configure the tree as the route.
The overall tree structure of the navigator is as follows.
Step Item Description Step 1
Superordinate Dept. Name
Displays the superordinate department name to which the developer belongs.
Step 2
Department Name
Displays the department name to which the developer belongs.
Step 3
Type of Available Resources
Displays available resources in the studio.
Step 4
Subdivision of Available Resources
Displays subdivision of available resources in the studio.
Step 5
Developed Resources
Displays the developed resources.
-
Select [Provider-based View] to display the tree with the order of Step 3 > Step 4 > Step 2 > Step 5.
-
Select [Group-based View] to display the tree with the order of Step 2 > Step 3 > Step 4 > Step 5.
-
Select [Team-based View] to display the tree with the order of Step1 > Step 2 > Step 3 > Step 4.
-
Navigator Menu
The following is a description of the menu that appears when you select a resource in each area and right-click.
-
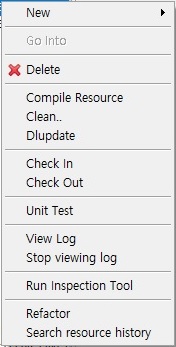
ProFrame Navigator
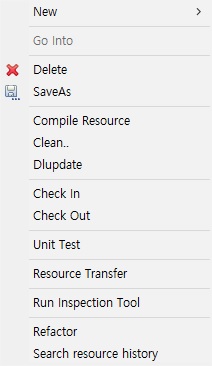 ProFrame Navigator Menu
-
[Delete]
Deletes the information of the selected resource.
-
[Compile Resource], [Dlupdate]
Execute compile and Dlupdate to reflect the newly created resources in the program. Compiling and Dlupdate are sometimes executed at the same time, but sometimes only a part is executed.
The target of compiling and Dlupdate is as follows.
Item Compiling Dlupdate All types of module
O
O
DBIO
O
O
Input/output structure
O
O
Message
X
X
Map
X
X
-
[Clean]
Compiles the selected resources with –clean option.
-
[Check Out]
Checks the selected resources out. Depending on the availability of RI/WS functions, check in/out function varies.
Refer to ProFrame EMB Developer Guide for more information.
-
[Discard Check Out]
Does not reflect the resources checked out in RI area and changes the status to check in after deleting the resources checked out in WS area.
-
[Unit Test]
Checks whether the created resource works properly. This menu is only activated in the service module and business module.
Refer to ProFrame Unit Test Guide for more information.
-
[View Log], [Stop Log]
Runs the unit test to check the logs generated on the integrated server in the studio. This menu is only activated in the service module and business module.
Refer to ProFrame EMB Developer Guide for more information.
-
[Run Inspection Tool]
Runs Inspection Tool for the selected resources when the tool exists in the integrated server.
-
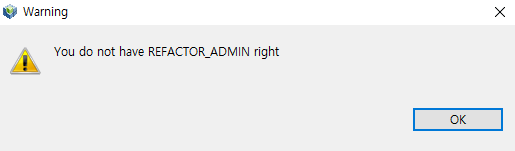
[Refactor]
Changes the name of a resources. The function is only performed by the user with the role of REFACTOR_ADMIN. If the user does not have the role of REFACTOR_ADMIN, the following pop-up message appears.
When a user with the role of REFACTOR_ADMIN selects the [Refactor], a dialog box for changing the resource name appears.
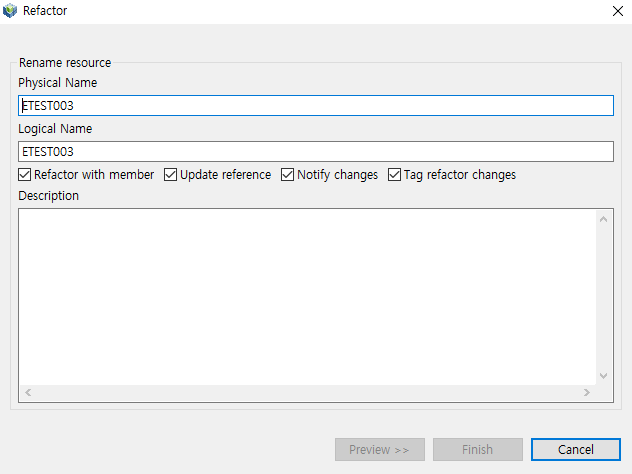
Item Description Physical Name
A physical name of the changed resource.
Logical Name
A logical name of the changed resource.
Check box
-
Refactor with member: executes refactoring for all members.
-
Update reference: executes refactoring for all related resources.
-
Notify changes: notifies the changes.
-
Tag refactor changes: adds tag on the refactoring resources.
Description
Reason for refactoring.
Click [Preview] to preview the contents and click [Finish(F)] to complete the operation. To cancel the work, click [Cancel].
-
-
[View History]
You can check the resource history on [Resource History] tab of support function area.
Refer to Resource History for more information.
-
-
Workspace Navigator
 Workspace Navigator Menu
-
[New]
The sub-menu of [New] in Workspace Navigator is as follows.
Menu Description FileIO
Creates resources of FileIO module.(It is displayed only when a separate FileIO plugin is installed.)
Module
Creates module resources.
Header
Creates header resources.
Shell
Creates shell resources.
Structure
Creates structure resources.
Message
Creates message resources.
Mapping
Creates mapping resources.
Server
Creates resources such as general deployment, resident deployment, and POD deployment module (It is displayed only when installing a separate SERVER plugin).
EMB Design
Creates resources such as service module, batch module, business module, preprocessing module, post-processing module, template module, etc.
EMB Batch Design
Creates resources, such as batch module, batch template, etc.
DBIO Query
Creates resources of query type (PERSIST, VIEW, EXECSQL, DYNAMICSQL).
Table Basic Query
Creates resources of 5 Pesist Type (INSERT, UPDATE, DELETE, SELECT, FETCH) for one table.
-
[Check In]
Check in the selected resources. Check-in/check-out function varies depending on whether RI/WS function is used. Refer to ProFrame EMB Developer Guide for more information.
The functions of Delete, Compile Resource, Dlupdate, Clean, Unit Test, View Log, Stop Log, Run Inspection Tool, Refactor, and View History are the same as those of ProFrame Navigator.
-
3.4. Editor
Users can select the desired resource in the navigator area and double-click it to display the corresponding contents in the editor of Studio Screen Configuration.
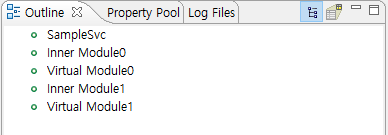
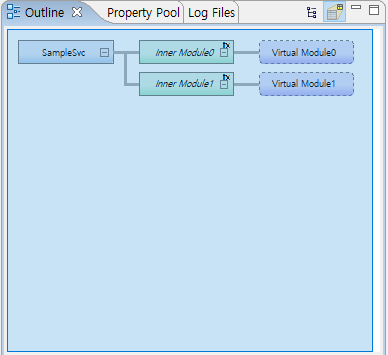
3.5. Outline
Displays the source structure of the service or module and thumbnail image of the EMB screen.
Since the version of ProFrame 5.0 Fix1, a function that shows the location of the node currently being modified by reducing the entire view in the [source] tab of the EMB editor has been added. Nodes being modified are displayed in black. The position of the node being modified appears only when the source is dragged or directly modified.
3.6. Functionality
Includes the functions such as resource dependency search, history search, etc. in Studio Screen Configuration. [Problems], [Properties], and [Console] tabs are displayed by default and users can select [Resource Dependency], [Resource History], [Resource Pool], [Outline] to add tabs in [Window] > [Show View].
-
[Problems]
Displays error description in the studio.
 Problems View
 -
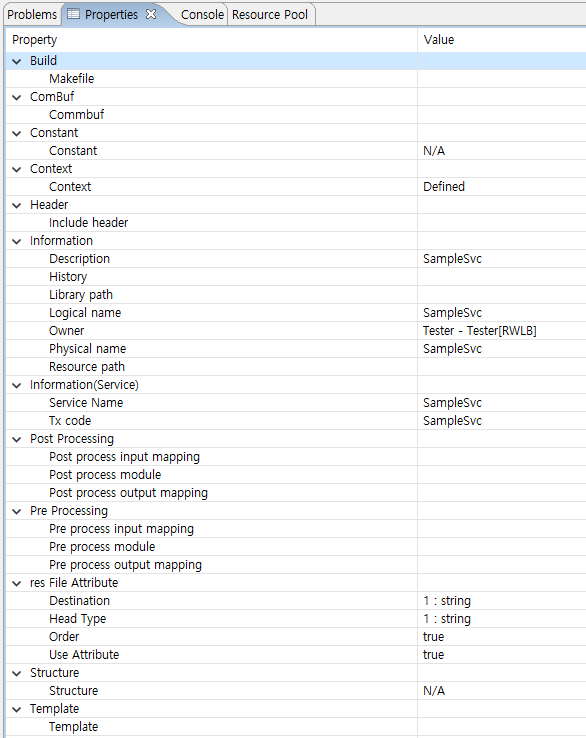
[Properties]
The resource information users want to inquire about is displayed differently whether to click or double-click the [Properties] tab. The [Properties] tab when clicking the resource is as follows.
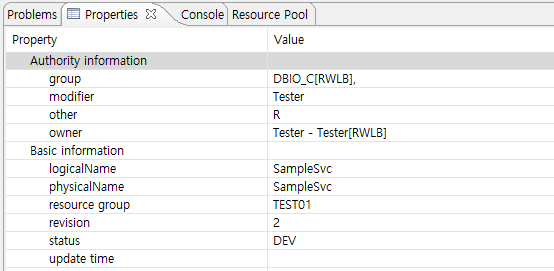 Example 1 of Properties Tab
The information is categorized into authority information and basic information in properties tab.
Category Item Description Authority information
group
Group name to which the resource belongs
modifier
Resource modifiers
other
Users other than the owner and the owner’s group
owner
Resource owner
Basic information
logicalName
Logical name of resource
physicalName
Physical name of resource
resource group
Group name to which the resource belongs
revision
Revision number of resource
status
Resource status
-
C: compiling status
-
DEV: development status
-
E: error status
update time
Last updated date and time
The [Properties] tab that appears when you double-click a resource is as follows.
 Example 2 of Properties Tab
Refer to ProFrame EMB Developer Guide for more about the properties.
-
4. View
4.1. Console
Displays the corresponding service logs when executing compile, result and error of Dlupdate, or view log for unit test.

4.2. Resource Dependency
Modifying or deleting a module may affect other modules that are using the corresponding module. Therefore, check the resource dependency with [Resource Dependency] tab before editing or deleting.
The order of resource dependency information is as follows. The standard target is RI resources.
-
Click [Search Name] in [Resource Dependency] tab.
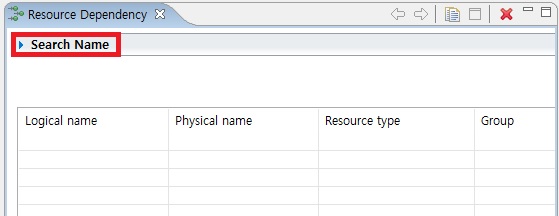 Start Screen of Resource Dependency
 -
When the following screen appears, enter a keyword to search for dependencies in 'Keyword' and click [Search Name] to search.
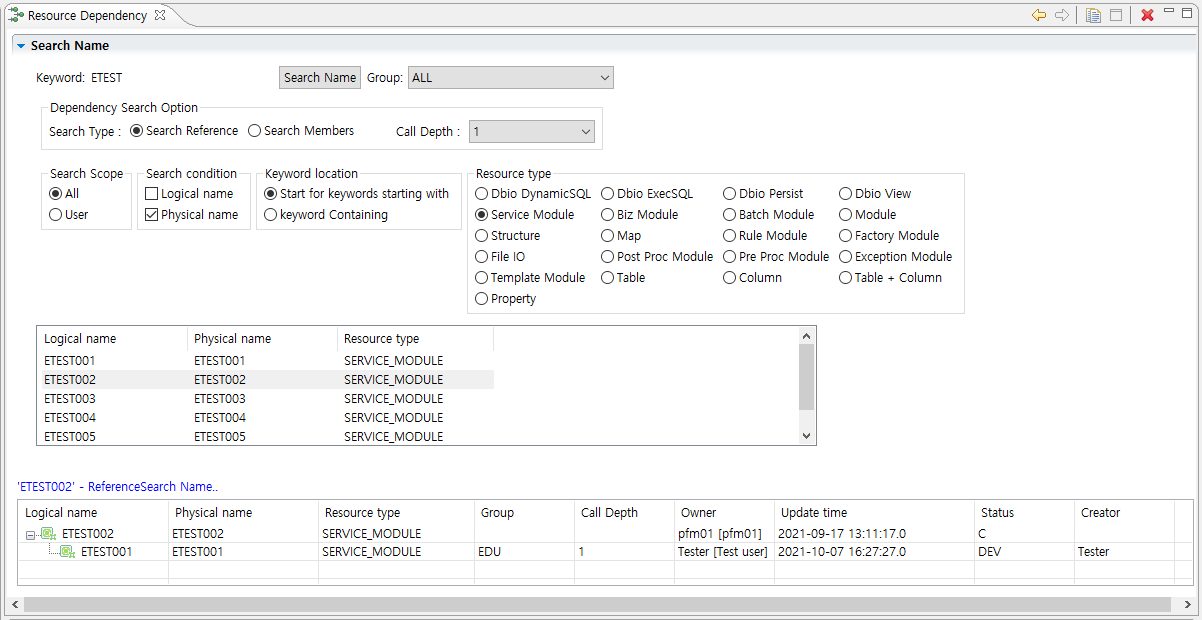 Resource Dependency
Set the following search conditions.
Condition Description Dependency Search Option
Select the search type in Dependency Search Option.
-
Search Reference: displays the resource list of search reference.
-
Search Members: displays the components of the resources, that is the list of members, to be searched.
-
Call Depth: decides up to how many levels (Call Depth) to search in performing a reference search.
Search Scope
Set whether to search only for resources developed by the developer or search for all resources.
Search Condition
Set whether the entered search keyword is the physical name or logical name of the resource. If they are selected at the same time, they are searched by AND condition.
Keyword Location
Set whether the entered search keyword is a starting word or an included word in the resource name.
Resource Type
Displays the resource type for search. Only the selected resource type is searched.
-
-
Double-click the resources for dependency search in the searched resources.
-
Check the search results in the table at the bottom of the screen.
4.3. Resource History
When a resource is changed, a resource history is created. The resource history is used when comparing the contents of a resource currently being developed with an old resource or when returning to a previous state.
Check the resource history in the following order.
-
Click [Search Name] in [Resource History] tab.
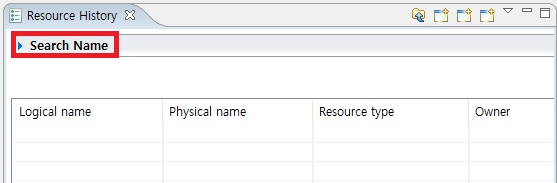 Start Screen of Resource History
 -
Enter 'Keyword' and click [Search Name].
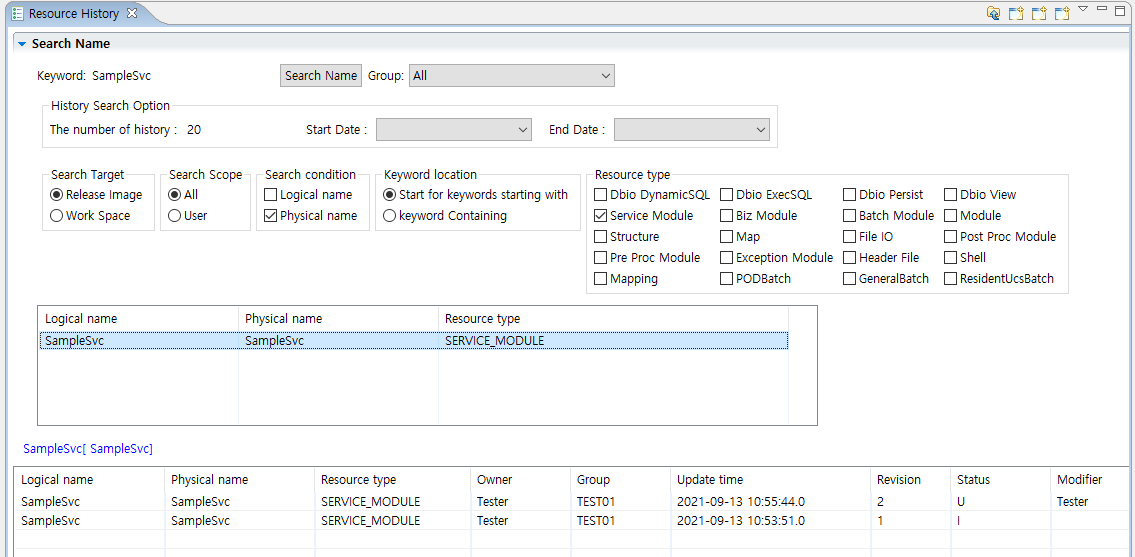 Resource History
Set the following search conditions.
Condition Description History Search Option
Select the desired item in the history search option.
-
The number of history: sets for how many history of the resources from top of the list will be displayed on the screen.
-
Start date and end date: sets the relevant date to check the history from the start date to the end date.
Search Scope
Set whether to search only for the resources developed by the developer or search for all resources.
Search Condition
Set whether the entered search keyword is the physical name or logical name of the resource. If they are selected at the same time, they are searched by AND condition.
Keyword Location
Set whether the entered search keyword is a starting word or an included word in the resource name.
Resource Type
Displays the resource type for search. Only the selected resource type is searched.
-
-
Double-click the resources for history search in the searched resources.
-
Check the search results in the table at the bottom of the screen.
Restore/Compare Resource
With a search result, users can restore the current resource to the previous one, or compare the current resources with the previous one.
-
Restore Resource
Restores the current resource state to the previous one.
All restored resources are saved in the workspace regardless of the resource target. Select the desired resource from the search results. Right-click and select the [Restore] menu. When Set history comments dialog box appears, enter the content in 'Comment' and click [OK].
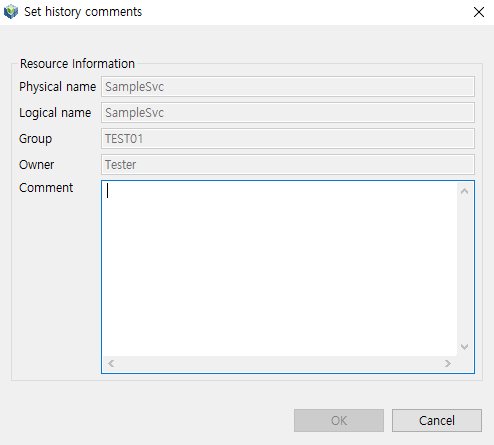 Restore Resource
 -
Compare Resource
Compares the current resource state and the previous one.
Select the desired resource from the search results using the resource history. Right-click and select the [Compare] menu. In the editor area, the codes of two resources are compared. Editor displays the comparison for the code of two resources.
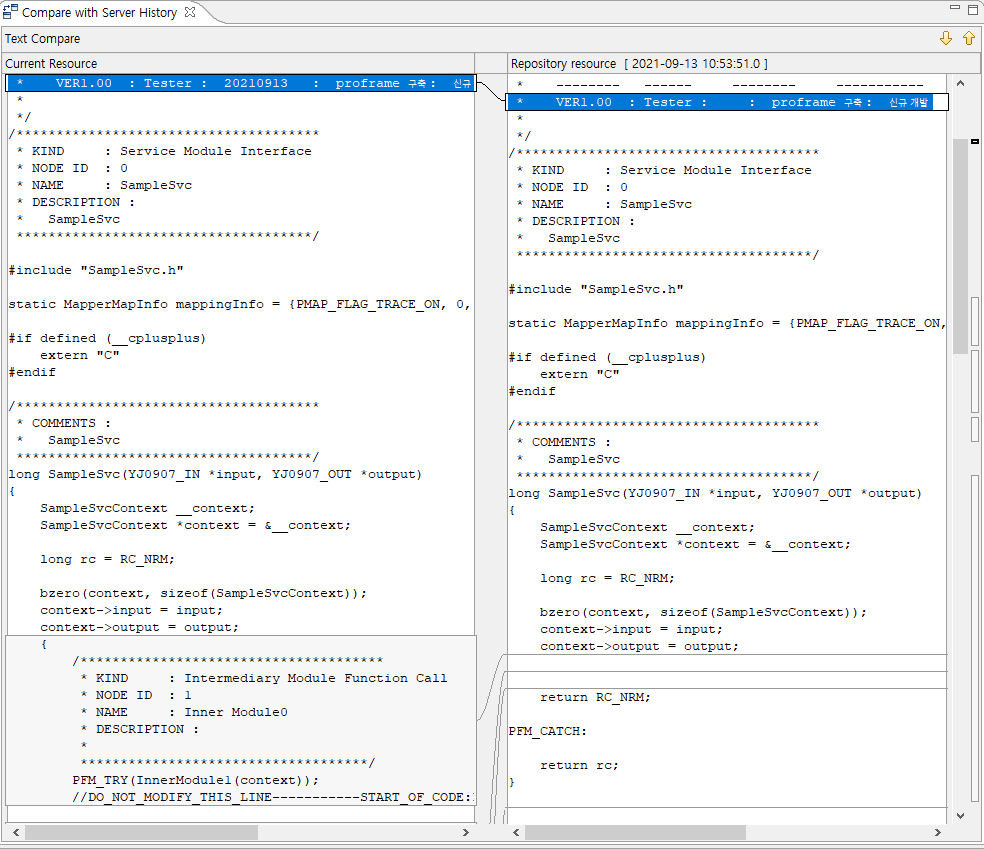 Compare Resource
4.4. Resource Pools
Enables to search for the developed resources.
-
Click [Resource Searching Option] to enter search conditions. However, the standard target is RI resources.
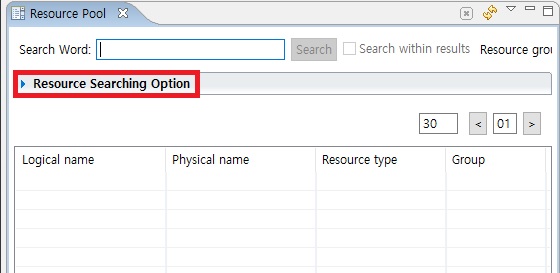 Start Screen of Resource Pool
 -
Enter a 'Search Word' and click [Search].
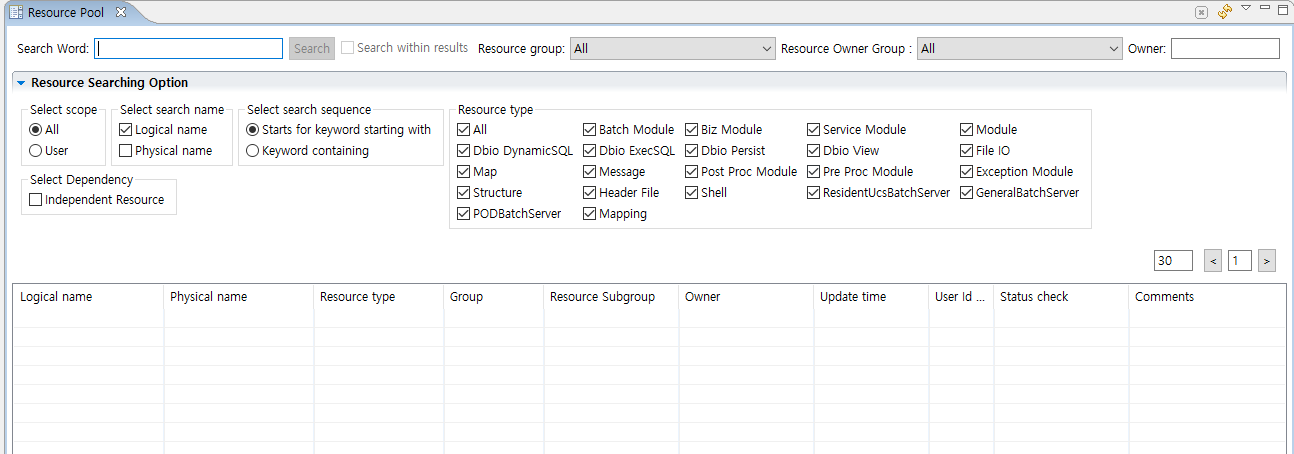 Search with Resource Pool
Select the desired item in Resource Searching Option.
Item Description Owner
Enter the owner’s name when searching for the resource with a specific owner.
Select Scope
Set whether to search only for resources developed by the developer or search for all resources.
Select Search Name
Set whether the entered search keyword is the physical name or logical name of the resource. If they are selected at the same time, they are searched by AND condition.
Select Search Sequence
Set whether the entered search keyword is a starting word or an included word in the resource name.
Resource Type
Displays the resource type for search. Only the selected resource type is searched.
Select Dependency
Only searches the resources that do not have dependencies on other resources. If this option is selected, users can delete the search results.
-
To view the details of the search results, double-click the desired item among the search results. Check the corresponding contents displayed in the editor area. After selecting the desired item from the search results, right-click to use the following additional menu.
-
[Delete]
Deletes the selected resources.
-
[Refresh]
Refreshes the information of selected resources.
-
[Compile Resource]
Compiles the selected resources.
-
[Clean..]
Compiles the selected resources with clean option.
-
[Dlupdate]
dlupdate the selected resources.
-
[Unit Test]
Refer to ProFrame Unit Test Guide for more about unit test.
-
[Check In]
Check in the selected resources.
-
[Check Out]
Check out the selected resources.
-
[Complete Development (Request to QA)]
Request a test for the resources to QA.
-
[Request Review]
Request a review for the selected resources.
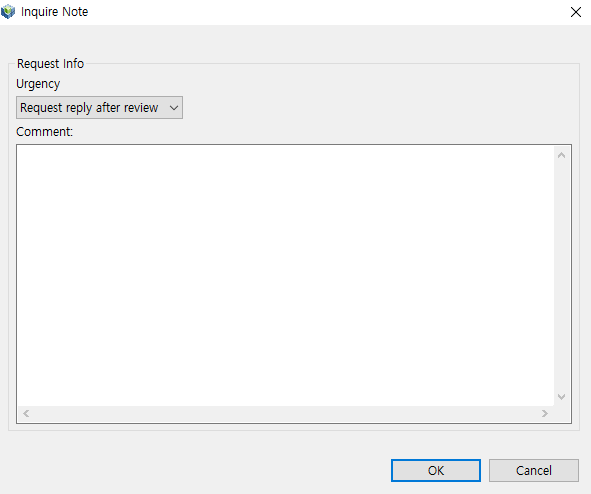 Review Request Dialog Box
Select the item according to the urgency of the request.
Category Item Description Urgency
Urgent review
Requests the urgent review.
Request replay after review
Requests a replay after review.
Review request
Requests a general review.
Review reference
Sets a review reference.
Inform about task
Sets task notifications.
Comment
-
Enters any other desired information.
-
[Notice of Change]
When a resource owner clicks this menu, the change history of the resource is displayed as shown in the following figure.
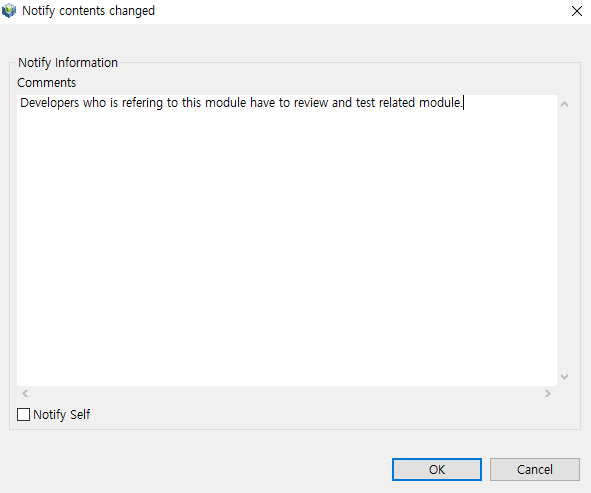 Notify contents changed
If a user who is not the owner of the resource clicks this menu, the following message appears.
-
[Set Release Tag]
Set a tag for release management. Click [OK] after entering the name to be tagged in ‘Tag/Title’ and the contents related to tag setting in ‘Comments’.
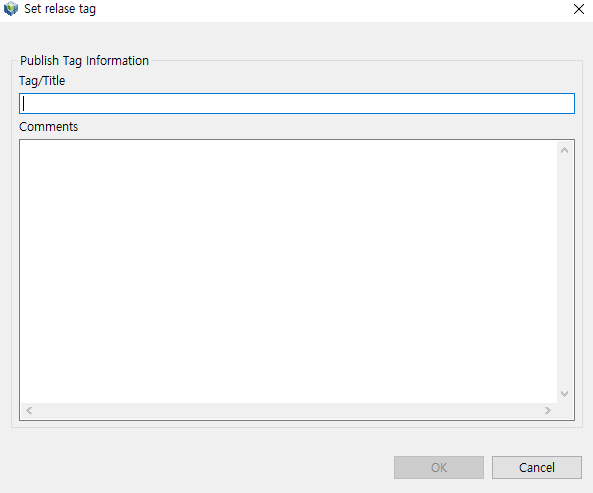 Set Release Tag
 -
[Request for Releasing Resources]
Requesting for release is as follows.
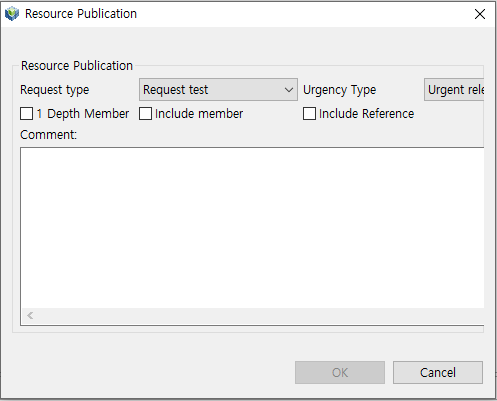 Release Publication Request Dialog Box
Category Item Description Request Type
Test Request
Requests a test for resources before publication.
Bug Fix
Requests to fix a bug before publication.
Dependency Check Request
Requests a dependency check for resources before publication.
Request Again
Requests a review for resources again before publication.
Check Box
1 Depth Member
Requests a publication only for a set of members of resources.
Include Member
Requests a publication including a set of members of resources.
Include Reference
Requests a publication including all resources referenced by the resource.
Comments
-
Inputs the comments for request for resource publication
-
[Add to Project]
Enables to manage the developed resources.
-
[Release of Basic DBIO Request]
Enables to publish only the DBIO module. The contents of the dialog box are the same as the [Resource Publication Request] as aforementioned.
-
[Set Inspection Tag]
Enables to set tags related to inspection tool management. The contents of the dialog box are the same as the [Set Release Tag] as aforementioned.
-
[Transfer Resource]
Enables to change the owner and change the group at the same time. Select a new owner in 'New Owner' and a new resource group in 'New Group' and then click [OK] to complete.
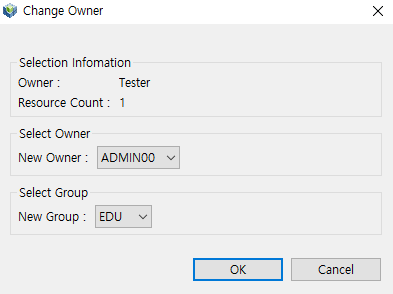 Change Owner Dialog Box
 -
[Change Resource Group]
Enables to change the resource group. Select a new resource group in ‘New Group’ and click [OK].
 Change Group Dialog Box
 -
[Manage Resource User Right]
Enables to change user right settings for resources.
-
[Version Tag]
Enables to tag resources as a group when they have dependency or need to be grouped.
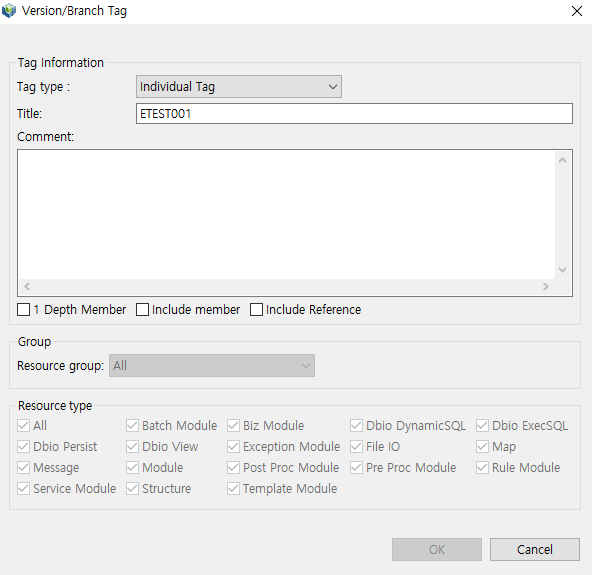 Version/Branch Tag Dialog Box
Item Description Tag Type
Select either individual tag or group tag.
Title
Enter the tag name.
Comments
Enter the tag comments.
Check Box
-
1 Depth Member
-
Include Member
-
Include Reference
Resource Group
Select resource group.
Resource Type
Select resource type.
-
-
[Export to Excel File]
Exports a search result to an excel file.
-
[Refactor]
Enables to change the resource name. Refer to the "Refactor" in Navigator for more information.
-
[View History]
Enables to view history of the resources. Refer to Resource History for more information.
-
4.5. Other Views
The following is a description of other views.
| View | Description |
|---|---|
Checks the number of calls to the resources and the called resources. |
|
Creates a description for each node. |
|
Checks the SQL usage for the table being used in the service module. |
|
Checks the execution plan of the query created through DBIO. |
|
Inquires and deploys the resource requested for review. |
|
Retrieves information about mapping relationships in the currently opened service module or business module. |
|
Uploads a template file (.xls) that defines information related to module creation and retrieves new resources in ProFrame. |
|
Uploads the template file (.xls) that defines the specification of the module and registers it as a new resource in ProFrame. |
|
Retrieves metadata registered in WebAdmin. |
|
Requests for review on the quality of the resource that has been developed. |
|
Uploads a template file (.xls) that defines information related to structure creation and retrieves a new structure in ProFrame. |
|
Searches the module being used in DBIO Design. |
|
Immediately checks the contents of the structure without opening the ProMapper editor. |
|
Enables to view the table schema of the database connected to the preferences. |
|
Checks the variables accessible in the currently activated EMB Designer. |
|
Enables to create a virtual function or add the created function to EMB Designer. |
|
Retrieves the status of a resource. |
|
Approves the resource requested for deployment. |
|
Changes the name of a resource. |
|
Makes a deployment request to resources. |
|
Enables to search for the history of resource deployment and reflect it with the latest resource. |
|
Retrieves the version history of a resource. |
|
Checks the user rights and sets the user permissions for resources. |
|
Requests an approval for resources. |
|
Checks the resource statistics for each project by dividing them by project and owner. |
Refer to the relevant paragraph for details on each screen.
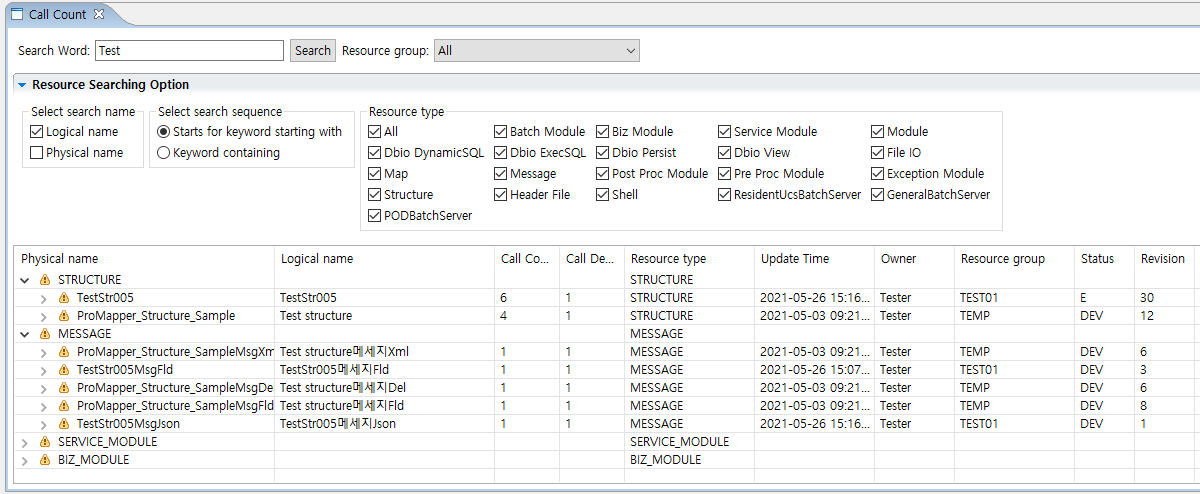
[Call Count]
Enables to check the number of calls to the resources and which resource it was called from. The standard target is RI resources.
Select [Window] > [Show View] > [Other] and then click [ProFrame Studio] > [Call Count] in Show View dialog box.
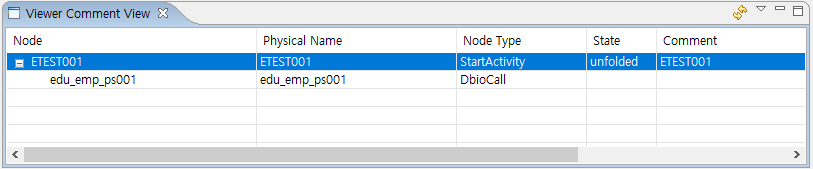
[Comment]
Comment View enables to write a comment for each node. The written description of the node is reflected on the source. The standard target is RI resources.
Select [Window] > [Show View] > [Other], and then click [ProFrame Studio] > [Comment] in Show View dialog box.
[Crud Matrix]
Enables to check the SQL usage of the table being used in a service module. Crud Matrix search is available only for queries created with Persist. The standard target is RI resources.
Select [Window] > [Show View] > [Other] and click [ProFrame Studio] > [Crud Matrix] in the Show View dialog box.

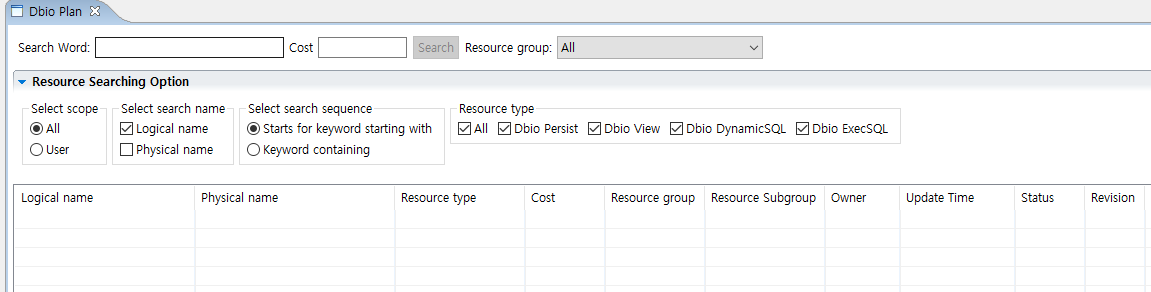
[Dbio Plan]
Enables to check the execution plan of the query created through DBIO. The standard target is RI resources.
Select [Window] > [Show View] > [Other] and click [ProFrame Studio] > [Dbio Plan] in the Show View dialog box.
[Inquire Note]
Enables to inquire and deploy the resources requested for review. The standard target is RI resources.
Select [Window] > [Show View] > [Other] and click [ProFrame Studio] > [Inquire Note] in the Show View dialog box.
Click 'Resource Searching Option' and the following screen will appear. If you click [Search], the results are displayed in the table at the bottom of the screen.
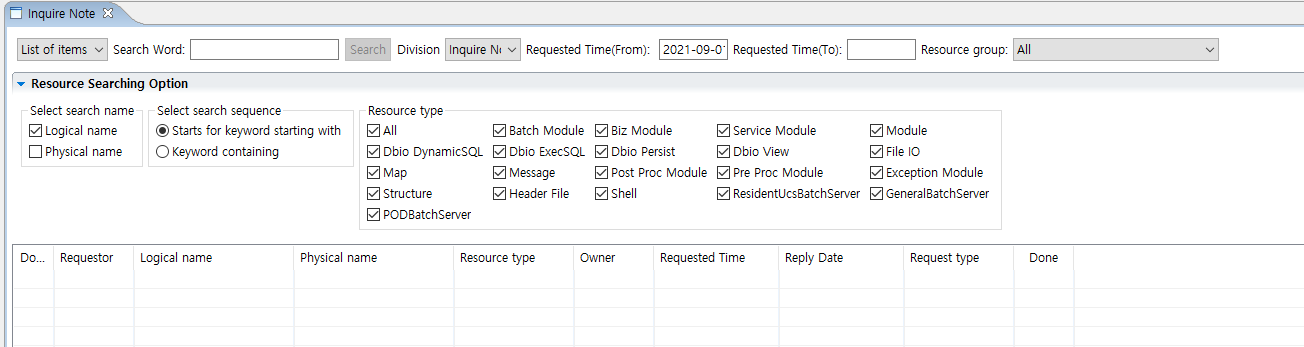
The following describes each item.
| Search Condition | Description |
|---|---|
Dropbox |
Select one between List of items need to be responded and List of asked items. |
Division |
Select one among Inquire Note, Answered, and All. |
Requested Time (From) |
Set the start date for search. |
Requested Time (To) |
Set the end date for search. |
Resource Group |
Set whether to search only for resources developed by the developer or search for all resources. |
Select Search Name |
Set whether the keyword input for search is the physical name or logical name of the resource. If they are selected at the same time, they are searched by AND condition. |
Select Search Sequence |
Set whether the input keyword position is the start word or the inclusion word of the resource name. |
Resource Type |
Select the type for the resources to be searched. It is searched only within the selected resource type. |
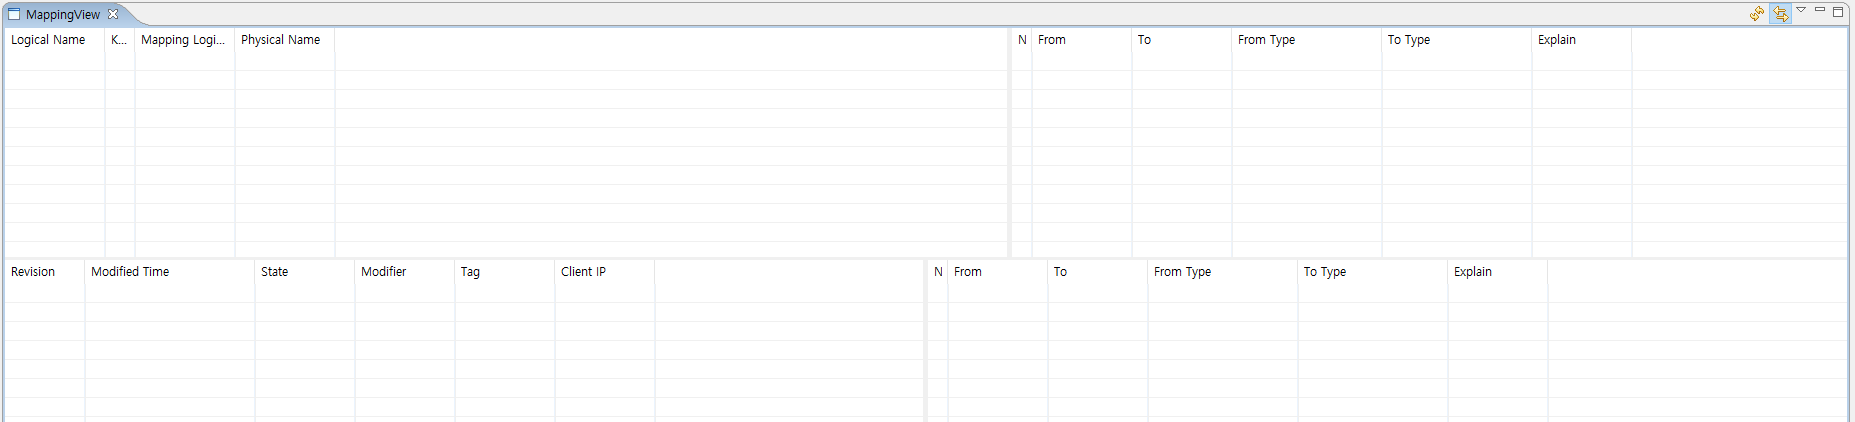
[MappingView]
Shows information about mapping relationships in the currently opened service module or business module. The standard target is RI resources.
Select [Window] > [Show View] > [Other] and click [ProFrame Studio] > [Mapping] in Show View dialog box.
[Import ModuleList]
Searches for new resources in ProFrame by uploading a template file (.xls) that defines information related to module creation. The standard target is RI resources.
Select [Window] > [Show View] > [Other] and click [ProFrame Studio] > [Import ModuleList] in Show View dialog box.
Click ‘Resource Searching Option’ and the following screen will appear. Enter the 'Search Word' and select the desired search option. If you click [Search], the search results are displayed in the table.

The following describes each item.
| Search Conditions | Description |
|---|---|
Resource Group |
Set whether to search only for resources developed by the developer or search for all resources. |
Import File |
Set the excel file to import. |
Select Search Name |
Set whether the keyword input for search is the physical name or logical name of the resource. If they are selected at the same time, they are searched by AND condition. |
Select Search Sequence |
Set whether the input keyword position is the start word or the inclusion word of the resource name. |
Resource Type |
Select the type for the resources to be searched. It is searched only within the selected resource type. |
[Import ModuleSpec]
Uploads the template file (.xls) that defines the module specification and registers it as a new resource in ProFrame. The standard target is WS resources.
Select [Window] > [Show View] > [Other] and click [ProFrame Studio] > [Import ModuleSpec] in Show View dialog box.
Click ‘Resource Searching Option’ and the following screen will appear. Enter the 'Search Word' and select the desired search option. If you click [Search], the search results are displayed in the table.

The following describes each item.
| Search Conditions | Description |
|---|---|
Resource Group |
Set whether to search only for resources developed by the developer or search for all resources. |
Import file |
Set the excel file to import. |
Select Search Name |
Set whether the keyword input for search is the physical name or logical name of the resource. If they are selected at the same time, they are searched by AND condition. |
Select Search Sequence |
Set whether the input keyword position is the start word or the inclusion word of the resource name. |
Resource Type |
Select the type for the resources to be searched. It is searched only within the selected resource type. |
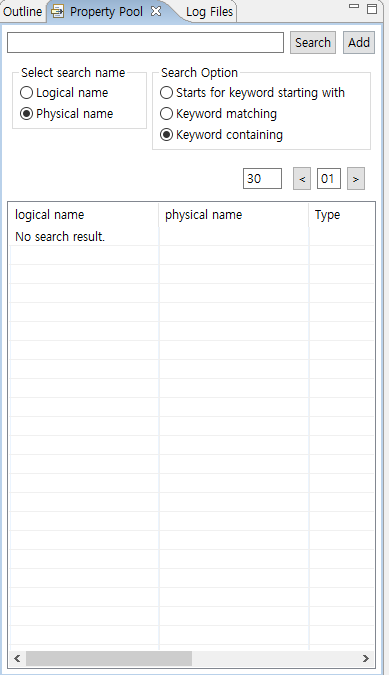
[Property Pool]
Retrieves the metadata registered in WebAdmin.
Select [Window] > [Show View] > [Other] and click [ProFrame Studio] > [Property Pool] in the Show View dialog box.
|
Refer to ProFrame ProMapper Developer Guide for more information. |
[QA]
Requests review on the quality of resources that have been developed.
Select [Window] > [Show View] > [Other] and click [ProFrame Studio] > [QA] in the Show View dialog box.
Click ‘Resource Searching Option’ and the following screen will appear. Enter the 'Search Word' and select the desired search option. If you click [Search], the search results are displayed in the table.
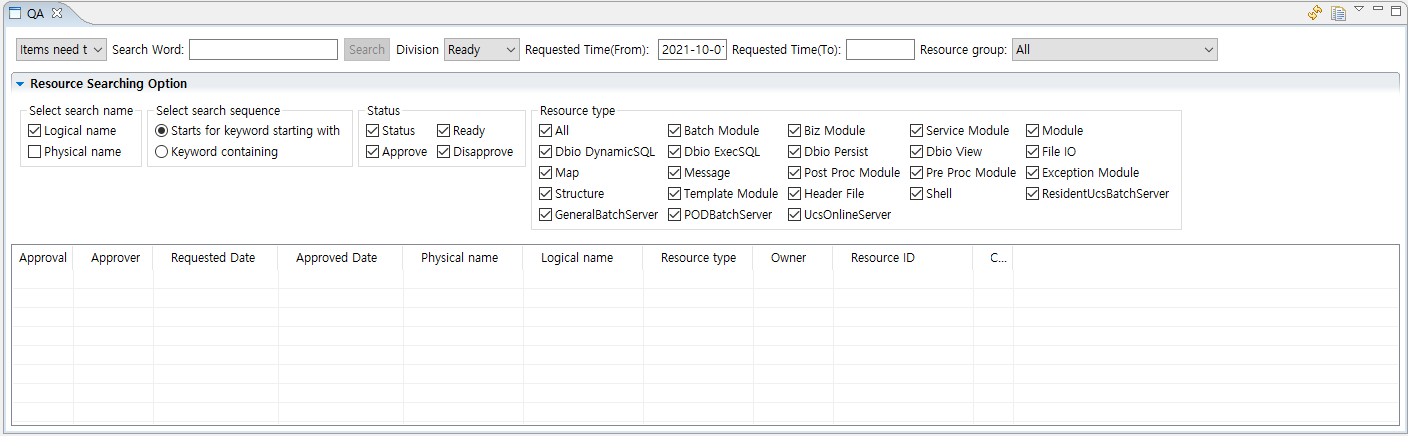
The following describes each item.
| Search Conditions | Description |
|---|---|
Dropbox |
|
Division |
|
Requested Time (From) |
Set the start date for search. |
Requested Time (To) |
Set the end date for search. |
Select Search Name |
Set whether the keyword input for search is the physical name or logical name of the resource. If they are selected at the same time, they are searched by AND condition. |
Select Search Sequence |
Set whether the input keyword position is the start word or the inclusion word of the resource name. |
Status |
Set the quality review request status of the resource. |
Resource Type |
Select the type for the resources to be searched. It is searched only within the selected resource type. |
[Import StructureList]
Searches for a new structure in ProFrame by uploading a template file (.xls) that defines information related to structure creation.The standard target is WS resources.
Select [Window] > [Show View] > [Other] and click [ProFrame Studio] > [Import StructureList] in the Show View dialog box.
Click ‘Resource Searching Option’ and the following screen will appear. Enter the 'Search Word' and select the desired search option. If you click [Search], the search results are displayed in the table.
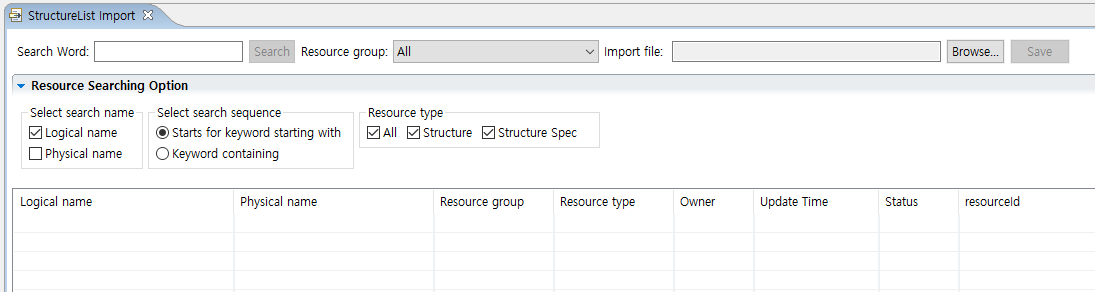
The following describes each item.
| Search Conditions | Description |
|---|---|
Resource Group |
Set whether to search only for resources developed by the developer or search for all resources. |
Import file |
Set the excel file to import. |
Select Search Name |
Set whether the keyword input for search is the physical name or logical name of the resource. If they are selected at the same time, they are searched by AND condition. |
Select Search Sequence |
Set whether the input keyword position is the start word or the inclusion word of the resource name. |
Resource Type |
Select the type for the resources to be searched. It is searched only within the selected resource type. |
[Search Module]
Searches the module being used in DBIO Design.
Select [Window] > [Show View] > [Other] and click [ProFrame Studio] > [Search Module] in the Show View dialog box.
[StructureView]
Enables to immediately check the contents of a structure without opening the ProMapper editor.The standard target is RI resources.
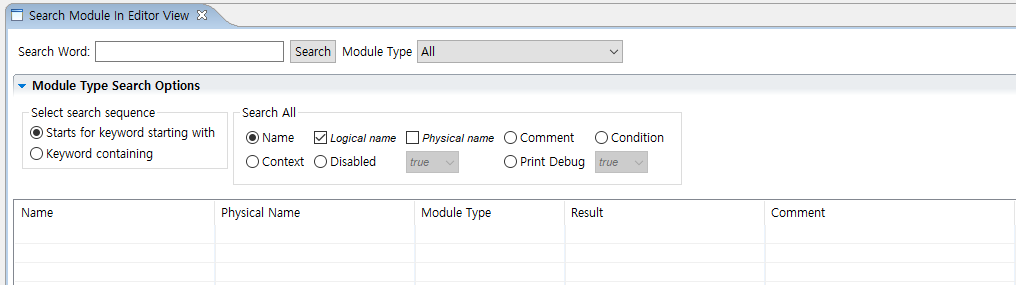
Select [Window] > [Show View] > [Other] and click [ProFrame Studio] > [Search Module In Editor View] in the Show View dialog box.
Select the desired structure in ProFrame Navigator area to display its contents in StructureView.

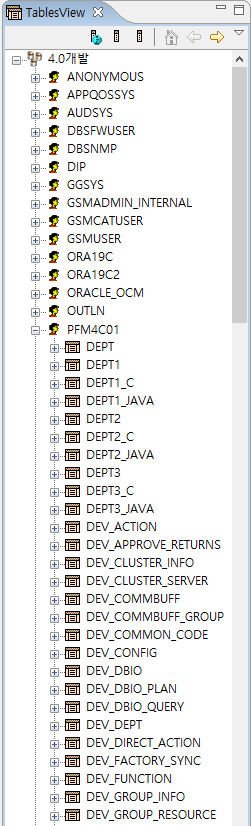
[TablesView]
Enables to view the table schema of the database linked to the preferences.
Select [Window] > [Show View] > [Other] and click [ProFrame Studio] > [TablesView] in the Show View dialog box.
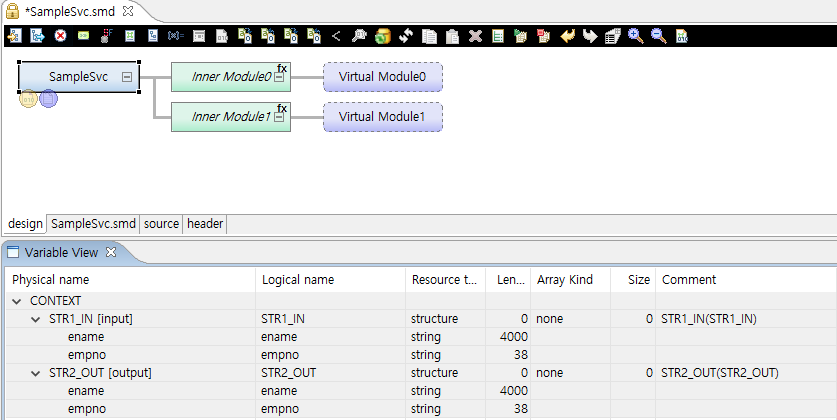
[Variables]
Enables to check the accessible variables in the currently activated EMB Designer and to move to the editor area by drag and drop when editing the sources.
Select [Window] > [Show View] > [Other] and click [ProFrame Studio] > [Variables] in the Show View dialog box.
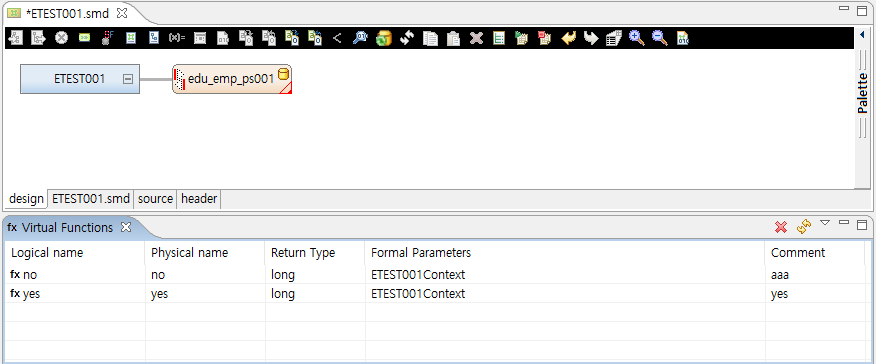
[Virtual Functions]
Enables to create a virtual function or add the created function to EMB Designer.
Select [Window] > [Show View] > [Other] and click [ProFrame Studio] > [Virtual Functions] in the Show View dialog box.
|
For more information, refer to ProFrame EMB Developer Guide. |
[Resource Status]
Inquires the status of resources. The standard target is RI resources.
Select [Window] > [Show View] > [Other] and click [ProFrame Studio] > [Resource Status] in the Show View dialog box.
Click ‘Resource Searching Option’ and the following screen will appear. Enter the 'Search Word' and select the desired search option. If you click [Search], the search results are displayed in the table.
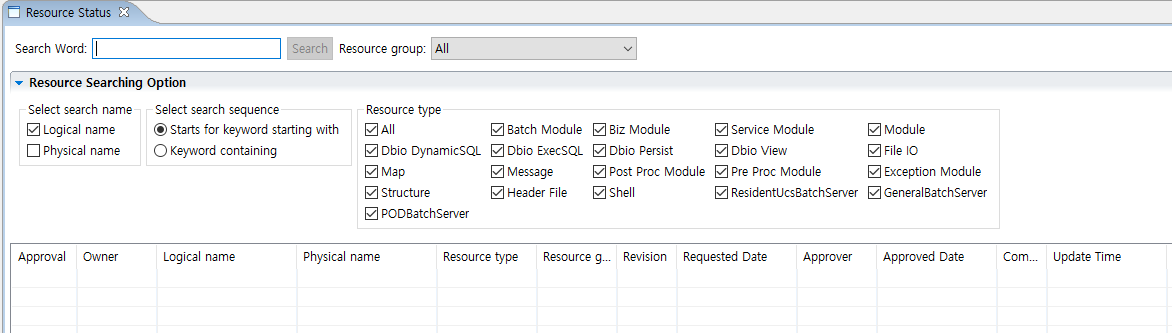
The following describes each item.
| Search Conditions | Description |
|---|---|
Select Search Name |
Set whether the keyword input for search is the physical name or logical name of the resource. If they are selected at the same time, they are searched by AND condition. |
Select Search Sequence |
Set whether the input keyword position is the start word or the inclusion word of the resource name. |
Resource Type |
Select the type for the resources to be searched. It is searched only within the selected resource type. |
[Resource Approval]
Approves the resource requested for deployment. Only users with PUBLISH_ADMIN role are able to approve.
Select [Window] > [Show View] > [Other] and click [ProFrame Studio] > [Resource Approval] in the Show View dialog box.
Click ‘Resource Searching Option’ and the following screen will appear. Enter the 'Search Word' and select the desired search option. If you click [Search], the search results are displayed in the table.
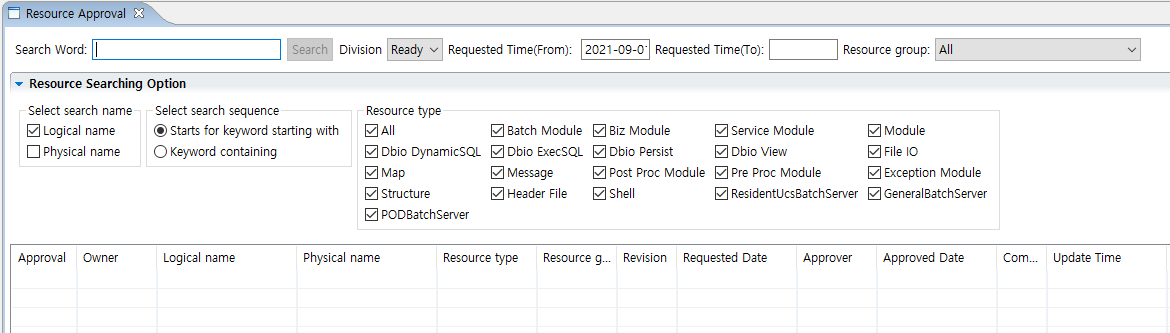
The following describes each item.
| Search Conditions | Description |
|---|---|
Division |
|
Requested Time (From) |
Set the start date for search. |
Requested Time (To) |
Set the end date for search. |
Select Search Name |
Set whether the keyword input for search is the physical name or logical name of the resource. If they are selected at the same time, they are searched by AND condition. |
Select Search Sequence |
Set whether the input keyword position is the start word or the inclusion word of the resource name. |
Resource Type |
Select the type for the resources to be searched. It is searched only within the selected resource type. |
[Refactor]
Enables to change the name of a resource. The refactor view appears when performing refactoring in the navigator or resource pool and performing a preview function. Refactoring is not performed in the refactor view itself. For more information, refer to "Refactor" in Navigator.
Select [Window] > [Show View] > [Other] and click [ProFrame Studio] > [Refactor] in the Show View dialog box.
Click ‘Refactor Option’ to check the contents for refactoring and click [Refactor] in the upper right corner.
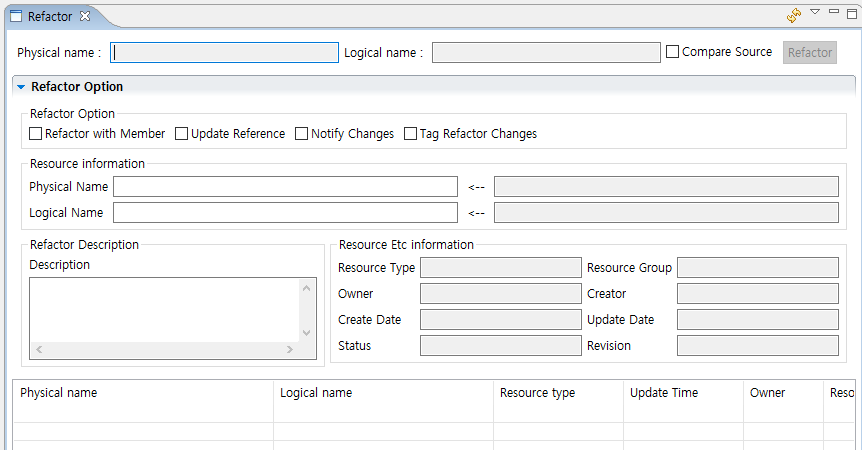
The following describes each item.
| Search Conditions | Item | Description |
|---|---|---|
Physical Name |
- |
A physical name of resources. |
Logical Name |
- |
A logical name of resources. |
Refactor Option |
Compare Source |
Select whether to compare the source before and after the change. |
Refactor with Member |
When checked, refactoring is performed for all members. |
|
Update Reference |
When checked, refactoring is performed for all resources. |
|
Notify Changes |
When checked, the changed information is notified. |
|
Tag Refactor Changes |
When checked, tags are attached to the resource that performed the refactoring. |
|
Resource information |
Physical Name |
A physical name of resources. |
Logical Name |
A logical name of resources. |
|
Refactor Description |
Description |
Describes why the refactoring was operated. |
Resource Etc information |
Resource Type |
Type of resources. |
Resource Group |
Group of resources. |
|
Owner |
Owner of resources. |
|
Creator |
Creator of resources. |
|
Create Date |
Time of being created. |
|
Update Date |
Last updated time. |
|
Status |
Status of resources. |
|
Revision |
Revision number of resources. |
[Publish Request]
Enables to publish request for resources.
Select [Window] > [Show View] > [Other] and click [ProFrame Studio] > [Publish Request] in the Show View dialog box.
Click ‘Resource Searching Option’ and the following screen will appear. Enter the 'Search Word' and select the desired search option. If you click [Search], the search results are displayed in the bottom table of the page.
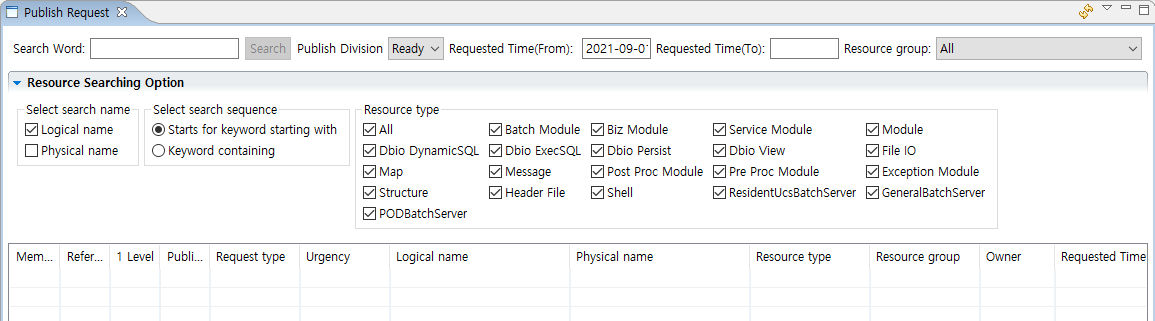
The following describes each item.
| Search Conditions | Description |
|---|---|
Publish Division |
|
Requested Time (From) |
Set the start date for search. |
Requested Time (To) |
Set the end date for search. |
Select Search Name |
Set whether the keyword input for search is the physical name or logical name of the resource. If they are selected at the same time, they are searched by AND condition. |
Select Search Sequence |
Set whether the input keyword position is the start word or the inclusion word of the resource name. |
Resource Type |
Select the type for the resources to be searched. It is searched only within the selected resource type. |
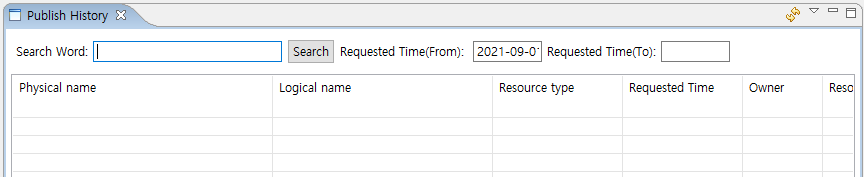
[Publish History]
Enables to inquire the publish history of resources and to reflect it as the latest resources.
Select [Window] > [Show View] > [Other] and click [ProFrame Studio] > [Publish History] in the Show View dialog box. Enter 'Search Word' and designate the request date and time. Click [Search] to display the search results in the table.
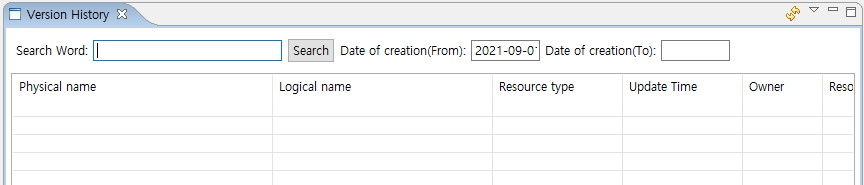
[Version History]
Inquires the history of the version of the resource.
Select [Window] > [Show View] > [Other] and click [ProFrame Studio] > [Version History] in the Show View dialog box. Enter 'Search Word' and designate the request date and time. Click [Search] to display the search results in the table.
[User Right]
Checks and sets the user rights for resources.
Select [Window] > [Show View] > [Other] and click [ProFrame Studio] > [User Right] in the Show View dialog box.
The following describes the process of changing the user right.
-
Click [Resource Searching Option] to enter the search conditions.
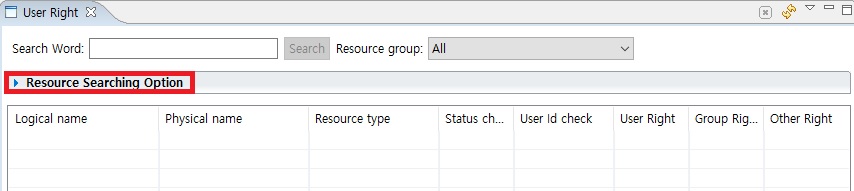 Starting Screen of User Right
 -
Enter a keyword to search for in ‘Search Word’ and select a desired search condition and then click [Search].
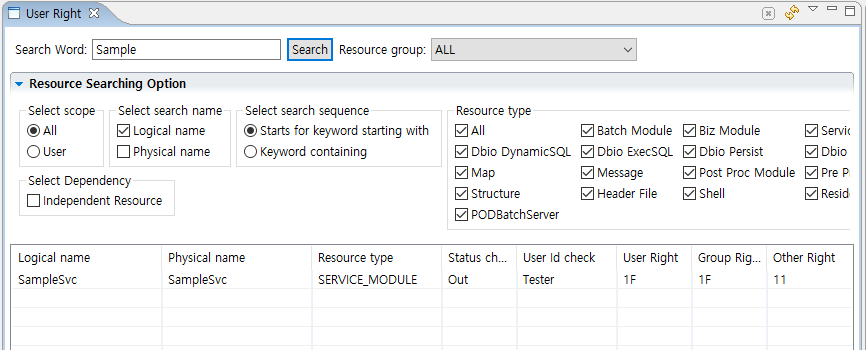 User Right View
 -
From the search results, select the resource to set user rights from the search results and right-click for selecting [Manage Resource User Right].
-
Change the settings in the dialog box.
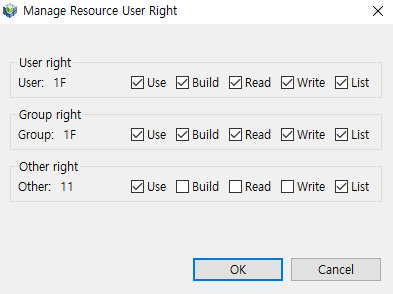 Manage Resource User Right
The following describes each item.
Item Description Use
Whether it is available to use
Build
Whether it is available to build
Read
Whether it is available to read
Write
Whether it is available to write
List
Whether the list is available to inquire
-
Click [OK], when the setting is complete.
[Publish Approval]
Requests an approval for resources.
Select [Window] > [Show View] > [Other], and then click [ProFrame Studio] > [Approve Request] in the Show View dialog box. Enter 'Search Word' and specify the period to search. Click [Search] to display the search results in the table.
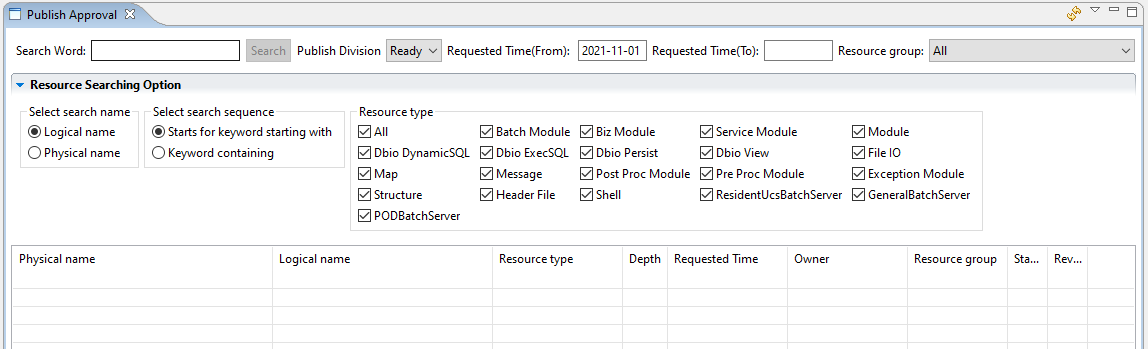
The following describes each item.
| Search Conditions | Description |
|---|---|
Publish Division |
|
Requested Time (From) |
Set the start date for search. |
Requested Time (To) |
Set the end date for search. |
Select Search Name |
Set whether the keyword input for search is the physical name or logical name of the resource. If they are selected at the same time, they are searched by AND condition. |
Select Search Sequence |
Set whether the input keyword position is the start word or the inclusion word of the resource name. |
Resource Type |
Select the type for the resources to be searched. It is searched only within the selected resource type. |
[Project Info]
Checks the resource statistics of the currently logged in project. Only users who have been granted the ADMIN role can change the project and check resource statistics.
Select [Window] > [Show View] > [Other] and click [ProFrame Studio] > [Project Info] in Show View dialog box.
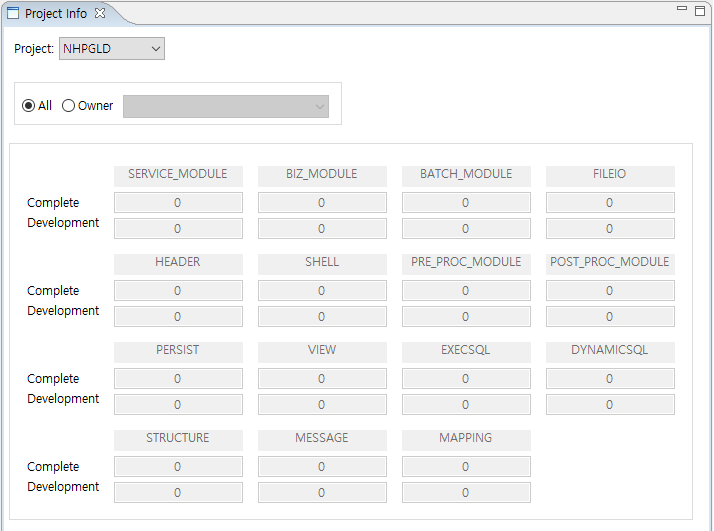
| Search Conditions | Description |
|---|---|
Project |
Shows project information when viewing resource statistics. By default, the logged in project is automatically selected. Only users who have been granted the ADMIN role can select another project. |
All |
Checks the resource statistics information for the selected project of all users. |
Owner |
Checks the resource statistics information for the selected project of a specific user. |