Managing WebAdmin
This chapter describes how to use WebAdmin provided by ProFrame.
1. Overview
WebAdmin manages the development environment, including tool, development environment authority, and meta information, of ProFrame. In addition, by providing a GUI screen, it is convenient to set up the development environment.
2. Screen Layout
You can access to WebAdmin by using the following HTTP address.
http://IP_ADDRESS:PORT/pfmdevsvr/login.jsp
IP_ADDRESS is the IP address of the host where the integration server is installed, and PORT is the listen port number of the integrated server set in WEBMain.xml.
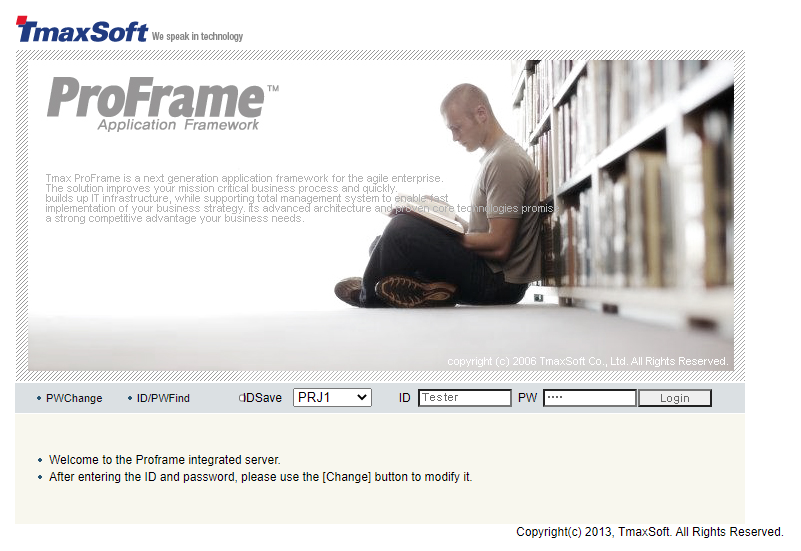
If there is no account setting, you can access to WebAdmin by using the default ID and password. In the account information set as default, the ID and password are set to ‘Tester’ and ‘1234’, respectively. Select the project to be accessed in 'PROJECT ID' and click [Login] after entering 'ID' and 'PW'.
If you log in to the WebAdmin, you can see the main screen. For details on the configuration of the WebAdmin main screen, refer to the following.
The following describes the main screen layout in detail.
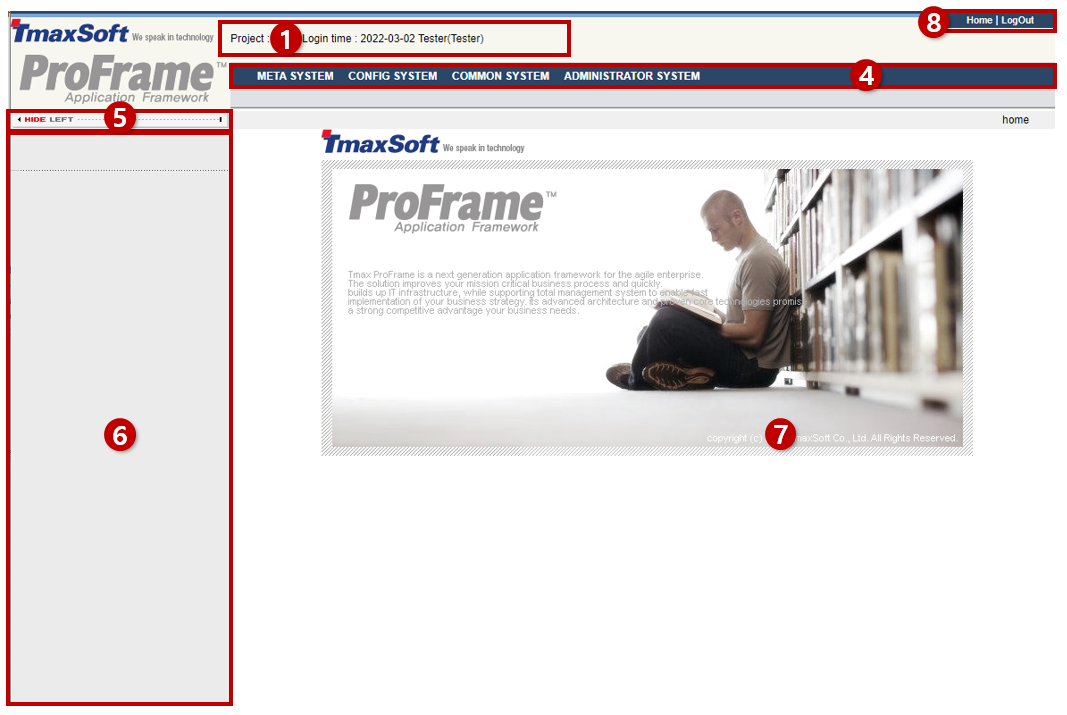
① Displays the project name, time, user ID and authority that WebAdmin logged into the system.
② List box of shortcuts to the service. It consists of [Register Favorites] and [User Management]. (This feature is currently not supported in 5.0.)
③ Search option within WebAdmin. You can search by 'member information' and 'program information'.
④ Available menu item of WebAdmin.
The following is a description of each menu provided by WebAdmin.
| Menu | Description |
|---|---|
[Meta Mgt] |
Consists of the page that manages meta such as Property, Constant, and the page that registers and manages logical resource groups for various resources used in CommBuff, Rule I/O definition, and EMB Designer. |
[Configuration] |
Consists of the page to set the environment used in tools and servers and the page to create an AP server. |
[Common] |
Consists of the page for registering and managing various codes used in tools and servers. |
[Administrator] |
Consists of the page for registering developers and administrators who use tools and servers, and the page for managing WebAdmin, such as rights for programs used by developers and menu configuration. |
⑤ Hides the menu on the left. The menu on the left is defined as the navigator area.
⑥ Navigator area. It displays the function classification and detailed functions included in the upper menu.
⑦ Frame defined by Viewer. Viewer displays the results of the functions performed by the administrator.
⑧ Moves to the initial screen you accessed for the first time or for logging out.
3. Meta Management
Resources developed using ProFrame are managed by meta. This is for providing a powerful integrated development environment management system by registering various resources developed on multiple computers in one server, the integrated development server, and systematically managing the resources.
If you select [Meta Management] > [Meta System] from the WebAdmin menu, items managed in the [Meta System] appear in the navigator area.
The meta system menu provides the following functions.
-
Meta Management
-
CommBuff Management
-
Rule Management
-
Resource Group Management
3.1. Meta Management
[Meta Management] provides a property management function to manage the property meta format and the constant meta format.
|
Note that any modification to Meta may affect the project for Meta is used in common in the entire project since the ProFrame 5.0 Fix1 version and later. |
[Property Management]
Select [MetaMgmt] > [Property Mgmt] in the navigator area. [Property Mgmt] is divided into a property meta type and a constant meta type according to resources.
The initial screen of the [Property Management] is as follows:
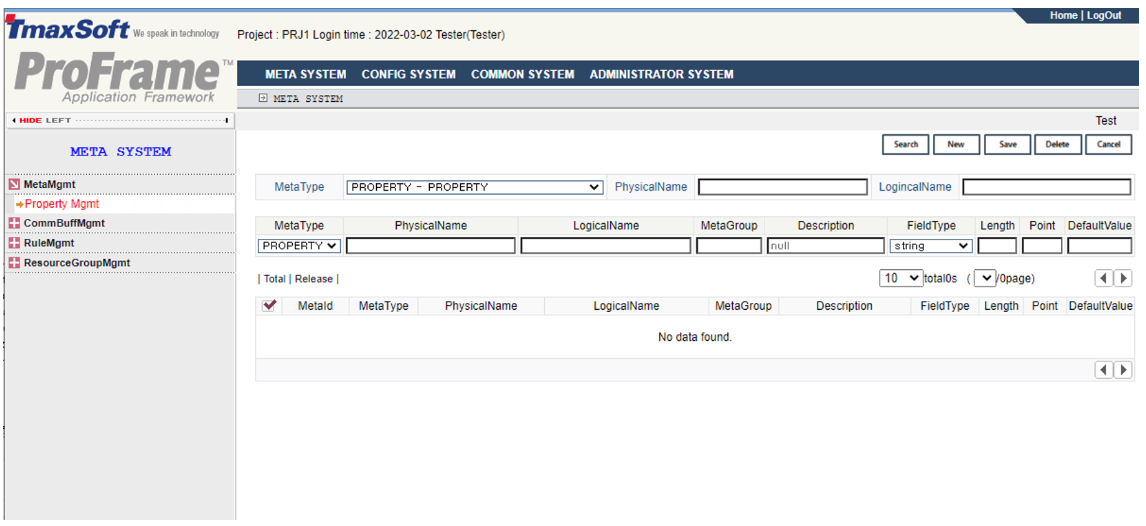
-
Inquiry
Item Description MetaType
Choose from the following:
-
PROPERTY- Property meta format: It is used when declaring variables among various resources of ProFrame and defining structures with declared variables.
-
CONSTANT- Constant meta format: It is used when defining parts related to constants in C language.
PhysicalName
Physical name defining the meta.
LogicalName
Logical name defining the meta.
-
-
Registration
Item Description MetaType
Selects the required meta format when registering meta.
PhysicalName
Required physical name when registering the meta.
LogicalName
Logical name required when registering the meta.
MetaGroup
Registers the meta and enter the user group to use.
For user groups, refer to [Department Management], [User Management], [Group Management] and [User Group Management] in the Administrator menu.
Description
An additional description of the meta.
FieldType
Specifies the following meta field format.
-
string
-
number
-
integer
-
date
-
long
-
binary
-
double
-
pointer
-
float
Length
Specifies the length of the relevant field.
Point
Specifies the decimal places.
It is valid only in numeric data types (number, double, float) that can represent rational numbers.
DefaultValue/FieldKey
Specifies the value to be used as the default.
-
-
Button
Button Description [Search]
Searches for a property.
[New]
Registers a new property.
[Save]
Saves the entered property information.
[Delete]
Deletes the property information.
[Cancel]
Initializes the entered contents while entering the contents in the field to register a new property.
3.2. CommBuff Management
CommBuff is a memory area for delivering ProFrame data. In order to store the structure in memory and reuse it, it is convenient to designate an available structure in the index of CommBuff. CommBuff management menu is a screen to define which structure to use for this CommBuff index item.
[Commuff Index Management]
Select [CommBuffMgmt] > [CommBuff Index Mgmt] in the navigator area to manage the index for CommBuff by the administrator with the action ID CommBuffSysmgmt in ProFrame.
The following is a description of the CommBuff index management screen.
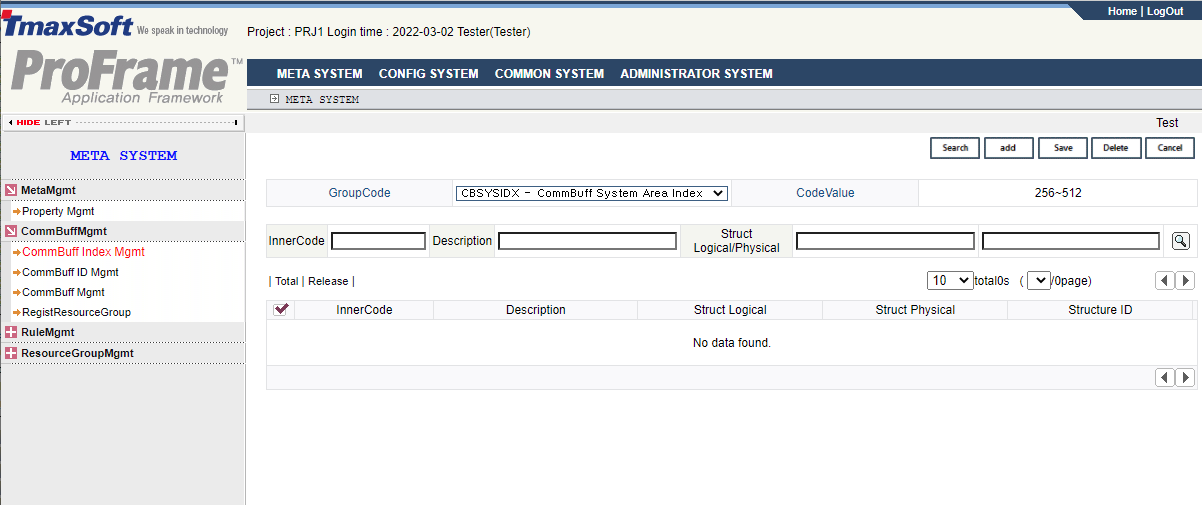
-
Inquiry
Item Description GroupCode
Displays the division of CommBuff index.
-
CBSYSIDX-CommBuff system index
-
CBBIZIDX-CommBuff work index
CodeValue
Displays the index range of CommBuff.
-
The system index is set in the range of 0 to 255.
-
The work index is set in the range of 256 to 512.
-
-
Registration
Item Description InnerCode
Sets the index manually.
Description
Description of CommBuff
Struct Logical/Physical
Automatic input field for selecting logical/physical names for structures.

Structure search button.
-
Button
Button Description [Search]
Searches for CommBuff index.
[Add]
Adds a new CommBuff index.
[Save]
Saves the entered CommBuff index information.
[Delete]
Deletes CommBuff index entries.
[Cancel]
Initializes the CommBuff index item entered while entering the contents in the field to register the new CommBuff index.
[CommBuff ID Management]
Select [CommBuffMgmt] > [CommBuff ID Mgmt] in the navigator area.
Following is the description of preparation for connecting to CommBuff created on the screen by setting logical and physical names to use the CommBuff created in CommBuff index management in ProFrame Studio (hereafter referred to as the studio).
Following is a description of the CommBuff ID management screen.
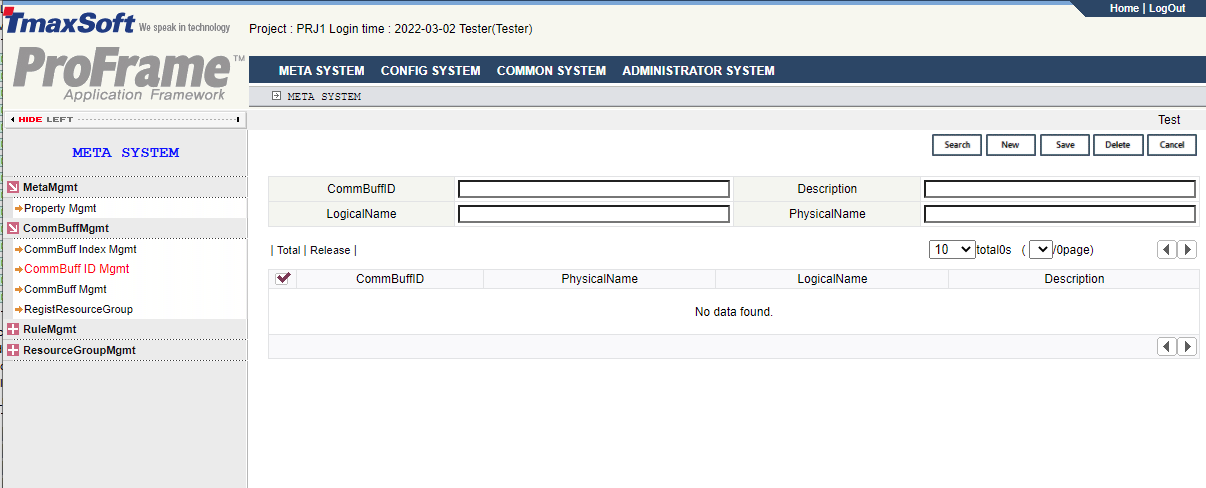
-
Inquiry
Item Description CommBuffID
CommBuff ID. Required field.
Description
Additional description of CommBuff.
LogicalName
Logical name of CommBuff .
PhysicalName
Physical name of CommBuff.
-
Button
Button Description [Search]
Searches for CommBuff ID.
[New]
Add a new CommBuff ID.
[Save]
Saves or edits the input CommBuff ID information.
[Delete]
Deletes CommBuff ID.
[Cancel]
Initializes CommBuff ID.
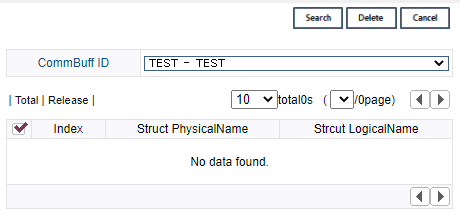
[CommBuff Management]
Select [CommBuffMgmt] > [CommBuff Mgmt] in the navigator area to connect the created CommBuff index and CommBuff ID in order to set it up for use in the studio. CommBuff management sets the relationship between CommBuff index and CommBuff ID.
Following is the description of CommBuff management screen.
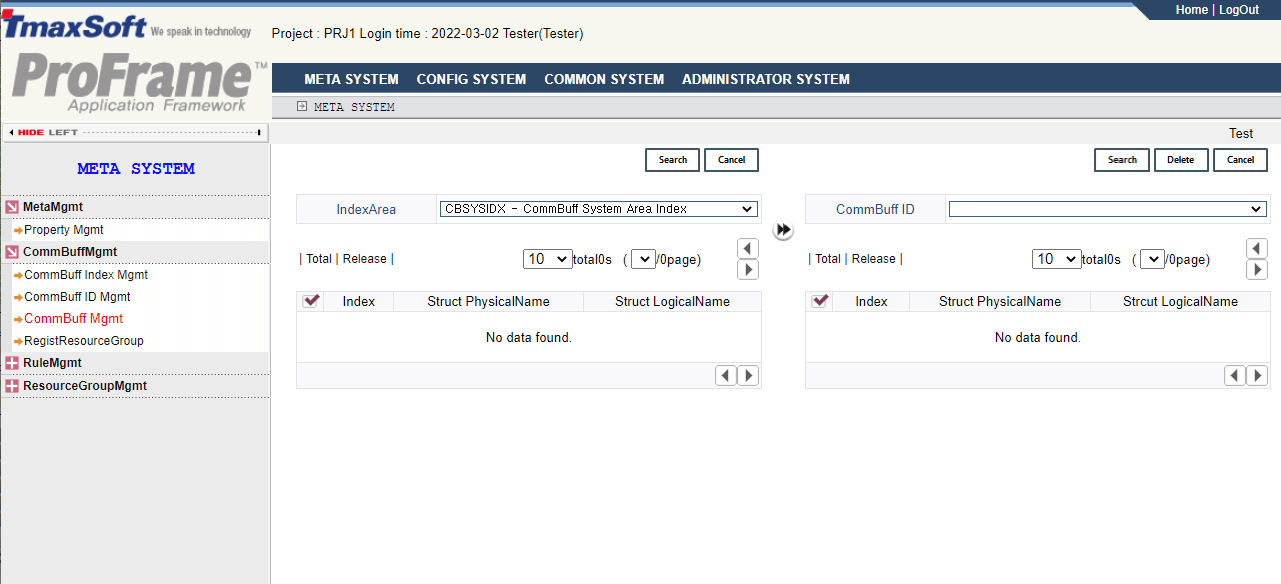
-
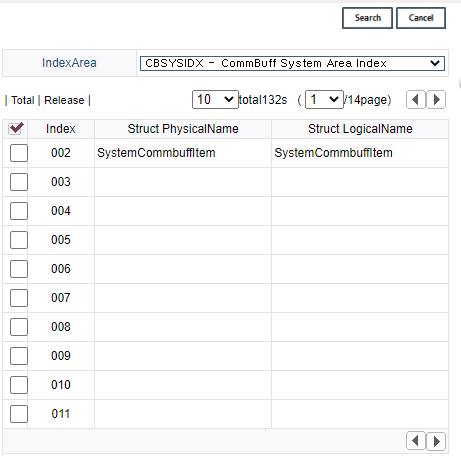
CommBuff Index Inquiry
Item Description IndexArea
Selects the CommBuff index area from the system index and business index.
[Search]
Searches for CommBuff index.
[Cancel]
Cancels to search for CommBuff index.
-
CommBuff ID Inquiry
Item Description CommBuff ID
CommBuff ID created in [CommBuff ID Mgmt].
-
Button
Button Description [Search]
Searches for CommBuff ID.
[Delete]
Deletes the selected CommBuff ID.
[Cancel]
Cancels to search for CommBuff ID.
|
For the detailed description of [CommBuff Management], refer to the section of each function. The detailed description is skipped for the menu composition is simpler and the functions are duplicated compared to the [Property Management], [CommBuff Index Management] or [CommBuff ID Management]. |
The following describes how to register or delete CommBuff by linking CommBuff index and CommBuff ID.
-
Registering CommBuff
-
Searching for CommBuff index
Select the CommBuff index area in 'Index Area' and click [Search] to display the search result in the table.
-
Searching for CommBuff ID
Select the CommBuff ID to be registered in ‘CommBuff ID’ and click [Search] to display the search result in the table.
-
Registering CommBuff index to ID
Select the check box of the CommBuff index area to be registered and click the right arrow button in the center of the screen to display a dialog box asking whether to add the selected content. Click [OK] to register the index to the ID.
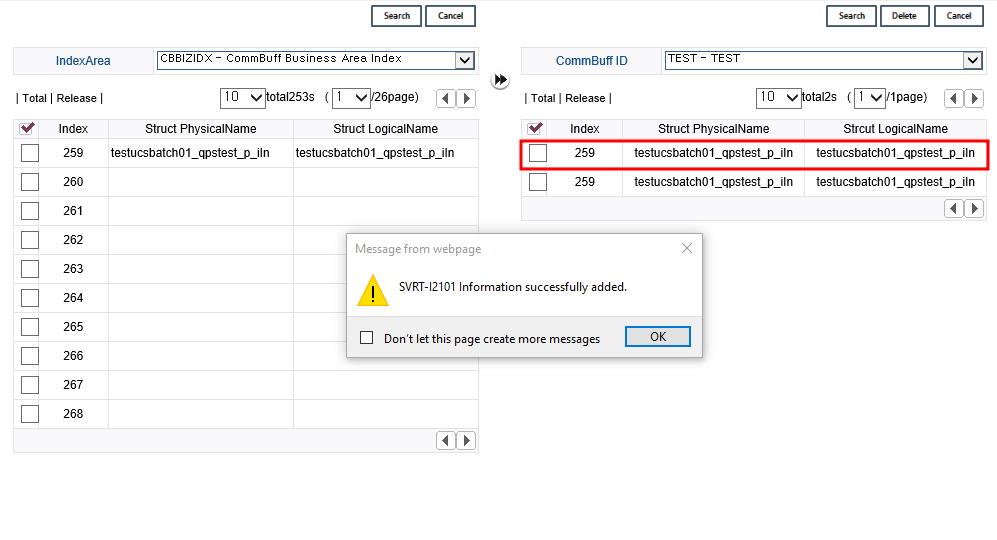
-
Registration is completed
Click [OK] when the dialog box saying that it has been successfully added appears.
-
-
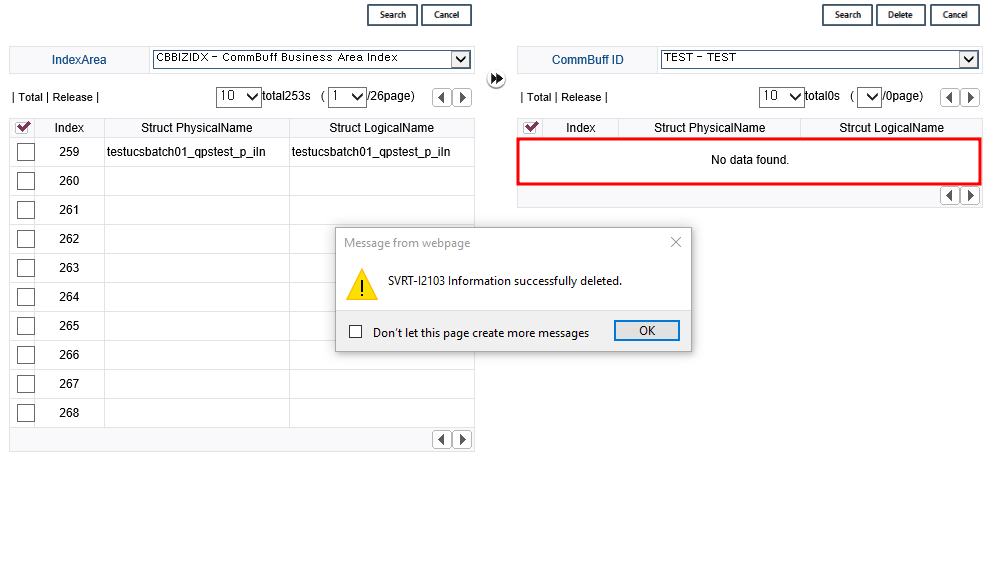
Deleting CommBuff
-
Deleting index in CommBuff ID
When you select the check box of the registered CommBuff and click the [Delete], a dialog box asking whether to delete appears. Click [OK] on the screen.

-
Deleting index in CommBuff Id is completed
CommBuff is deleted from the CommBuff ID table with a dialog box saying that it has been successfully deleted.
-
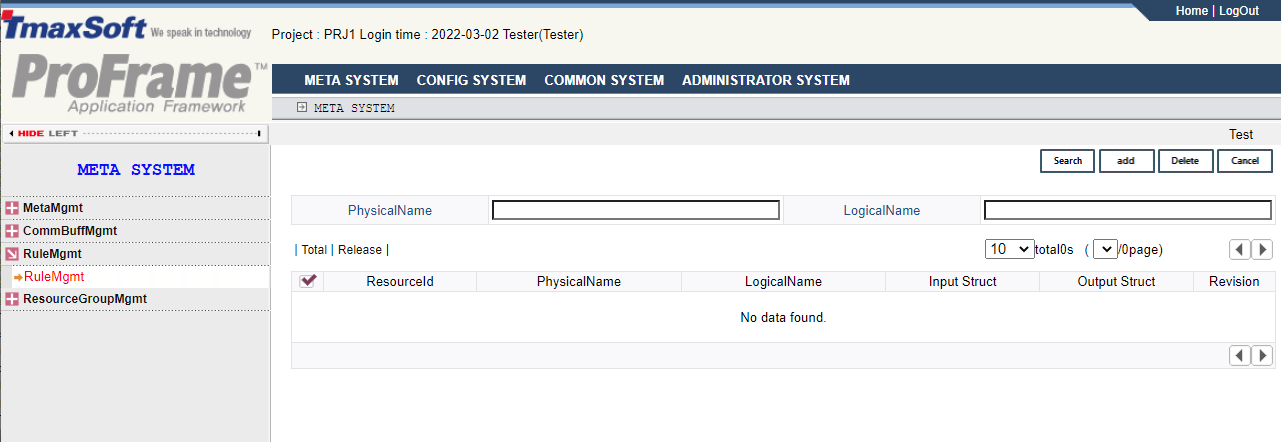
3.3. RULE Management
Rule is not managed using a separate DB table and there is only action IDs to manage the rules. RuleInfoMgmt is the action ID.
In case ProRule product is introduced separately from the integrated development server, ProFrame provides Rule Server, Rule DB, and GUI-based interface called ProRule. The studio is designed to automatically generate rule-based business logic through ProRule.
[Rule Mgmt] lists the rule information registered through ProRule, loads the input/output structure stored in the Rule Server, and adds it to the integrated development server. If there is a newly registered rule in ProRule, the rule information and input/output structure information are registered together in the integrated development server through the [Rule Mgmt].
[Rule Management]
Select [RuleMgmt] > [RuleMgmt] in navigator area.
The following is a description of the Rule management screen.
-
Inquiry
Item Description PhysicalName
Physical name of structure.
LogicalName
Logical name of structure.
-
Button
Button Description [Search]
Searches for rule.
[Add]
Adds a new rule.
[Delete]
Deletes a rule.
[Cancel]
Cancels to add a rule.
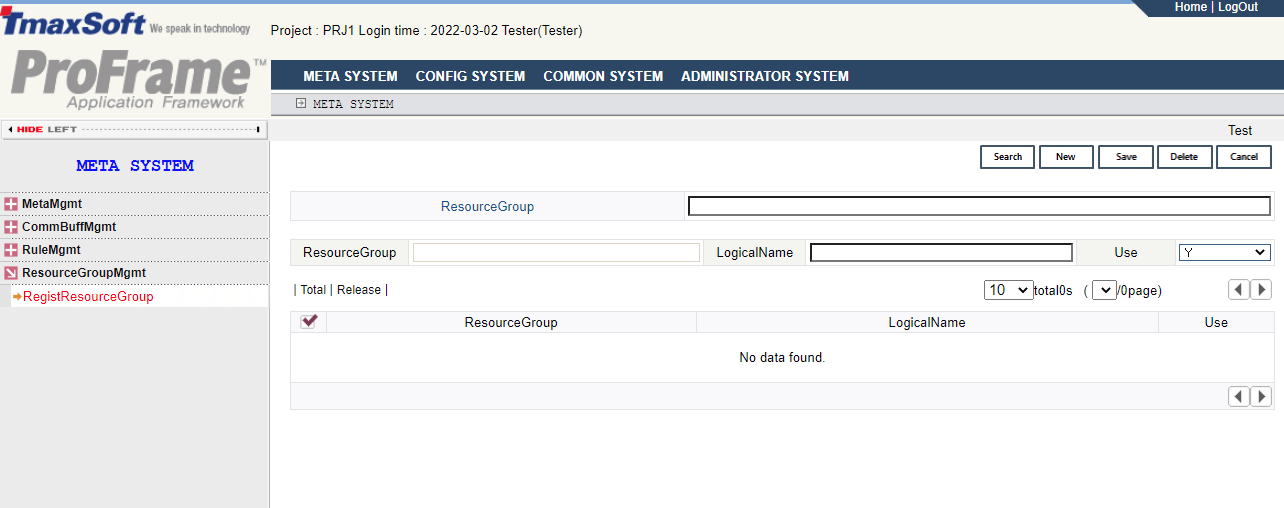
3.4. Resource Group Management
WebAdmin manages resource groups in the studio.
Resource group is developed in ProFrame and controls permissions to create, read, and execute for resources including various types of modules (Service Module, Business Module, Preprocess Module, Postprocess Module, Batch Module, etc.), DBIO (Persist, View, Exec Sql, Dynamic Sql), Sturcture, Map and Message. Resource group management is in DEV_COMMON_CODE table in database.
[Resource Group Management]
Select [ResourceGroupMgmt] >[RegistResourceGroup] in the navigator area.
Following describes the Resource Group Management screen.
-
Inquiry
Item Description ResourceGroup
Resource group name to be searched for.
-
Addition
Item Description ResourceGroup
Resource group name to add.
LogicalName
Logical name of resource group to add.
Use
Whether to use resource group.
-
Button
Button Description [Search]
Searches for a resource group.
[New]
Adds a new resource group.
[Sage]
Saves a resource group.
[Delete]
Deletes a resource group.
[Cancel]
Cancels to add a resource group.
4. Configuration
Manages environment setting of development and creation of AP server.
|
[DB Environment Setting] and [Build Environment Setting] are not currently supported. |
Basic configuration includes tool configuration and online and batch server management of ProFrame.
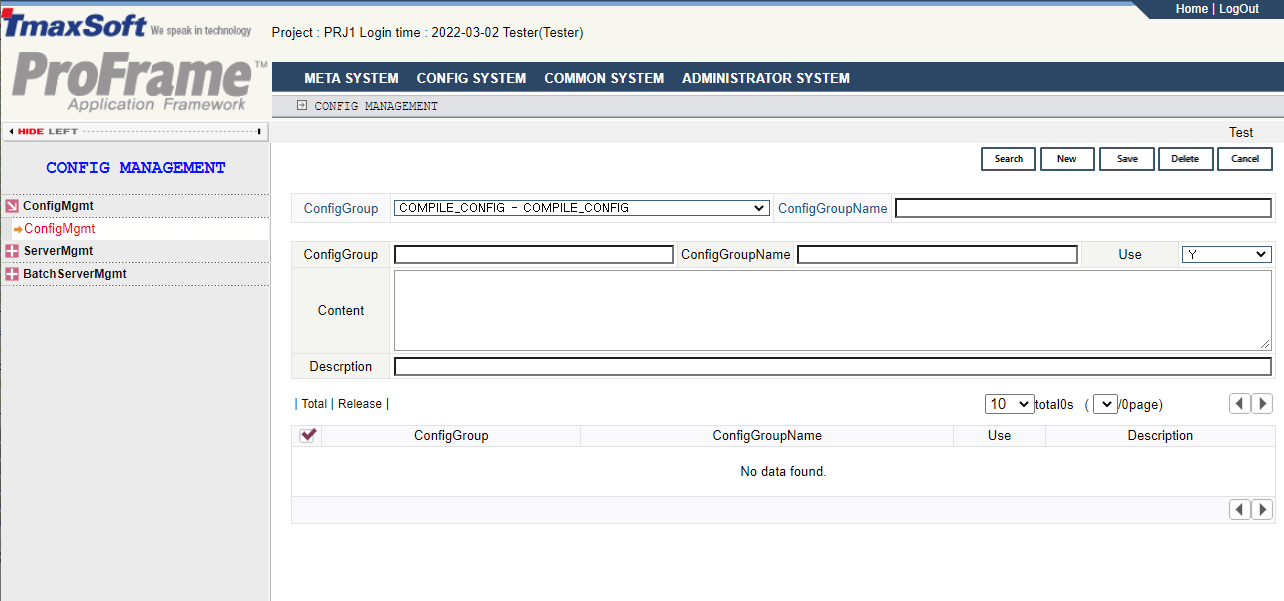
4.1. Configuration Management
Manages various setting values of the development configuration. The settings include the overall development environment such as the integrated server, DBIO, and ProMapper.
[Configuration Management]
Select [ConfigMgmt] > [ConfigMgmt] in the navigator area.
The management includes the following definition.
-
Defining compile configuration in the integrated development server.
-
Defining the configuration and naming rules related to DBIO.
-
Defining DBIO-related configuration and database configuration in the studio.
-
Defining the configuration related to the studio.
-
Defining the configuration related to ProMapper.
The following is a description of the basic configuration management screen.
-
Inquiry
Item Description ConfigGroup
Selects a preference group in configuration group list.
ConfigGroupName
Specifies the configuration name used in configuration group.
-
Addition
Item Description ConfigGroup
Group to which the preference value belongs.
ConfigGroupName
Name of configuration value.
Use
Whether to use configuration values.
ConfigValue
Configuration value
Description
Additional description.
-
Button
Button Description [Search]
Searches for the preference group.
[New]
Adds a new preference group.
[Save]
Saves a preference group.
[Delete]
Deletes a preference group.
[Cancel]
Cancels to add a preference group.
4.2. Server Management
Select [ServerMgmt] > [ServerMgmt] in the navigator area to manage the server to be used in the online service.
Following is the description of server management screen.
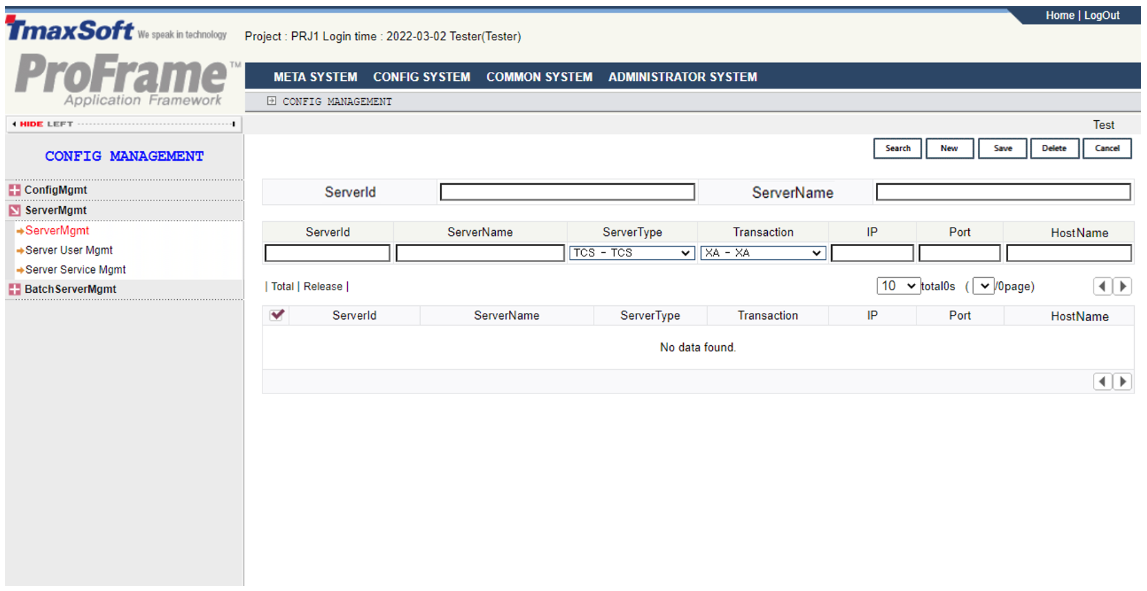
-
Inquiry
Item Description ServerID
Server ID to search for.
ServerName
Server name to search for.
-
Addition
Item Description ServerID
Server ID to add or delete.
ServerName
Server name to add or delete.
ServerType
Server type to add.
Transaction
Transaction type of the server to add.
IP
IP address of the node where that AP server is actually located.
Port
Port number of the node where the AP server is actually located.
HostName
Host name of the node where the AP server is actually located.
-
Button
Button Description [Search]
Searches for the managed server.
[New]
Adds a new server.
[Save]
Saves a server.
[Delete]
Deletes a server.
[Cancel]
Cancels to delete a server.
[Server User Management]
Select [ServerMgmt] > [Server User Mgmt] in the navigator area to manage the service list related information registered in the transaction parameters and server for online service.
Following is the description of server user management screen.
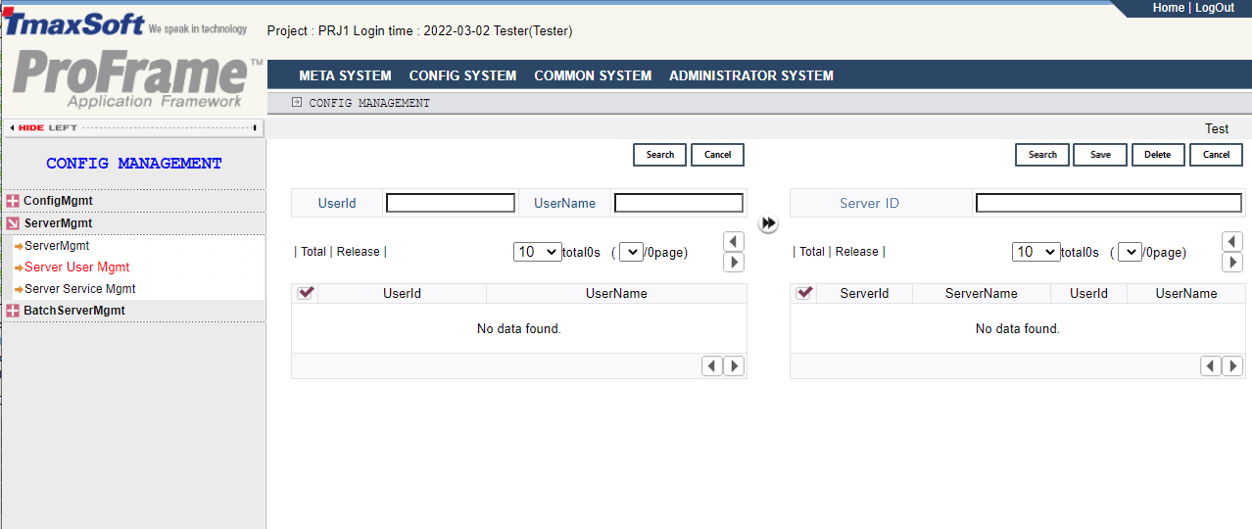
-
Search
Item Description UserID
User ID to search for.
UserName
User name to search for.

Moves to connect between user information and server.
-
Inquiry
Item Description Server ID
Searched server ID.
ServerName
Searched server name.
UserID
Server user ID.
UserName
Server use name.
-
Button
Button Description [Search]
Searches for a server.
[Save]
Saves a server.
[Delete]
Deletes a server.
[Cancel]
Cancels to search for a server.
[Server Service Management]
Select the [ServerMgmt] > [Server Service Mgmt] in the navigator area to manage the server to be used in the online service and the related information of the service list registered in the transaction parameters.
Following is the description of the server service management screen.
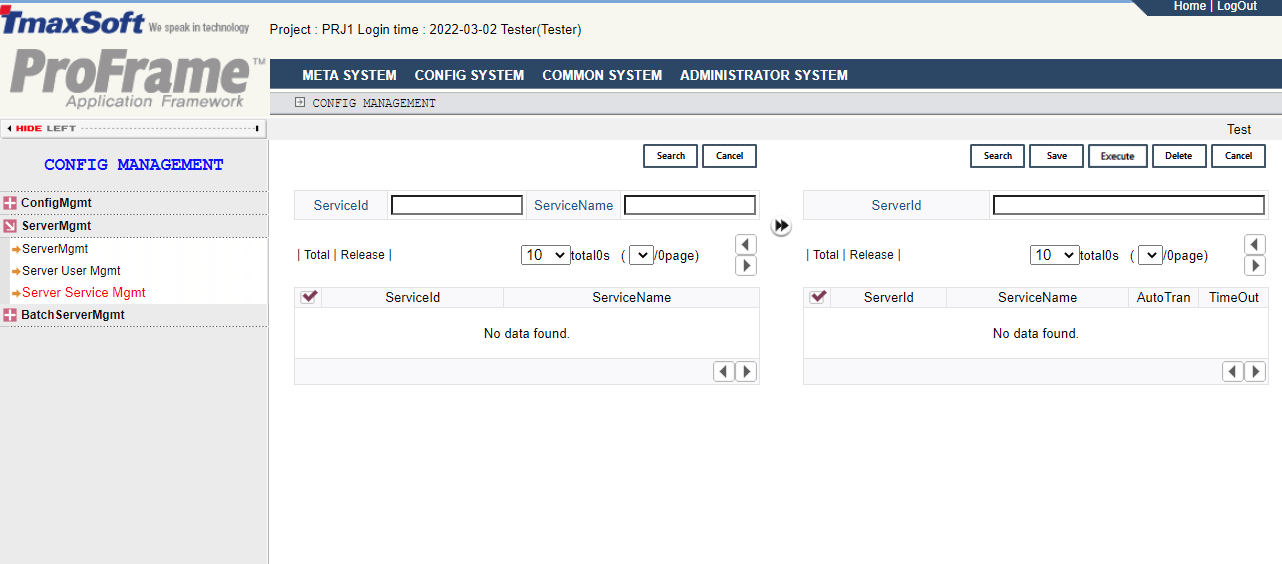
-
Inquiry
Item Description ServiceID
Service ID to search for.
ServiceName
Service name to search for.
Moves to connect between the service information and server.
-
Server and service related information
Item Description ServerID
Searched server ID.
-
Button
Button Description [Search]
Searches for a server.
[Save]
Saves the information related to server and service.
[Execute]
Creates the server template.
[Delete]
Deletes server and service connection information.
[Cancel]
Cancels to edit the server and service.
4.3. Batch Server Management
Registers, searches, and deletes batch servers. It also creates the actual deployment server from the deployment server properties.
[Batch Server Management]
Select [BatchServerMgmt]>[Batch ServerMgmt] in the navigator area.
Register the batch server to run the batch module. [Batch ServerMgmt] registers, searches, and deletes batch servers. The action ID for managing the batch server is BatchServerMgmt, and the same table as the DB table for online server management is used for the batch server management information.
Following is the description of the batch server management screen.
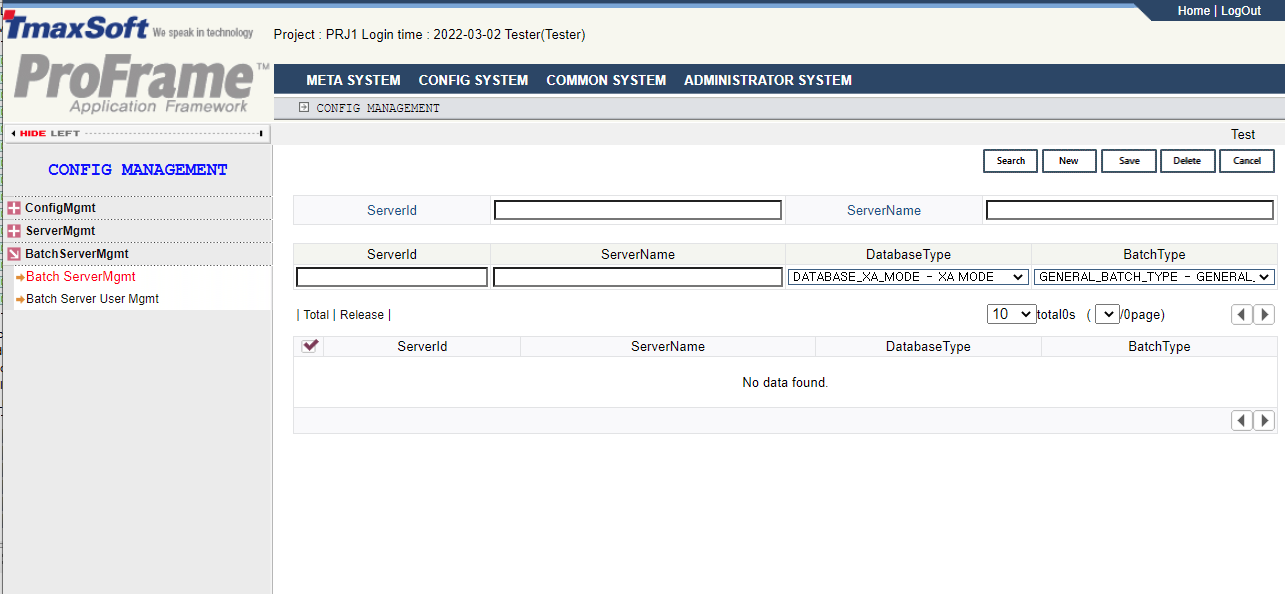
-
Inquiry
Item Description ServerID
Server ID to search for.
ServerName
Server name to search for.
-
Addition
Item Description ServerID
Server ID to add or delete.
ServerName
Server name to add or delete.
DatabaseType
Database type of server to add.
BatchType
Batch type of server to add.
-
Button
Button Description [Search]
Searches for a batch server.
[New]
Adds a new batch server.
[Save]
Saves the modified server information.
[Delete]
Deletes a batch server.
[Cancel]
Cancels a server modification.
[Batch Server User Management]
Select [Batch ServerMgmt] > [Batch Server User Mgmt] in the navigator area to register and manage the batch server to be used by registered users. BatchServerUserMgmt is used as an action ID for batch server user management, and information is stored in the DB_SERVER_USER table.
Following is the description of batch server user management screen.
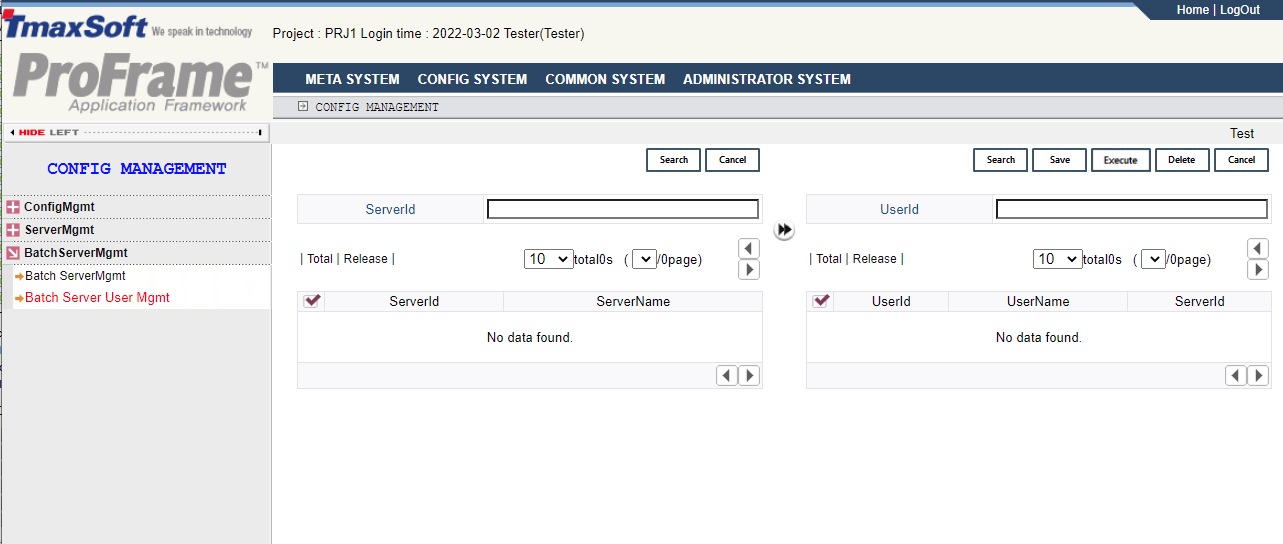
-
Inquiry
Item Description ServerID
Server ID to search for.
Moves to connect the batch server information with user.
-
Batch server and user related information
Item Description UserID
Batch server ID to search for.
-
Button
Button Description [Search]
Searches for user ID.
[Save]
Saves batch server ID and user ID related information.
[Execute]
Creates batch server template.
[Delete]
Deletes batch server ID and user related information.
[Cancel]
Cancels batch server and user related modification.
5. Common
[Common System] registers and modifies the common codes used in the integrated development server of the studio. Managing the common codes are as follows:
-
Common code management
-
Template management
-
Pattern management
5.1. Common Code Management
Registers and manages various codes used in the studio and integrated server.
[Common Code Management]
Select [CommonCodeMgmt] > [CommonCode Mgmt] to register and manage various codes used in the studio and integrated development server. Action IDs for managing common codes is CodeMgmt , and information on common codes is managed in the DB’s DEV_COMMON_CODE table.
Following is the description of common code management screen.
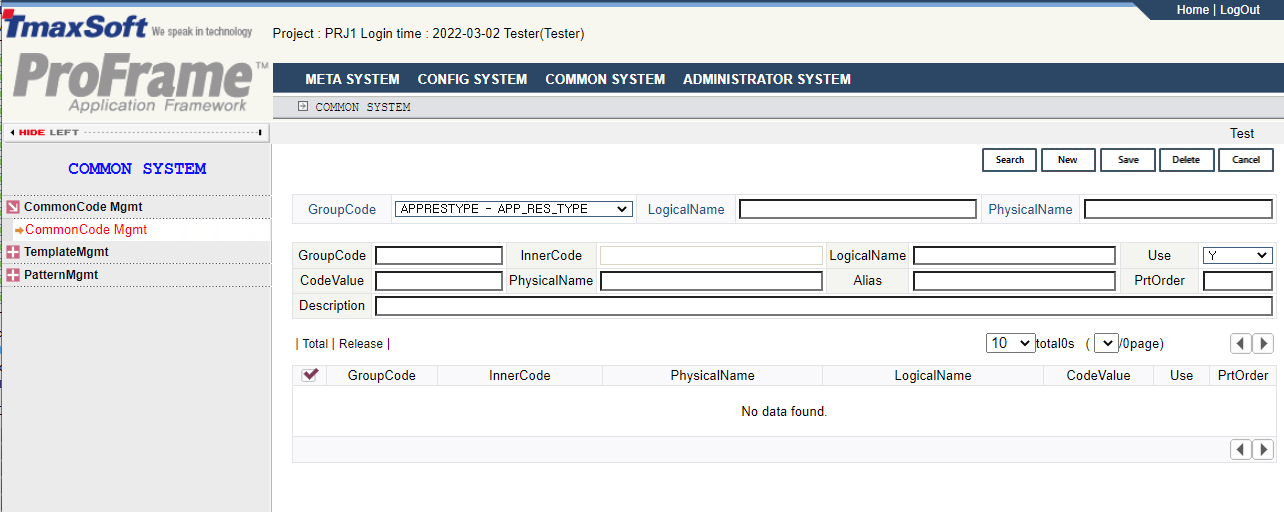
-
Inquiry
Item Description GroupCode
Group code to search for.
LogicalName
Logical name of the group to search for.
PhysicalName
Physical name of the group to search for.
-
Addition
Item Description GroupCode
Codes for groups to be added or modified.
InnerCode
Internal code to add or modify.
LogicalName
Logical name to add or modify.
Use
Whether to use a common code.
CodeValue
Code values to add or modify.
PhysicalName
Physical name to add or modify.
Alias
Abbreviation of code to add or modify.
PrtOrder
Output order of the code to be added or modified.
Description
Additional description of the code to be added or modified.
-
Button
Button Description [Search]
Searches for common codes.
[New]
Adds a new common code.
[Save]
Saves the modified common code information.
[Delete]
Deletes common codes.
[Cancel]
Cancels to modification.
5.2. Template Management
Manages templates used for source creation.
[Template Management]
Select [TemplateMgmt] > [Template Mgmt] in the navigator area to register and manage service and business modules used in the studio, other creation modules, and templates related to source creation. An action ID to manage templates is TemplateMgmt, and the template management information is saved in the DEV_TEMPLATE_INFO table of database.
Following is the description of template management screen.
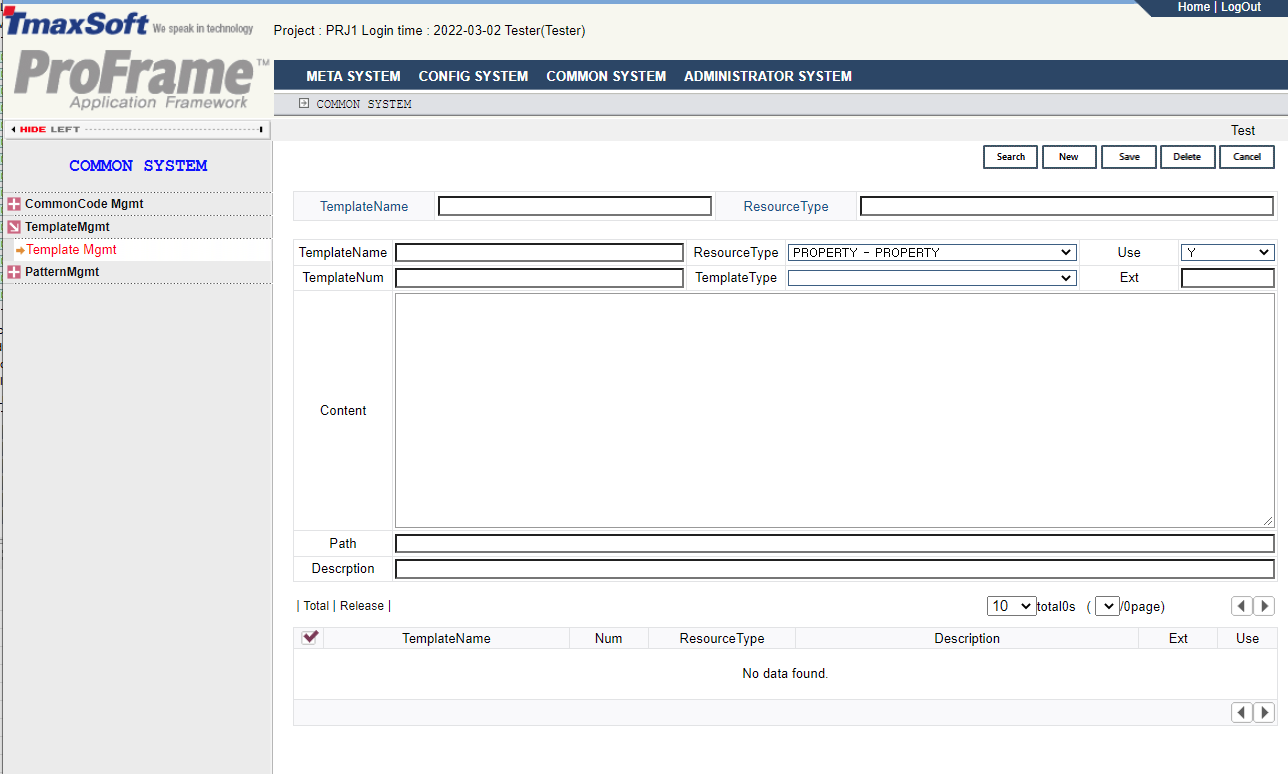
-
Inquiry
Item Description TemplateName
Template name to search for.
ResourceType
Resource type of template to search for.
-
Addition
Item Description TemplateName
Template name to add or modify.
ResourceType
Resource type of template to add or modify.
Use
Whether to use a template or not.
TemplateNum
Template number to add or modify.
TemplateType
Template type to add or modify.
Ext
Extension of template to add or modify.
Content
Template contents to add or modify.
Path
Template path to add or modify.
Description
Detailed description of template to add or modify.
-
Button
Button Description [Search]
Searches for a template.
[New]
Adds a new template.
[Save]
Saves a modified template information.
[Delete]
Deletes a template.
[Cancel]
Cancels to modify.
The list of templates provided by resource type is as follows:
-
BATCH_MODULE
Template name Description Extension TP-C Version make
Batch module make template file
MK
TP Batch Shell Template
Batch execution script template file
SH
-
MODULE
Template name Description Extension COMPILE TP-C Version make
Module make template file for development
C
TP-C Version make
Module make template file
C
ModuleTemplate
Module source template file
C
-
SERVICE
Template name Description Extension TP Batch Server Make Template
Batch server template make file
MK
TP Batch Server C Template
Batch server template C file
C
TP Server Make Template
Server template make file
MK
TP Server C Template
Server template C file (TCS)
C
POD Batch Server C Template
POD batch server template C file
C
TP UCS Batch Server C Template
TP UCS batch server template C file
C
TP UCS Batch Server Make Template
TP UCS batch server make template
MK
General Batch Server C Template
general batch server template
C
TP Server C Template
Server template C file (UCS)
C
General Batch Server Shell Template
general batch server shell template
SH
General Batch Server MakeFile Template
general batch server make file template
MK
-
STRUCTURE
Template name Description Extension TP-C Version make
Structure make template file
C
5.3. Pattern Management
Registers and manages the patterns for various tasks.
[Pattern Management]
Select [PatternMgmt] > [Pattern Mgmt] in the navigator area to register and manage patterns related to various tasks. Pattern management means changing DBIO, SM, BM except for template and module business logic (Flow module) to the resource desired by the developer. Action ID is PatternMgmt.
Following describes the pattern management screen.
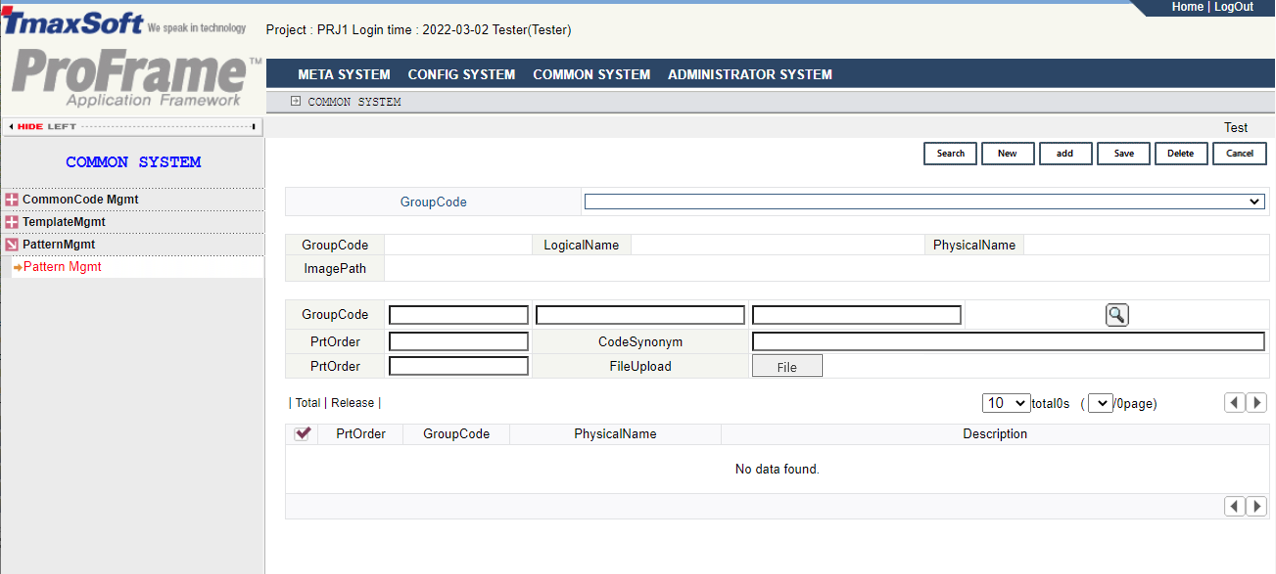
-
Inquiry
Item Description GroupCode
Task pattern to search for.
-
Addition
Item Description GroupCode
Pattern ID to add or modify.
LogicalName
Logical name of pattern to add or modify.
PhysicalName
Physical name of pattern to add or modify.
ImagePath
Image path of pattern to add or modify.
GroupCode
Pattern element ID to add or modify.
PrtOrder
Index to add or modify.
CodeSynonym
Index information to add or modify.
FileUpload
Searches for the file in order to upload the pattern to add or modify.
File
Searches for the pattern file.
6. Administrator
[Administrator] sets the access right of the administrator of WebAdmin to each menu and performs the authorization function related to the action ID.
The administrator system provides the following functions.
-
Department management
-
User management
-
Action management
-
Rule management
-
Menu management
-
Group management
6.1. Department Management
Select [DeptMgmt] > [DeptMgmt] in the navigator area to register and manage departments for users. The department name registered in the [DeptMgmt] is used as the directory name where source codes are stored in the integrated development server when developing programs in the studio. DeptMgmt is used as the action ID and the DEV_DEPT table in DB is used.
Following describes the department management screen.

-
Inquiry
Item Description DeptCode
Department code to search for.
DeptName
Department name to search for.
-
Addition
Item Description DeptCode
A required entry. Code of the department to add or modify.
DeptName (English)
A required entry. English title of department to add or modify.
DeptAlias
Name of department to add or modify.
DeptDiv
Division of department to add or modify.
ParentDept
Upper department to add or modify.
Use
Whether to use a department to add or modify.
-
Button
Button Description [Search]
Searches for a department.
[New]
Adds a new department.
[Save]
Saves a modified department.
[Delete]
Deletes a department.
[Cancel]
Cancels to modify.
6.2. User Management
Registers and manages users, and assigns roles to registered users. A user has various privileges according to the role granted to the user.
[User Management]
Select [UserMgmt] > [UserMgmt] in the navigator area to register and manage users who use WebAdmin and Studio. You can set basic information about users. An action ID for managing users is UserMgmt and the DB’s DEV_USER_INFO table is used.
Following describes the user management screen.
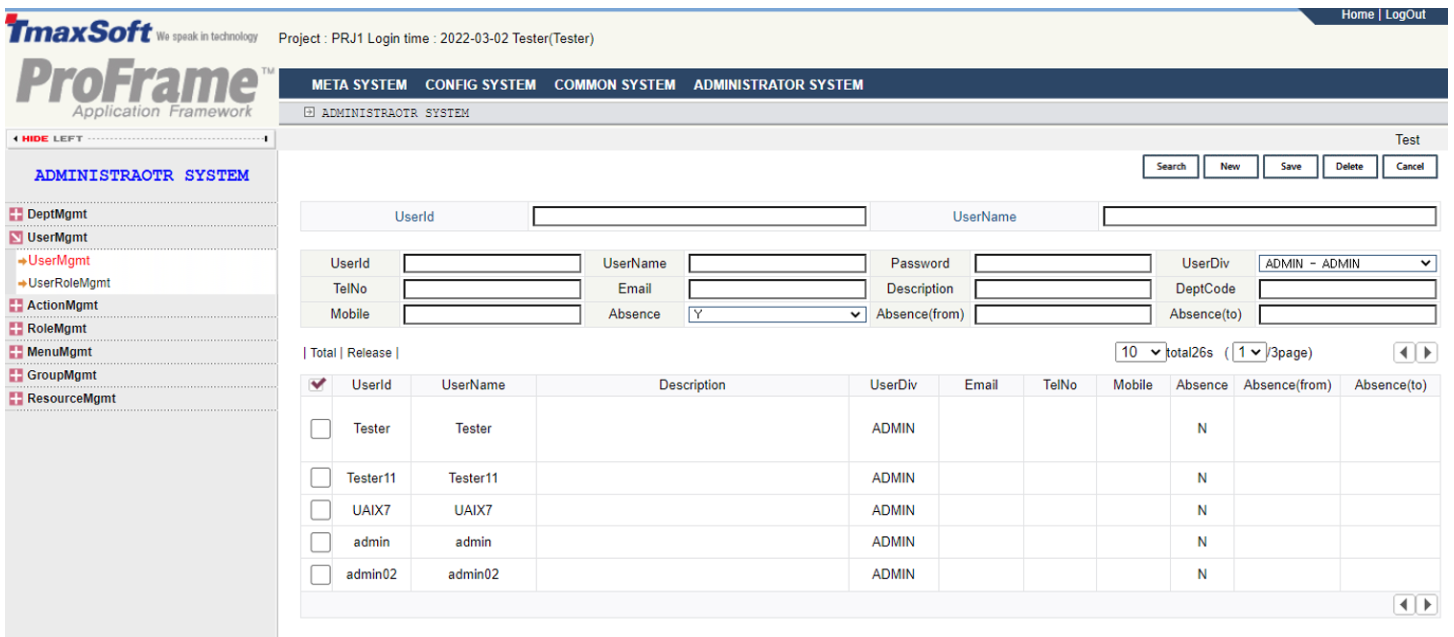
-
Inquiry
Inquiry Description UserID
User ID to search for.
UserName
User name to search for.
-
Addition
Item Description UserID
A required entry. User ID to add or modify.
UserName
User name to add or modify.
Password
User password to add or modify.
UserDiv
User type to add or modify.
TelNo
User’s contact number to add or modify.
Email
Email address to add or modify.
Description
Additional description for the user to add or modify.
DeptCode
Department code of user to add or modify.
Mobile
Cellular phone number of user to add or modify.
Absence
Absence status of user to add or modify.
Absence(from/to)
Absence period of user to add or modify.
-
Button
Button Description [Search]
Searches for a user.
[New]
Adds a new user.
[Save]
Saves the modified user information.
[Delete]
Deletes a user.
[Cancel]
Cancels to modify.
[User Role Management]
Select [UserMgmt] > [UserRoleMgmt] in the navigator area to assign roles such as ADMIN, DESIGNER, DEVELOPER, etc. to the registered user.
The menu sets the authority for actions and resources for a specific user, and whether to be a team leader. An action ID to manage user roles is UserRoleMgmt, and the DB’s DEV_USER_ROLE table is used.
Following describes the user role management screen.
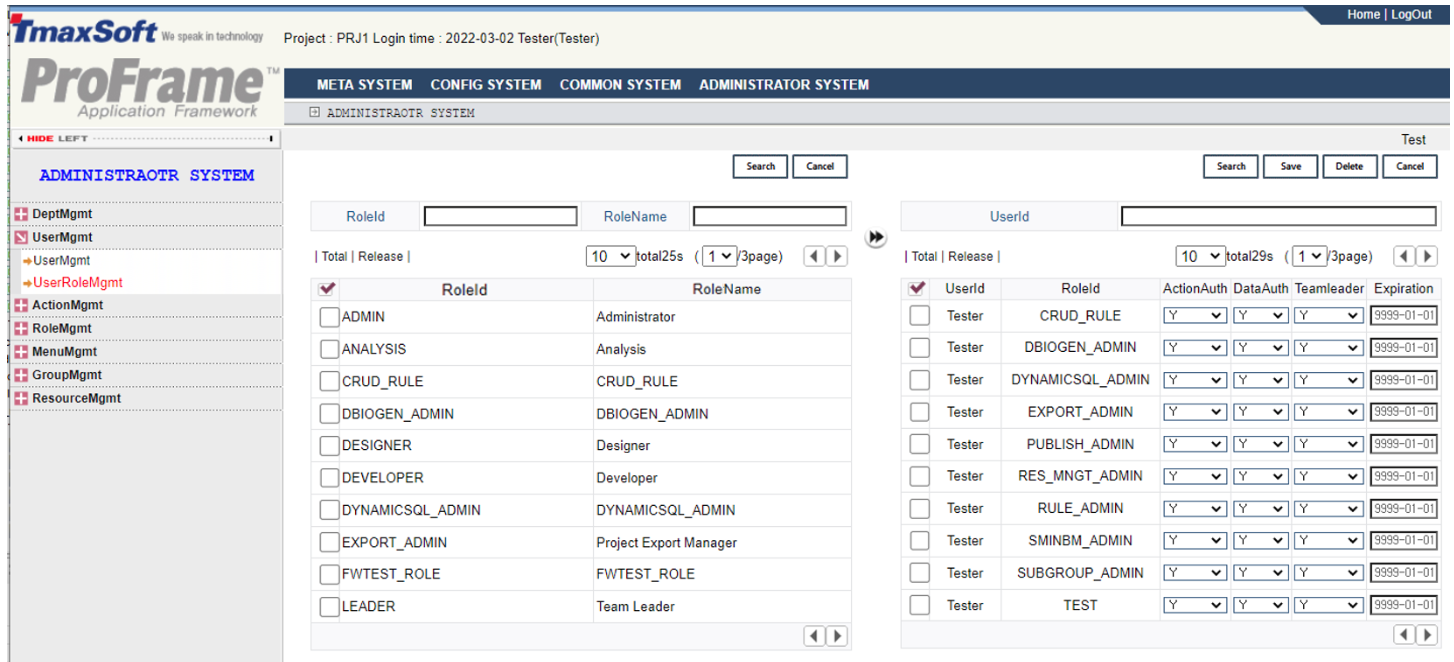
-
Inquiry
Item Description RoleID
Role ID to search for.
RoleName
Role name to search for.
[Search]
User role defined in WebAdmin.
[Cancel]
Cancels to search for a user role.
Registers user roles to the user.
-
User role and user related information
Item Description UserID
User ID to search for.
-
Button
Button Description [Search]
Searches for the user ID registered in WebAdmin.
[Save]
Saves user roles and ID related information.
[Delete]
Deletes user roles and ID related information.
[Cancel]
Cancels to modify user roles and related ID information.
6.3. Action Management
An action is a program and is later linked to a menu and executed by clicking the corresponding menu. PropertyMgmt action is executed by clicking the property management menu, and it registers and manages the actions. Menu and connection are set in menu management.
Select [ActionMgmt] > [ActionMgmt] in the navigator area. Action is a page where a screen is displayed in WebAdmin and a series of operations and functions. Action Management screen registers and manages each action.
An action ID to manage the actions is ActionMgmt and DEV_ACTION table of database is used.
Following describes the action management screen.
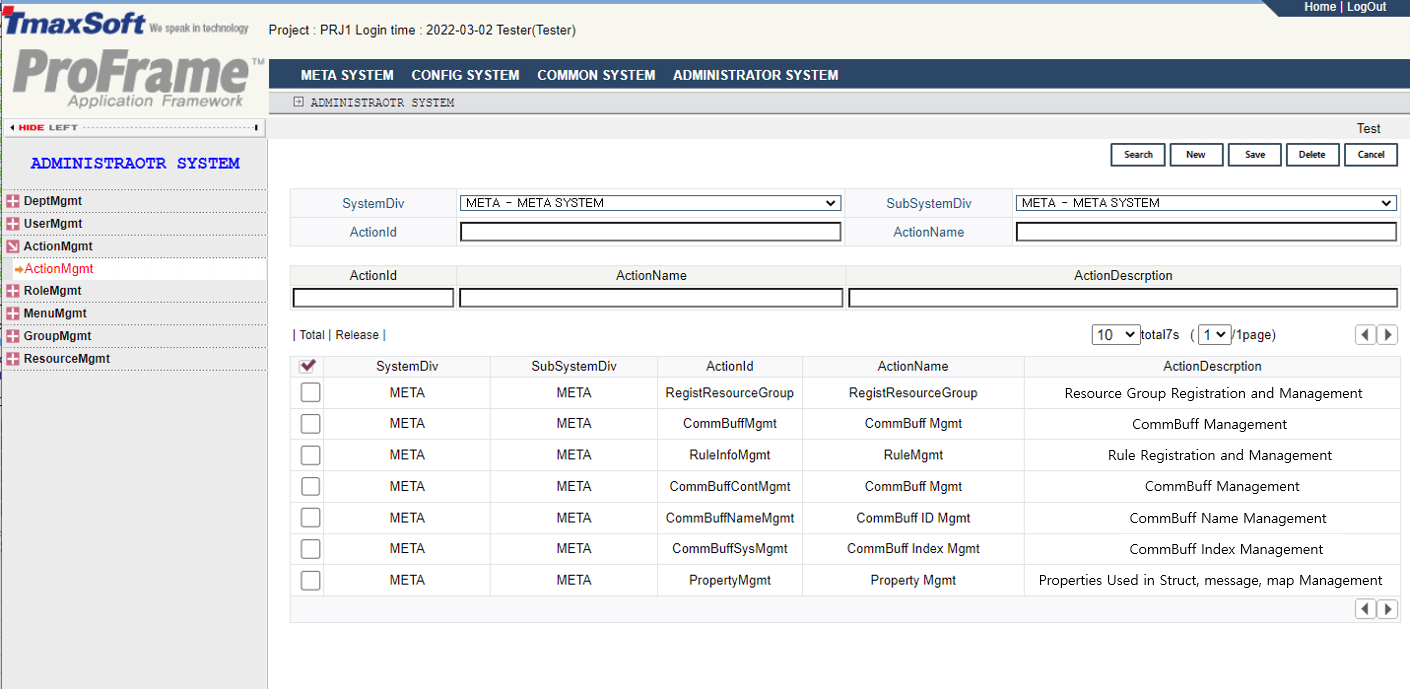
-
Inquiry
Item Description SystemDiv
User ID to search for.
SubSystemDiv
User name to search for.
ActionID
Action ID to search for.
ActionName
Action name to search for.
-
Addition
Item Description ActionID
Action ID in English.
ActionName
Action name.
ActionDescription
Description on action.
-
Button
Button Description [Search]
Searches for the action registered in WebAdmin.
[New]
Adds a new action.
[Save]
Saves an action information.
[Delete]
Deletes an action information.
[Cancel]
Cancels to modify an action information.
6.4. Role Management
Registers and manages roles used for user management. You can specify which actions can be used for each role, which has the same meaning as granting user rights for the menu.
[Role Management]
Select [RoleMgmt] > [RoleMgmt] menu in the navigator area to define the role of ProFrame WebAdmin user. Role ID and role name used in the [UserRoleMgmt] is defined on the role management screen. RoleMgmt is an action ID to manage roles, and the DEV_ROLE_INFO table of database is used.
Following describes the role management screen.
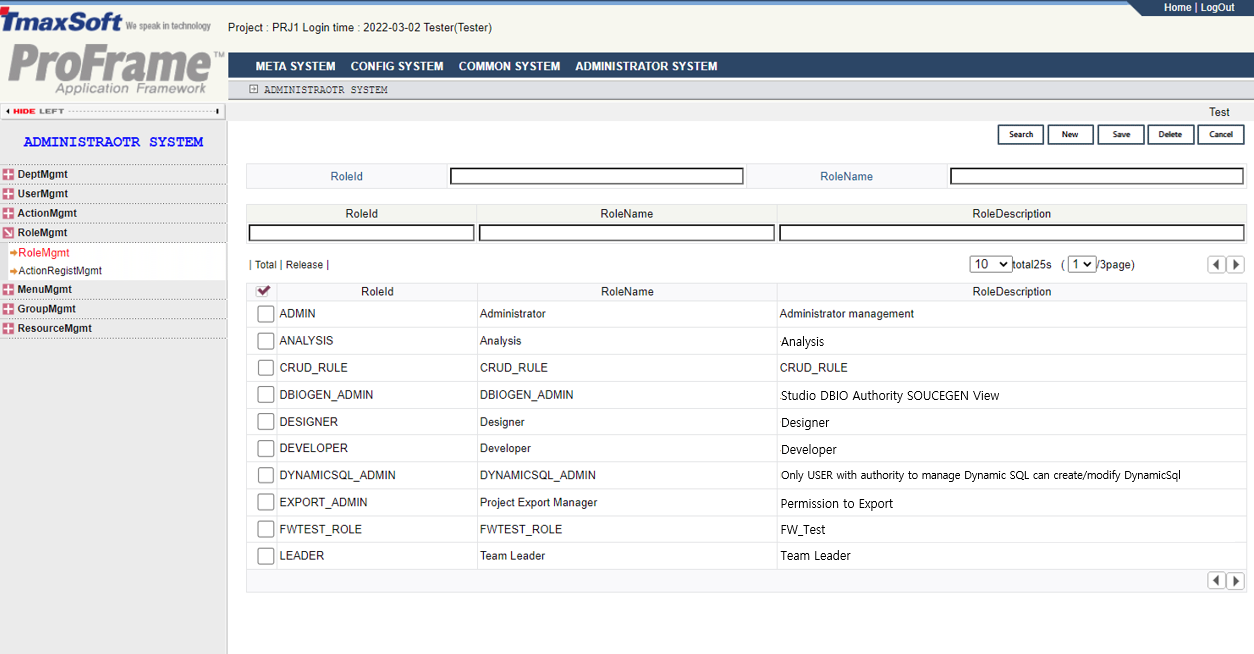
-
Inquiry
Item Description RoleID
Role ID to search for.
RoleName
Role name to search for.
-
Addition
Item Description RoleID
Role ID to add or modify.
RoleName
Role name to add or modify.
RoleDescription
Description of role to add or modify.
-
Button
Button Description [Search]
Roles registered in WebAdmin.
[New]
Adds a new role.
[Save]
Saves a role information.
[Delete]
Deletes a role information.
[Cancel]
Cancels to modify role information.
[Action Registration Management]
Select the [RoleMgmt]>[ActionRegistMgmt] in the navigator area to assign each action to the already defined rule. RoleActionMgmt is an action ID to register and manage actions, and the DEV_ROLE_ACTION table of DB is used.
Following describes the action registration management screen.
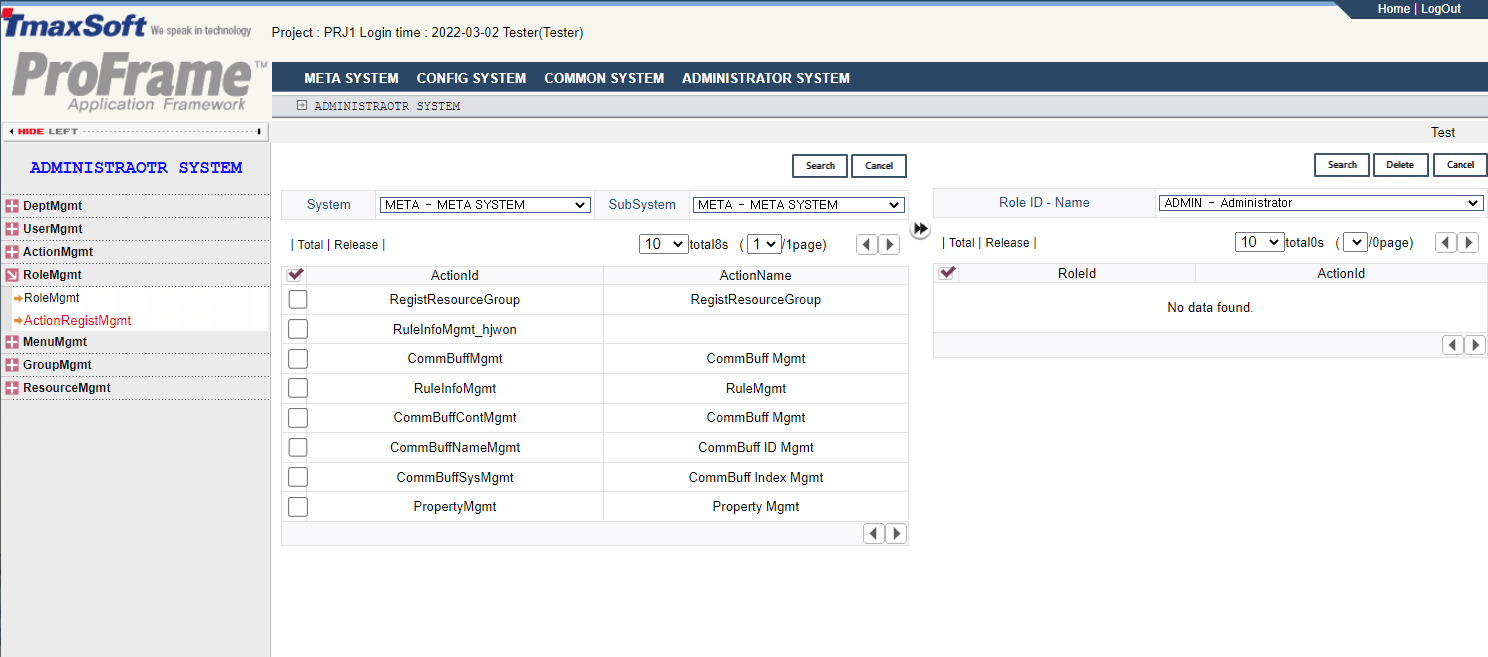
-
Inquiry for Action ID
Item Description System
System to search for.
SubSystem
Subsystem registered in the system to be searched.
[Search]
Searches for action ID registered in WebAdmin.
[Cancel]
Cancels to search for an action ID.
Registers an action ID to the role.
-
Action ID and role related information
Item Description Role ID – Name
Role ID to search for.
-
Button
Button Description [Search]
Searches for role ID registered in WebAdmin.
[Delete]
Deletes an action ID and role ID related information.
[Cancel]
Cancels to modify an action ID and role ID related information.
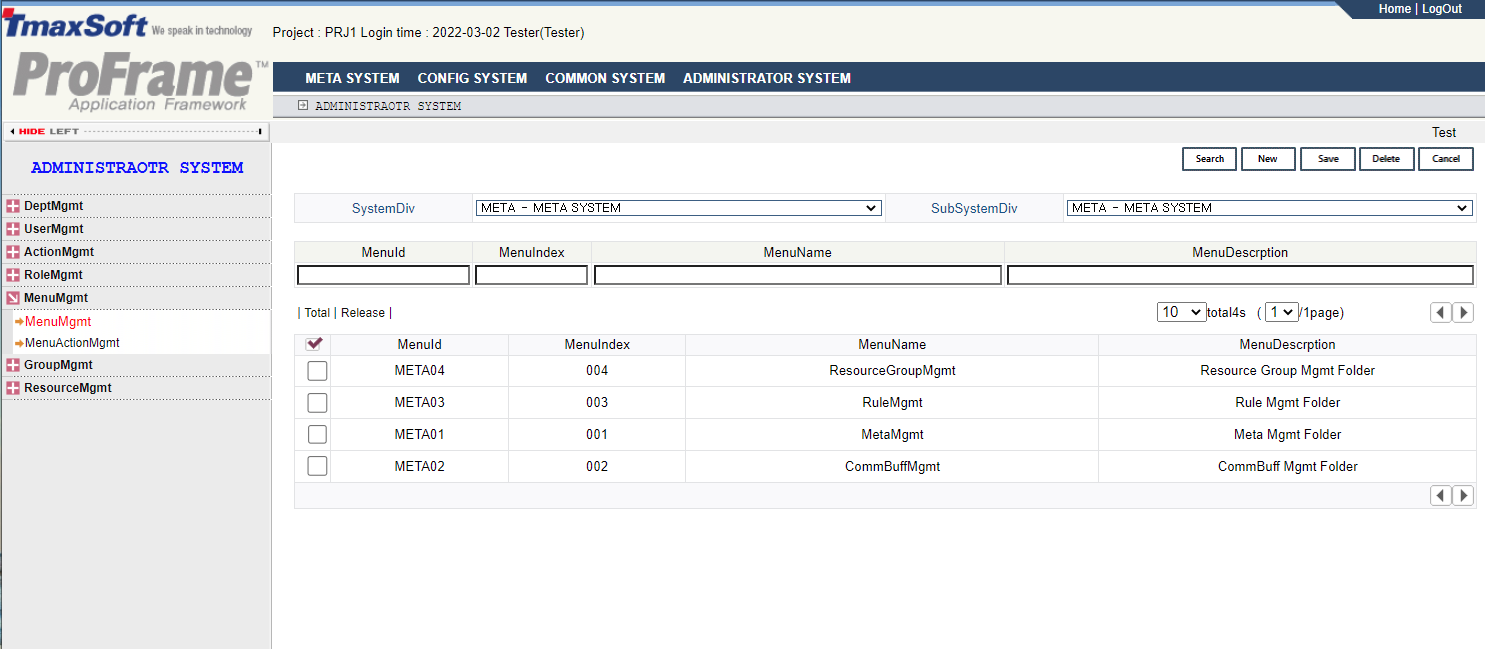
6.5. Menu Management
Registers a menu and connects an action to each menu. Action refers to the program corresponding to each leaf menu of WebAdmin. The action ID is an ID that identifies these actions. For example, the action ID corresponding to the property management menu is PropertyMgmt, which means that when the [Property Mgmt] is clicked, a program called PropertyMgmtAction is executed. In other words, action management functions to manage which program is to be executed when each menu is clicked.
[Menu Management]
If you select [MenuMgmt] > [MenuMgmt] in the navigator area, you can specify the setting screen for the menus displayed in WebAdmin and the actions for each menu item. The action ID of MenuMgmt is used, and menu information is stored in the DB’s DEV_MENU_GROUP table.
The following is a description of the menu management screen.
-
Inquiry
Item Description SystemDiv
Selects the system to search.
SubSystemDiv
Selects the subsystem of the system to search.
-
Addition
Item Description MenuID
ID of the menu to add or modify.
MenuIndex
Order in which the menu will be displayed.
MenuName
Name of the menu to add or modify.
MenuDescription
Description for the menu to add or modify.
-
Button
Button Description [Search]
Searches for the menu registered in WebAdmin.
[New]
Adds a new menu.
[Save]
Saves menu information.
[Delete]
Deletes menu information.
[Cancel]
Cancels editing of menu information.
[Menu Action Management]
If you select the [MenuMgmt] > [MenuActionMgmt] in the navigator area, the basic functions order execute the specific actions in connection with the menu configured for the registered action ID. The action ID for managing these menu actions is MemuActionMgmt, and related information is stored in the DEV_MENU_GROUP_ACTION table of DB.
Following describes the menu action management screen.

-
Inquiry for Action ID
Item Description System
Selects the system to search for.
SubSystem
Selects the subsystem registered in the system to search for.
ActionID
ID of the action to search for.
[Search]
Searches for the action ID registered in WebAdmin.
[Cancel]
Cancels to search for an action ID.
Registers the action ID to the corresponding menu.
-
Action ID and Menu-related Information Items
Item Description System
Selects the system for registering action IDs.
SubSystem
Selects the subsystem for registering action IDs.
MenuID
Menu ID to register the action ID.
-
Button
Button Description [Search]
Searches for the menu ID registered in WebAdmin.
[Save]
Saves the action ID and menu ID linkage information.
[Delete]
Deletes the action ID and menu ID linkage information.
[Cancel]
Cancels the action ID and menu ID linkage editing.
[Cancel]
Cancels the edit.
6.6. Group Management
Registers and manages groups and manages user groups, resource groups, etc.
[Group Management]
If you select [GroupMgmt] > [GroupMgmt] in the navigator area, you can register and manage groups to which developers, studios, and WebAdmin users will belong. GroupMgmt exists as an action ID for group management, and information is stored in the DB_DEV_GROUP_INFO table.
The following describes the group management screen.

-
Inquiry
Item Description GroupID
Group ID to search for.
GroupName
Group name to search for.
-
Addition
Item Description GroupID
Group ID to add or modify.
GroupName
Group name to add or modify.
Description
Group description to add or modify.
Use
Selects whether to use the group to add or modify.
-
Button
Button Description [Search]
Searches for the group registered in WebAdmin.
[New]
Adds a new group.
[Save]
Saves the group information.
[Delete]
Deletes the group information.
[Cancel]
Cancels to modify the group information.
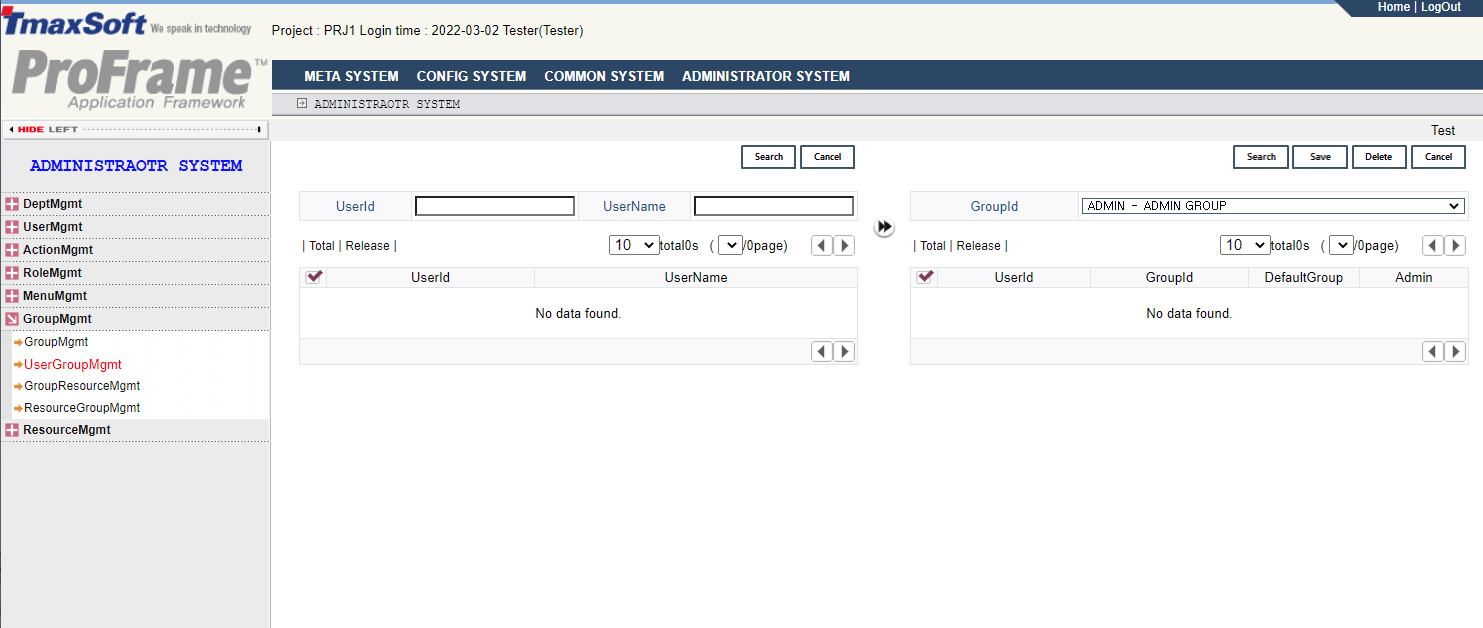
[User Group Management]
Select [GroupMgmt] > [UserGroupMgmt] in the navigator area to assign the user to a user group. To manage user groups, groups and users to designate users must be created. An action ID for managing user groups is UserGroupMgmt, and setting information is stored in the DB’s DEV_USER_GROUP table.
Following describes the user group management screen.
-
Inquiry
Item Description UserID
User ID to search for.
UserName
User name to search for.
[Search]
User ID registered in WebAdmin.
[Cancel]
Cancels to search for user ID.
Registers user ID to the group.
-
User ID and Group-related Information Item
Item Description GroupID
Group ID to search for.
-
Button
Button Description [Search]
Searches for the group ID registered in WebAdmin.
[Save]
Saves user ID and group ID linkage information.
[Delete]
Deletes user ID and group ID linkage information.
[Cancel]
Cancels editing of user ID and group ID linkage.
[Group Resource Management]
If you select [GroupMgmt] > [GroupResourceMgmt] menu in the navigator area, you can designate resources available to the previously defined user group. Each group is granted a right, which is defined by 2 hexadecimal digits from 1F to FF. GroupResourceMgmt is used as an action ID to manage resource groups, and the DEV_GROUP_RESOURCE table of DB is used.
Following describes the group resource management screen.

-
Inquiry
Item Description ResourceType
Selects the resource type to search for.
ResourceID
Resource ID to search for.
PhyscialName
Physical name of the resource to search for.
[Search]
Searches for the resource ID registered in WebAdmin.
[Cancel]
Cancels to search for the resource ID.
Registers the resource ID to the corresponding group.
-
Resource ID and Group-related Information Item
Item Description GroupID
Group ID to search for.
-
Button
Button Description [Search]
Searches for the group ID registered in WebAdmin.
[Save]
Saves resource ID and group ID linkage information.
[Delete]
Deletes resource ID and group ID linkage information.
[Cancel]
Cancels editing of the resource ID and group ID linkage.
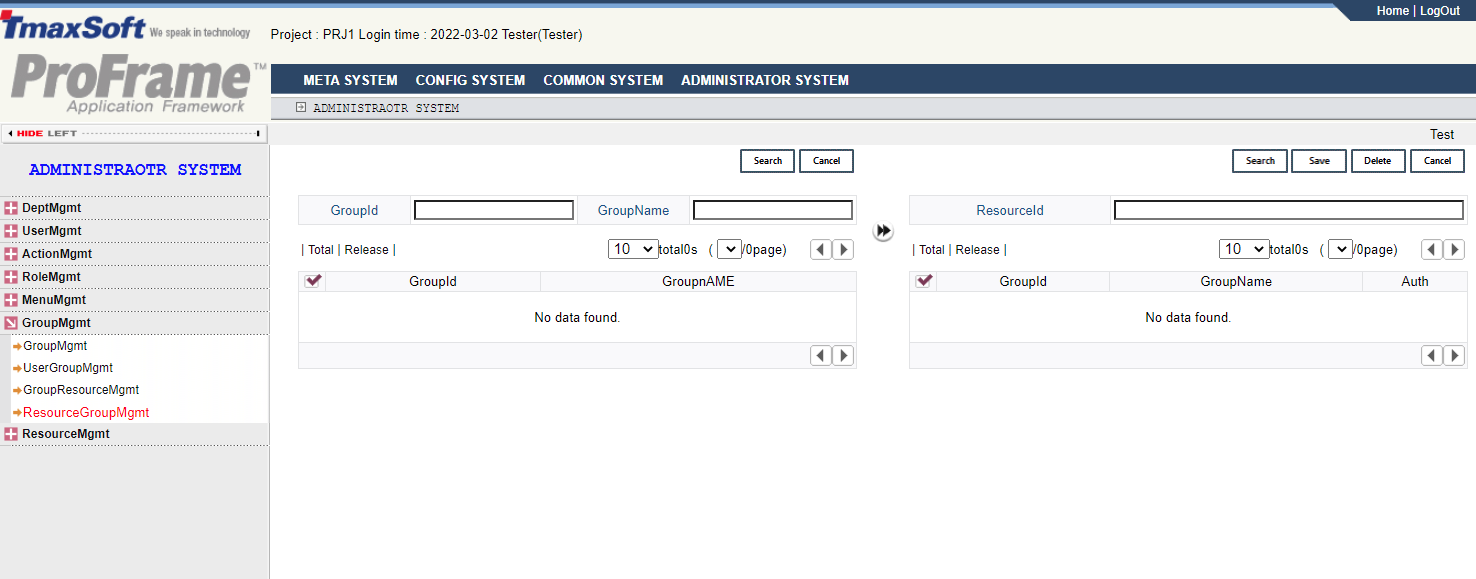
[Resource Group Management]
If you select [GroupMgmt] > [ResourceGroupMgmt] in the navigator area, you can set a group to manage specific resources.
While the [GroupResourceMgmt] registers the resource to be used by the group, and the [ResourceGroupMgmt] sets the management group for the resource. The action ID that can be performed in resource group management is ResourceGroupMgmt, and the DEV_GROUP_ RESOURCE table of DB is used in the same way as in the [GroupResourceMgmt].
Following describes the resource group management screen.
-
Inquiry
Item Description GroupID
Group ID to search for.
GroupName
Group name to search for.
[Search]
Searches for the group ID registered in WebAdmin.
[Cancel]
Cancels to search for the group ID.
Registers the group ID to the corresponding resources.
-
Group ID and Resource-related Information Item
Item Description ResourceID
Resource ID to search for.
-
Button
Button Description [Search]
Searches for the resource ID registered in WebAdmin.
[Save]
Saves the group ID and resource ID linkage information.
[Delete]
Deletes the group ID and resource ID linkage information.
[Cancel]
Cancels editing of the group ID and resource ID linkage.
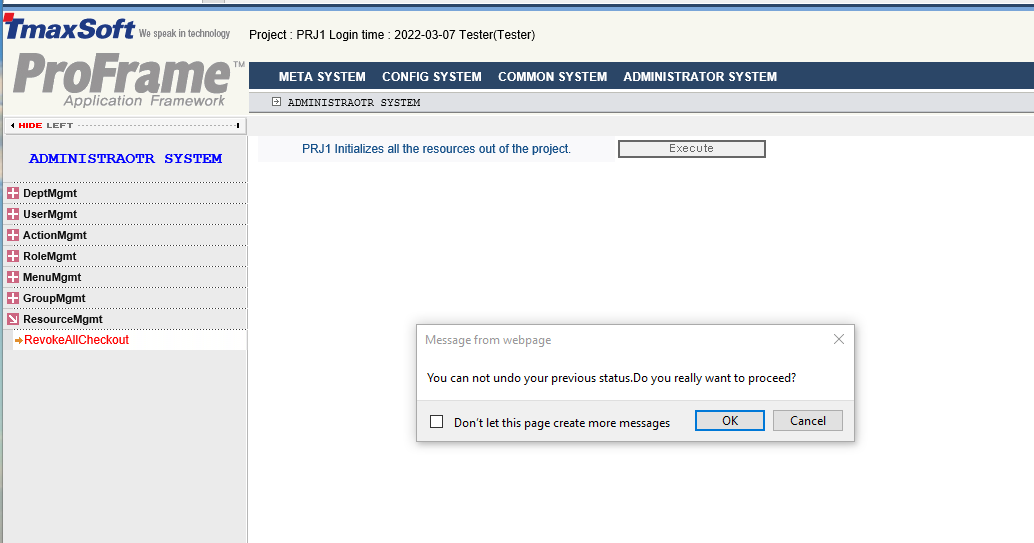
6.7. Resource Management
Manages the resources.
[Revoke All Checkout]
Cancels the checkout status of all resources for each project. When migrating a project or before changing RIWS options, you can revoke the checkout of all resources to avoid inconsistencies in the checkout status of resources.